Skip table of contents

Action Menu: Group Only Events

📆 Revision Date:

Group-Only Event Bookings

Use this feature to book events that include sleeping rooms only, without reserving any meeting or event space. This is ideal for:

  • Room blocks for weddings, conferences, or sports teams

  • Corporate travel where no on-site meetings are required

  • Group reservations that do not require event setup or services

When creating a Group-Only Event, you’ll specify the room types, quantities, and stay dates for the group, but you will not need to assign any meeting rooms or event spaces. This simplifies the booking process for lodging-focused events and ensures accurate inventory management within the system.

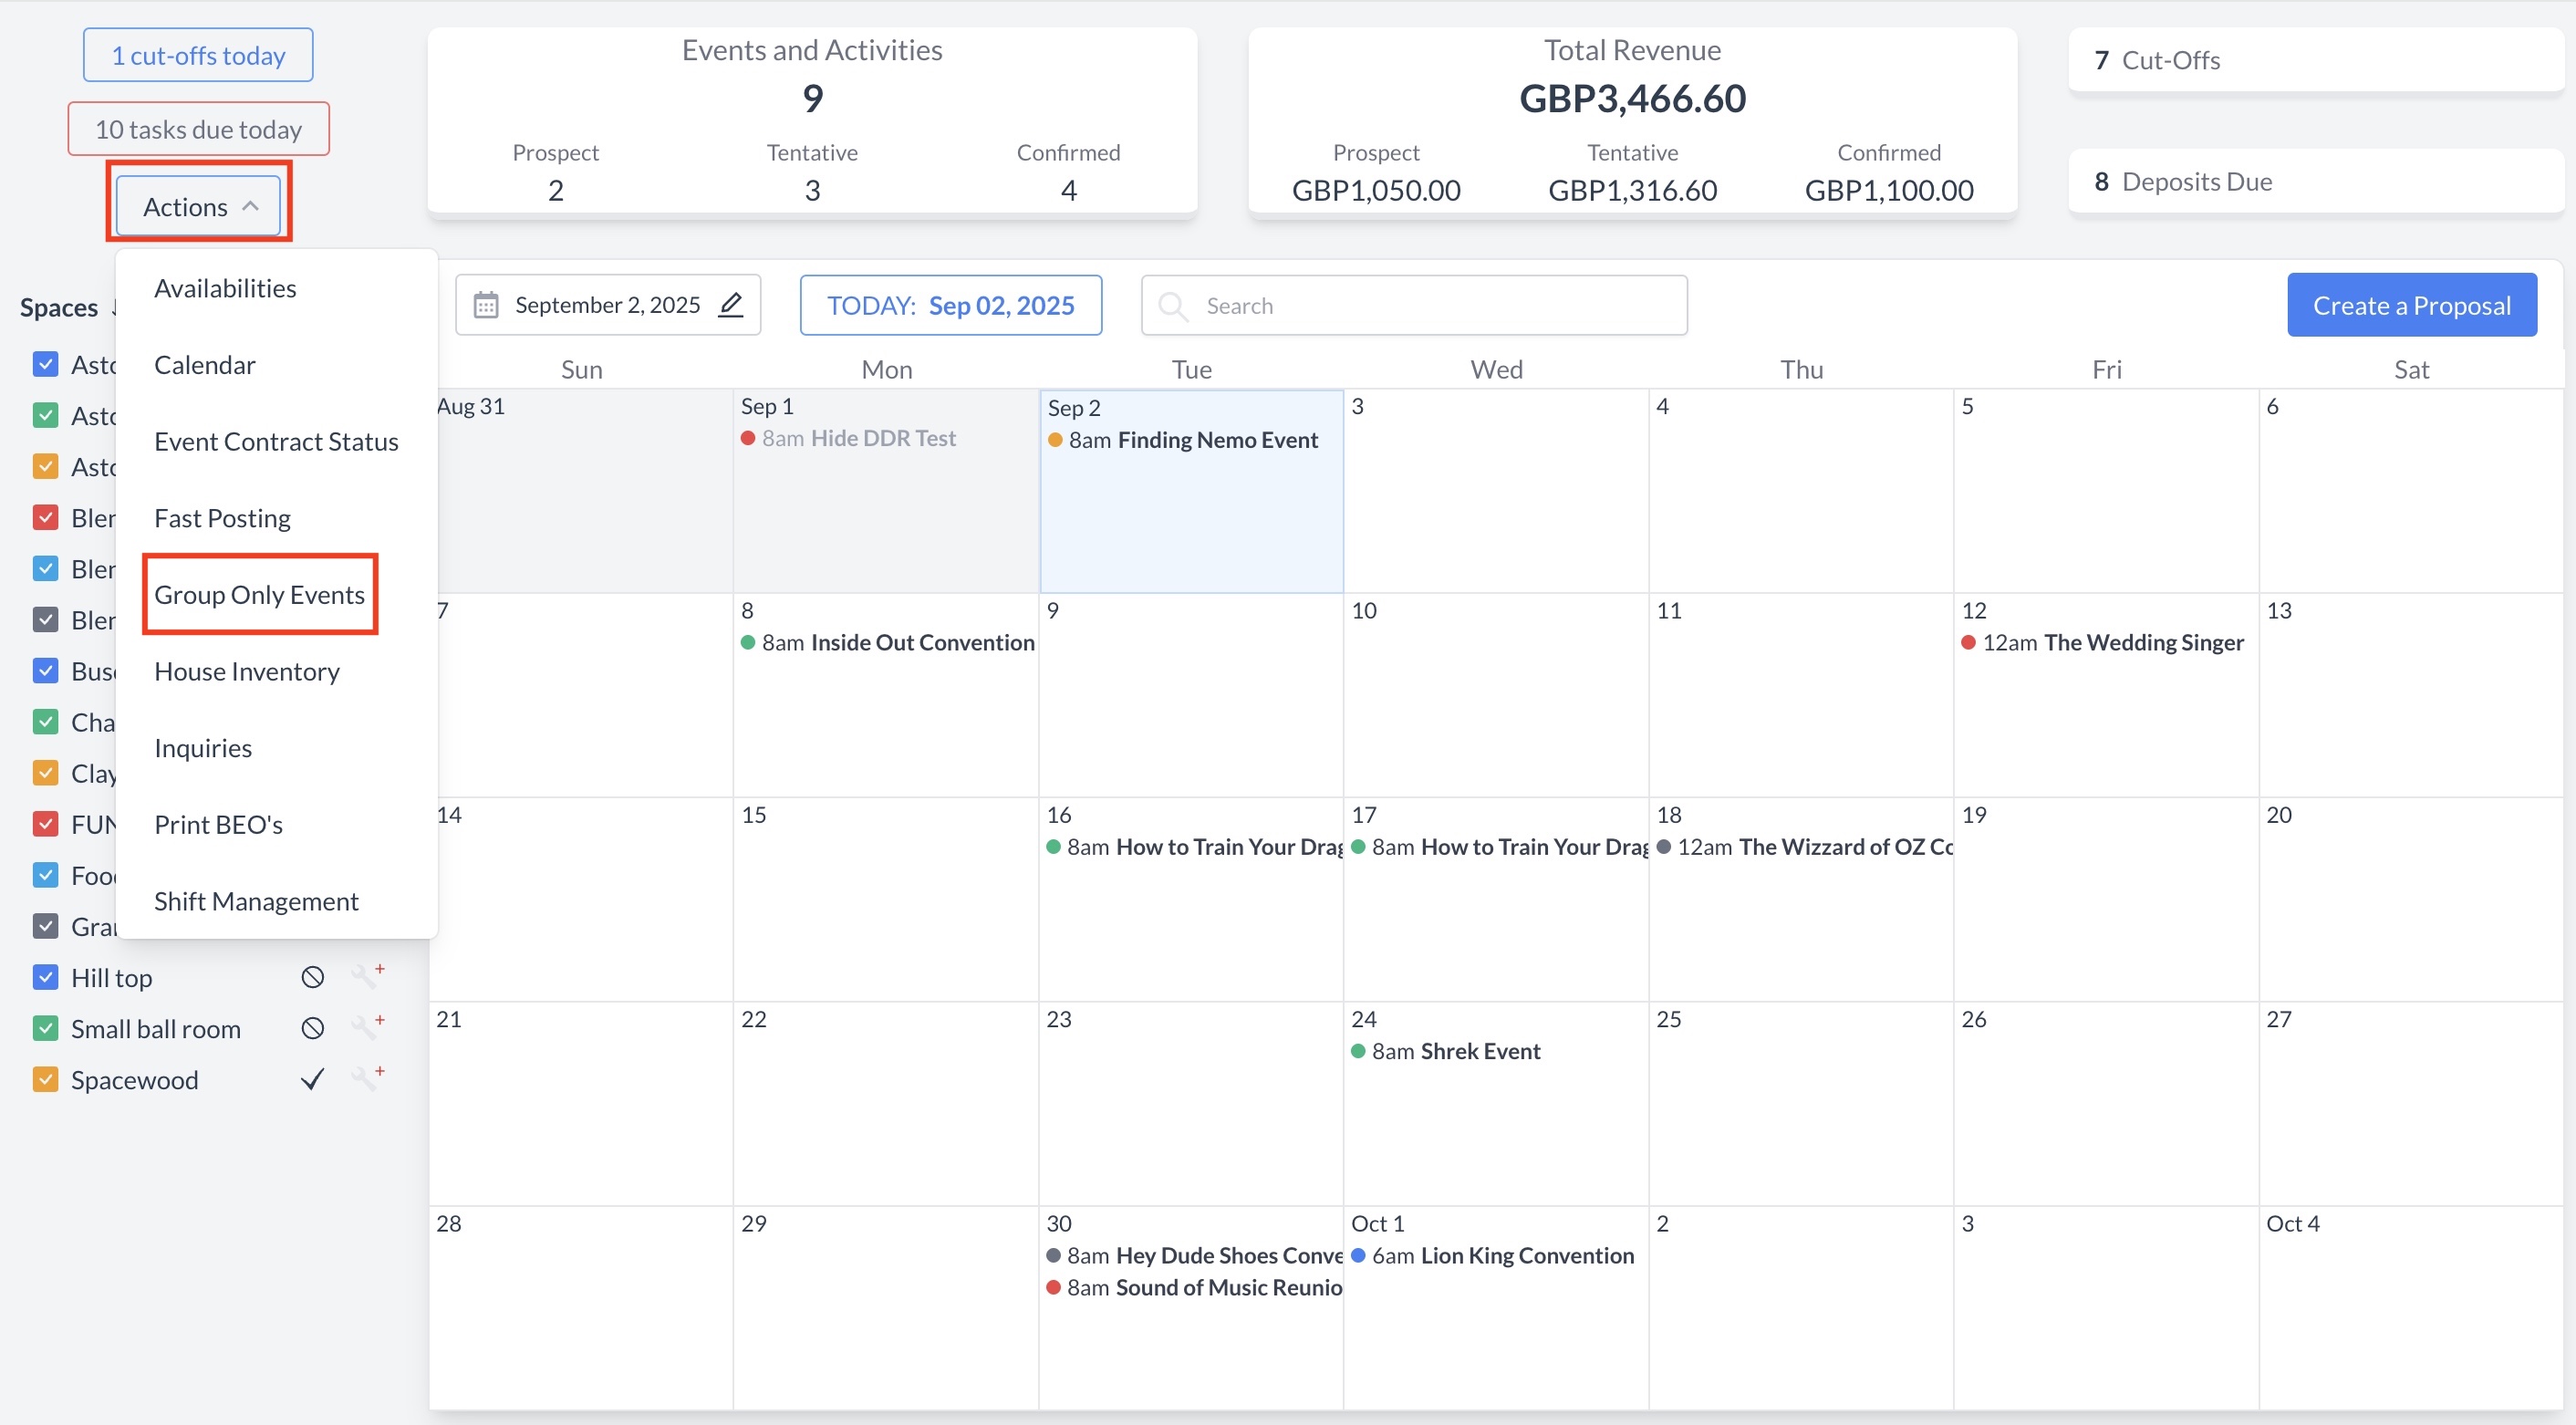
Navigate to Home > Event Management > Actions > Group Only Events

Actions Menu > Group Only Events

The Group Only Events screen displays all your upcoming group events scheduled within the next 30 days.

On this screen, you will find the following information for each event:

  • Confirmation Number: The unique identifier for the event booking.

  • Start Date: The date when the event begins.

  • End Date: The date when the event ends.

  • Group Confirmation Number: The unique number assigned to the overall group booking.

  • Group Check-in Date: The arrival date for the group.

  • Group Check-Out Date: The departure date for the group.

To view the details of a specific group event, click the blue Open button next to the event.

Group Only Events Screen

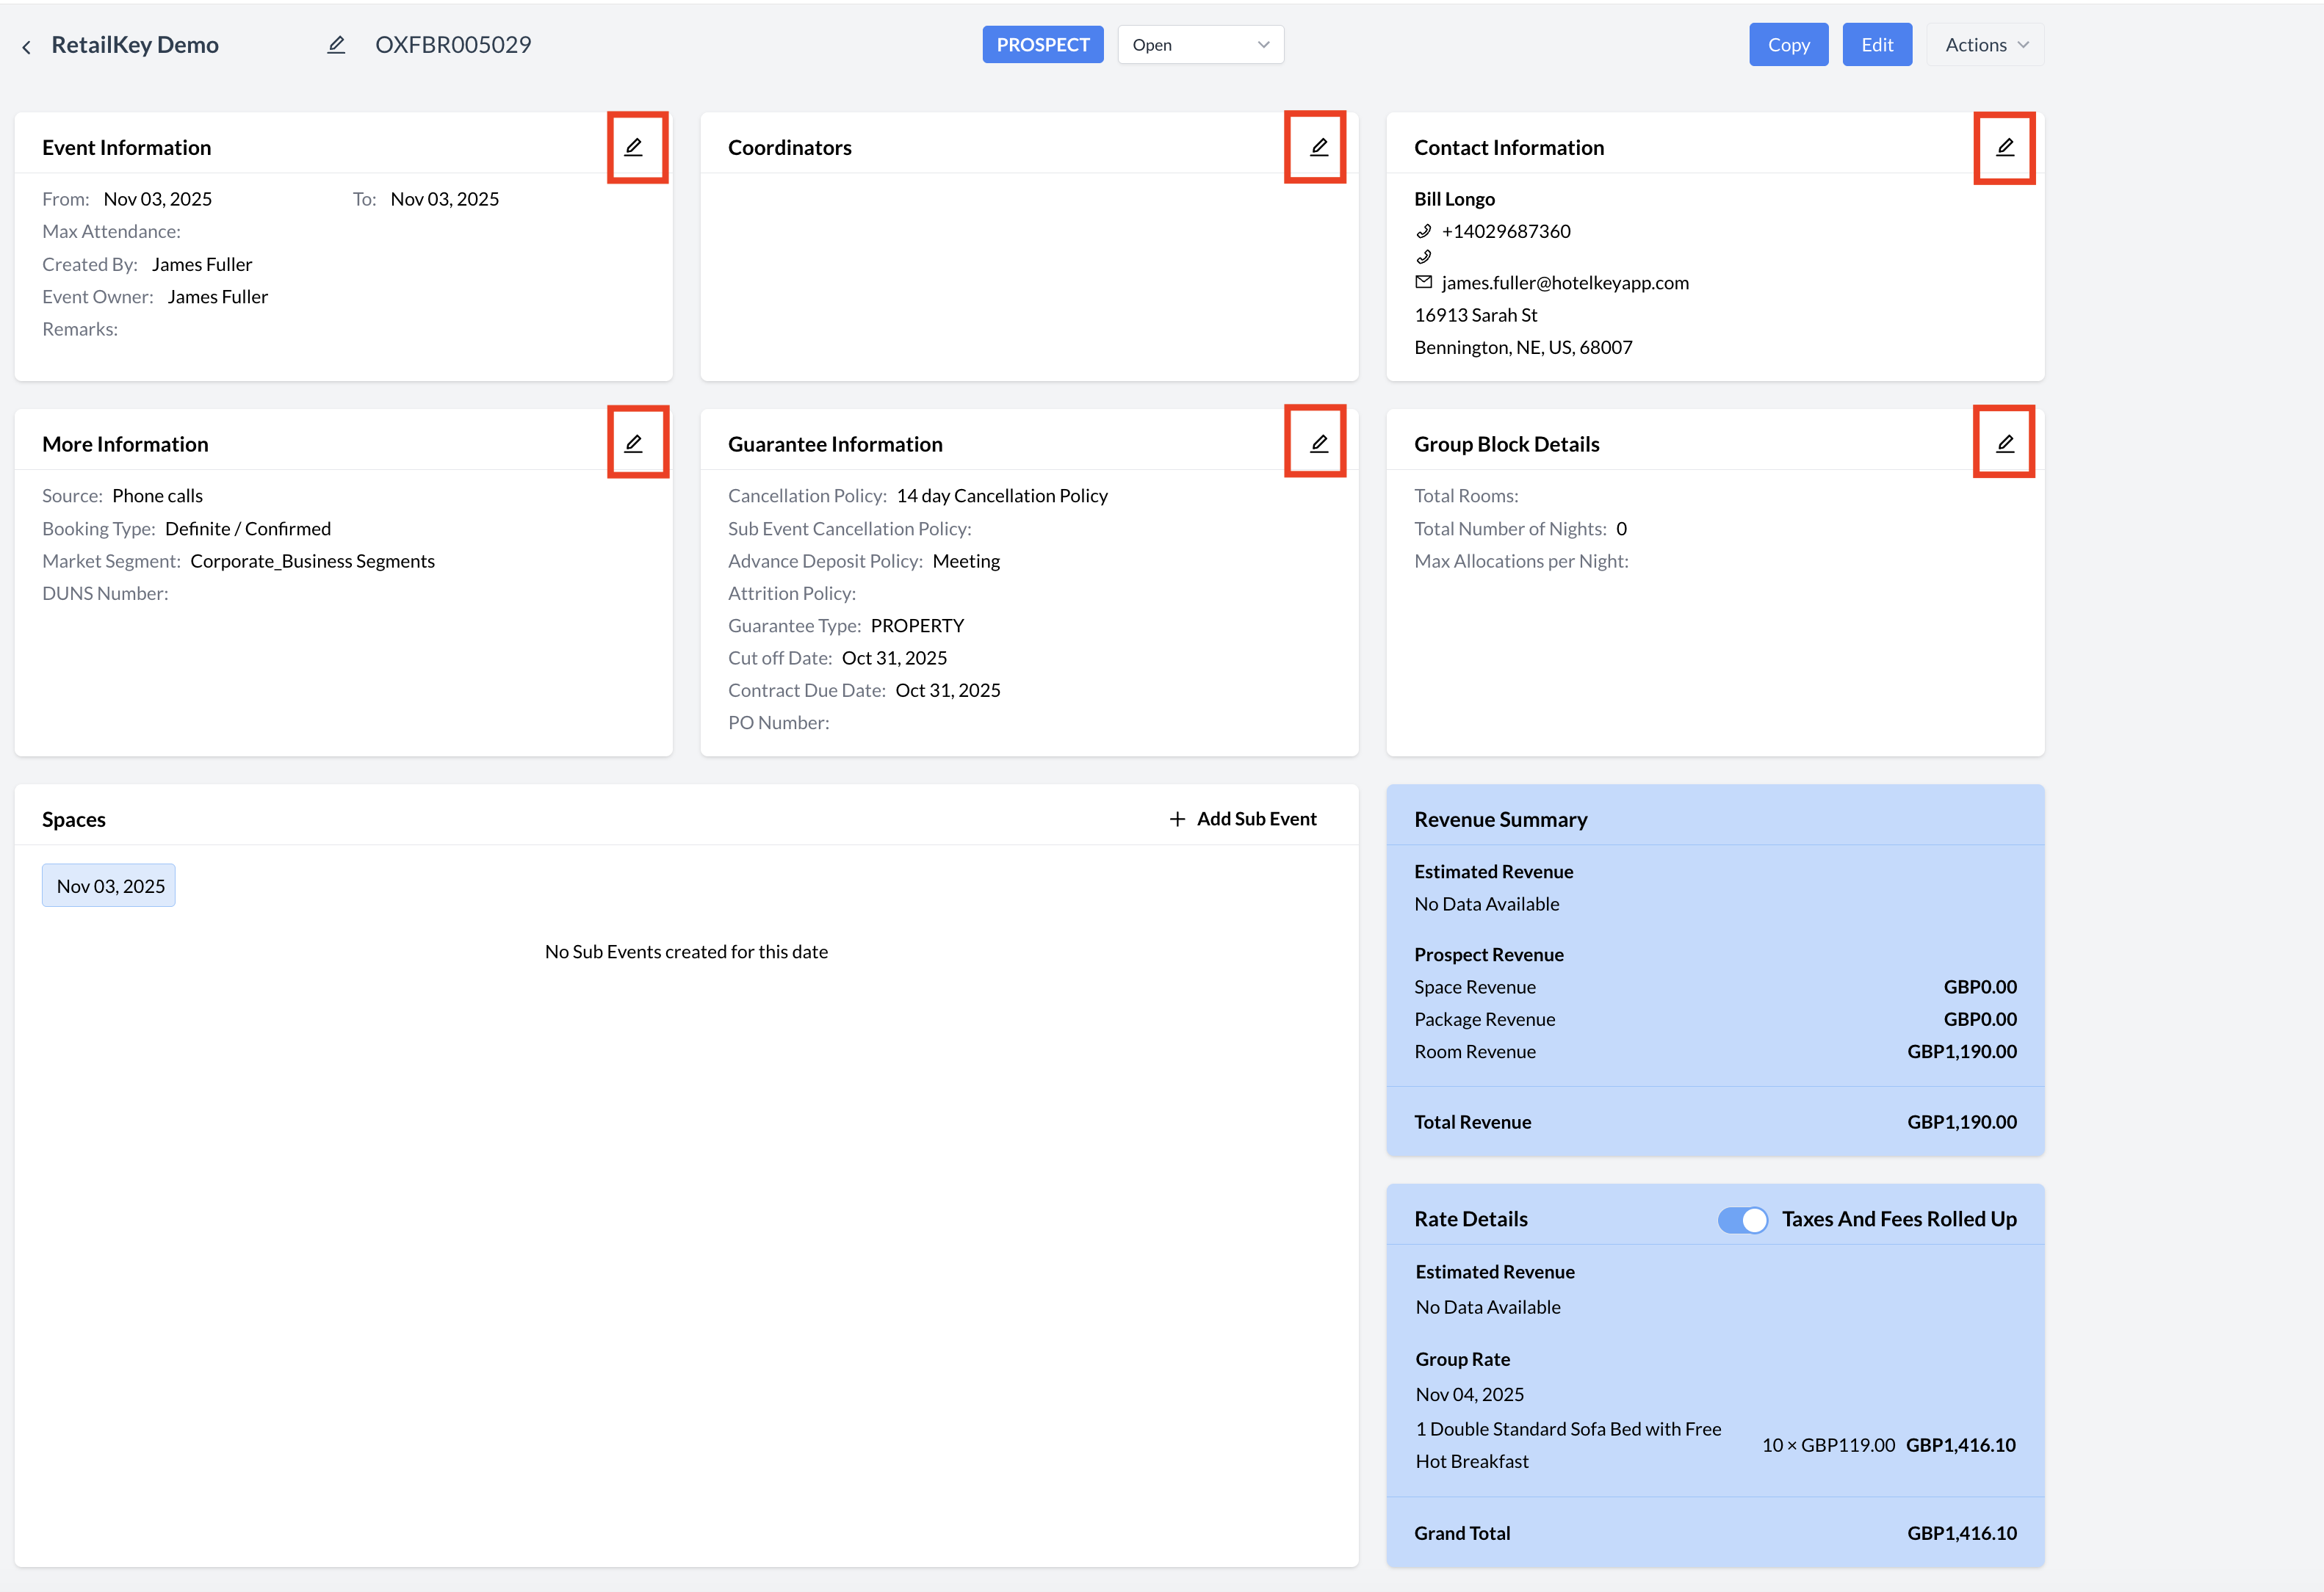
There are two primary ways to edit a Group Record (reservation).

  1. Quick Edit:

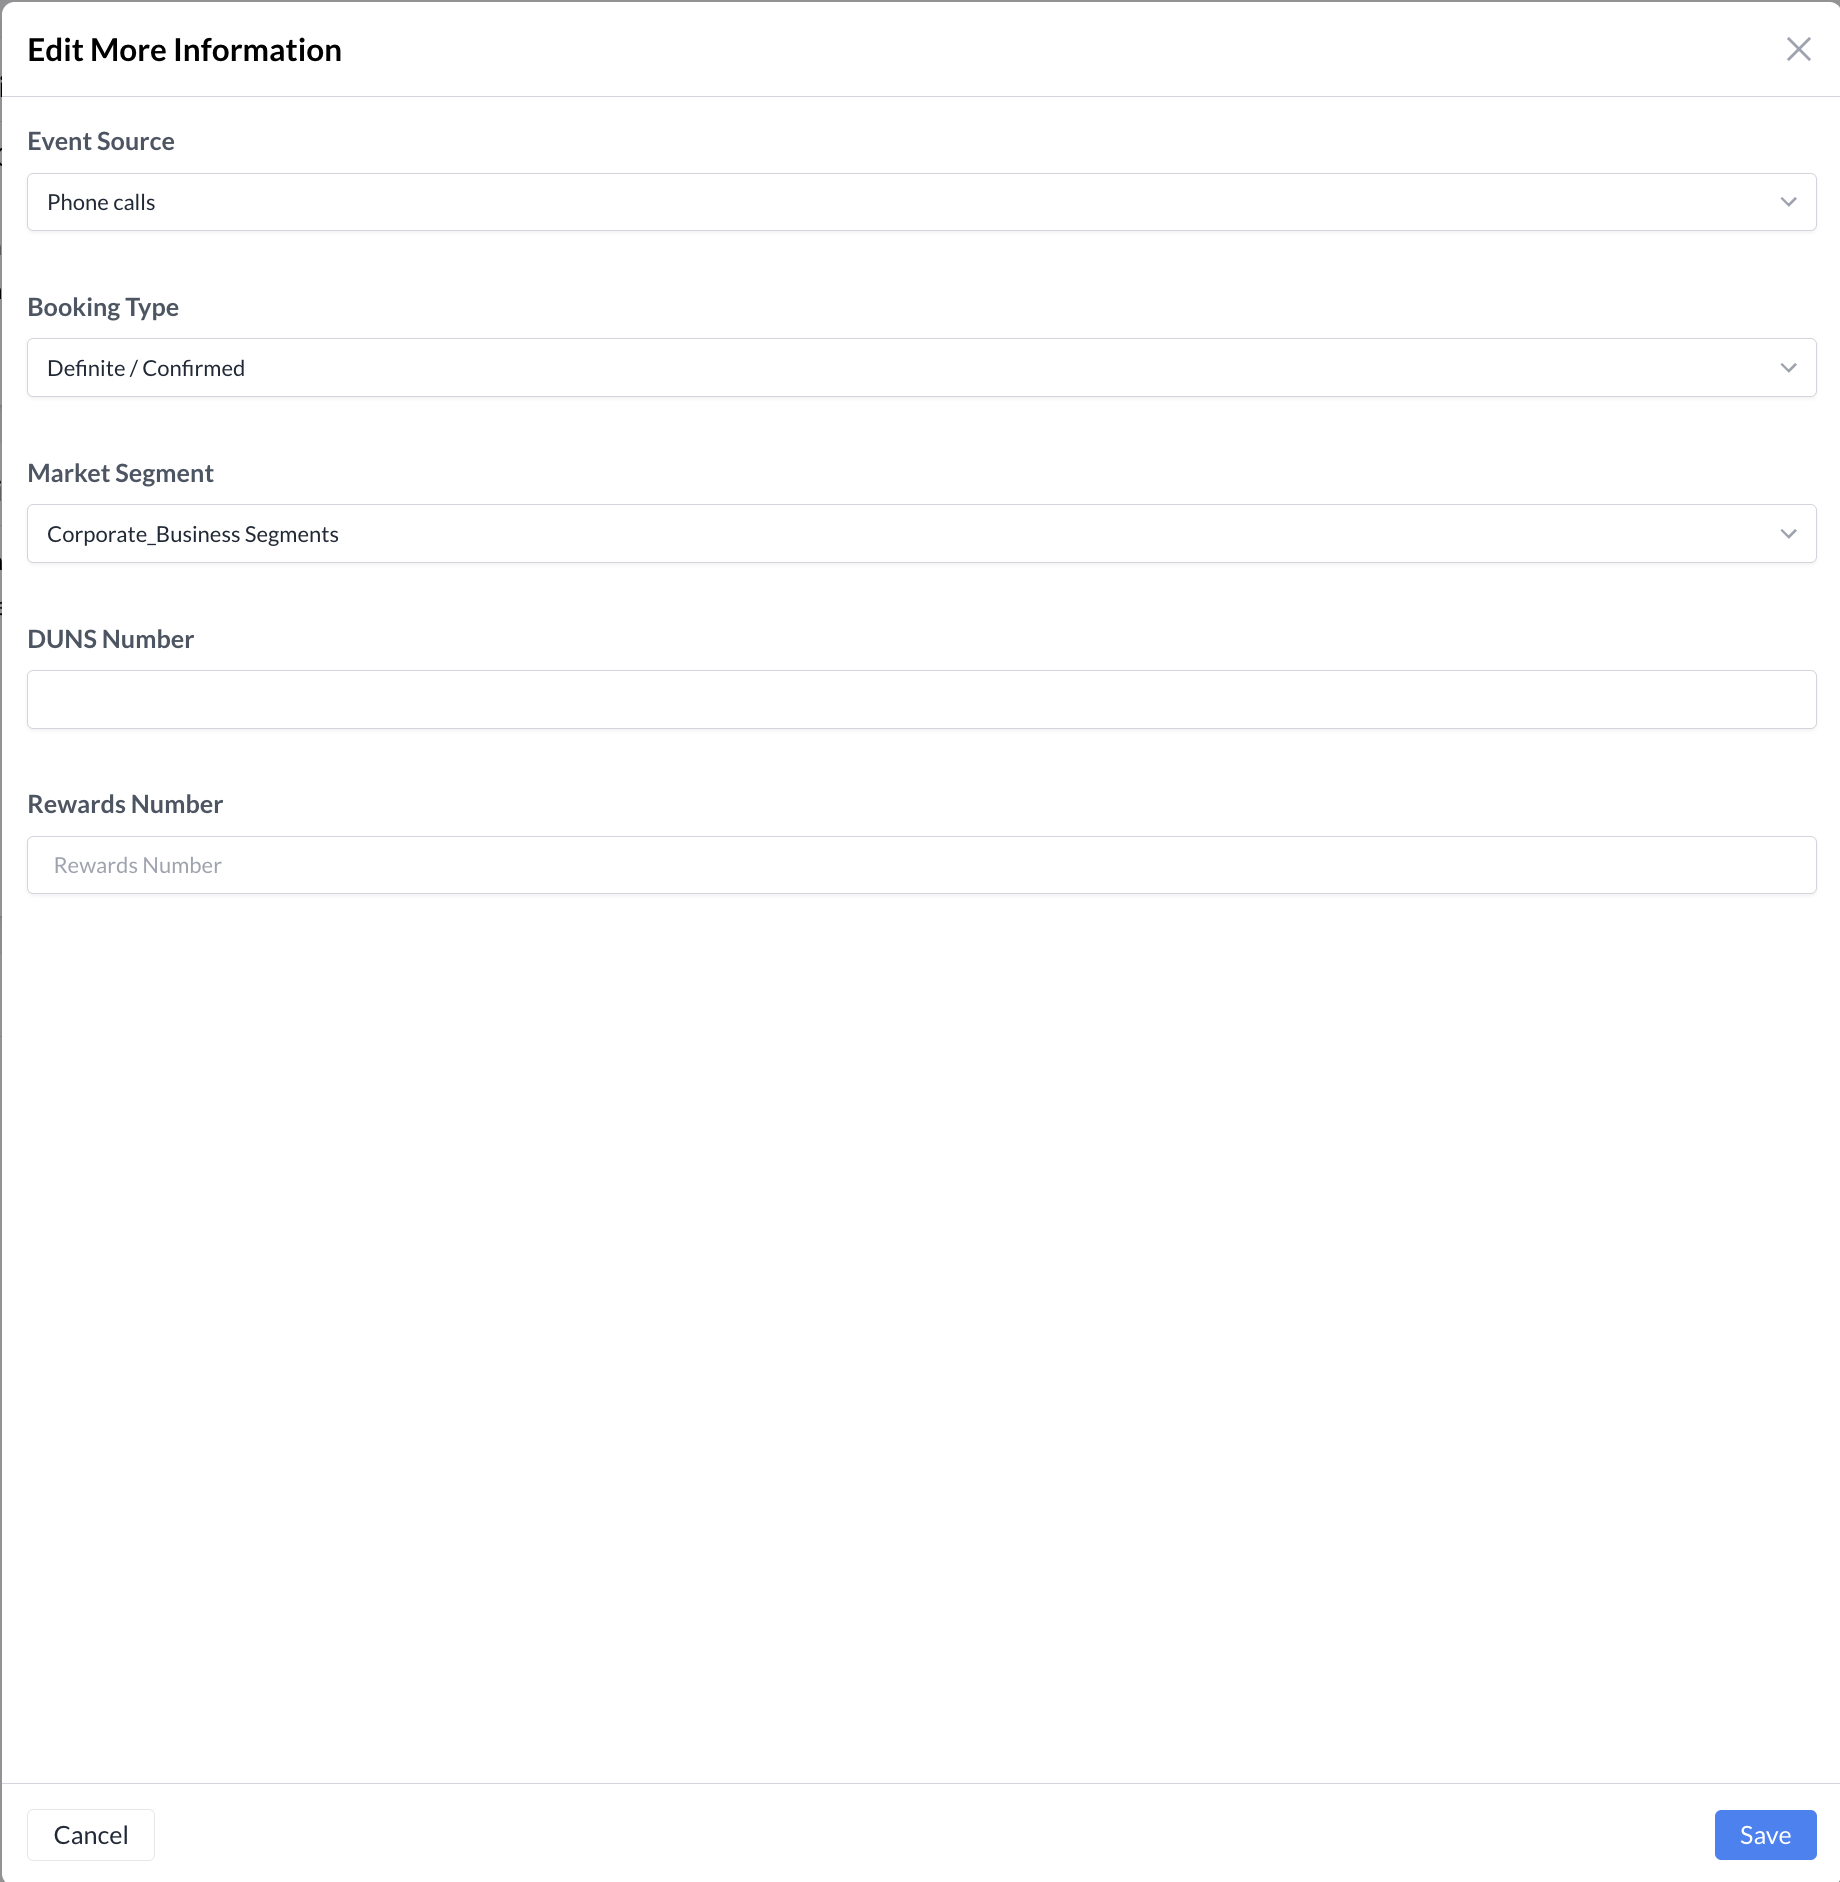
The first method is by using the Quick Edit buttons, which are conveniently located within each section of the Group Record. These buttons allow you to make targeted updates—such as changing the event name, date, time, or other details—without navigating away from the main screen.

This method is ideal for making fast, section-specific edits while reviewing the event.

When you click the Quick Edit button—such as in the More Information section—a dedicated edit screen will appear. This screen allows you to modify the specific fields within that section of the Group Record.

Once you've made the necessary updates, click the blue "Save Changes" button to apply your edits and return to the main Group Record.

Quick Edit Buttons

Edit More Information Screen

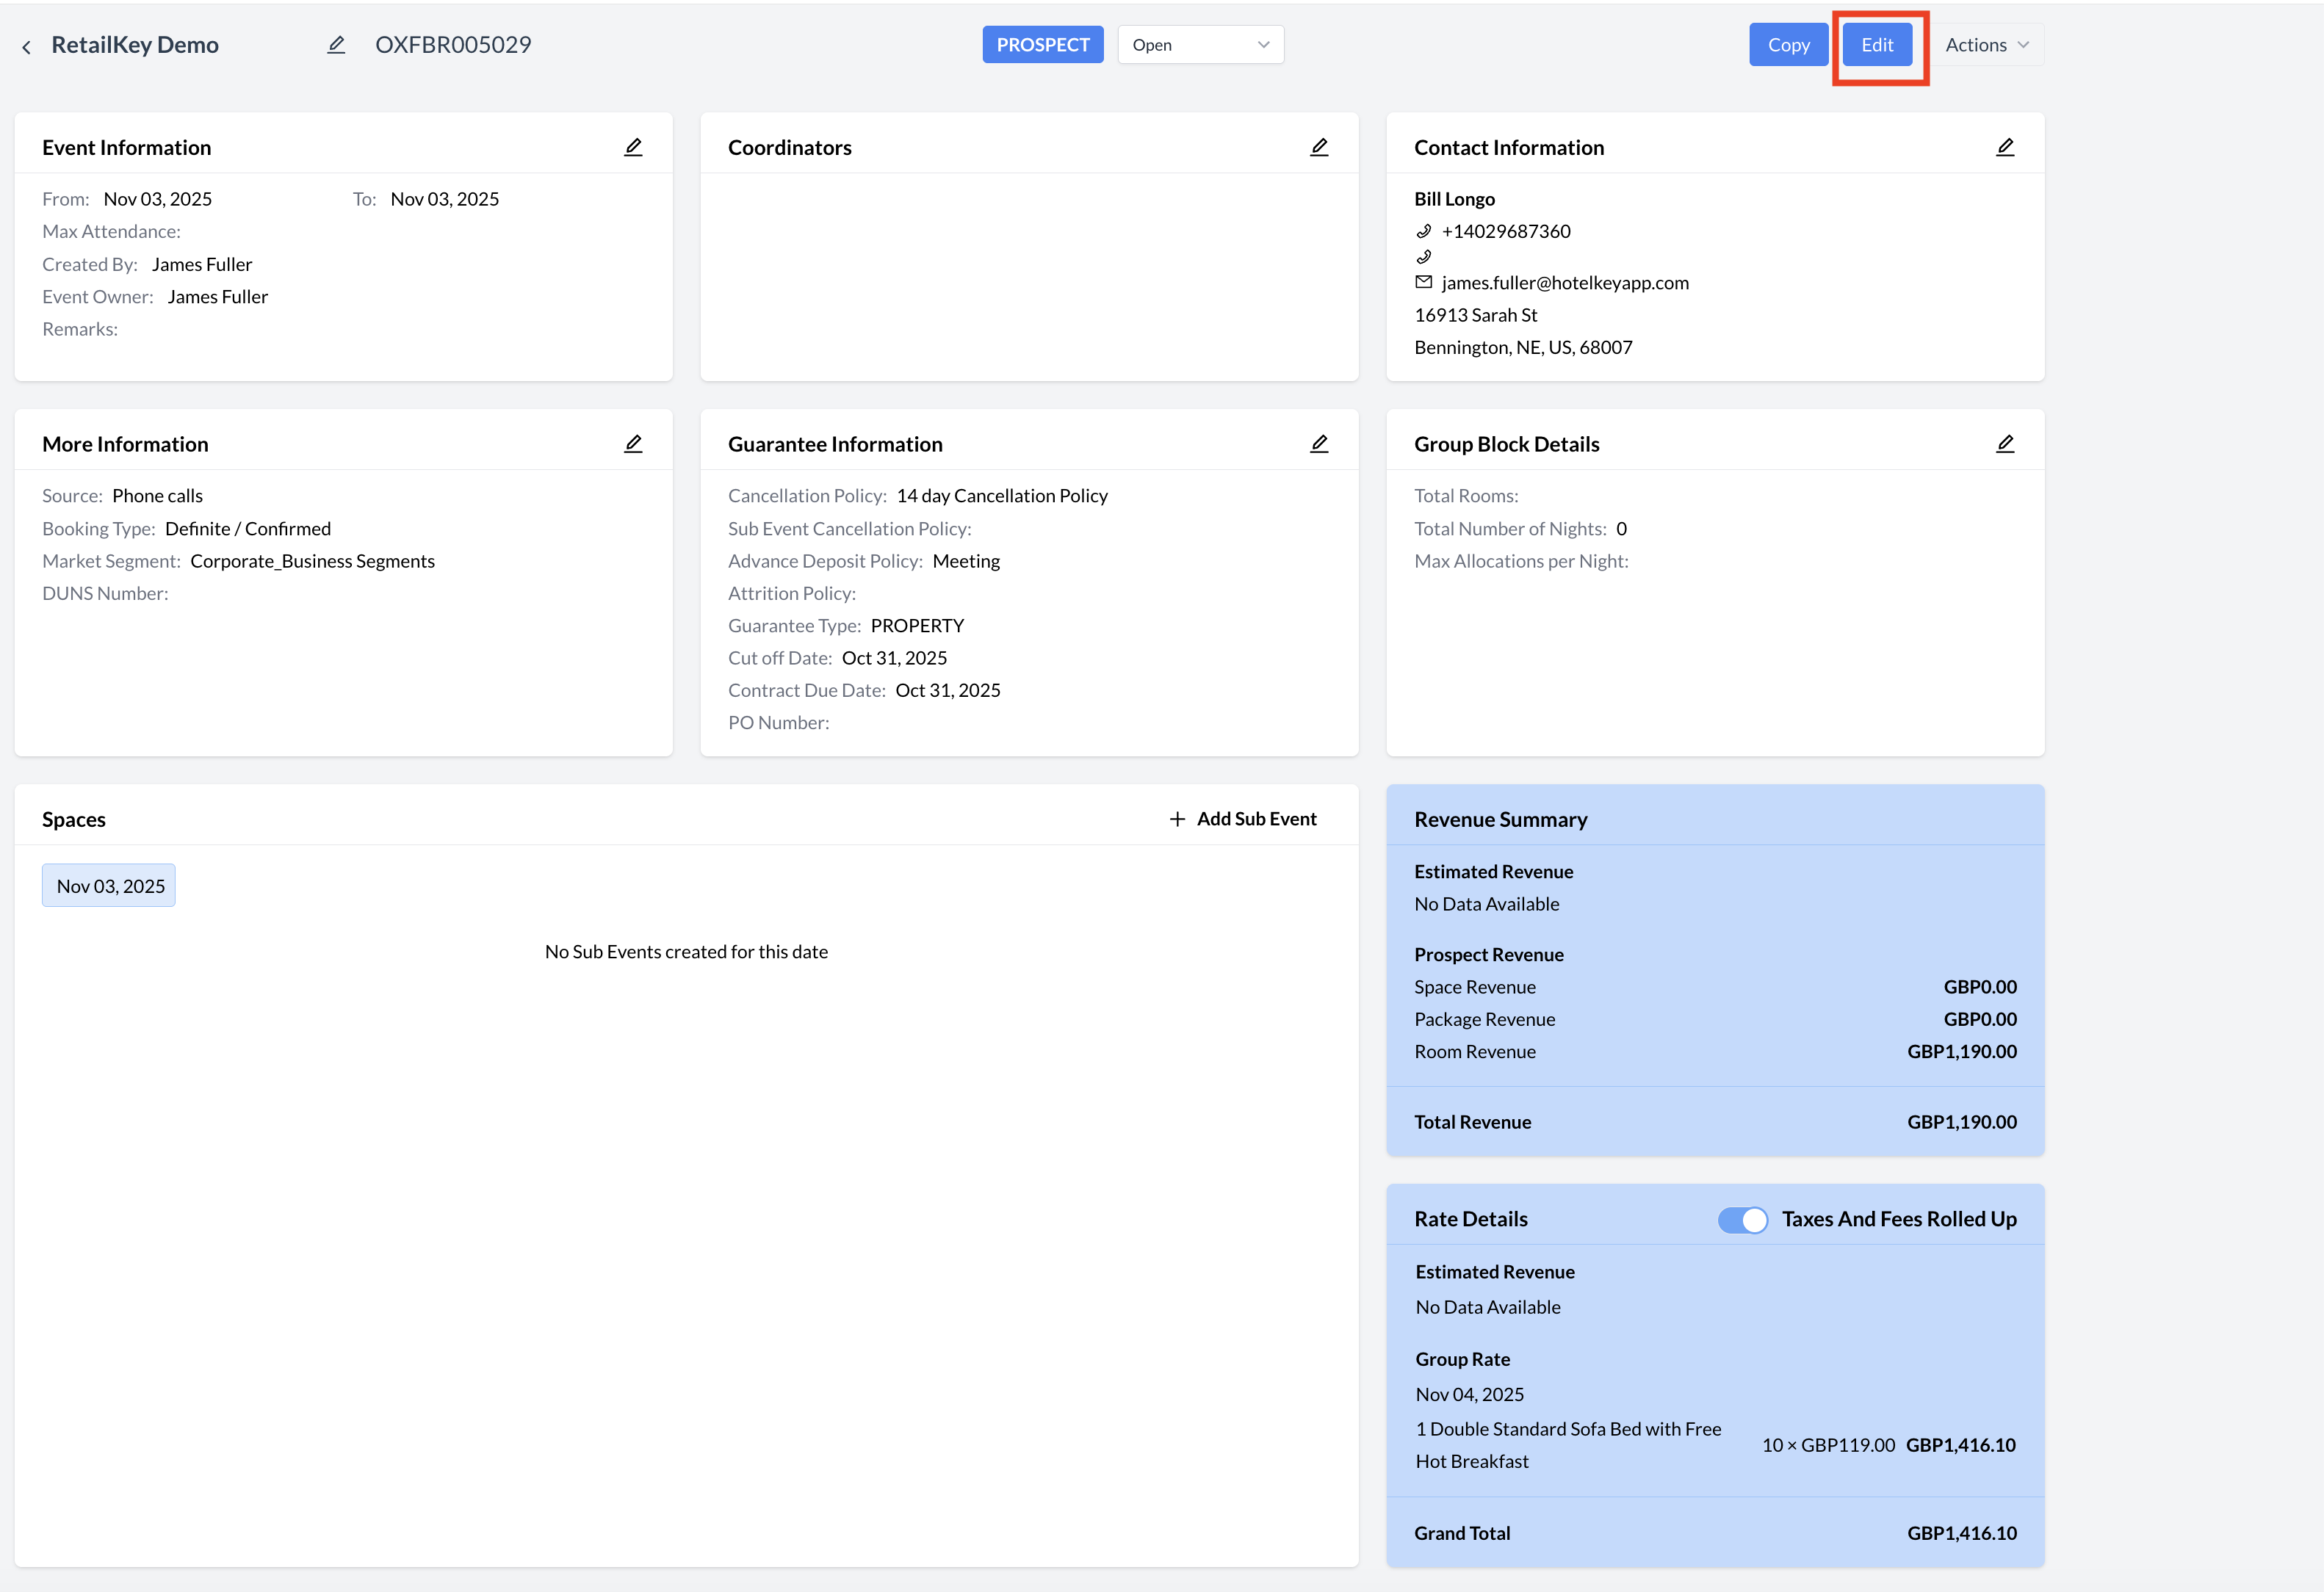
The second way to edit an Event Reservation is by using the Edit Flow, which takes you back into the group only creation process.

  1. Edit Flow:

  2. In the upper-right corner of the Event Record screen, click the blue "Edit" button.

  3. This action will launch the group creation flow.

  4. All existing information will be pre-populated in their respective fields, allowing you to review and update the event details as needed.

⚠️ Important: While in the group creation flow, you must click the blue "Next" button on each step to proceed through the process.

At the final step—the Review screen—click the blue "Confirm" button to save your changes.

This will complete the editing process and return you to the updated Event Record screen.

Important Note:
This workflow only allows you to make changes to the Basic Data and Contact Information screens for the group.
Because the Property Management System (PMS) is the system of record for group data, full editing capabilities are only available within the PMS. Any additional changes must be made directly in the PMS.

Edit Flow.png

Edit Flow Button

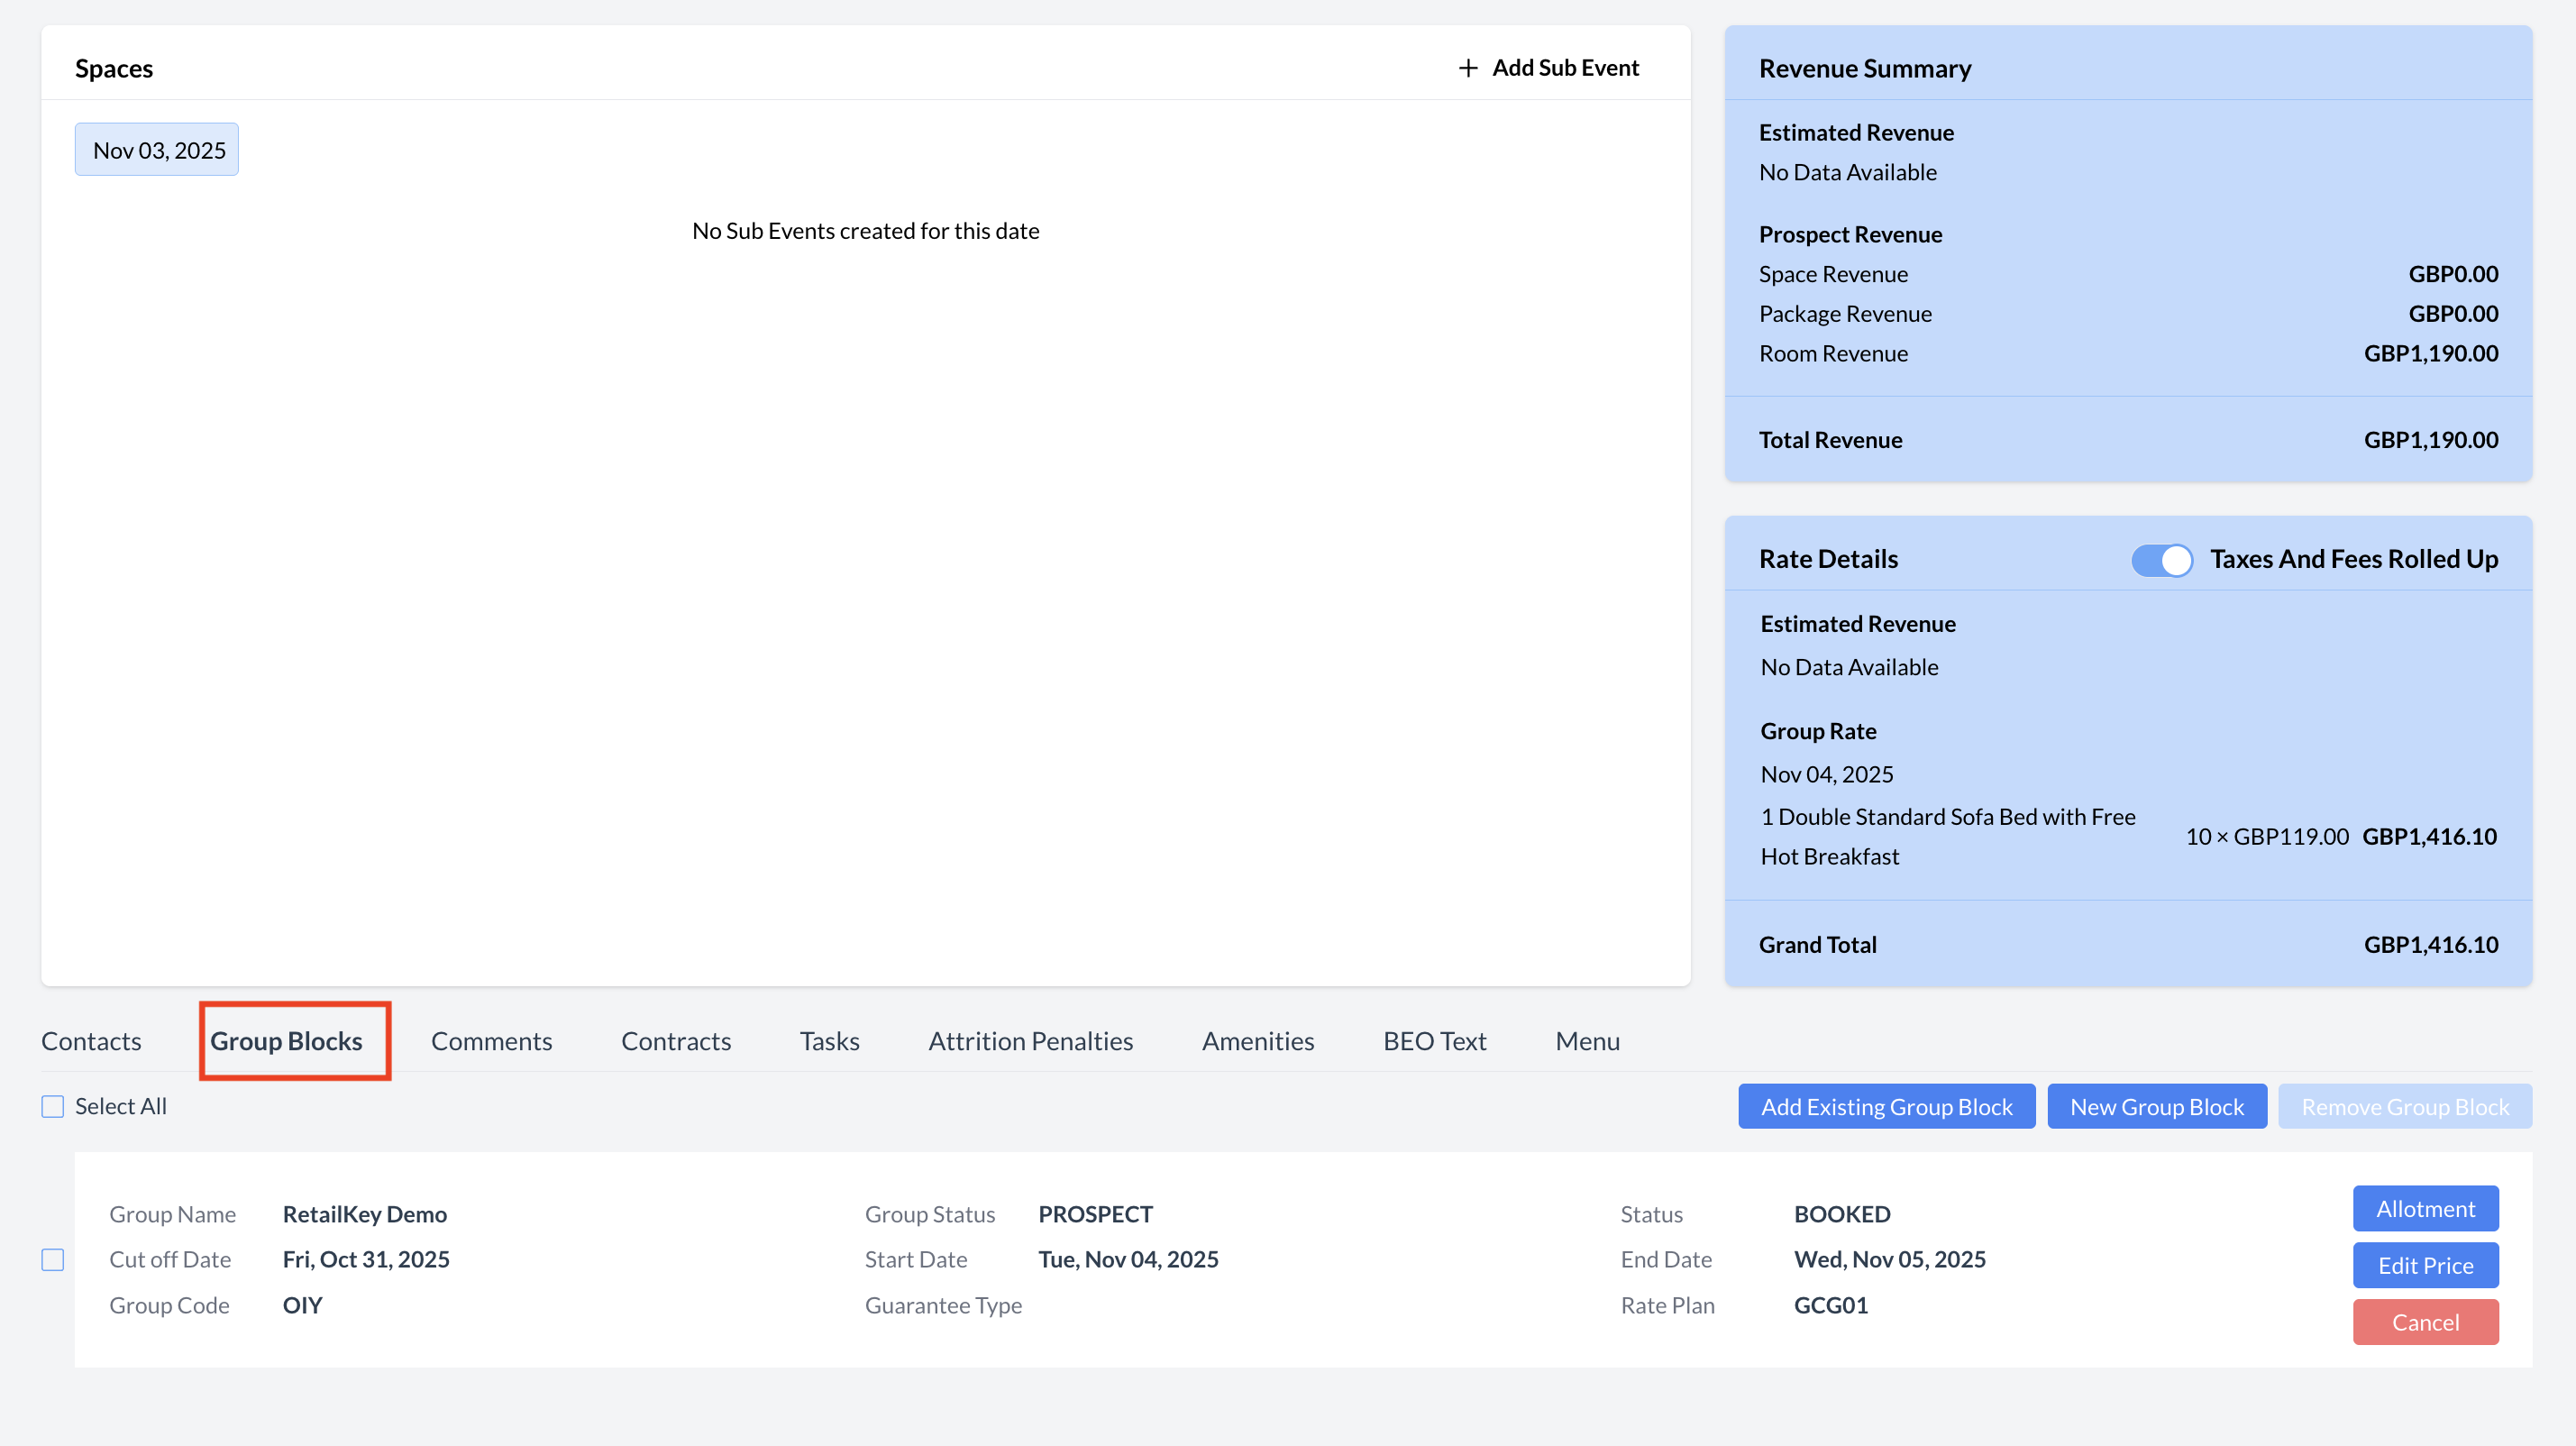
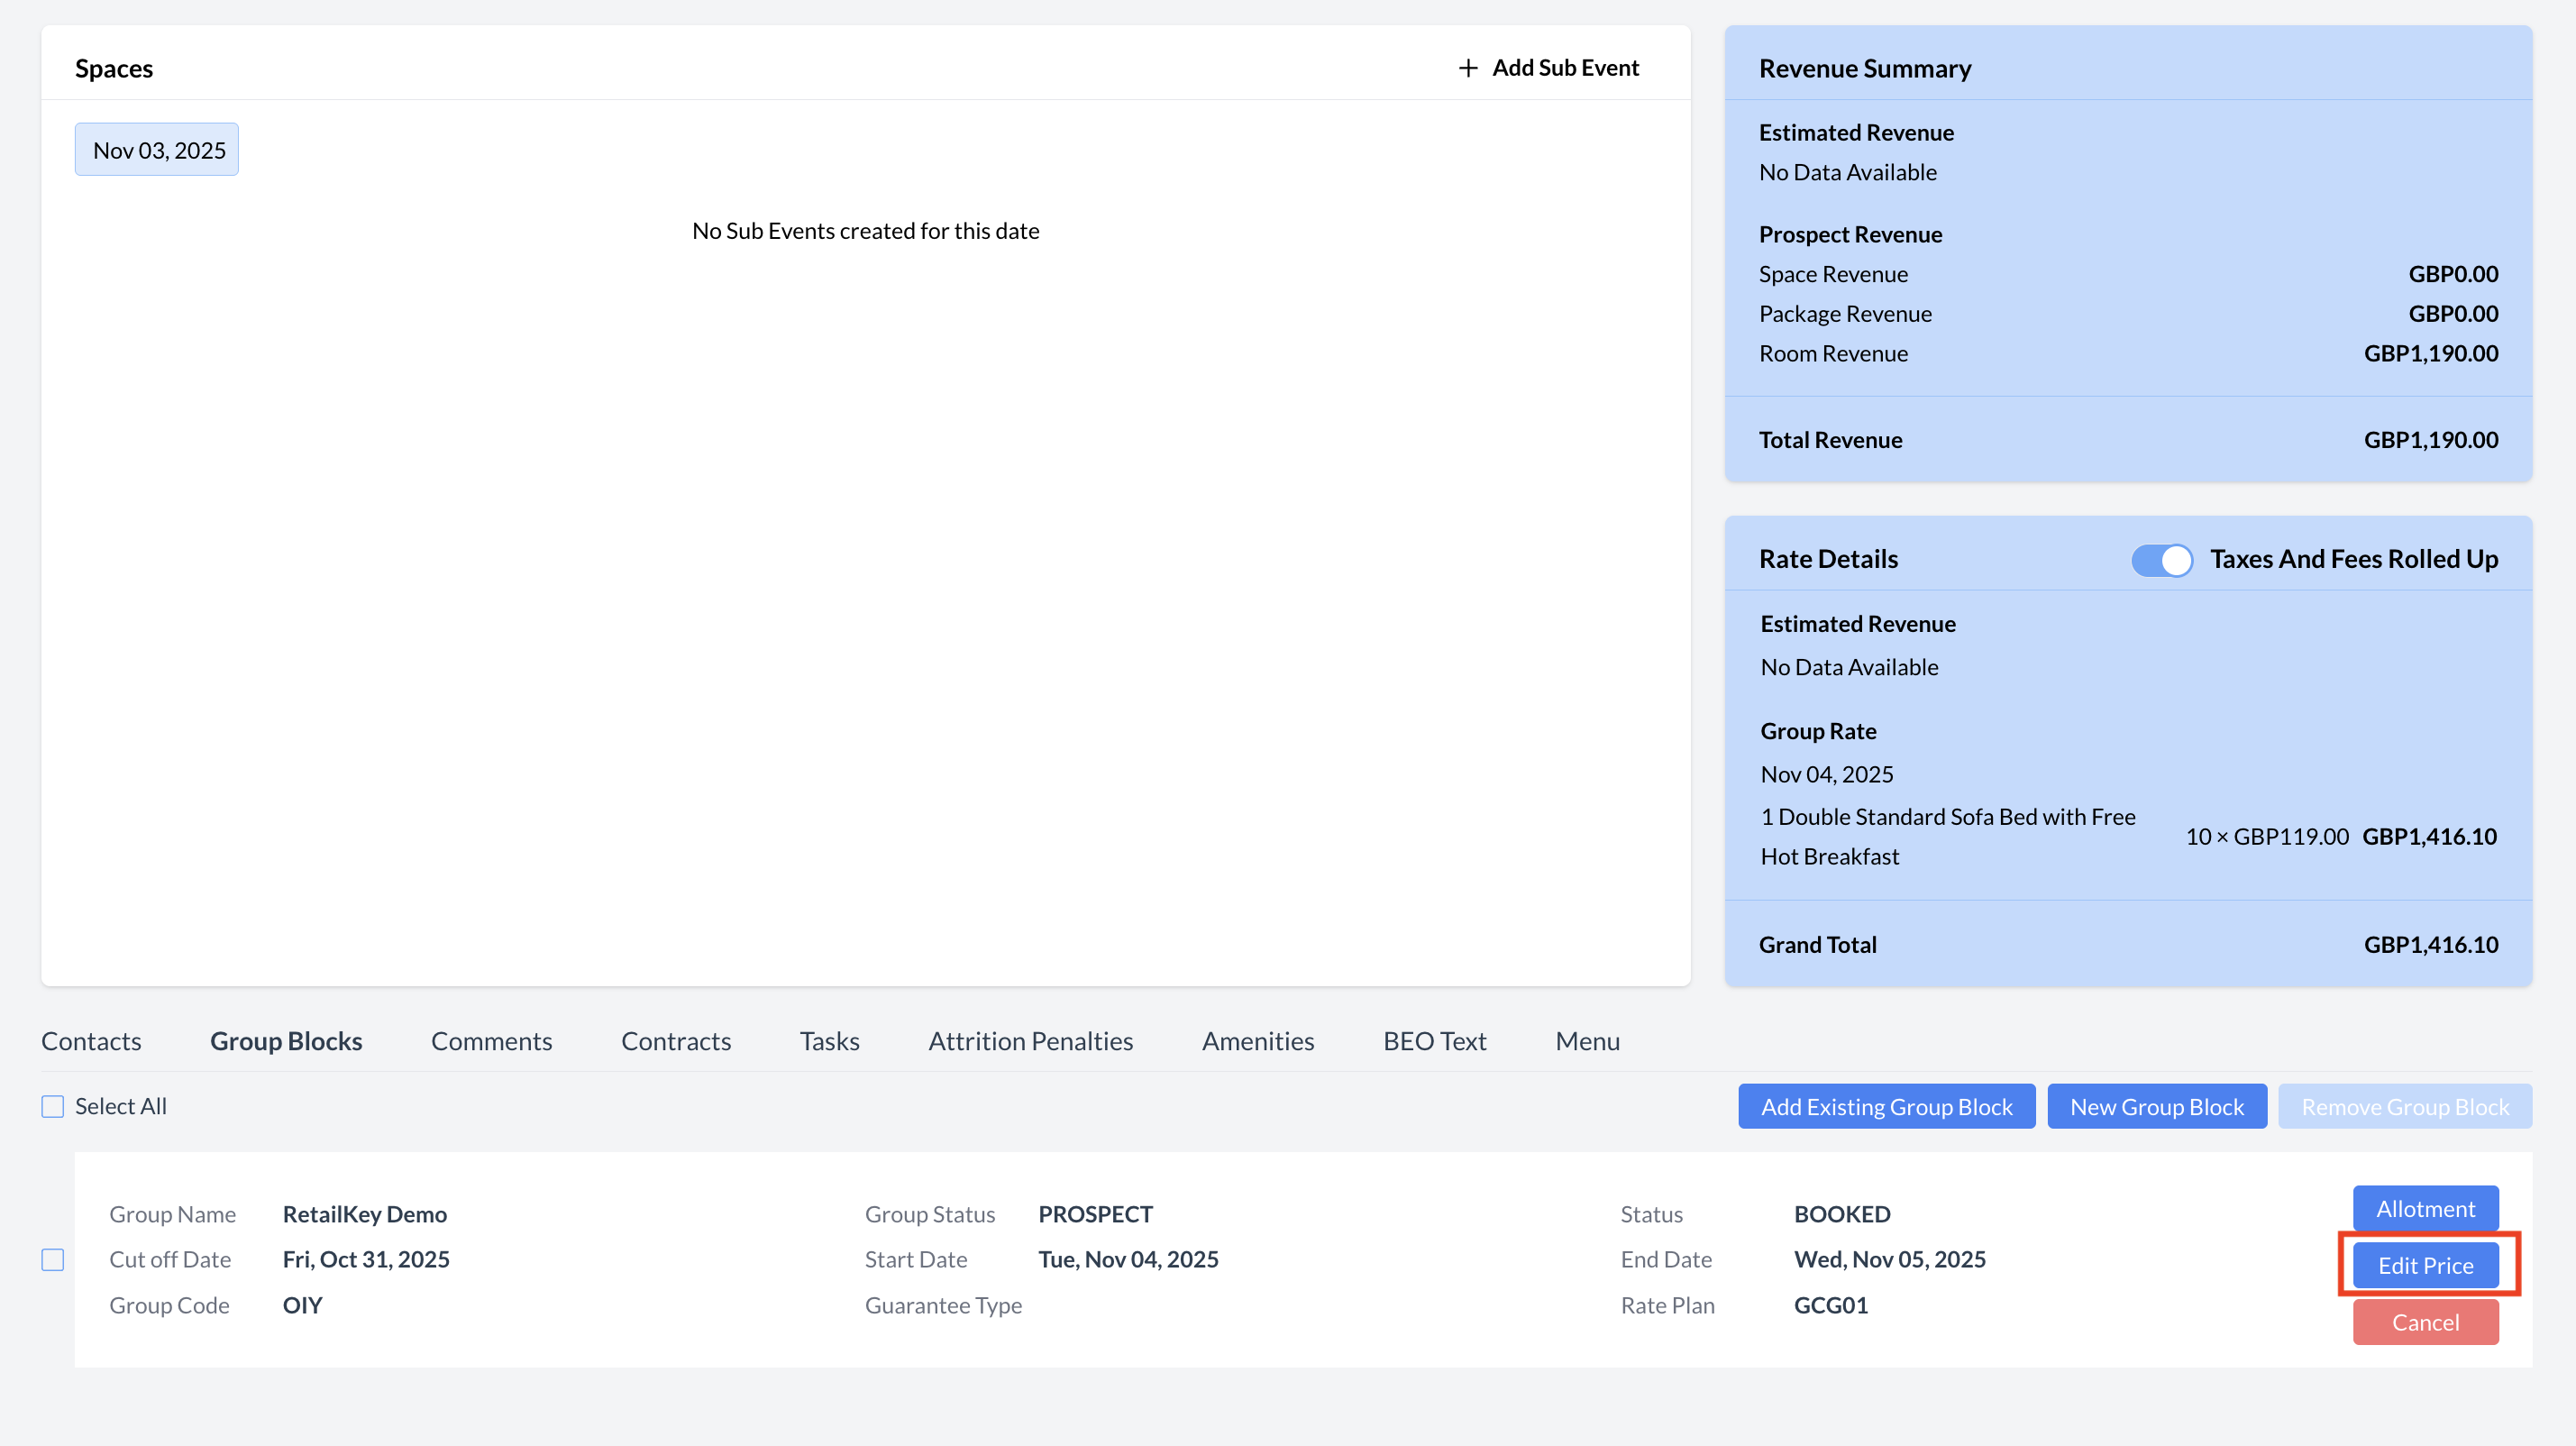
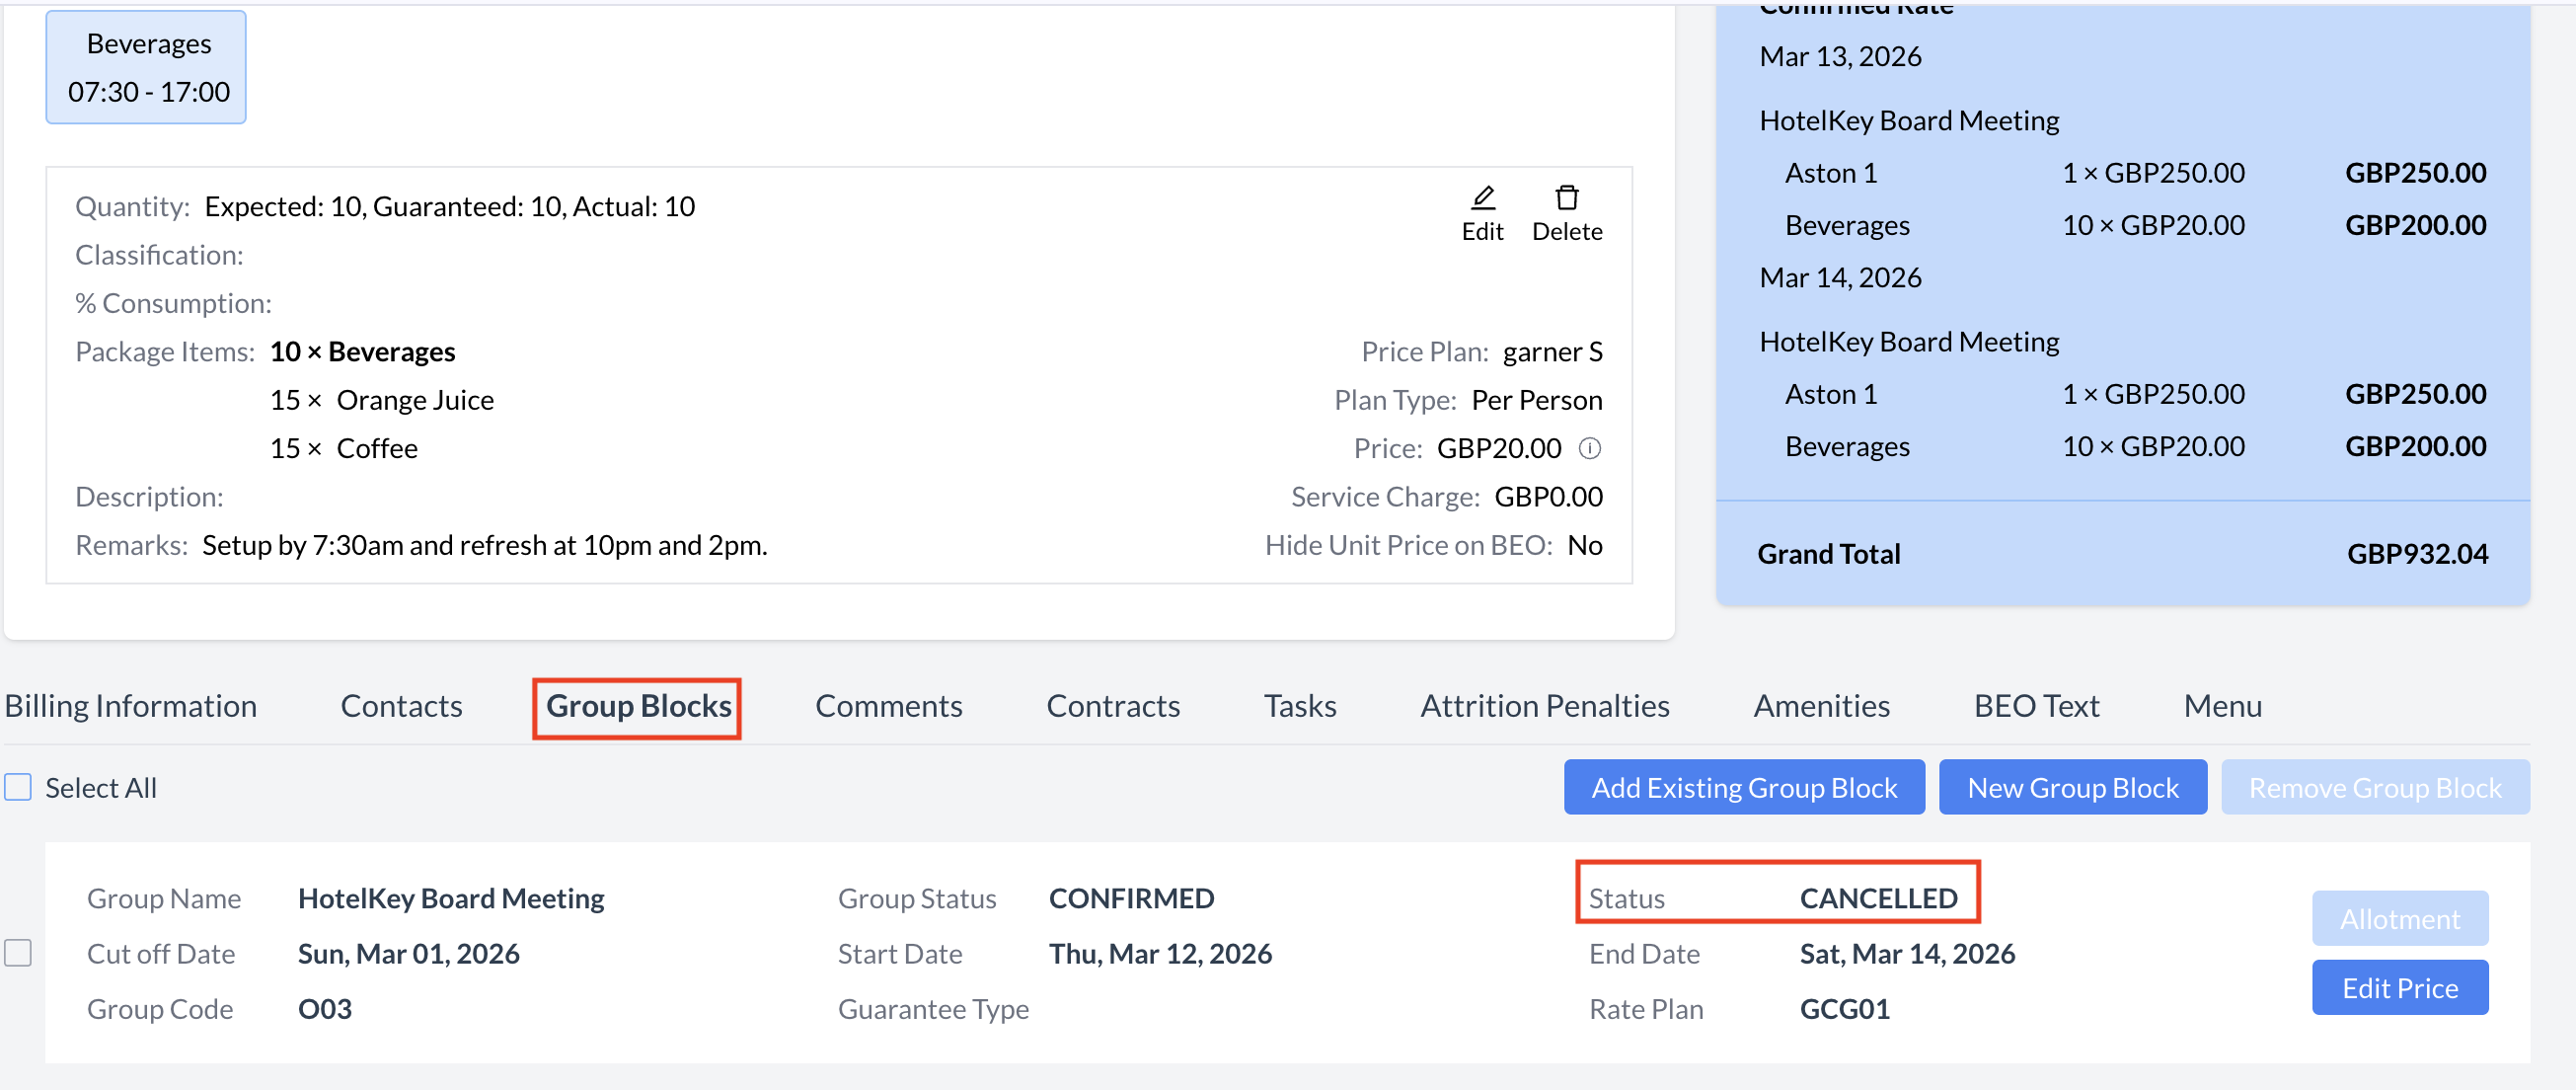
Once a group is created, the Property Management System (PMS) becomes the system of record (or "master") for the group. This means that most group edits must be made directly in the PMS.

However, you can still manage Inventory and Pricing for the group within EventKey.

📌 To manage group blocks in EventKey:

  1. Open the Group Record.

  2. Scroll to the bottom of the screen.

  3. Click on the "Group Blocks" section.

Here, you will see the group block information that has been loaded from the PMS. This includes key details such as:

  • Group Name

  • Group Status

  • Record Status

  • Cut-Off Date

  • Start Date

  • End Date

  • Group Code

  • Guarantee Type

  • Rate Plan

🛠️ From the Group Blocks screen, you can:

  • Manage room allotments

  • Edit pricing

  • Cancel the group block (if needed)

Note: Any structural or core group changes (e.g., group name, dates, contact info) must still be made in the PMS.

Group Block Section.png

Group Block Section

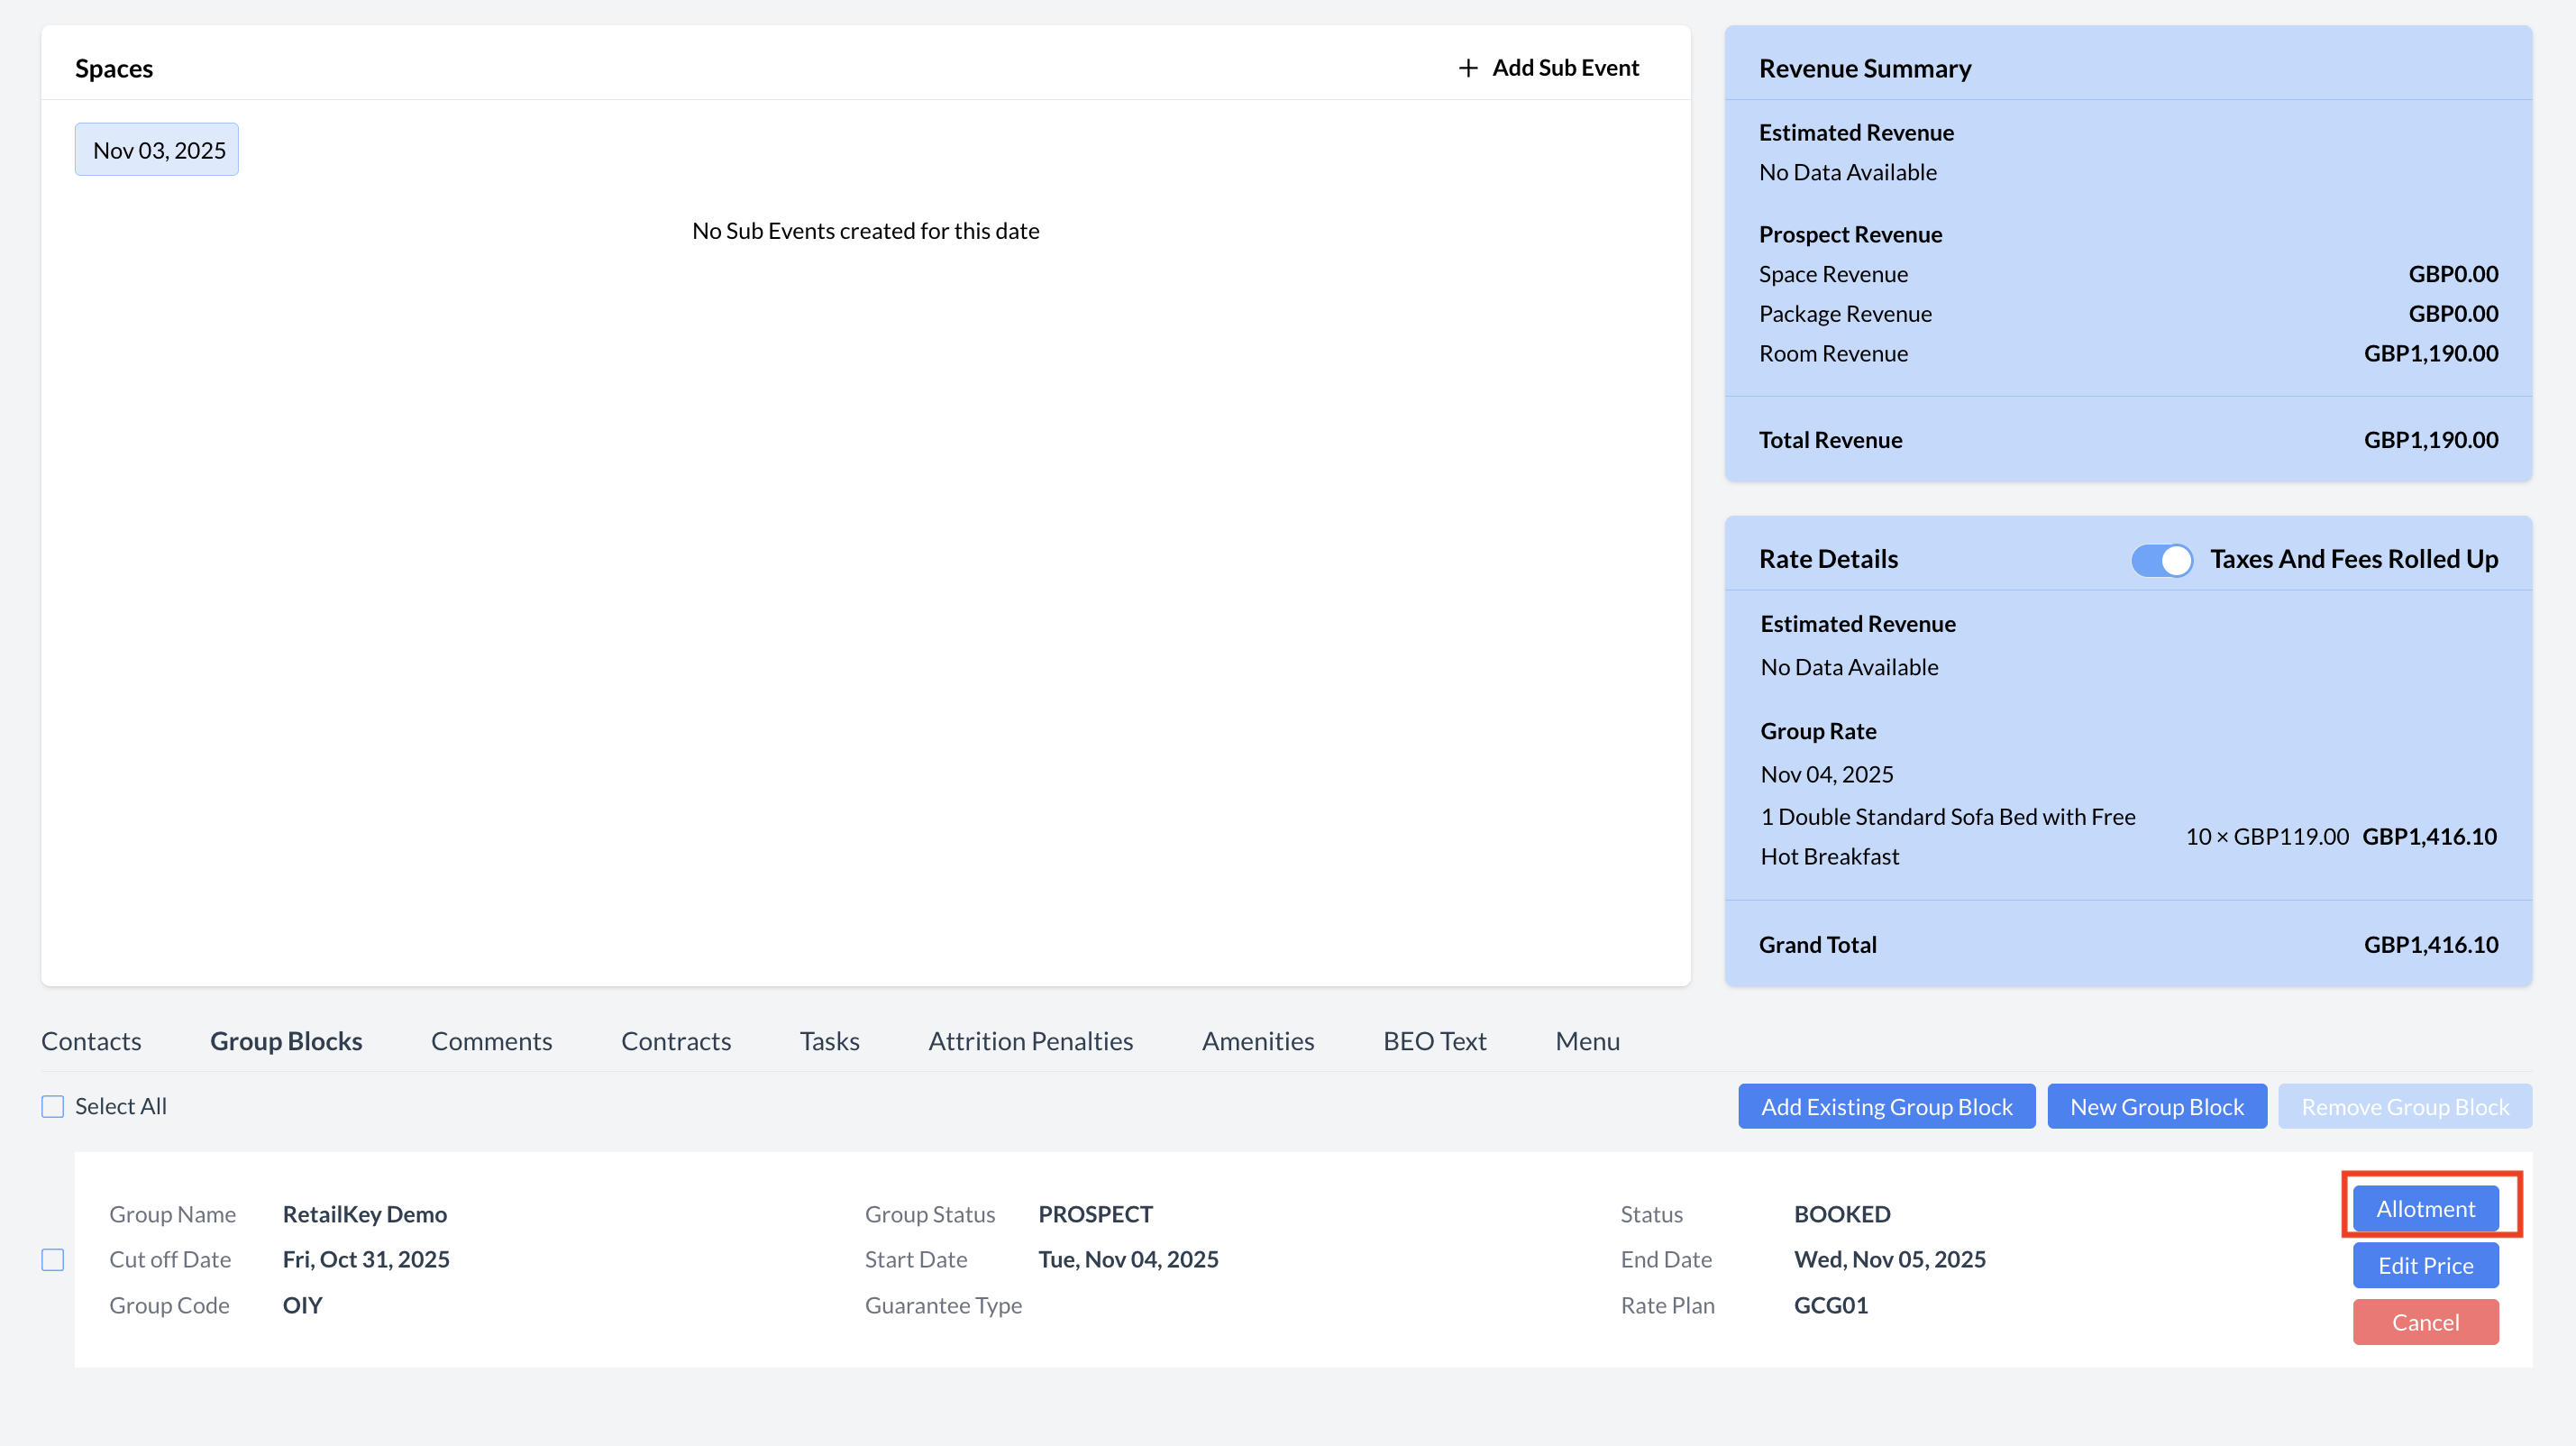
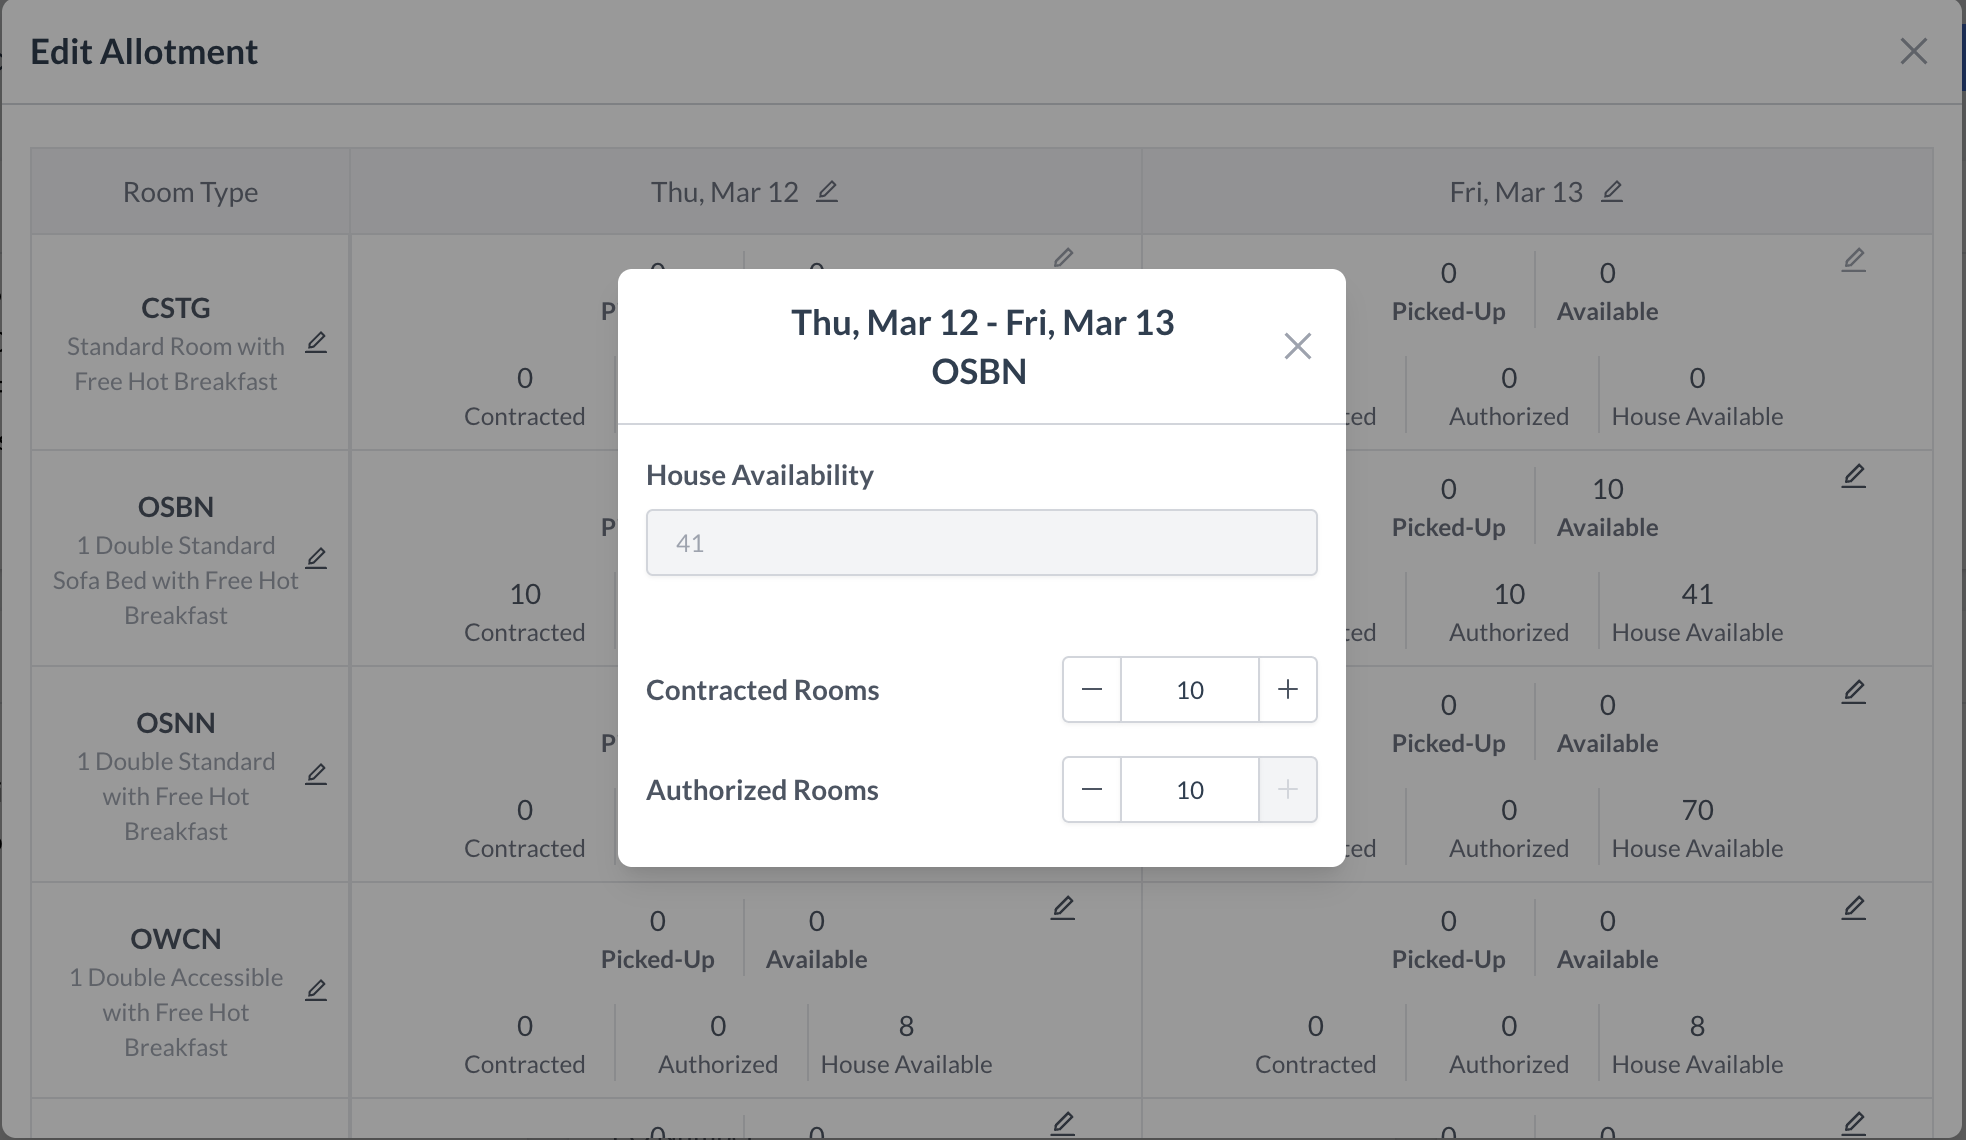
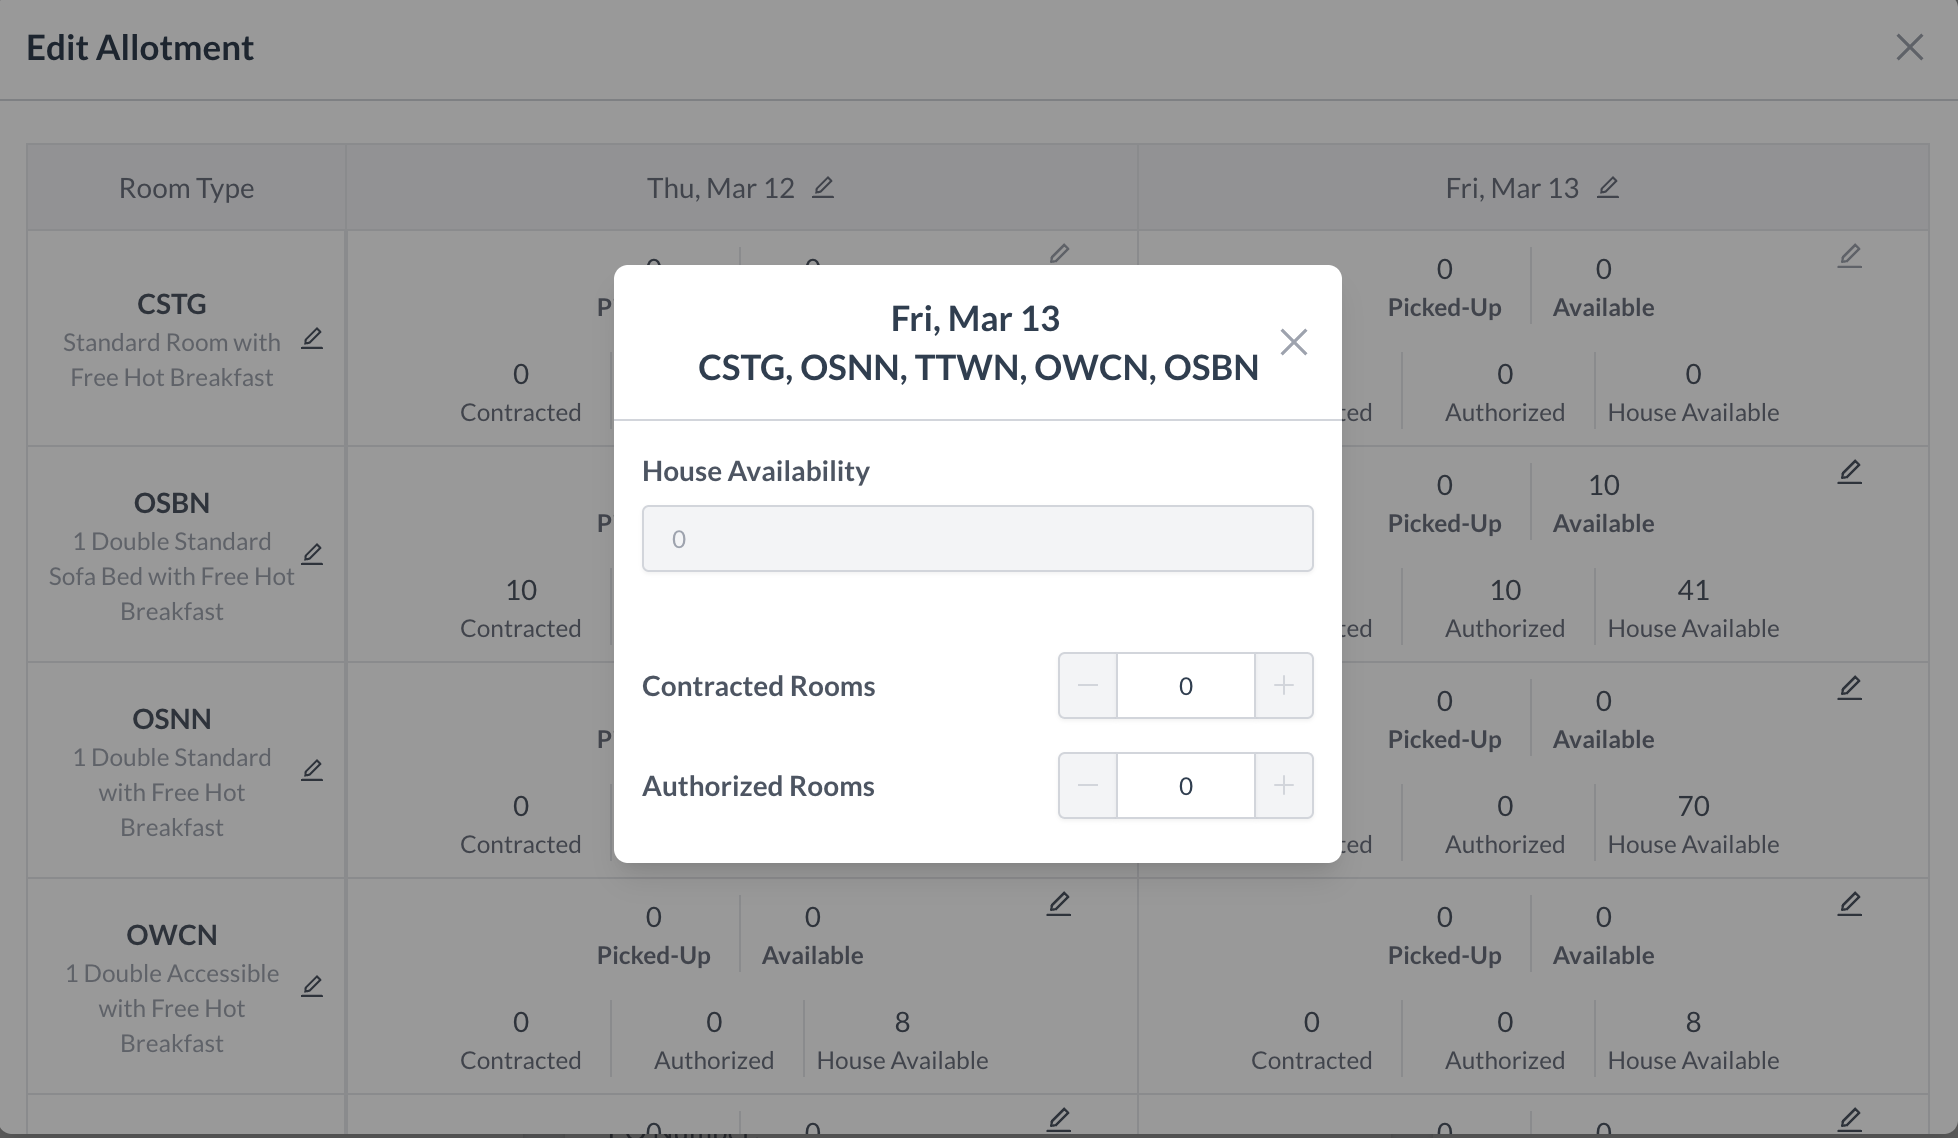
🛏️ Editing Group Block Allotments

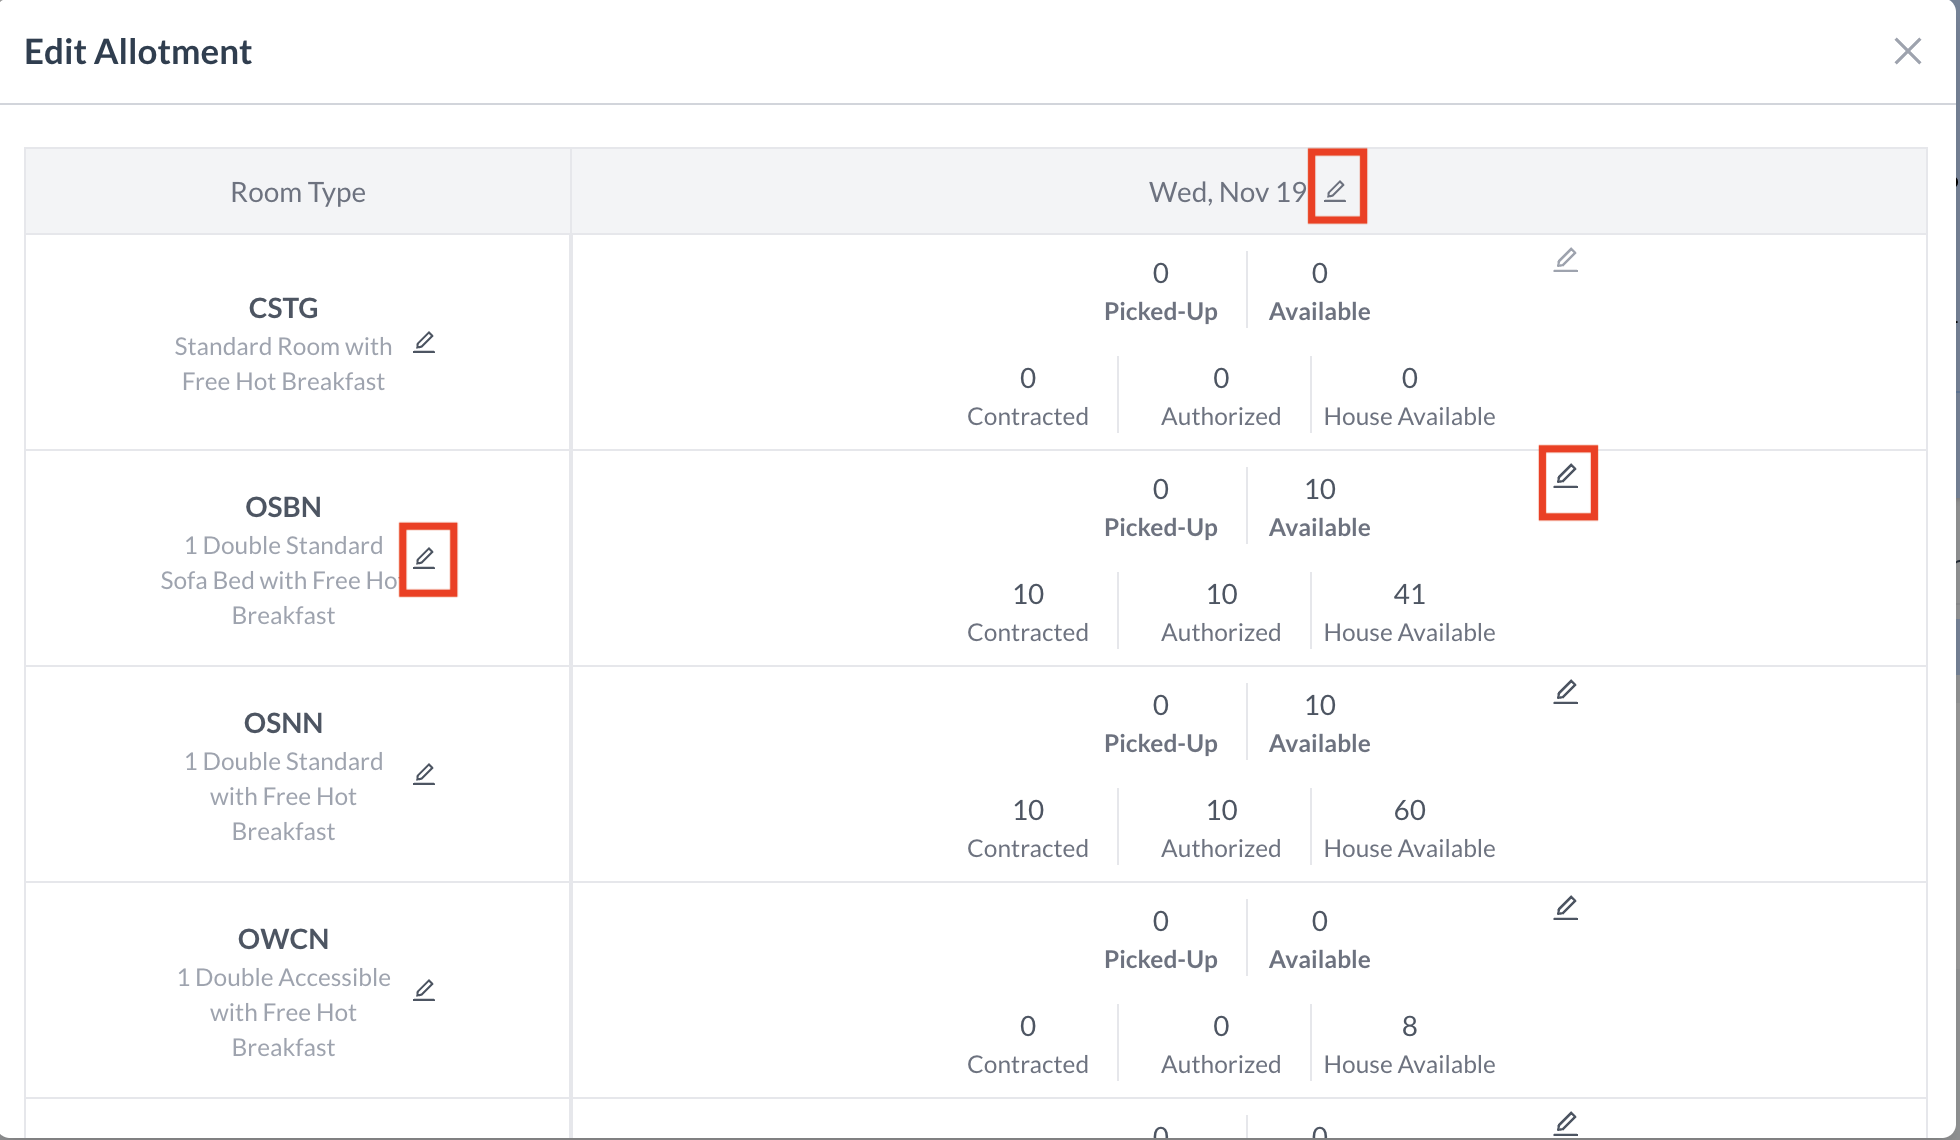
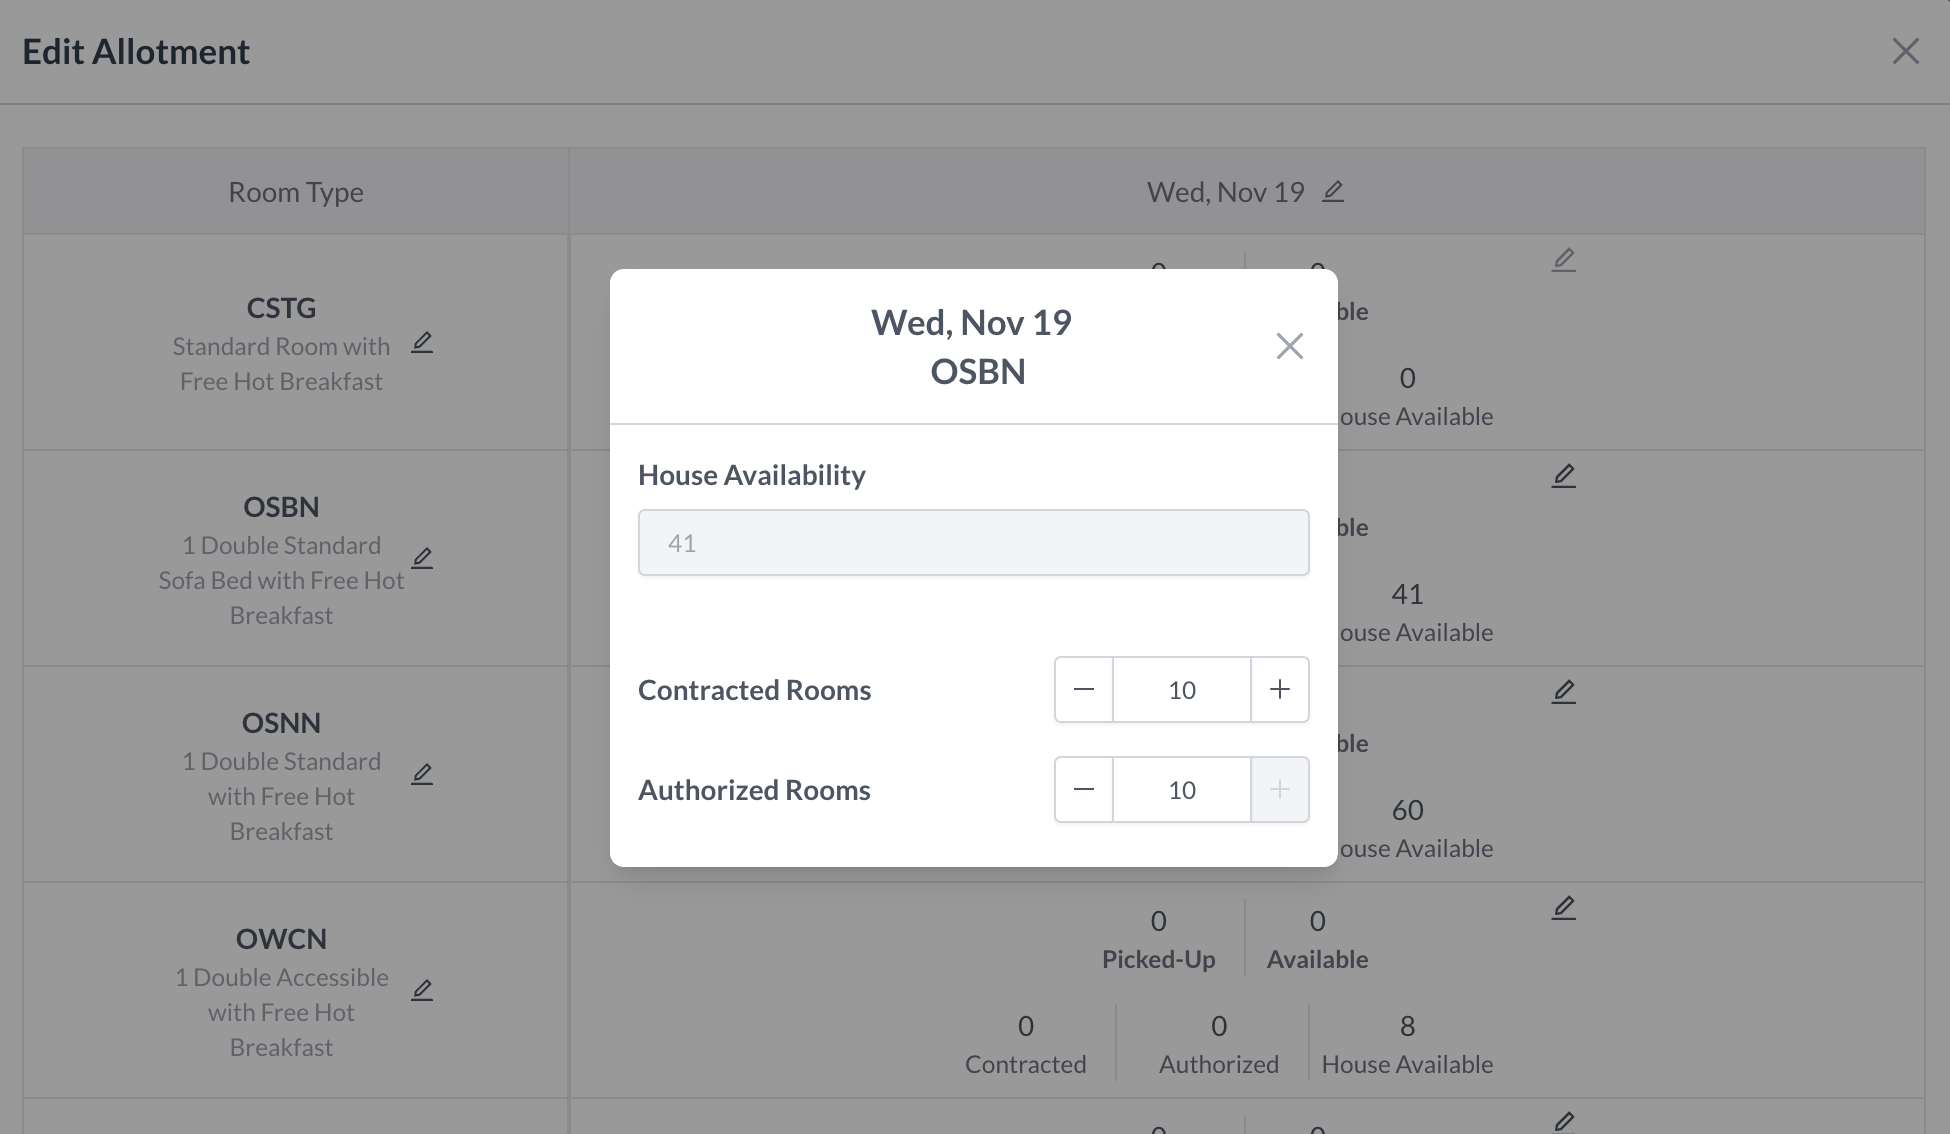
Click the Blue “Allotment” button, the Edit Allotment screen will open, allowing you to update room allocations for the group block.

🔧 Allocation Editing Options

You have three flexible ways to modify room allotments based on your needs:

1. Edit a Single Day for a Specific Room Type

  • Click the pencil icon under the date column for the desired room type.

  • The Allocation screen will open, allowing you to update the following for that day and room type:

    • Contracted Rooms

    • Authorized Rooms

2. Edit All Dates for a Specific Room Type

  • Click the pencil icon next to the room type name.

  • This opens the Allocation screen for that room type across all dates.

  • Any changes made will apply to every day for the selected room type.

3. Edit All Room Types for a Specific Date

  • Click the pencil icon next to the date.

  • This opens the Allocation screen for all room types on that specific day.

  • Any changes will apply to every room type for the selected date only.

💾 Saving Your Changes

  • As you adjust Contracted or Authorized Room values, the system will automatically save your updates.

  • To exit the Allocation screen, simply click the "X" in the top-right corner.

⚠️ Important Note: Allotment edits made in EventKey reflect in real time in the PMS

Allotment.png

Group Block Section - Allotment

Edit Allocations

Edit Allocation - Individual Day & Room Type

Edit Allocation - All Dates for a Room Type

Edit Allocations - All Room Types for a Single Date


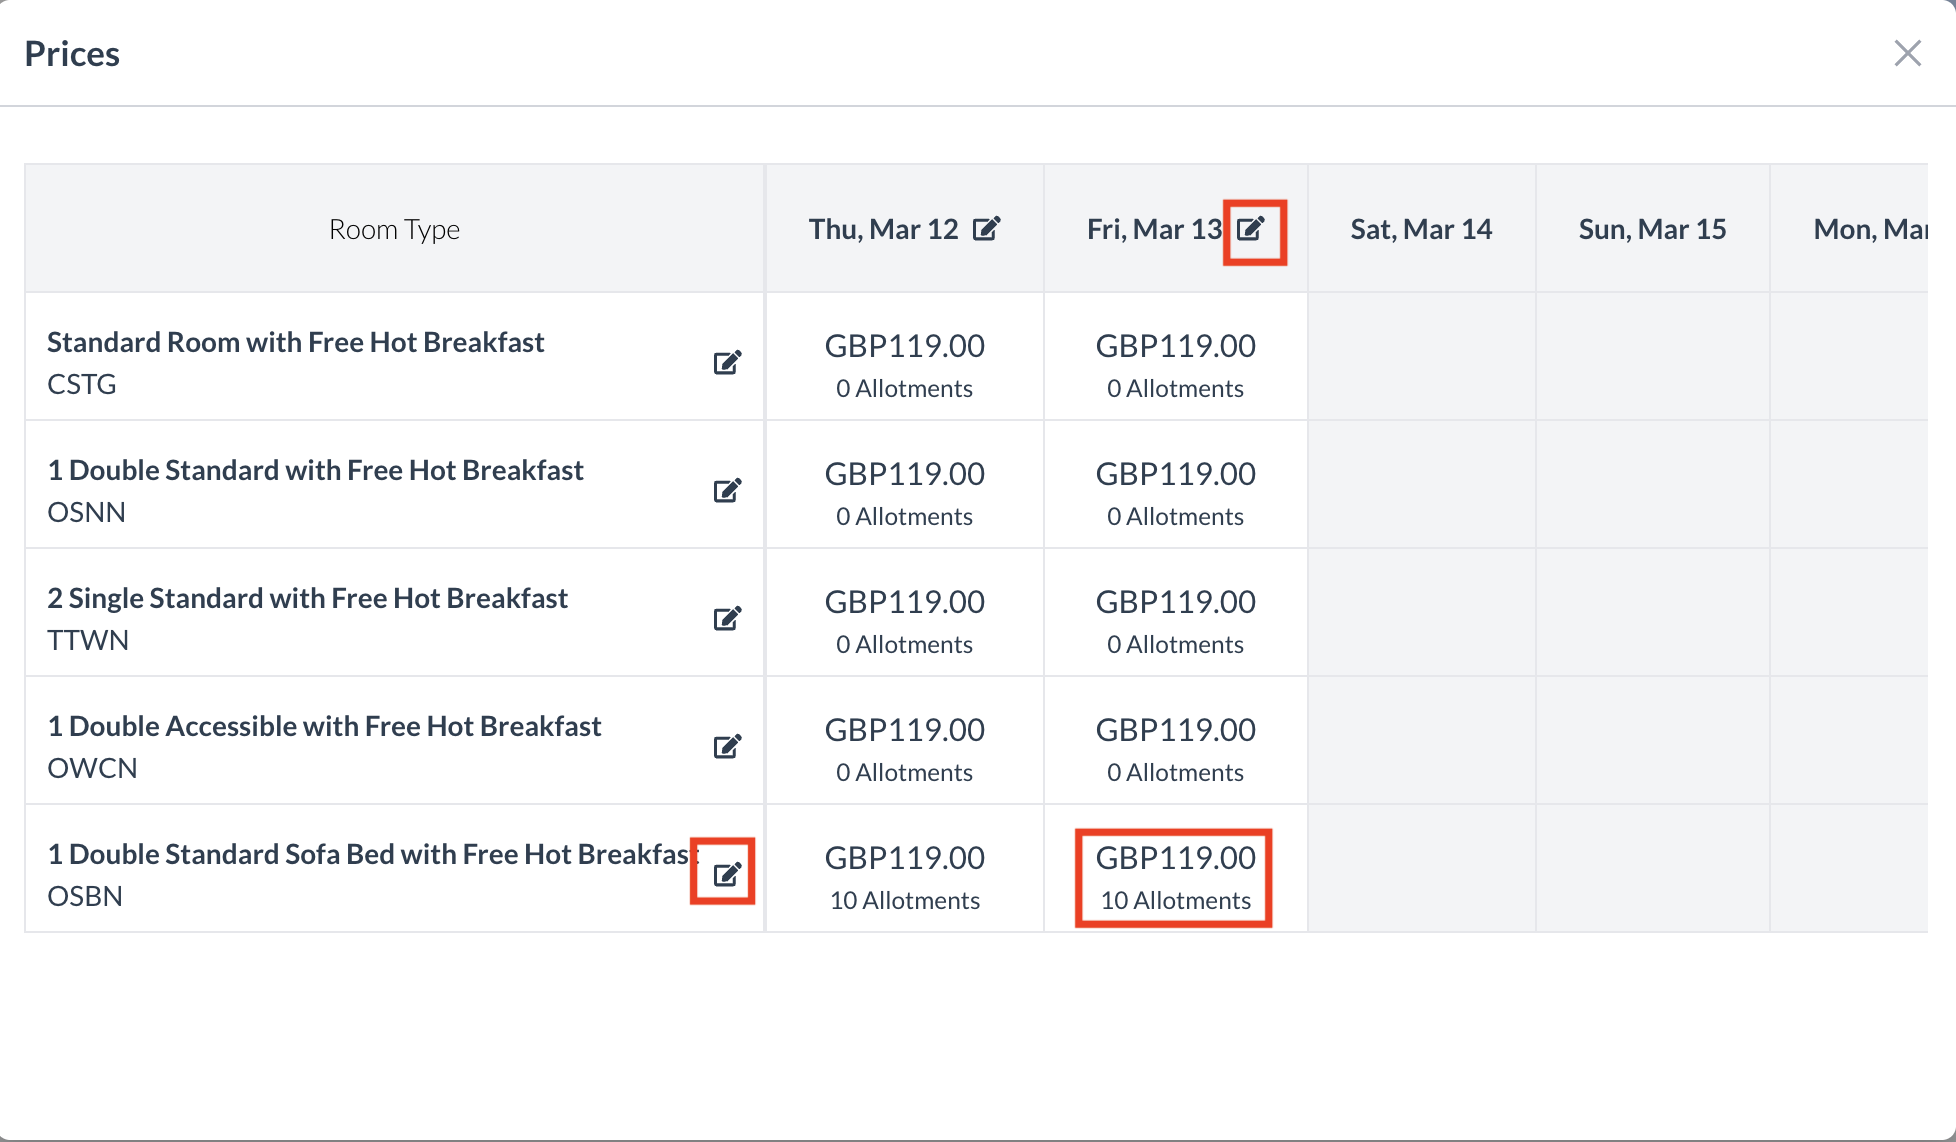
💲 Editing Room Type Pricing

Click the blue “Edit Price” button, the Prices screen will open, allowing you to update room prices for the group block.

🔧 Editing Options

You have three ways to update pricing:

1. Edit an Individual Day & Room Type

  • Click directly on the rate amount for a specific day and room type.

  • This will open the Update Pricing screen where you can adjust the rate for that specific day and room type only.

2. Edit All Dates for a Room Type

  • Click the pencil icon next to the room type name.

  • This opens the Update Pricing screen.

  • Any changes made here will apply to all dates for that room type.

3. Edit All Room Types for a Single Date

  • Click the pencil icon next to the date.

  • This opens the Update Pricing screen.

  • Changes made here will apply to all room types for the selected date only.

✅ Final Step

After reviewing and making any necessary changes, click the blue “Done” button to save the pricing changes.
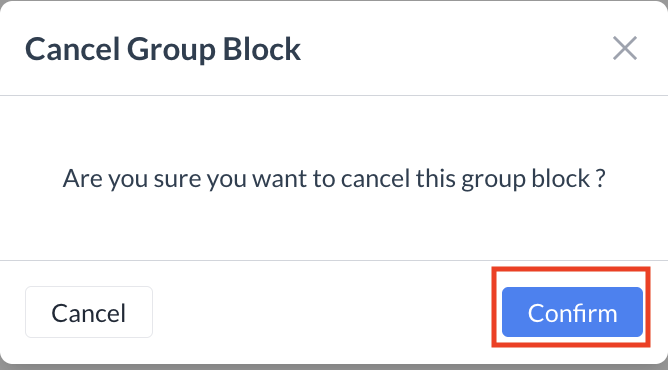
Group Block Section - Edit Price Button

Edit Pricing

Edit Pricing - Individual Day & Specific Room Type

Edit Pricing - All Dates for a Room Type

Edit Pricing - All Room Types for a Single Day


Cancelling a Group Block

If the group block is no longer needed, you can cancel it directly from the Group Blocks section of the Record.

Steps to Cancel:

  1. In the Group Blocks section, click the red “Cancel” button next to the block you wish to cancel.

  2. The Cancel Group Block confirmation screen will appear.

  3. Click the blue “Confirm” button to proceed with the cancellation.

Result:
The group block will remain visible in the Event Record, but its status will update to “Cancelled.”

Group Block - Canceling the Block

group block cancel confirm.png

Cancel Group Block Screen

Group Block - Cancelled Status

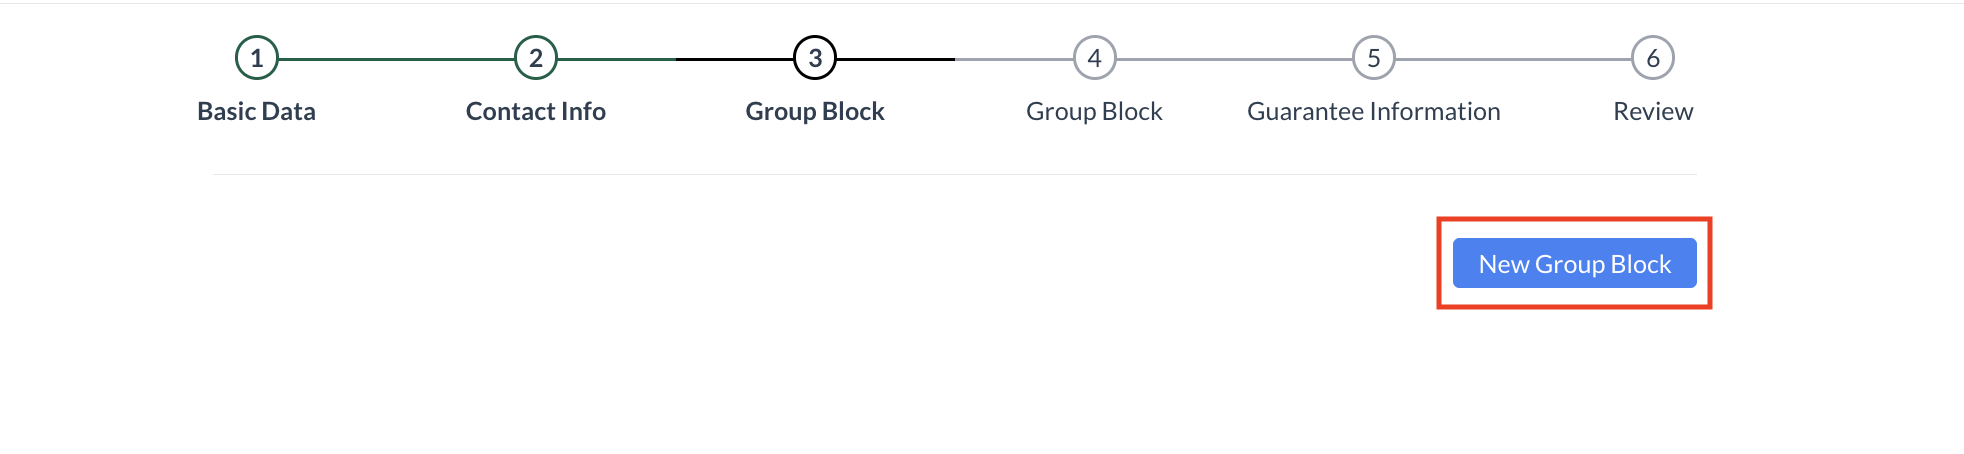
Creating a New Group Block from the Group Only Events Screen

In addition to managing existing group blocks, you can also create a new Group Block directly from the Group Only Events screen.

🛠️ To create a Group Block associated with an event:

  1. Navigate to the Group Only Events screen.

  2. Click the blue “Create Group Only Event” button.

This will open the Group Block Setup screen, where you can:

  • Enter room block details

  • Define start and end dates

  • Set room type allocations

  • Link the block directly to the selected event

Tip: Ensure your event details are accurate before creating the block, as this information will flow into your inventory and pricing setup.

Group Only Events - Create New Group

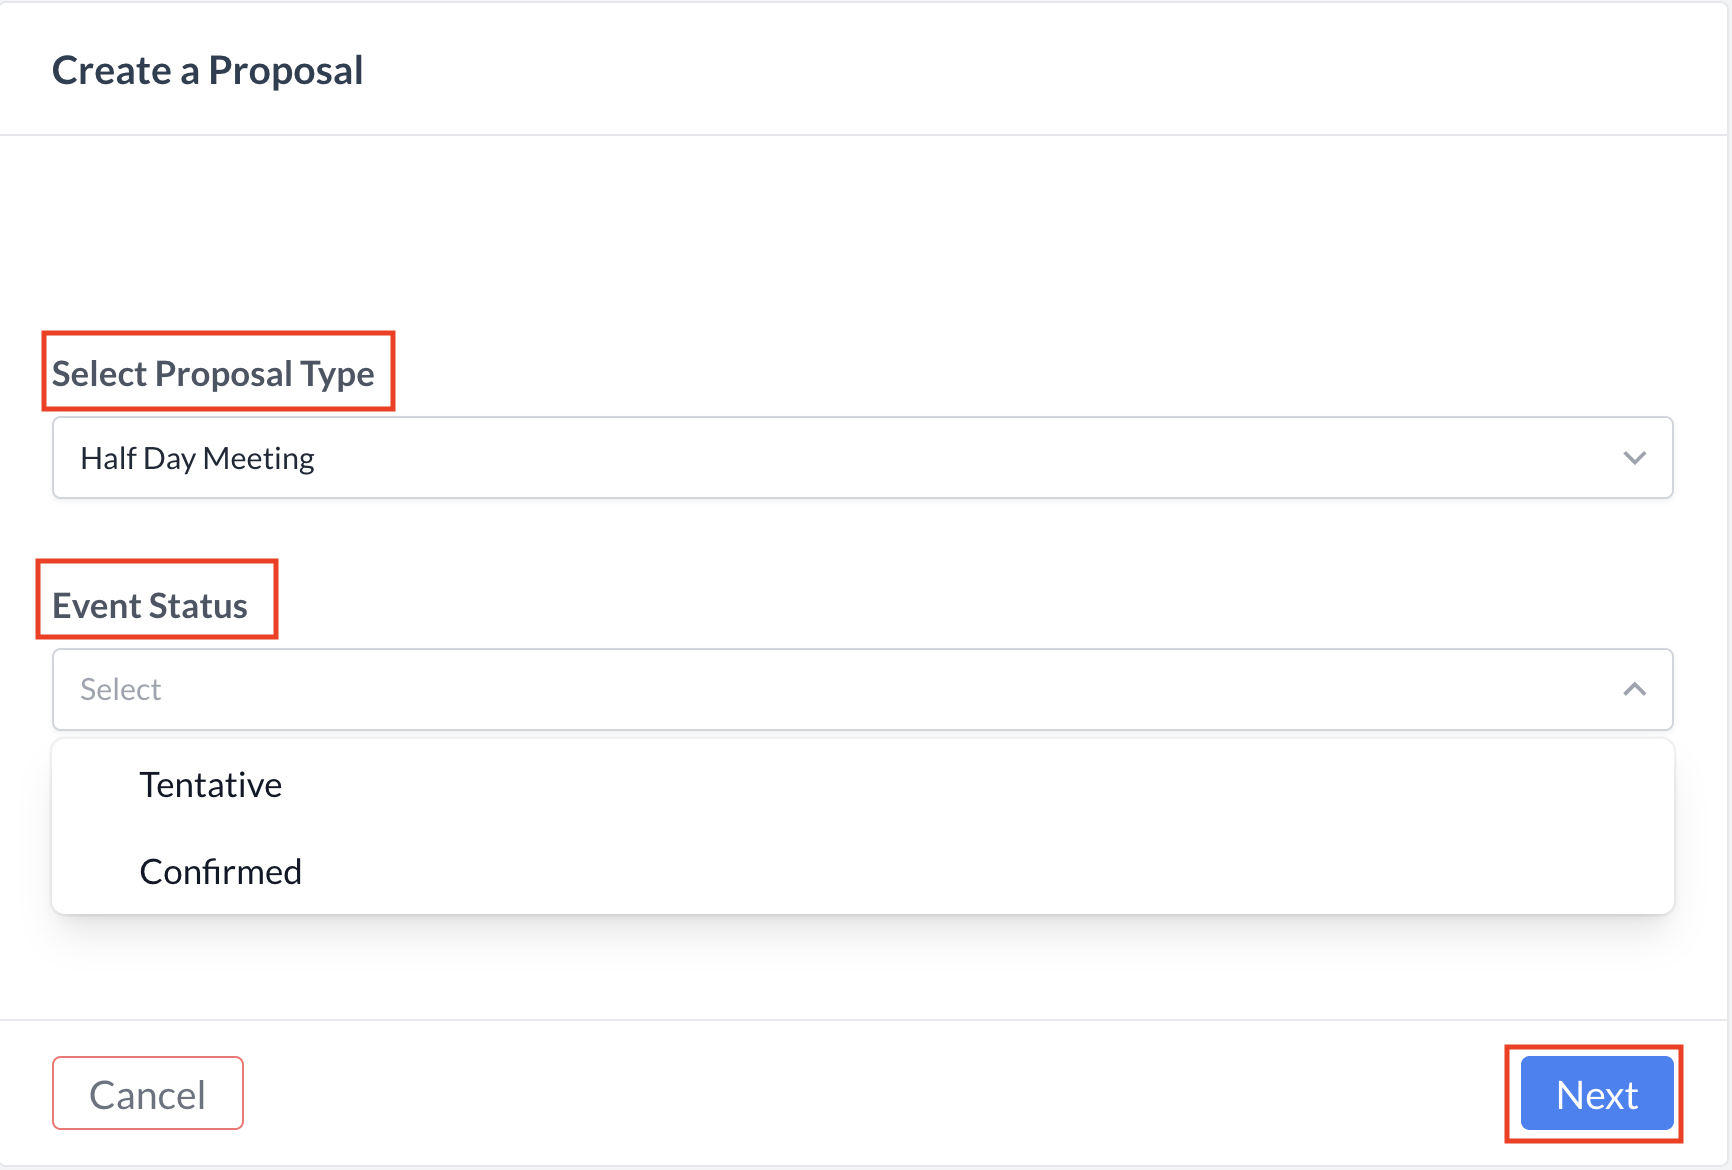
Select Proposal Type and Status:

  • From the Proposal Type dropdown menu, select the option that best matches the group master you are creating.

  • Choose the starting status for the event—either Tentative or Confirmed.

    ⚠️ Note: If no status is selected, the group will default to Prospect status.

Once both fields are completed, click the blue "Next" button to continue.

Selecting the correct proposal type and status ensures the appropriate template and configuration settings are automatically applied during the group creation and conversion process.

Create a Proposal Screen


Step 1a: Basic Data - Enter Event Information

Begin by completing the Event Information tab with the following details:

  • Name: Enter the name of the proposed event.

  • When do you want to schedule the event?

    • Start Date: Use the date picker to select the first day of the event.

    • End Date: Use the date picker to select the last day of the event.

  • Select Source: Choose the lead source (e.g., referral, website, phone inquiry) from the dropdown menu.

  • Sub Status: This field will default to “Open” for new inquiries. You may select a different status from the dropdown if needed.

  • Max Attendees: Enter the maximum number of attendees expected for the event.

  • Estimated Event Revenue: Enter the total anticipated revenue the event is expected to generate.

  • Remarks: Add any relevant notes or comments about the lead or event.

  • Custom Fields: Enter relevant information.

  • ⚠️ Note: Custom Fields are created by the property EK Admin and will be unique to each hotel.

✅ Once all required fields are filled out, proceed to the next step by clicking the Group Block tab.

Basic Data - Event Information Screen


Step 1b: Complete the Group Block Information

Navigate to the Group Block tab and enter the following details:

  • Total Rooms: Enter the total number of room nights (allocations) needed for the entire event duration.

  • Max Allocations per Night: Specify the maximum number of rooms to be allocated per night.

  • Estimated Room Rate: Enter the average nightly rate for the group block.

  • Estimated Room Revenue: This value is automatically calculated based on the Total Rooms × Estimated Room Rate.

✅ Once all required fields are filled out, proceed to the next step by clicking the Other Information tab.

Group Block Tab


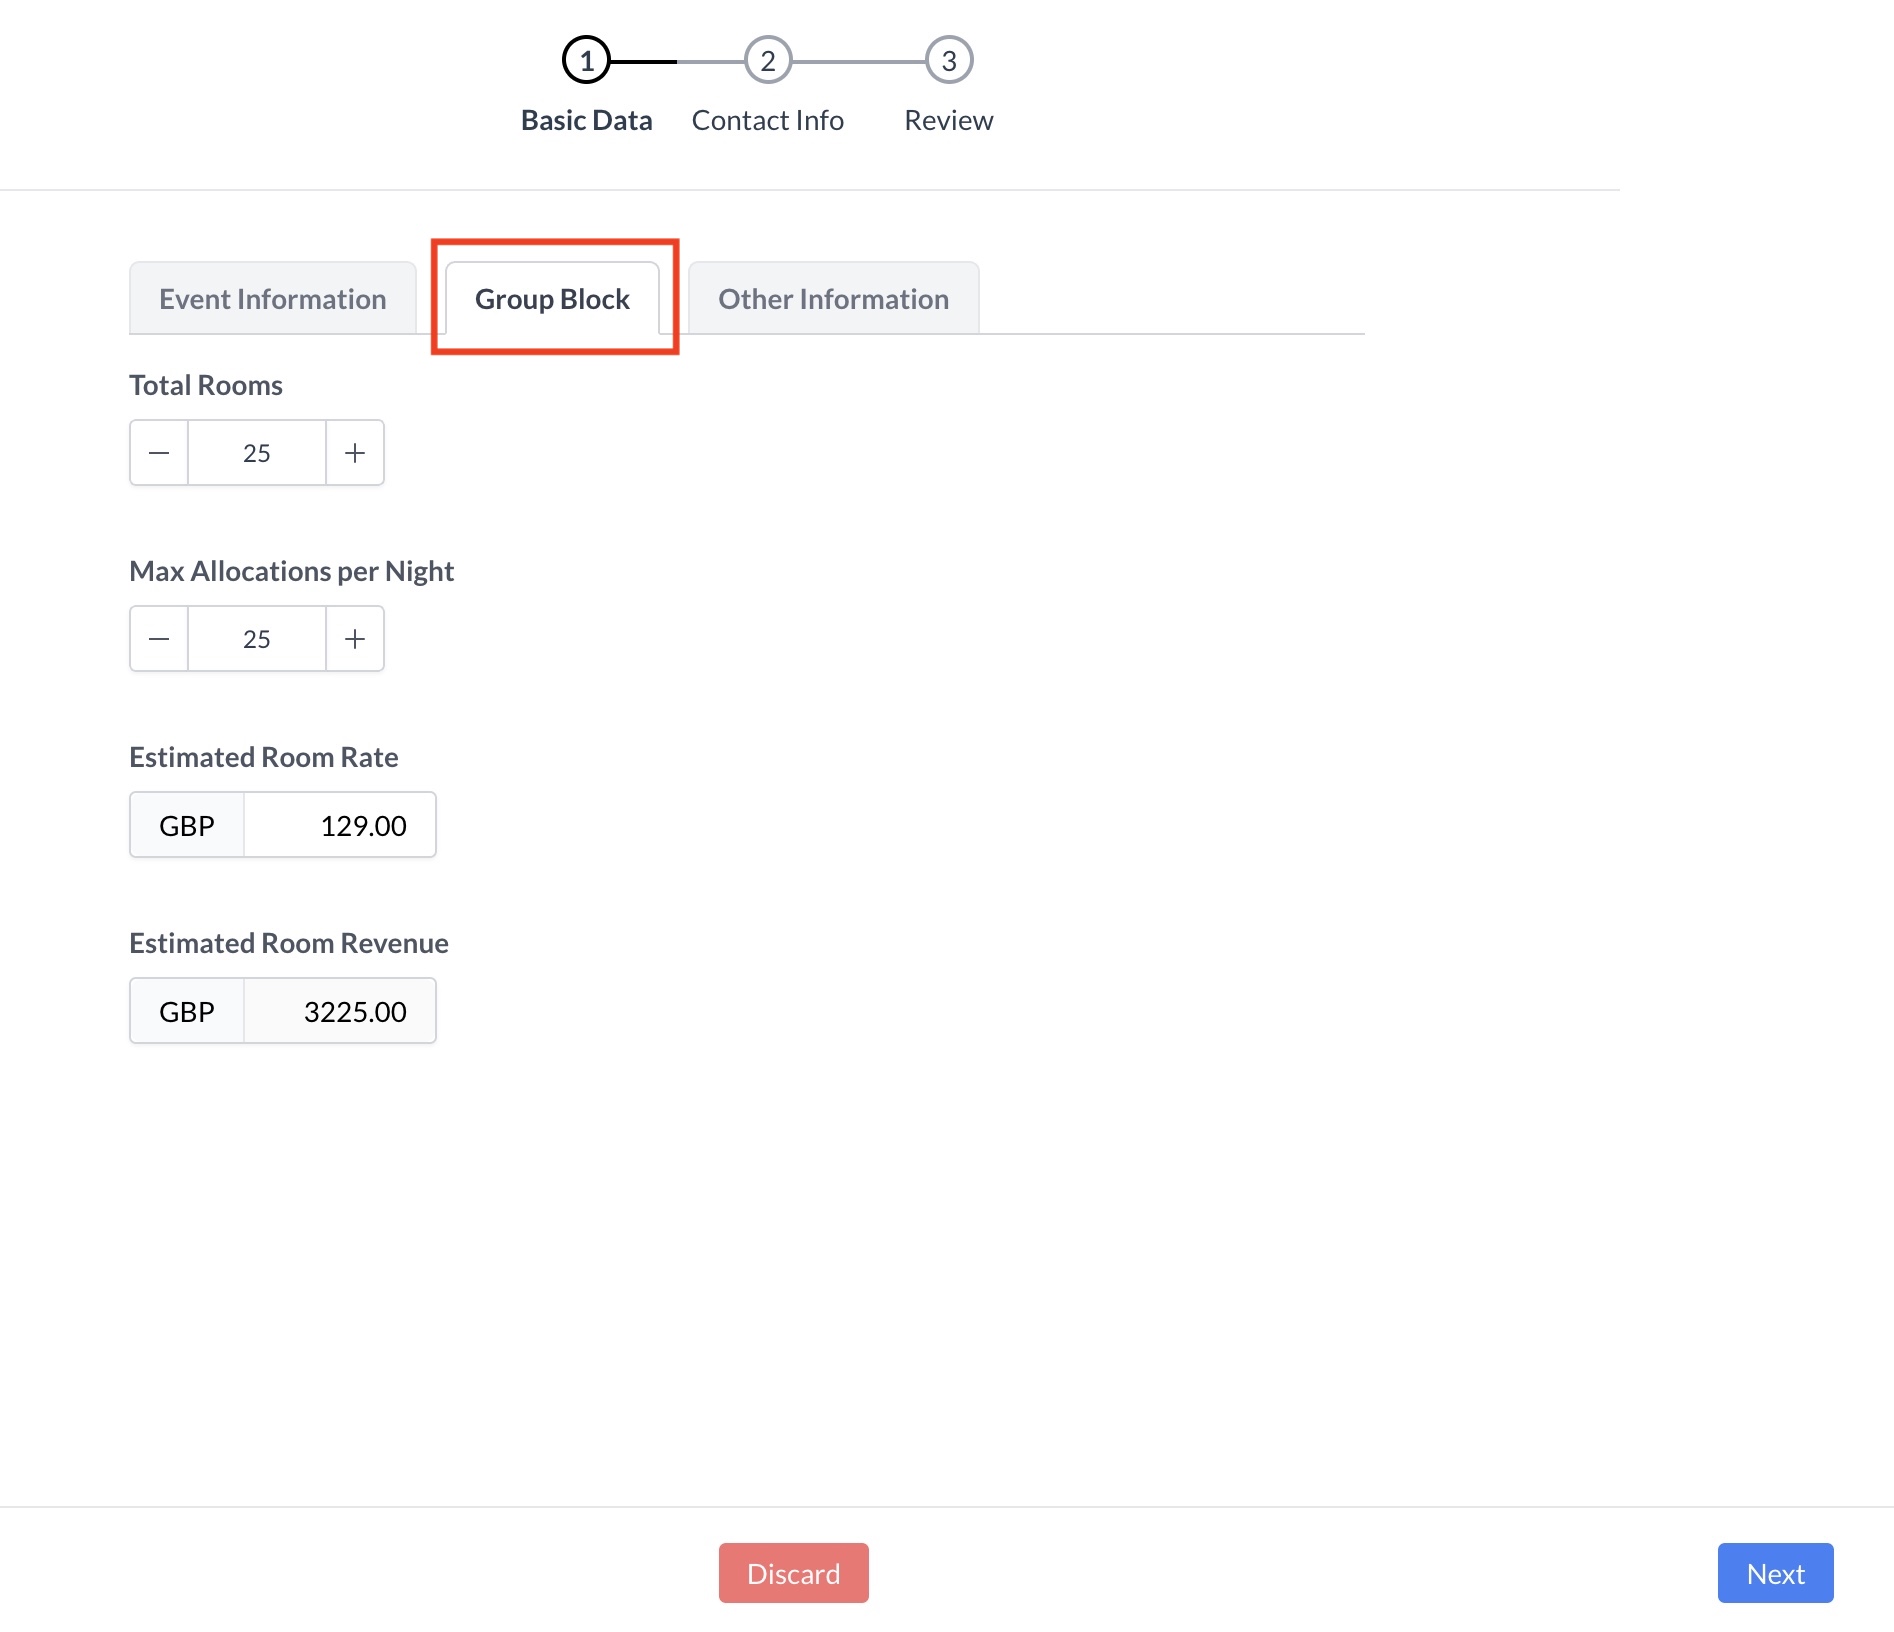
Step 1c: Basic Data Complete Other Information

On the Other Information tab, enter the following details to help categorize and assign responsibility for the event:

  • Market Segment:
    Use the dropdown to select the appropriate market segment code. This categorizes the event for reporting purposes and helps track revenue and room nights across different guest types.

  • Booking Type:
    Choose the booking type from the dropdown that best describes the nature of the event (e.g., corporate, social, government).

  • Event Manager:
    Select the onsite event manager who will be responsible for overseeing the event.

  • Catering Contact:
    Select the onsite catering contact who will be responsible for managing the event catering.

  • Group Sales Representative:
    Choose the group sales representative assigned to manage the sales process for this group.

  • Conference Coordinator:
    Select the onsite conference coordinator who will assist in overseeing the event.

  • Group Sales Administrator:
    Select the sales administrator who will assist with managing the group booking and related tasks.

  • DUNS Number:
    Enter the nine-digit D-U-N-S® Number, a unique business identifier issued by Dun & Bradstreet, if applicable.

✅ Once all fields are completed, proceed to the next step by clicking the Next button.

Basic Data - Other Information Screen


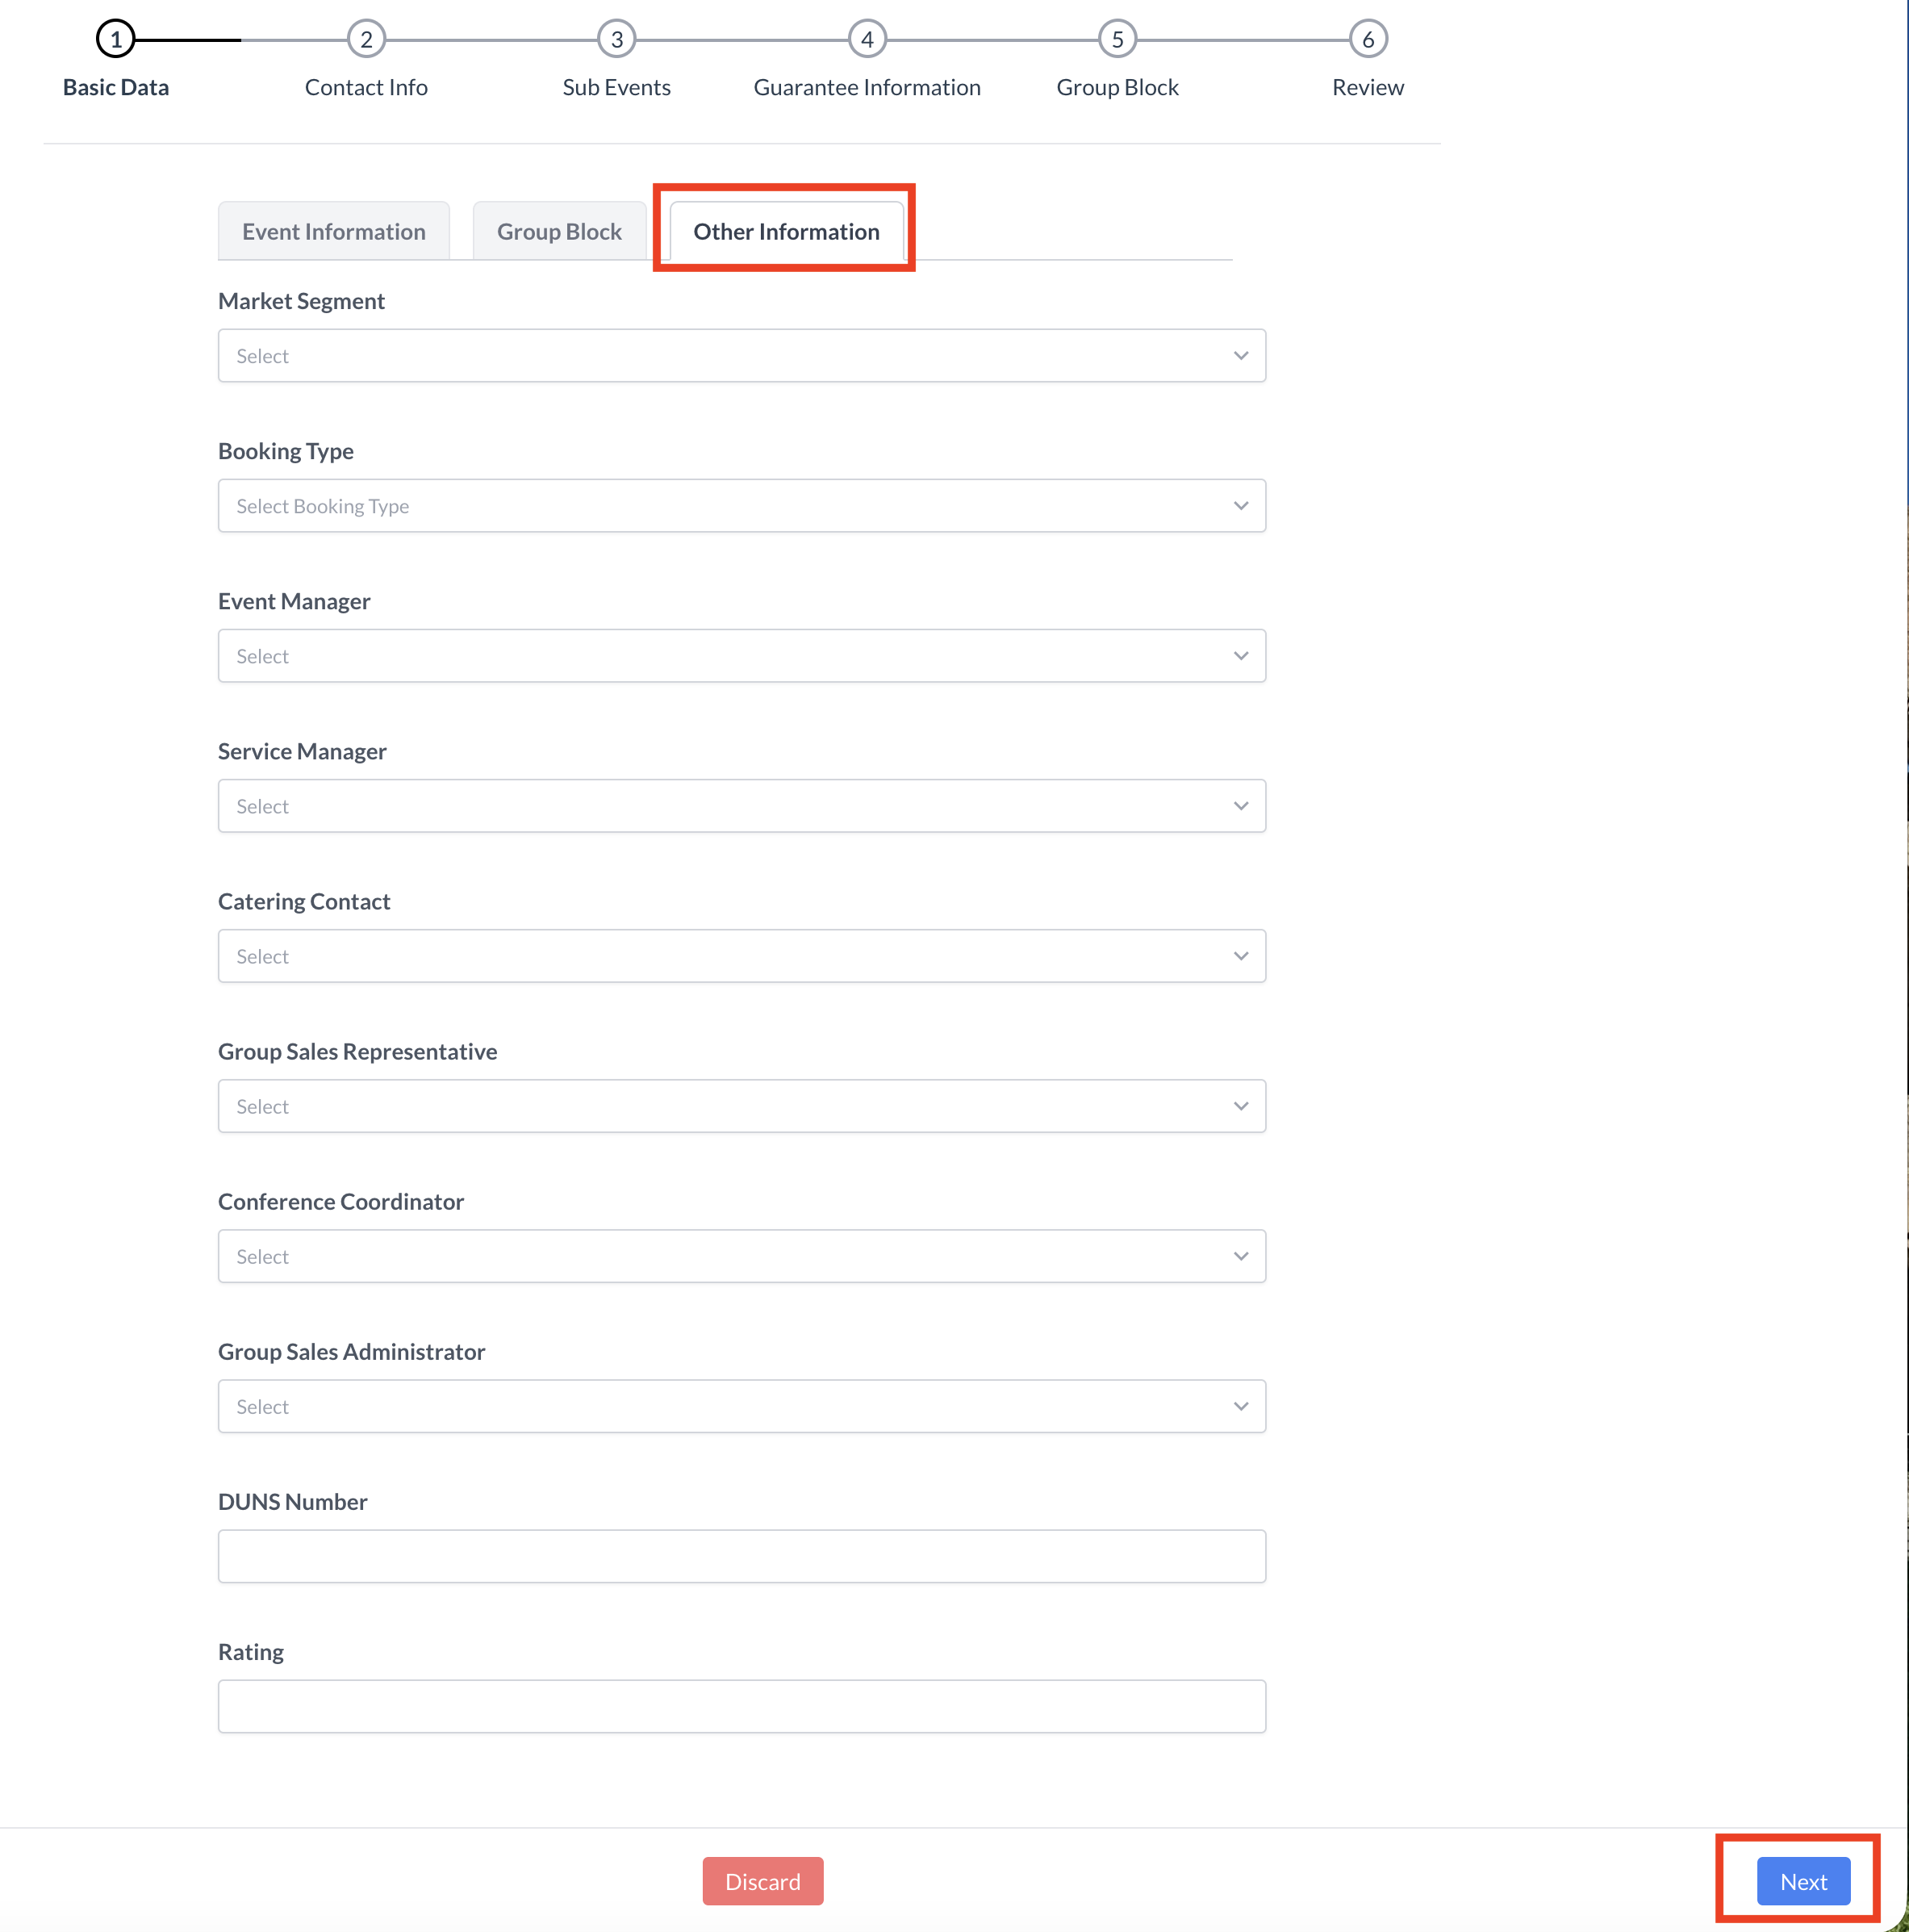
Step 2a: Enter Contact Information

On the Contact Info screen, enter the booker's details, including:

  • First Name

  • Last Name

  • Address

  • Country

  • Postal Code

  • City

  • State

  • Phone Number

  • Email Address

🔍 If the booker is a returning guest, click Select Existing Guest to search for and attach an existing guest record to the inquiry.

➡️ If the booker is not associated with a company or travel agent, click the blue Next button to continue. If they are, proceed to the next step to add company or agency details.

Contact Info - New or Existing Guest


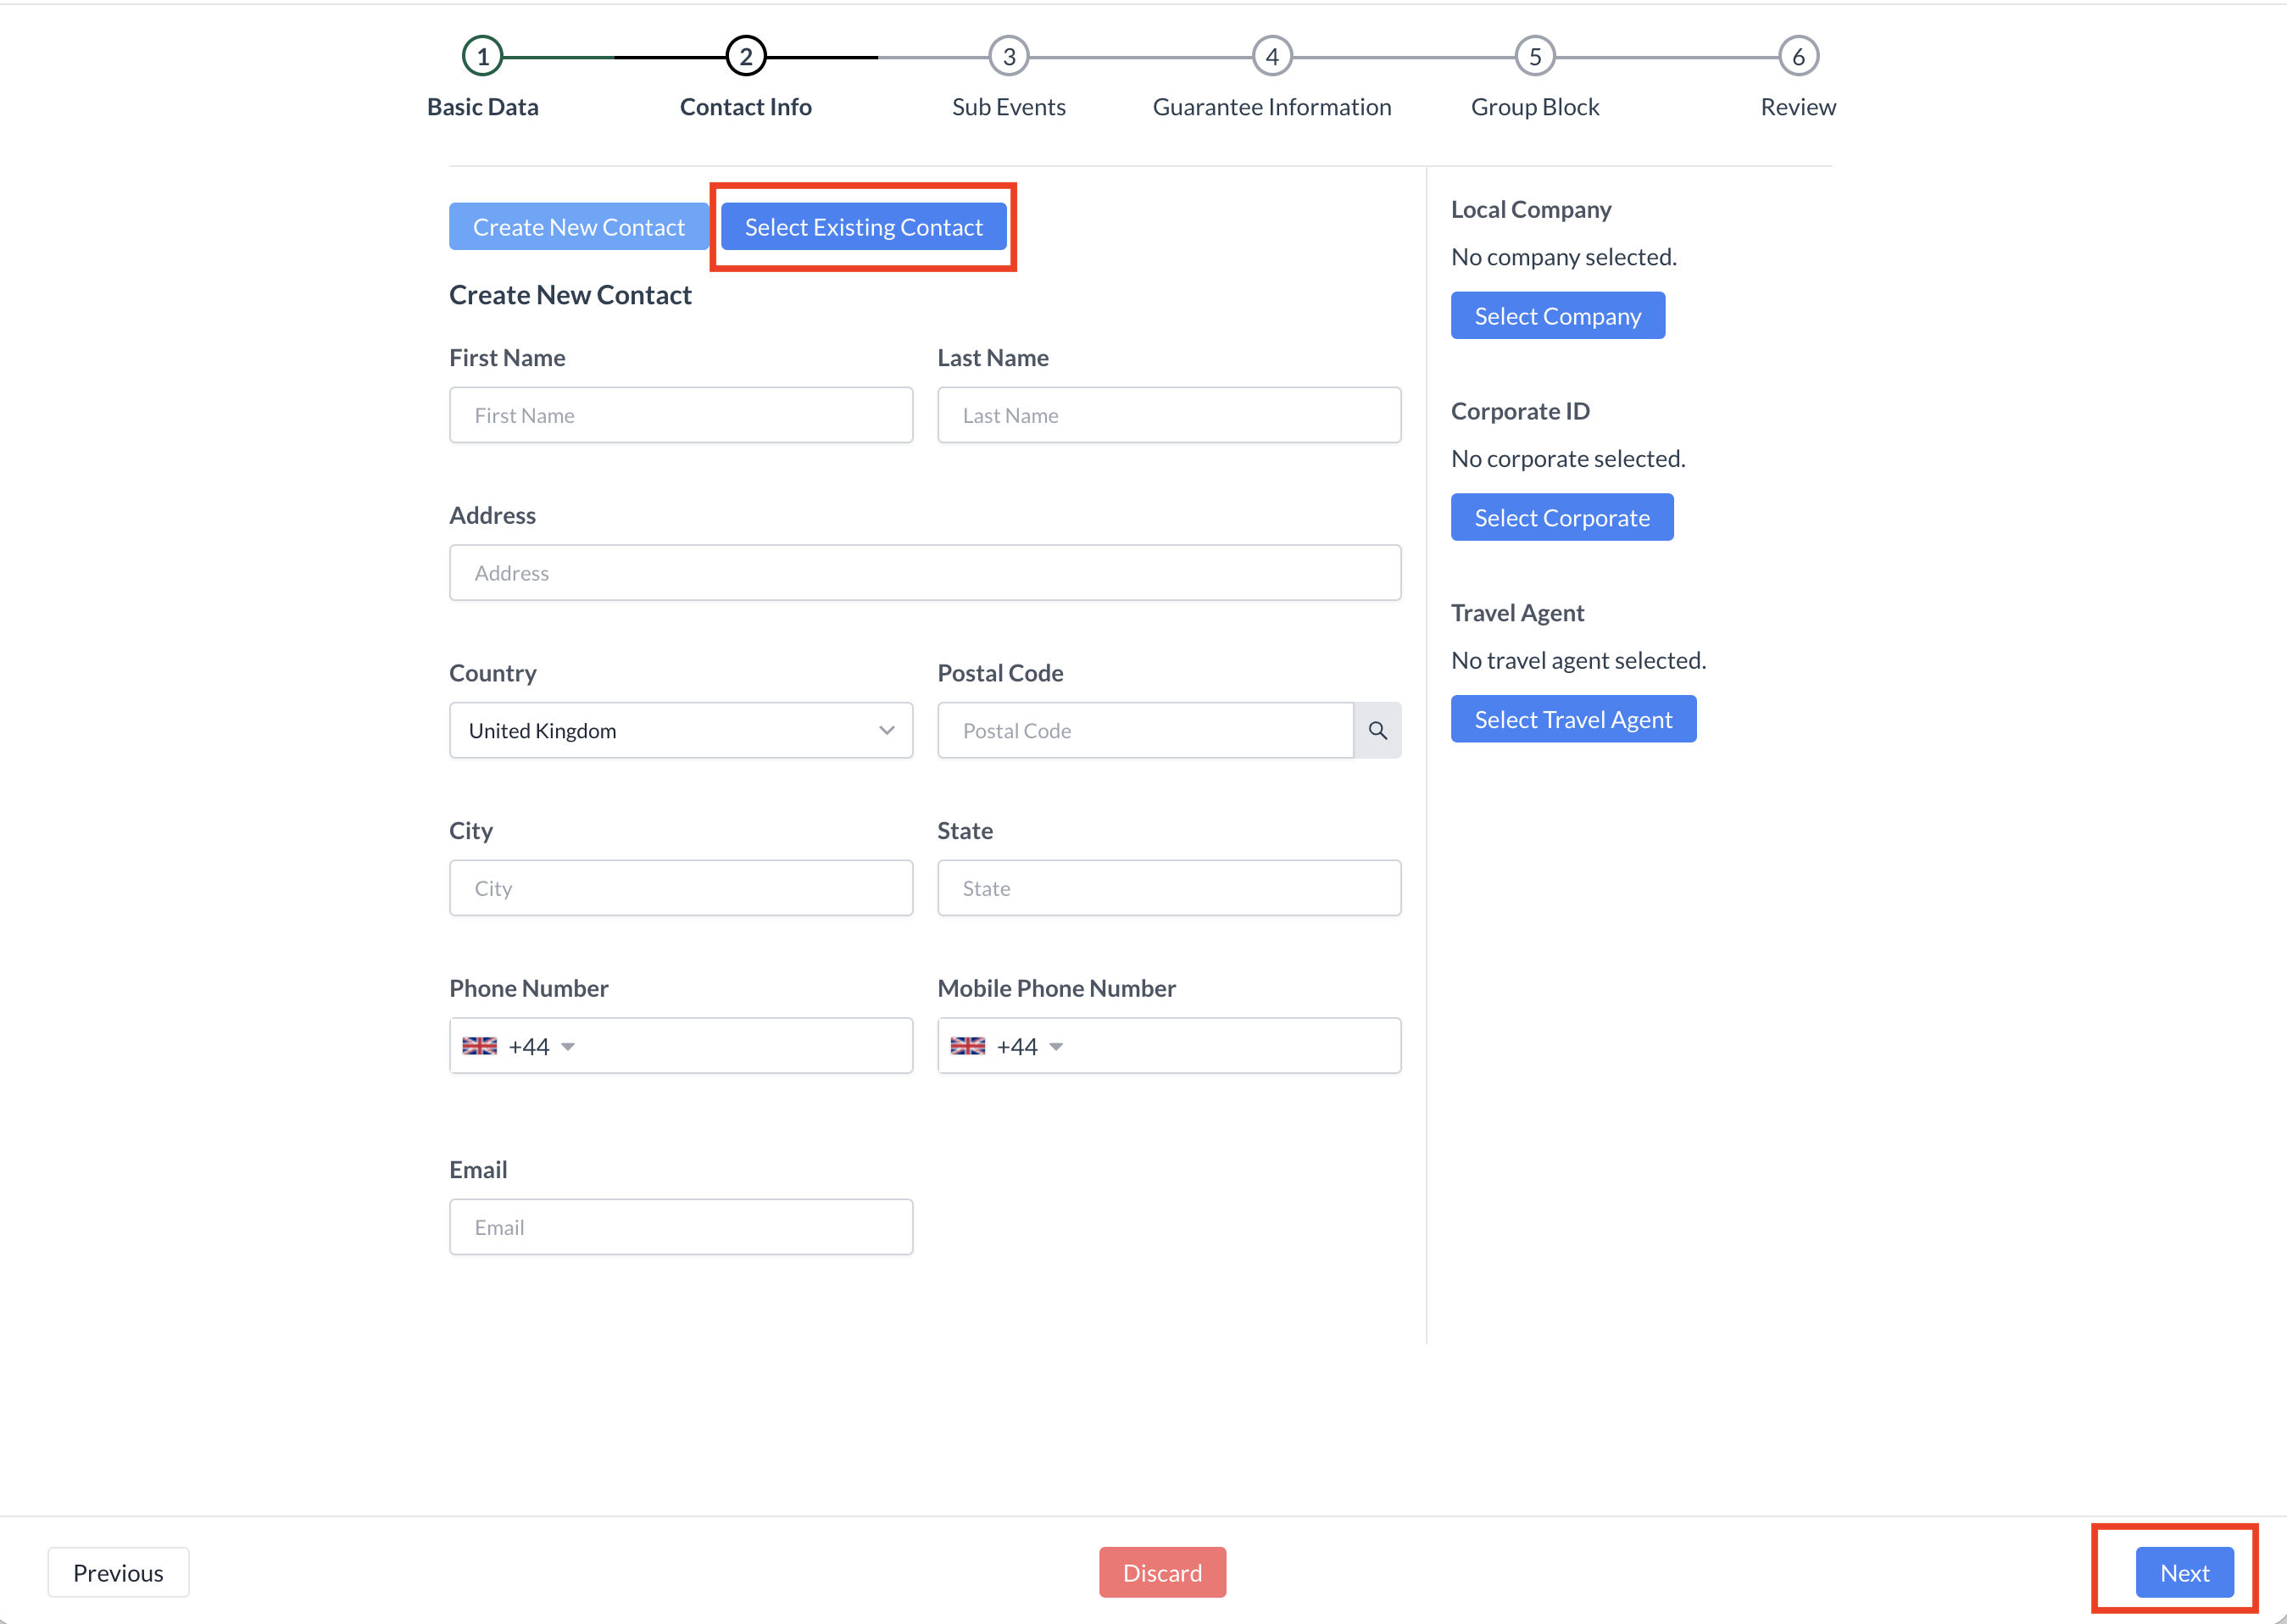
Step 2b: Add a Company Profile (If Applicable)

If the booker is associated with a company, follow these steps to attach a company profile:

  1. Click the Local Company button.

  2. In the search box, enter the name of the company you want to find.

  3. From the list of matching results, click on the company name to select it.

  4. Click the blue Confirm button to attach the company profile to the booker's contact details.

✅ Once confirmed, the company information will be linked to the inquiry.


Contact Info - Attaching a Company Profile

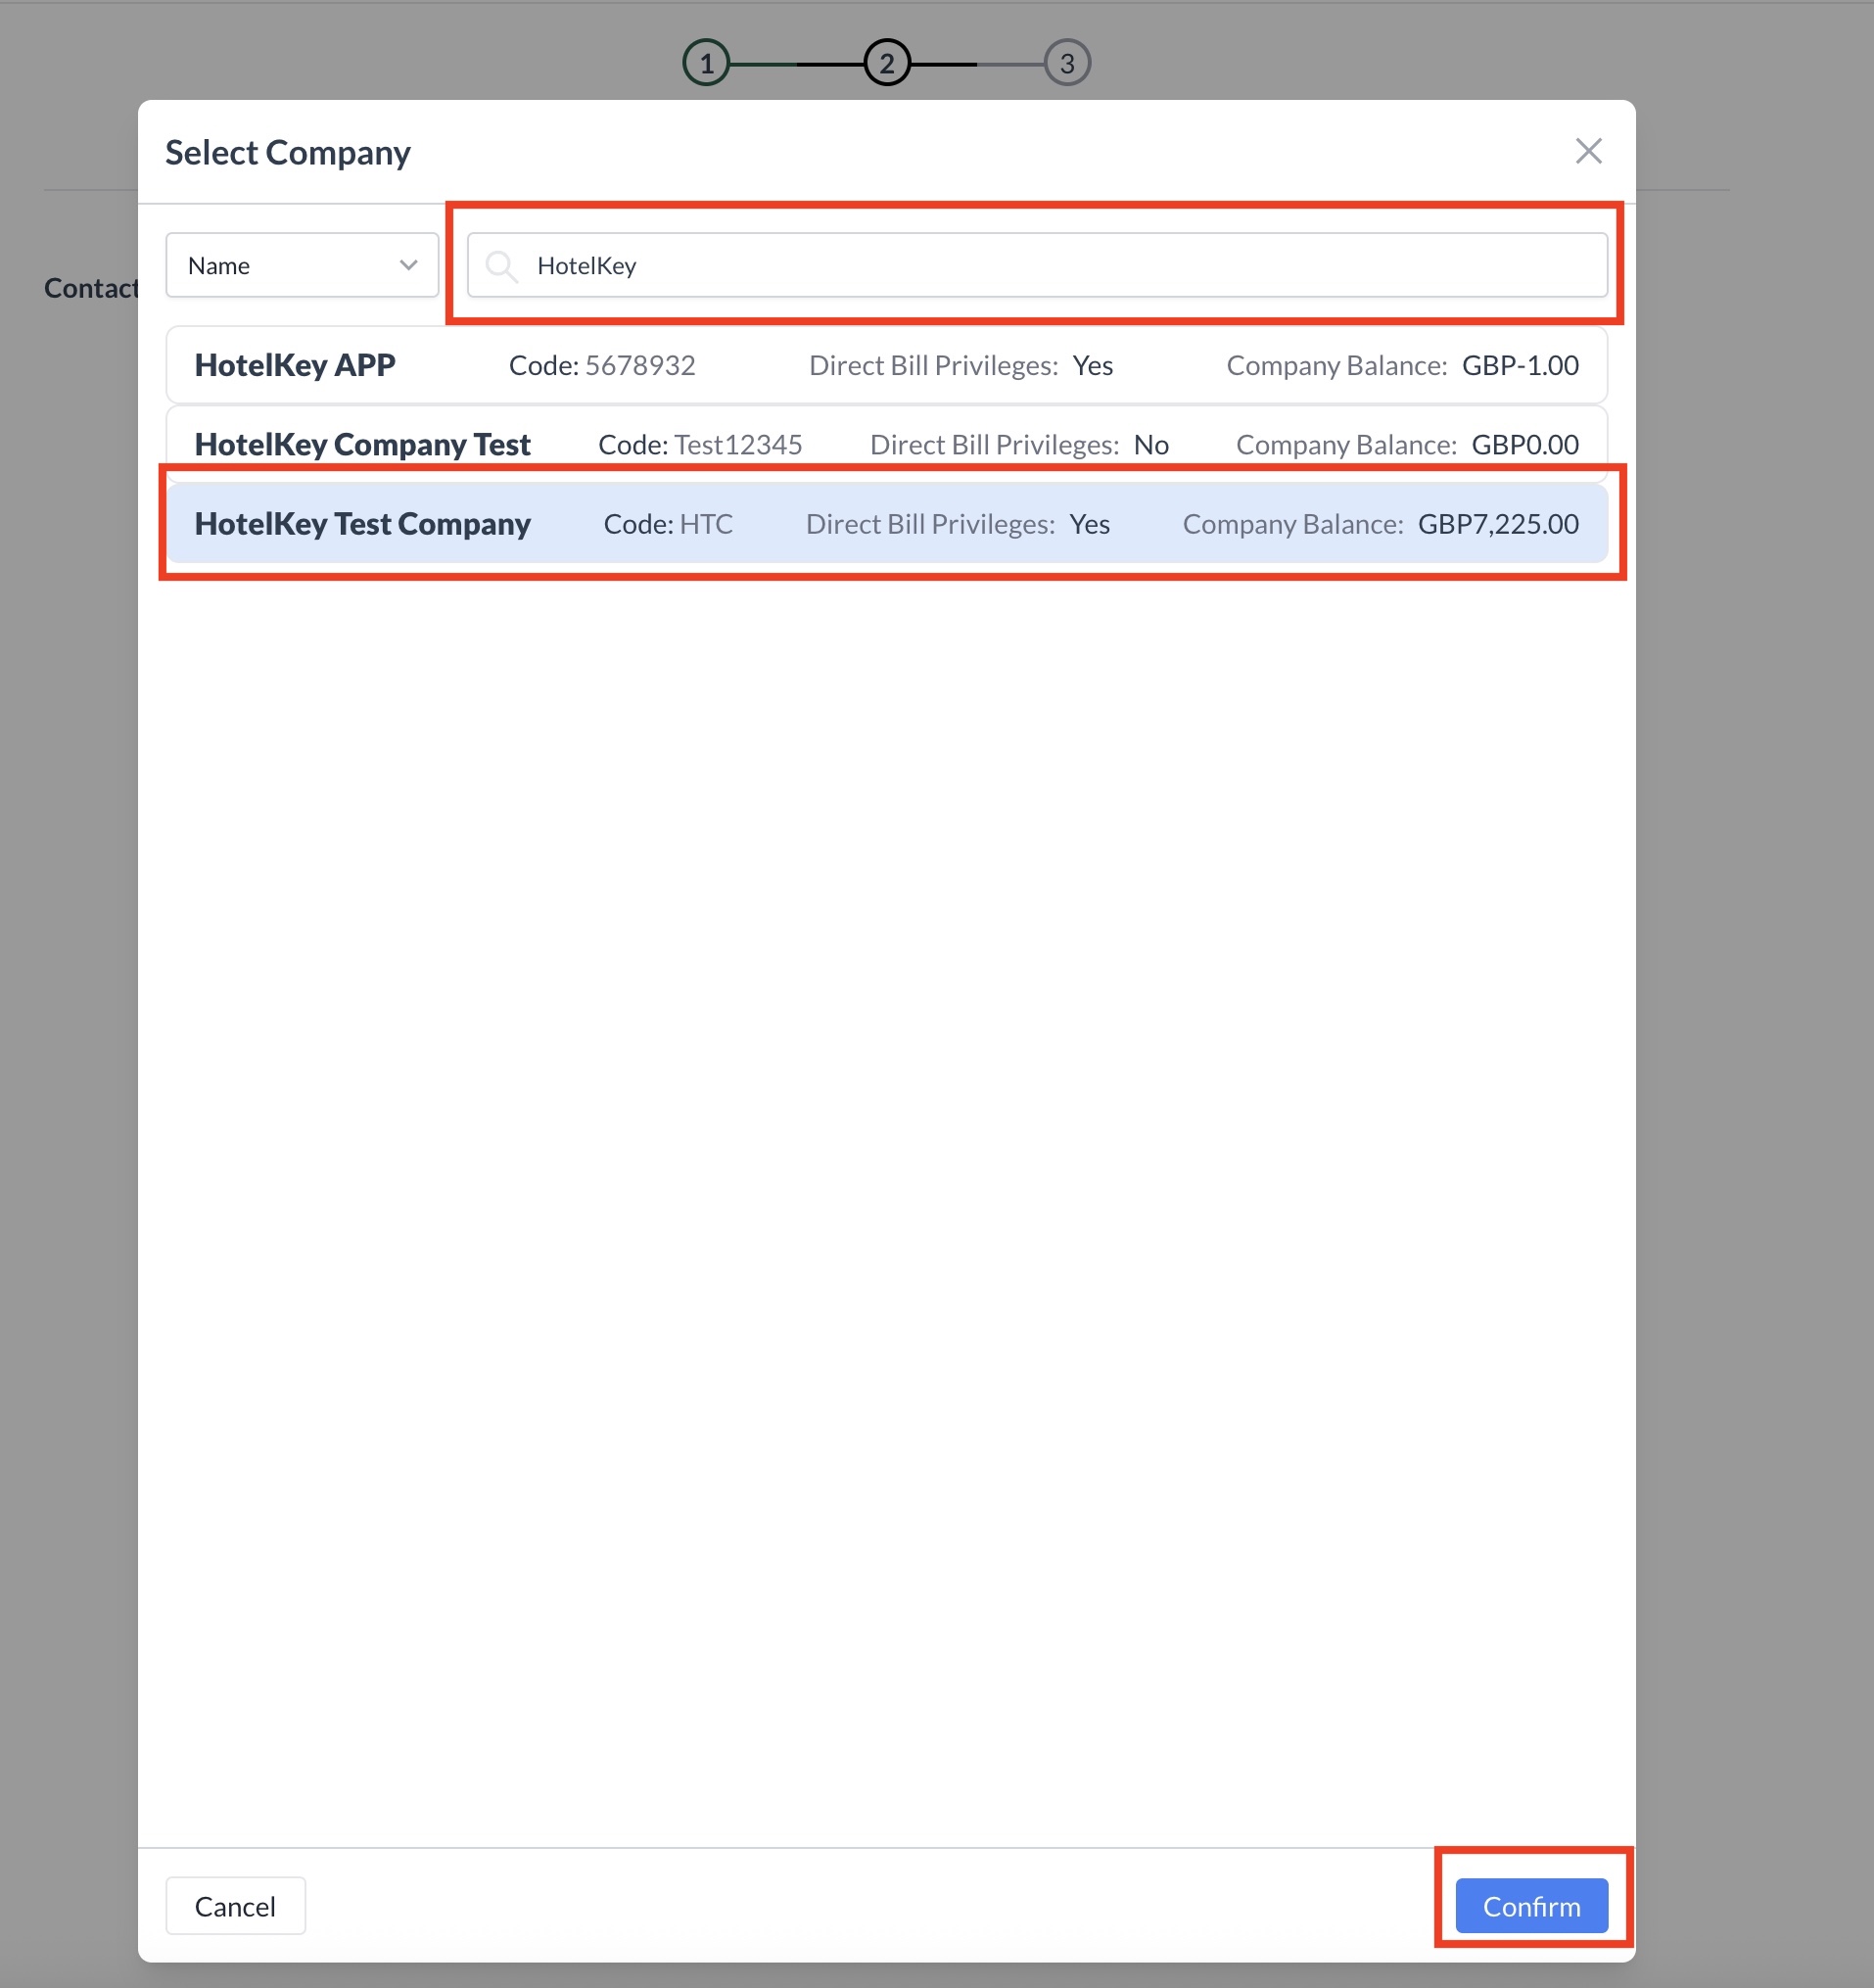
Step 2c: Add a Travel Agent (If Applicable)

If the booker is associated with a travel agency, follow these steps to attach the correct IATA profile:

  1. Click the Select Travel Agent button.

  2. In the search box, enter the travel agent’s name.

    • Alternatively, use the dropdown menu to switch the search type to IATA Code, then enter the agency’s IATA number.

  3. The system will return a list of matching results.

  4. Click on the correct IATA profile to select it.

  5. Click the blue Next button to attach the selected IATA profile to the booker's contact information.

Attaching the correct travel agency helps with accurate reporting and commission tracking.

Contact Info - Attaching a Travel Agent Profile


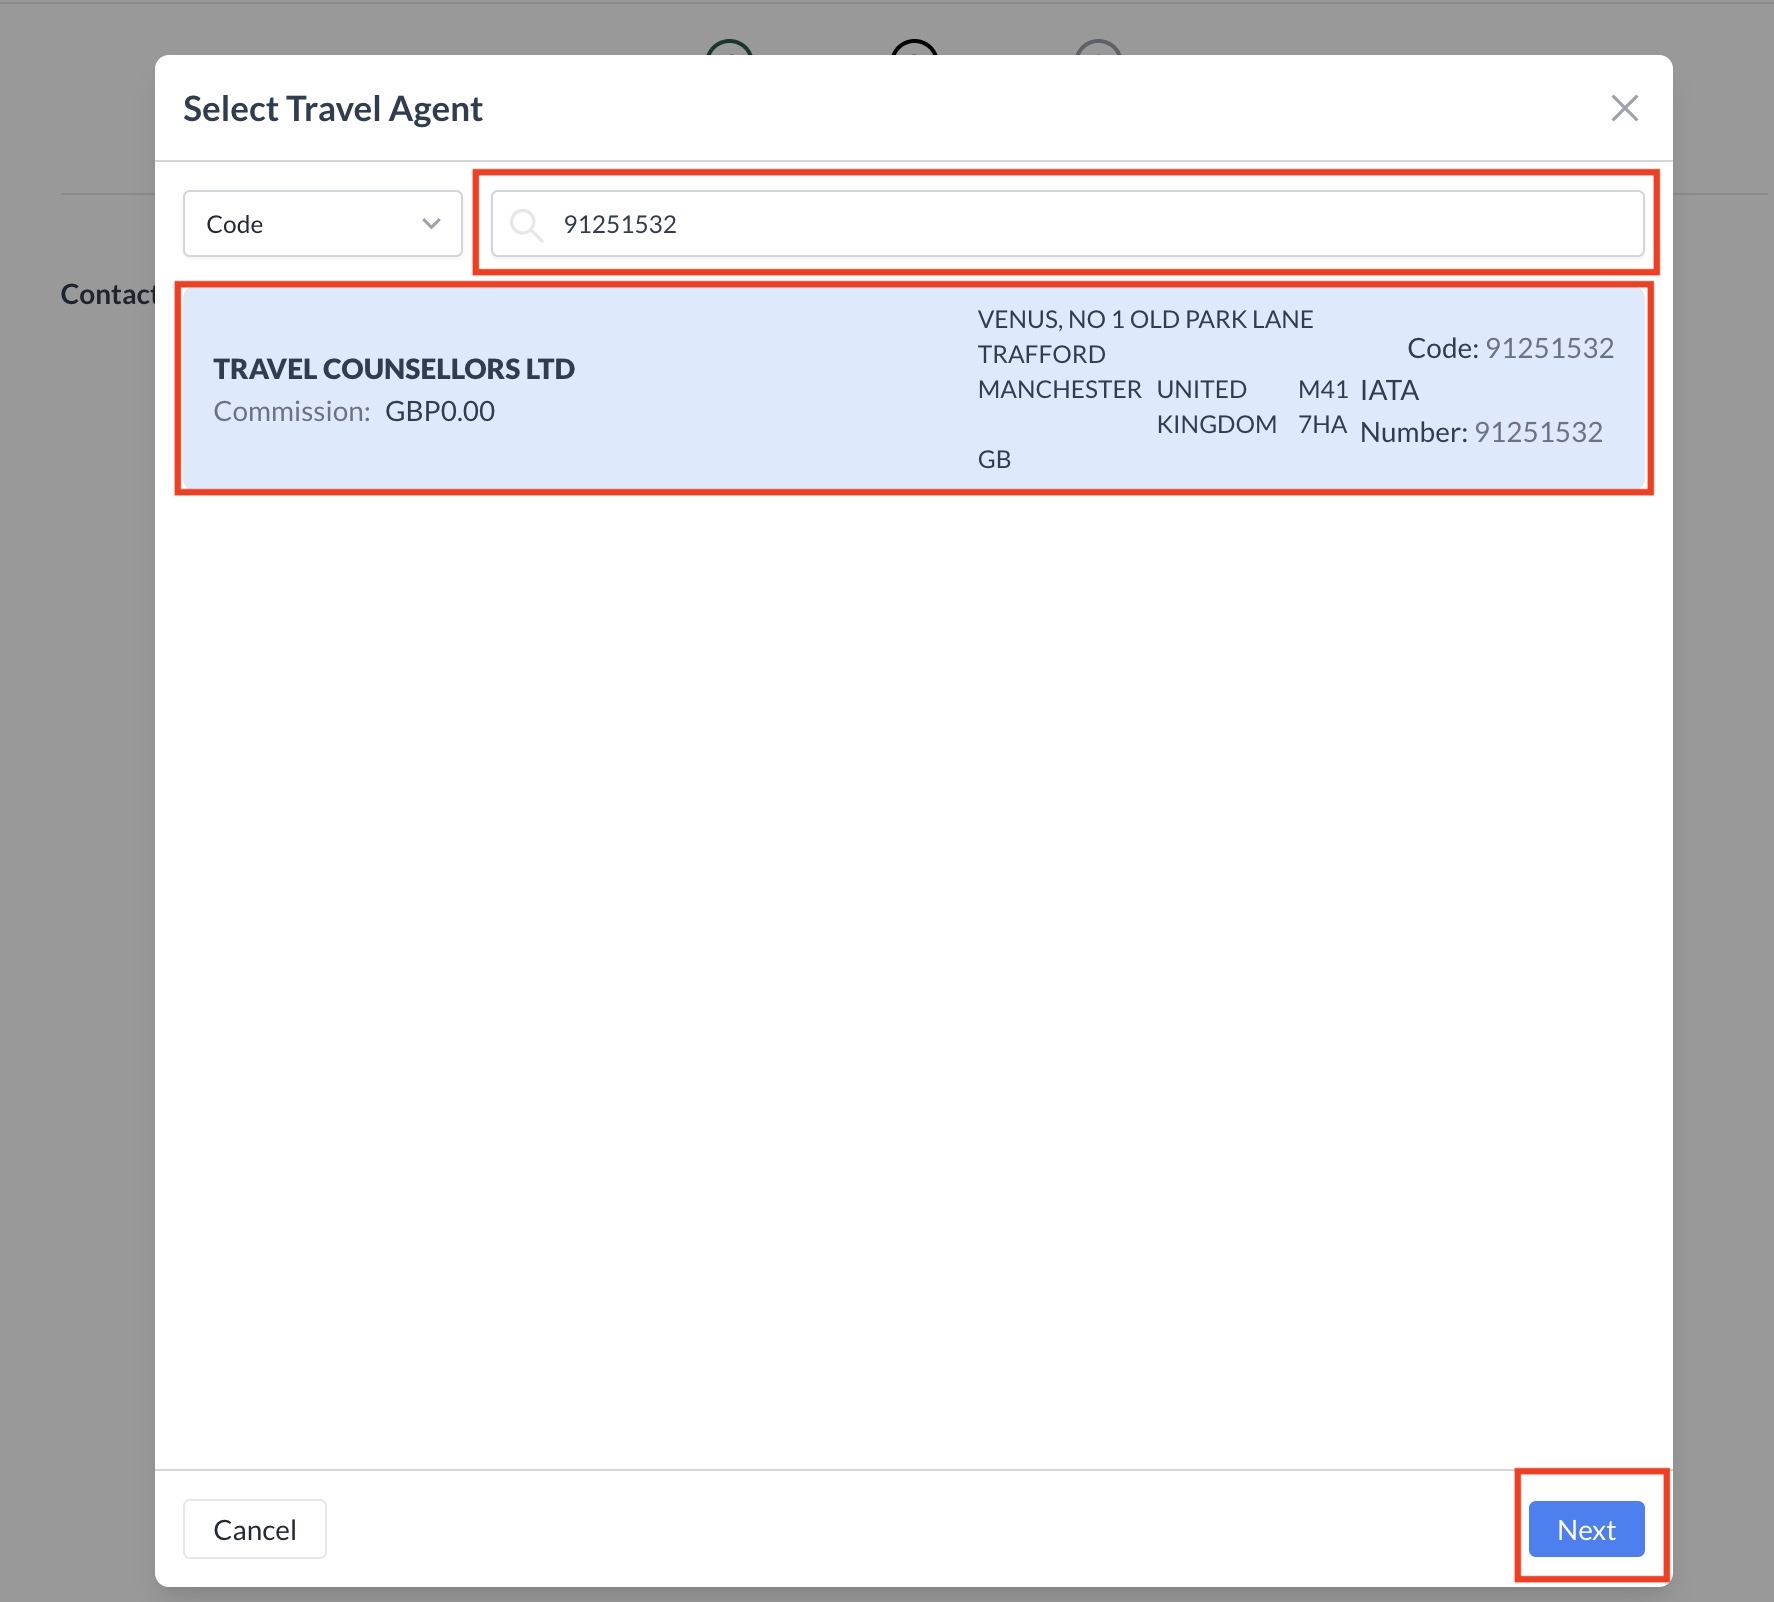
Proceed to the Next Step

Once the booker’s contact information is complete and any associated Company and/or IATA profiles have been successfully attached:

  • Click the blue _Next_ button to proceed to the Next Step.


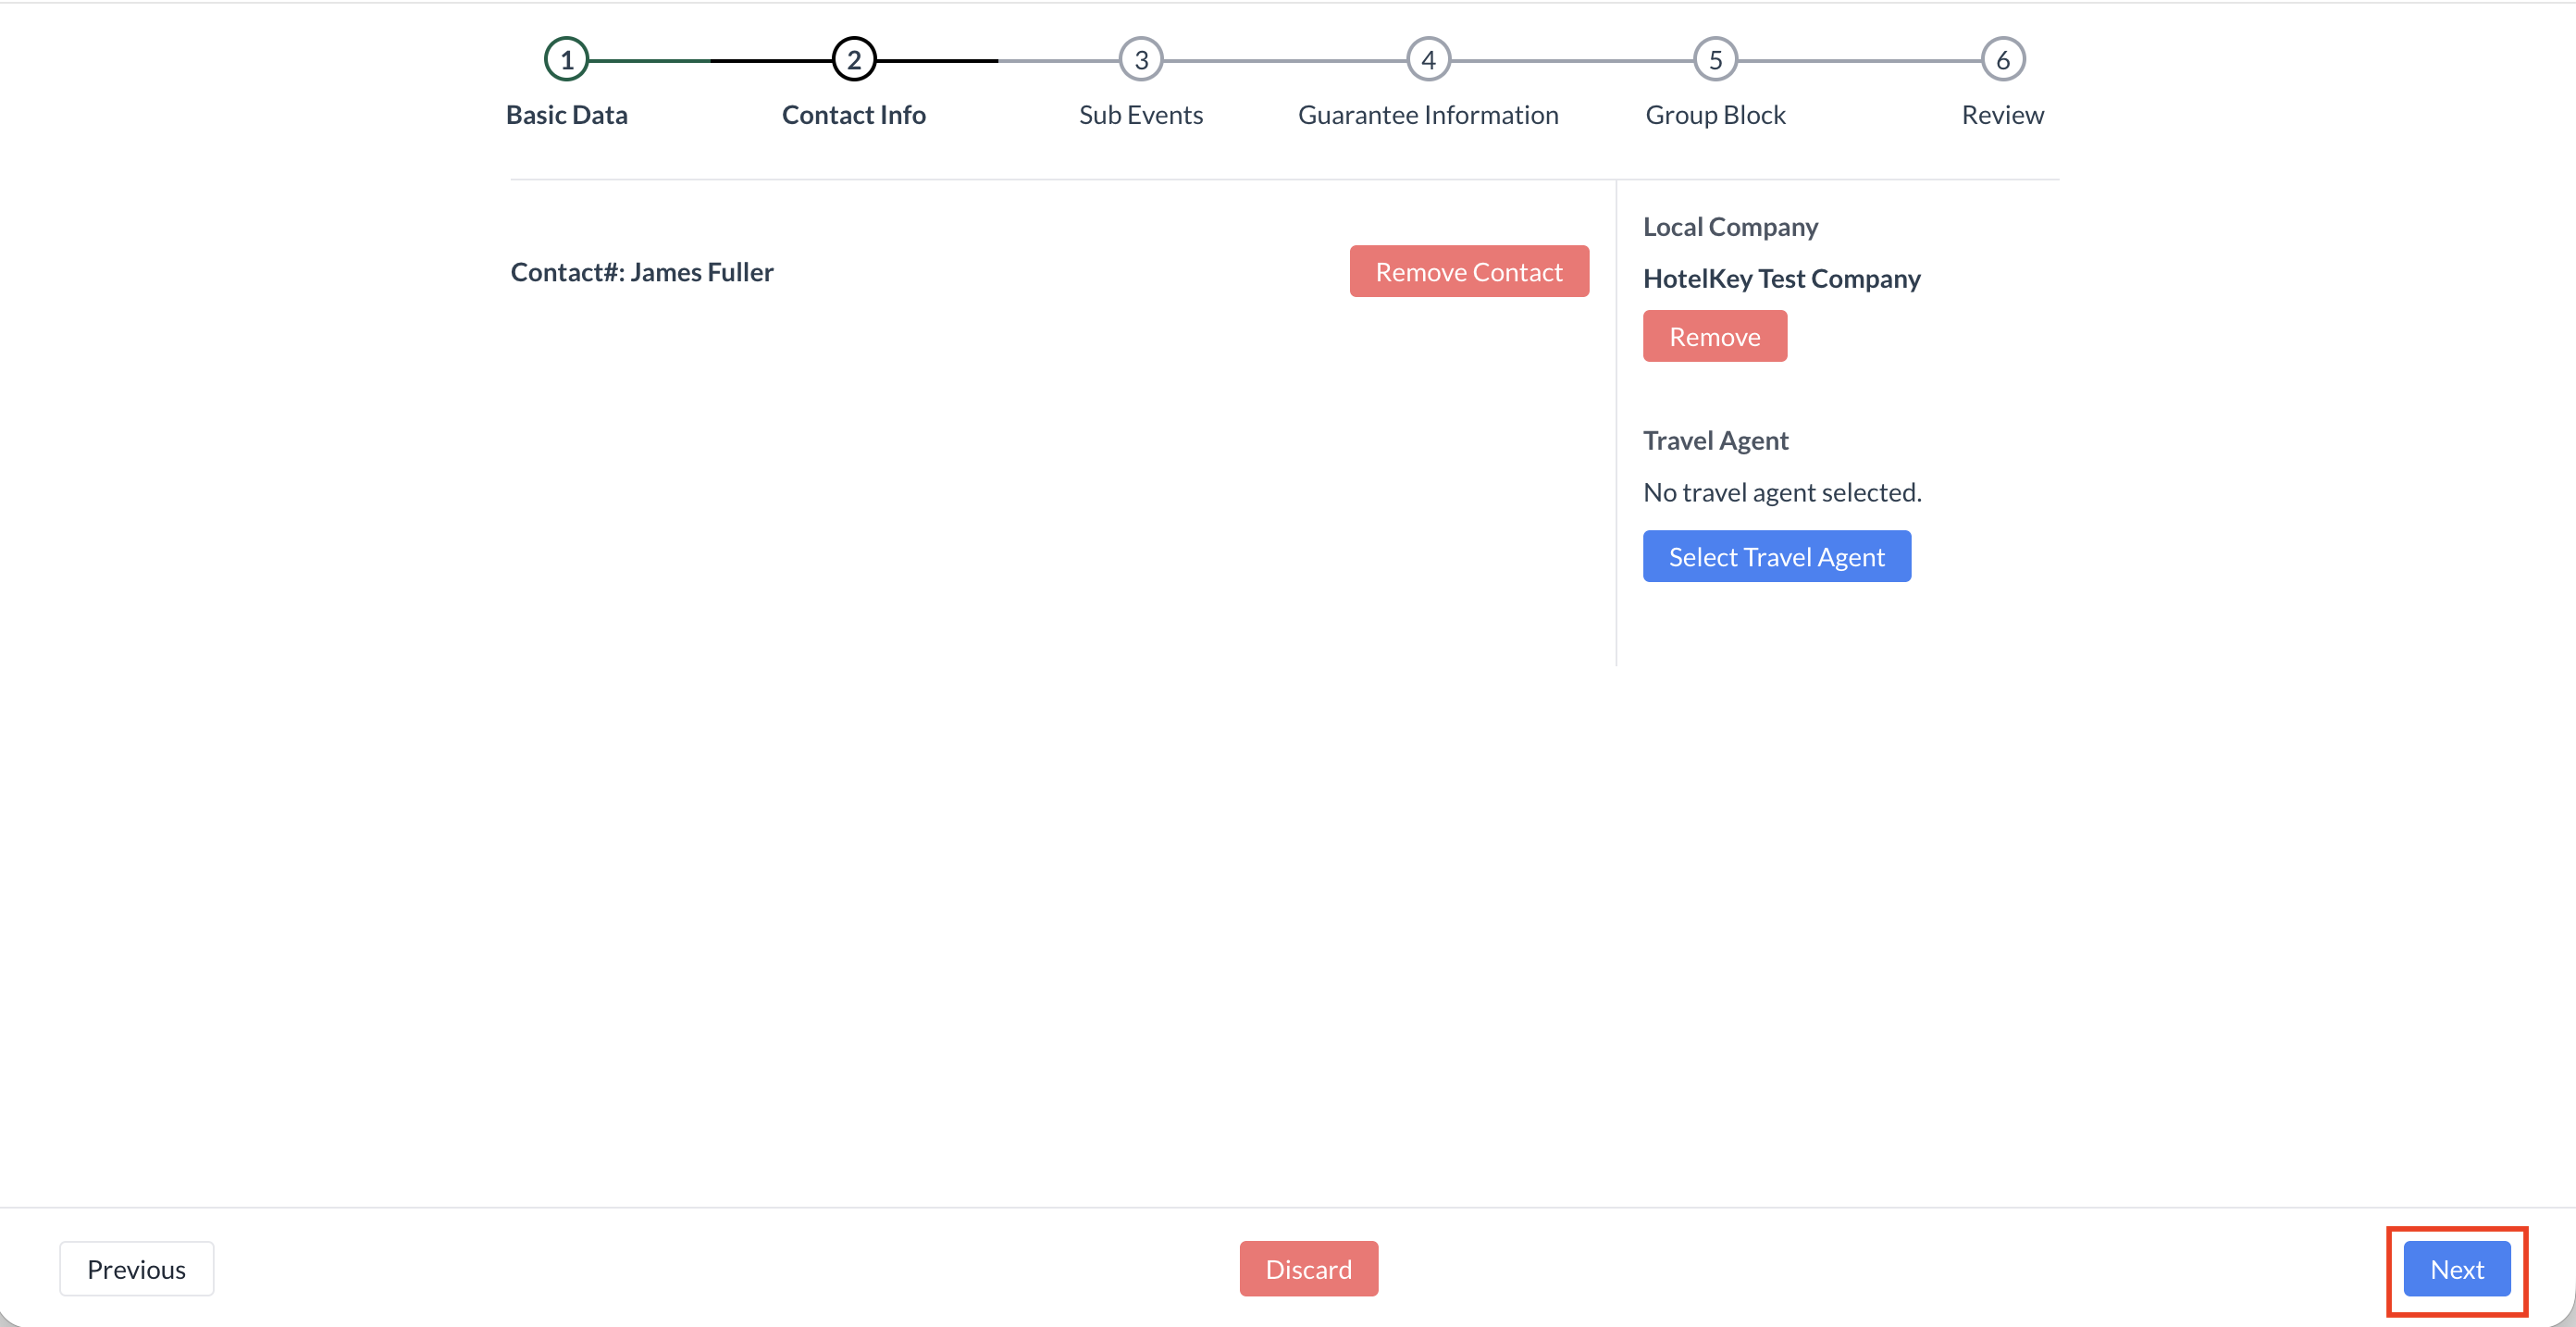
Step 3: Creating a New Group Block

To create a group block associated with this event:

  1. Click the blue “New Group Block” button.

This will open the group block setup screen, allowing you to define room block details, dates, and allocations linked directly to the event.

Group Block - New Group Block Button


Step 3a: Creating a New Group Block – Basic Data Screen

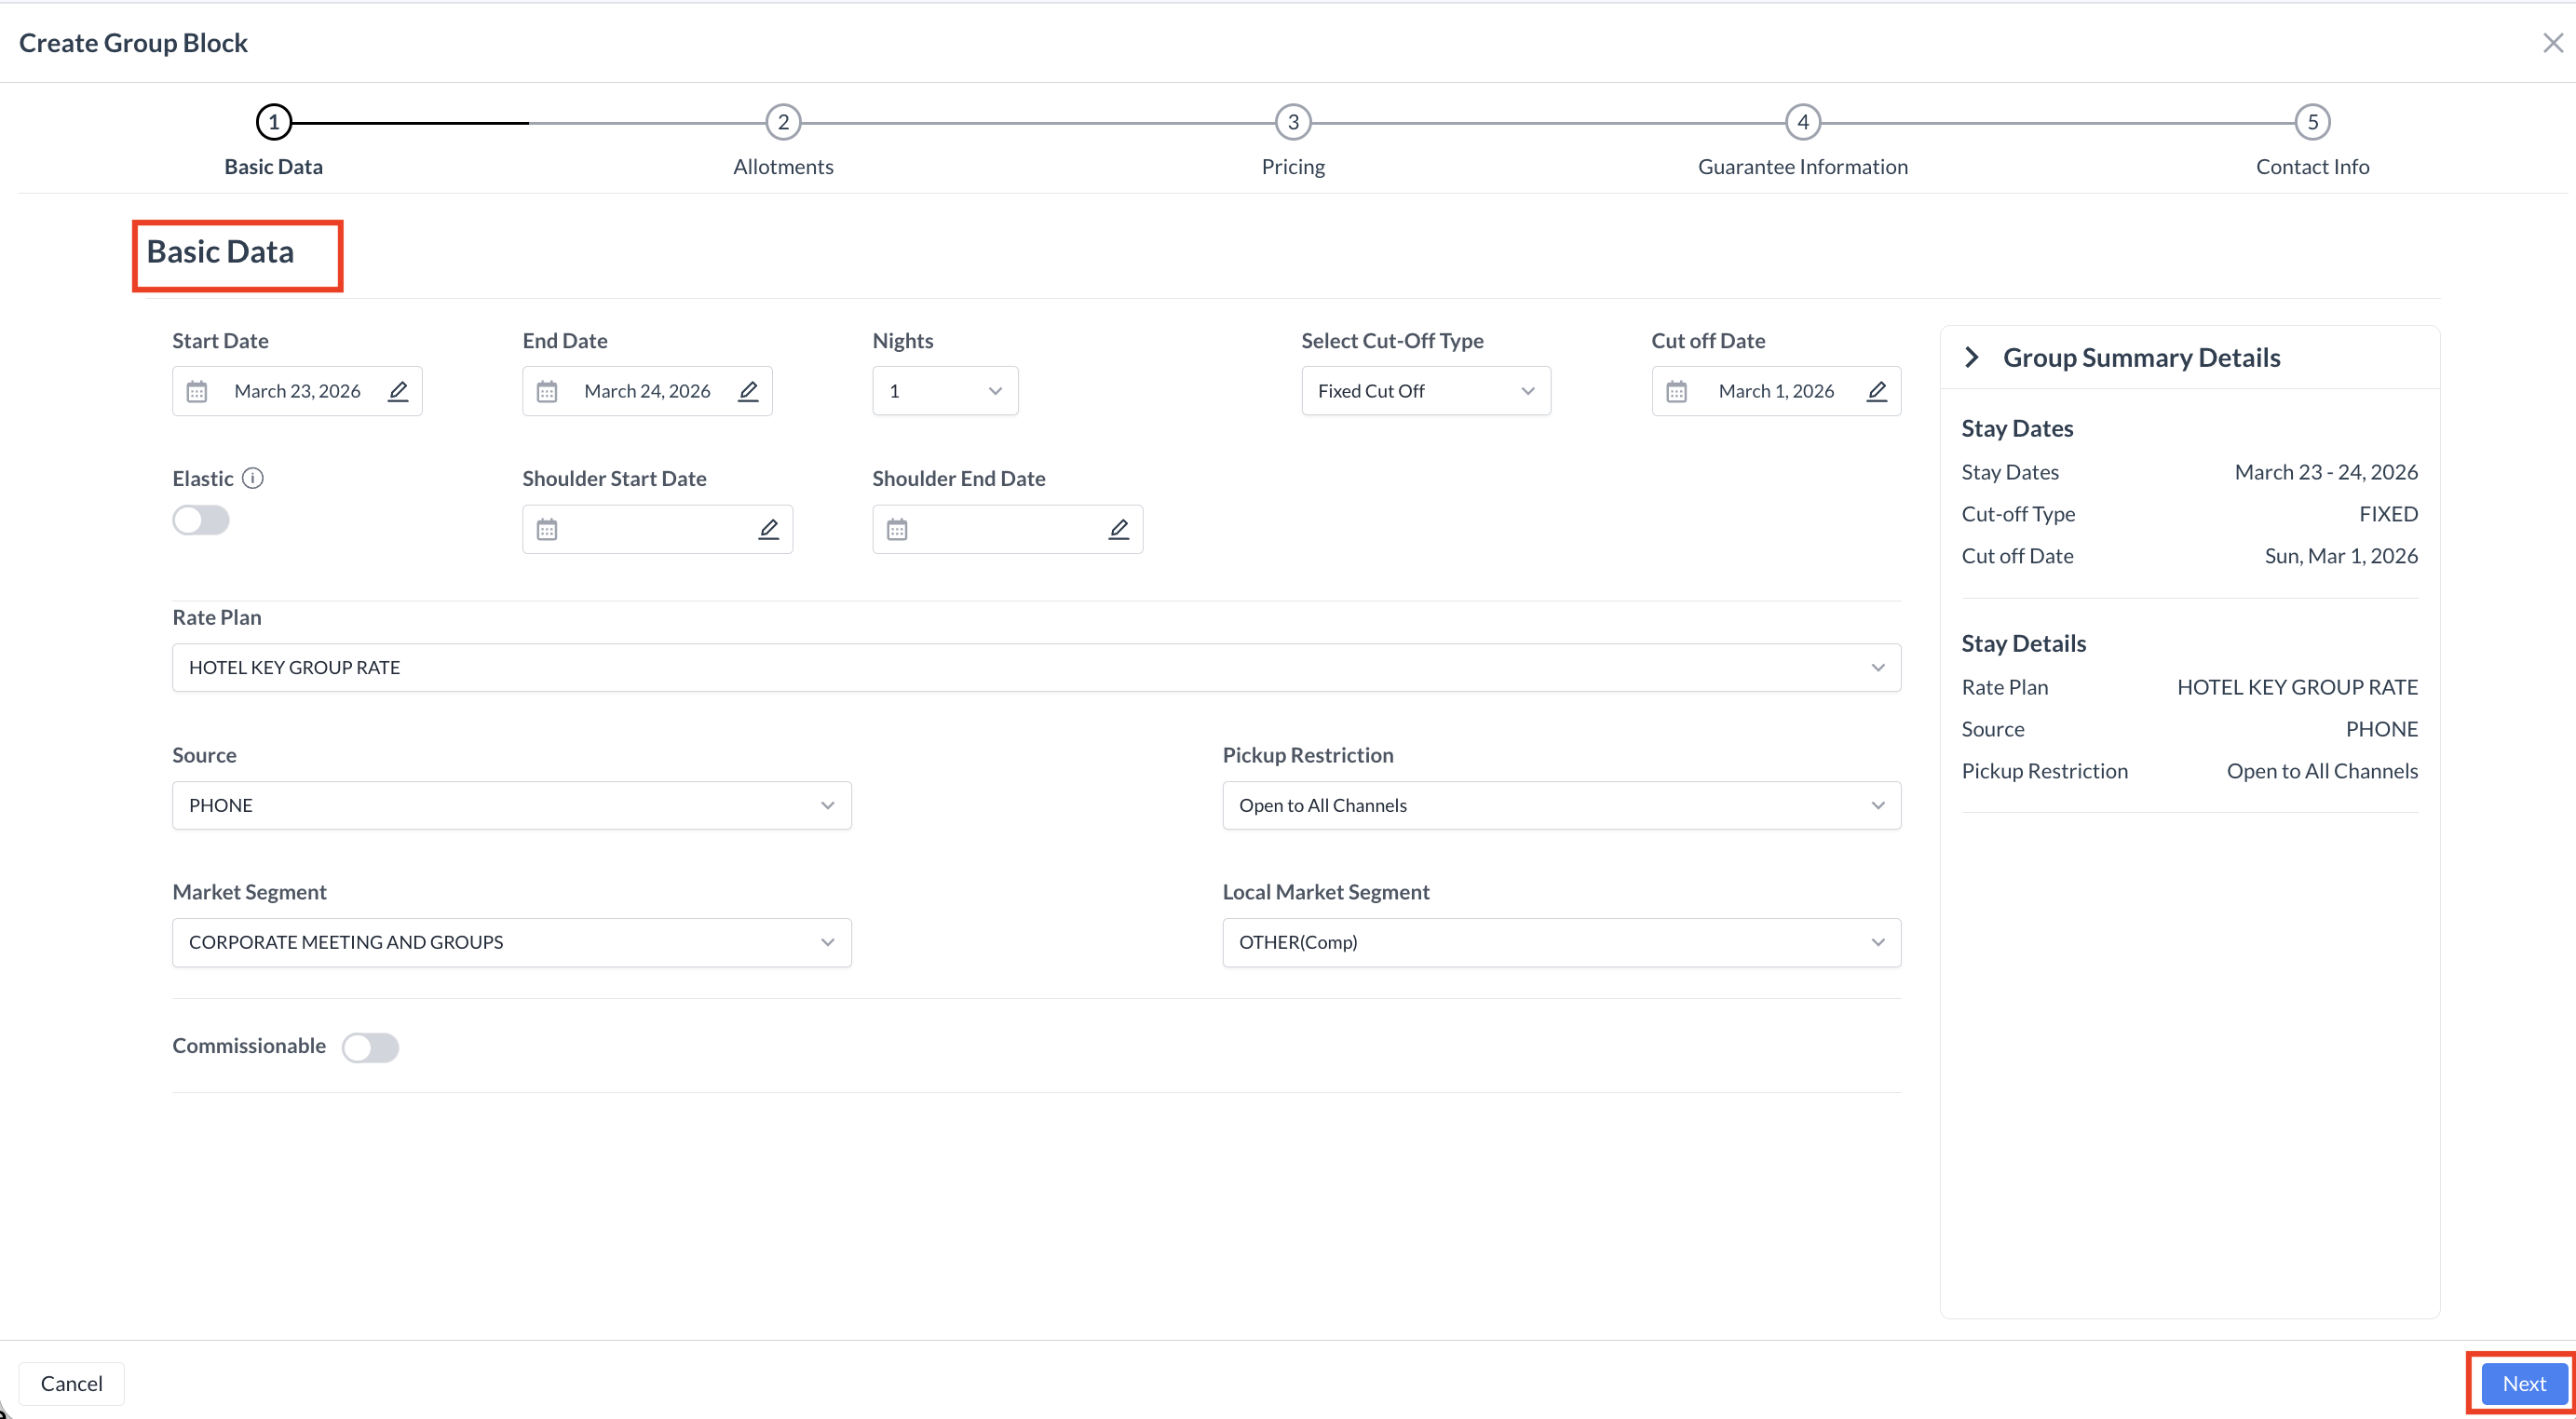
Use the Basic Data screen to configure key details for the group block associated with the event.

1. Enter Group Block Dates

  • Start Date:
    Select the first arrival date (night) for the group.

    📌 Note: This may be different from your Event Start Date.

  • End Date:
    Select the group checkout (departure) date.

    📌 Note: This may be different from your Event End Date.

2. Select Group Block Cut-Off Date

Choose the Cut-Off Date for the group block.

📌 Note: This date is specific to the group block and may differ from the overall event cut-off date.

Depending on your CRS capabilities, you may choose one of the following options:

  • Fixed Cut-Off Date:
    A set date when all unreserved rooms in the block are released back to general inventory.

  • Rolling Cut-Off Date:
    Unreserved rooms are released one night at a time, starting a specified number of days before arrival.

  • No Cut-Off Date:
    The system may use the block's arrival date as the default cut-off if no specific date is provided.

Use the Date Picker to select a Fixed Cut-Off Date, or enter the number of days for a Rolling Cut-Off Date.

3. Select Additional Group Block Details

  • Rate Plan:
    Choose the appropriate Rate Plan from the dropdown menu.

  • Source:
    Select the source of the booking inquiry (e.g., Sales Call, RFP, Online Form).

  • Pickup Restriction:
    This setting defines how reservations can be made for the group block. Options may vary based on your CRS, but generally include:

    • Open to All Channels: Reservations can be made through any supported channel where a group code can be entered.

    • Restricted to PMS: Reservations are limited to the Property Management System or hotel staff only.

  • Market Segment:
    Select the relevant corporate or managed market segment from the dropdown.

  • Local Market Segment:
    Choose the property-specific market segment applicable to this group.

4. Commission Tracking (Optional)

If the group block should be commissionable, enable the Commission Tracking toggle.

5. Continue to the Next Step

Once all required fields are completed, click the blue “Next” button to proceed.

Group Block - Basic Data Screen


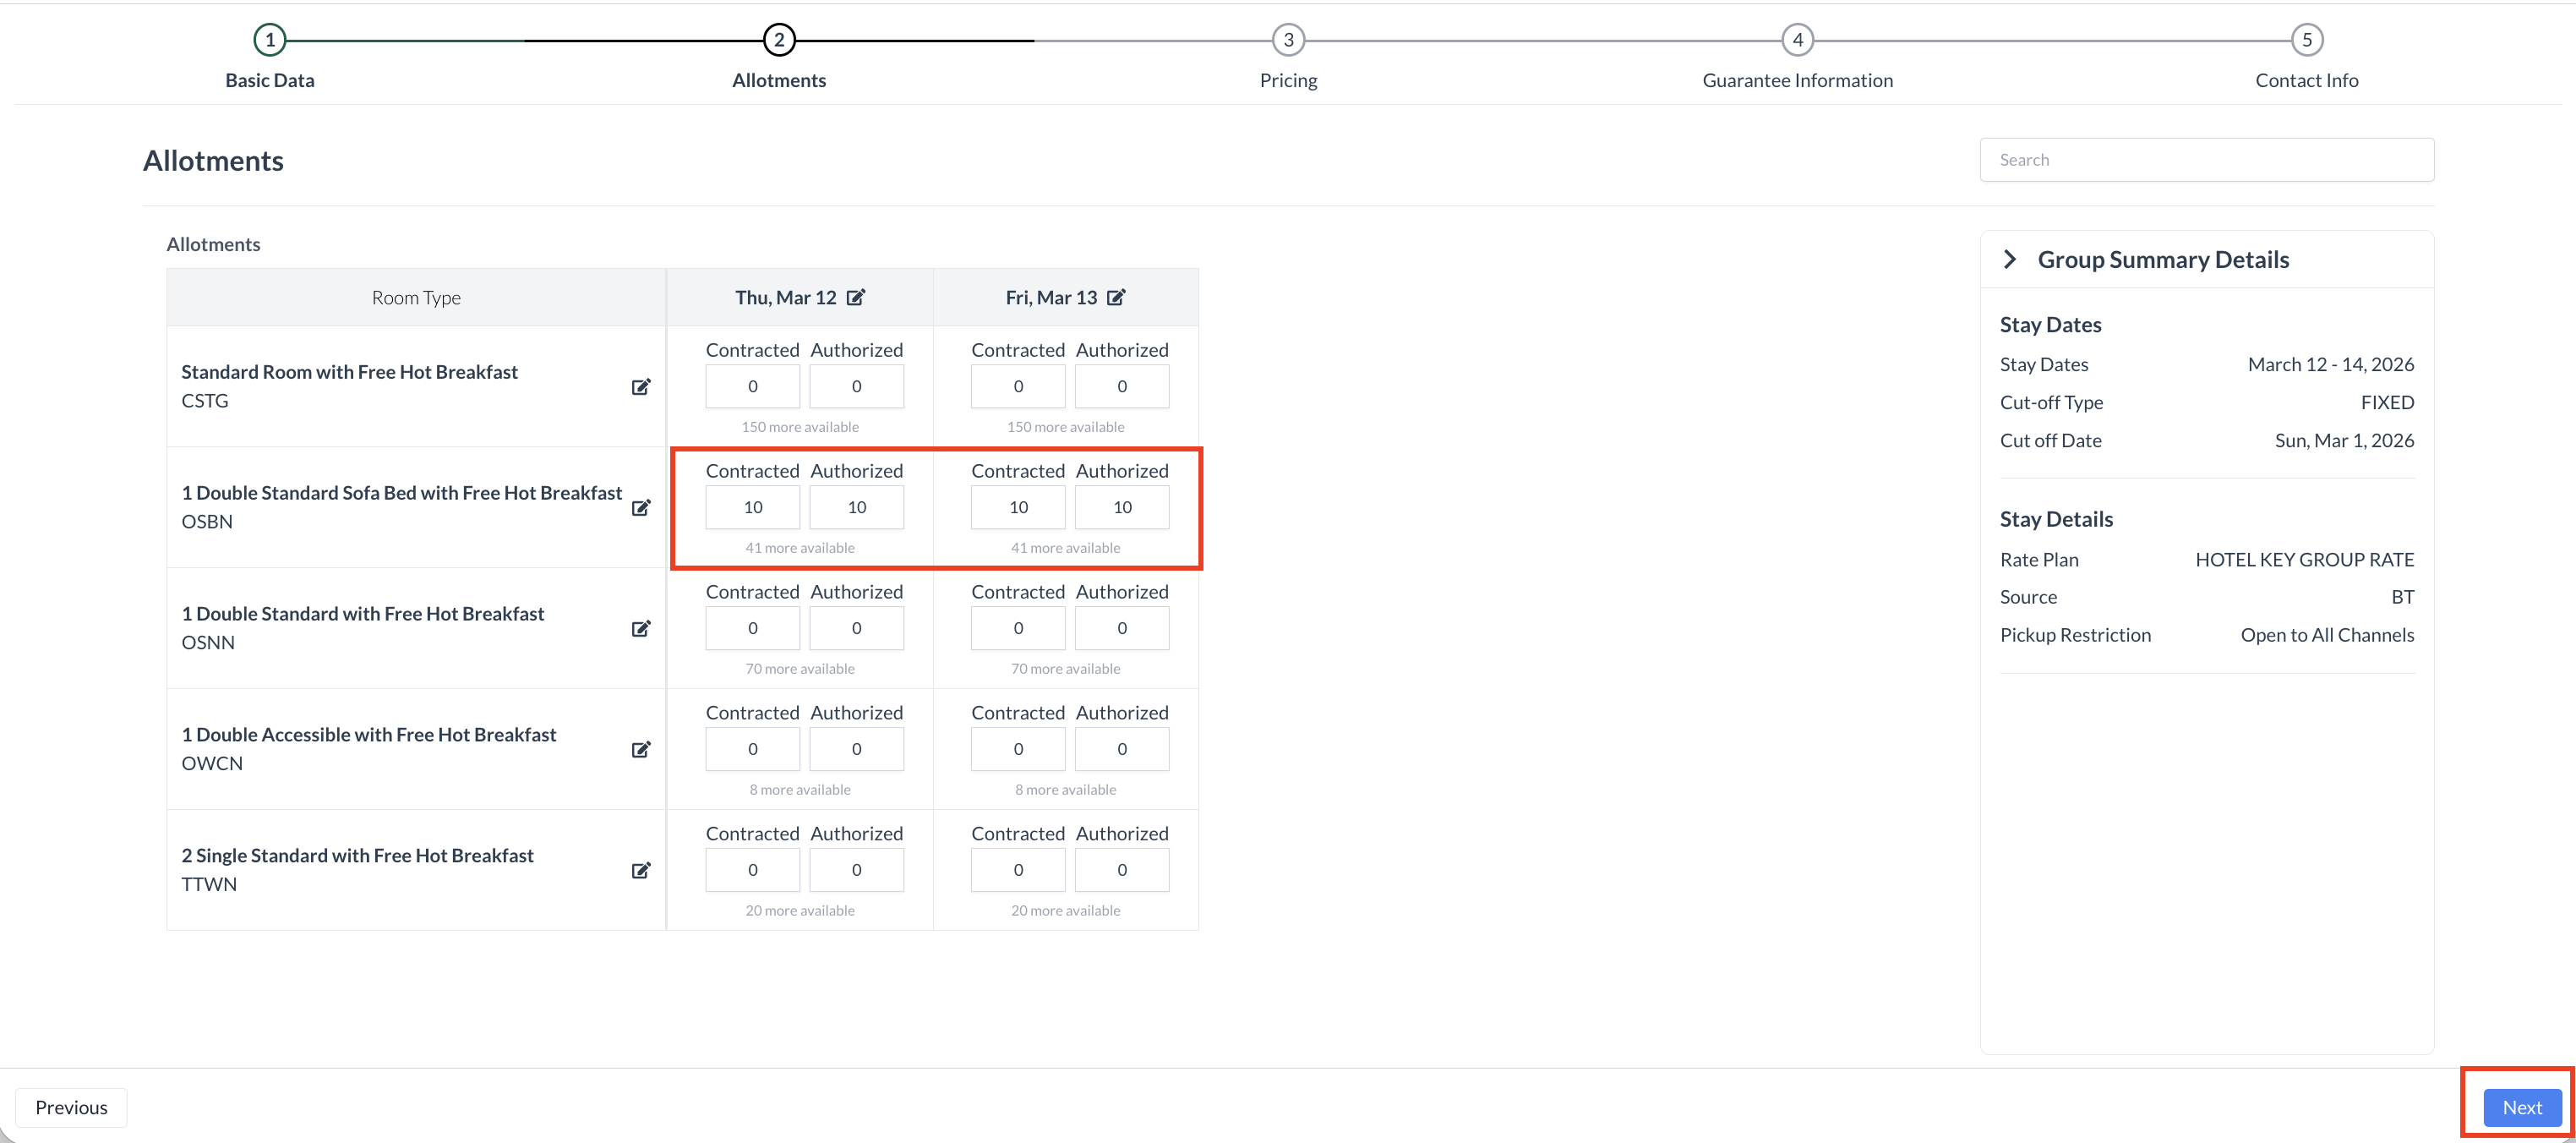
Step 3b: Creating a New Group Block – Allotment Screen

On this screen, you will enter the inventory allocations for each room type associated with the group block.

1. Review Room Availability

For each day, the system will display the number of rooms currently available in the PMS under the Contracted and Authorized columns. Use this information to guide your allocation entries.

2. Enter the Contracted Amount

In the Contracted Amount field, enter the number of rooms the group is allowed to book—provided inventory is available at the time of reservation.
This represents the maximum number of rooms the group can pick up.

3. Enter the Authorized Amount

In the Authorized Amount field, enter the number of rooms you are reserving exclusively for the group.
This amount will be deducted from general inventory and held for the group until the cut-off date.

🔹 Note: The Contracted Amount must be equal to or greater than the Authorized Amount. You cannot contract fewer rooms than are authorized.

4. Continue to the Next Step

After entering allocations for each room type, click the blue “Next” button to proceed.

Group Block - Allotment Screen


Step 3C: Creating a New Group Block – Pricing Screen

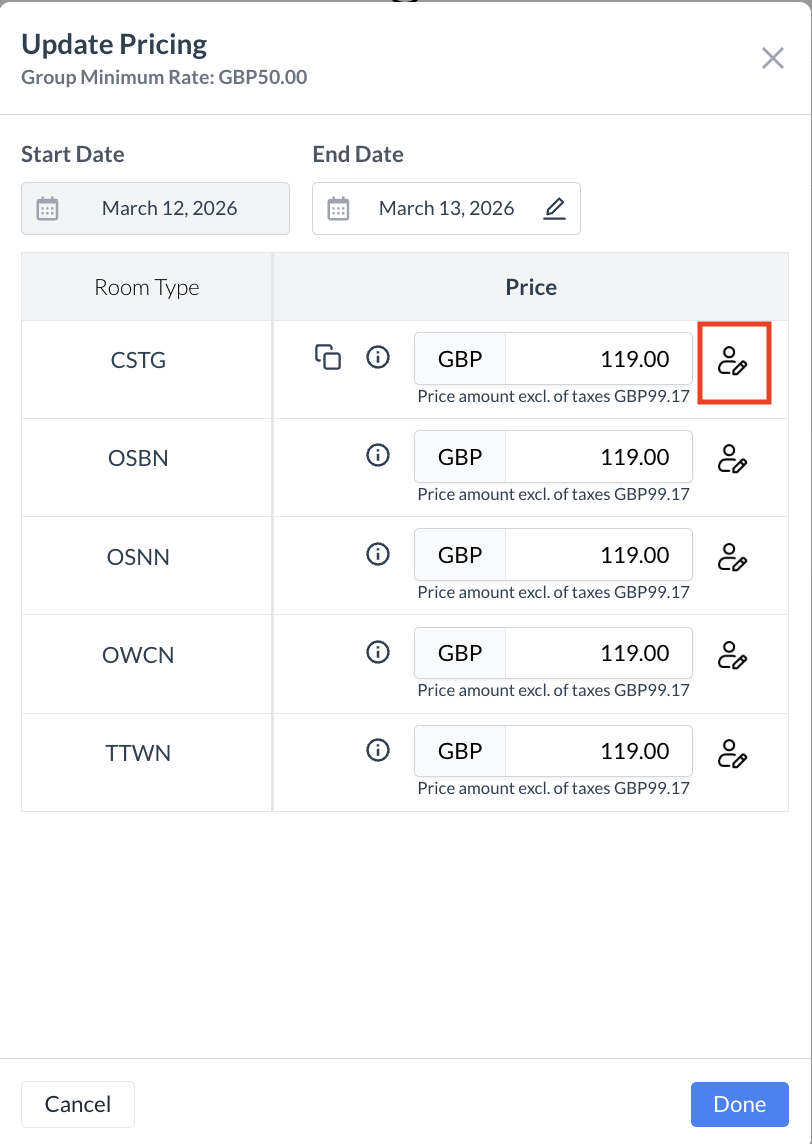
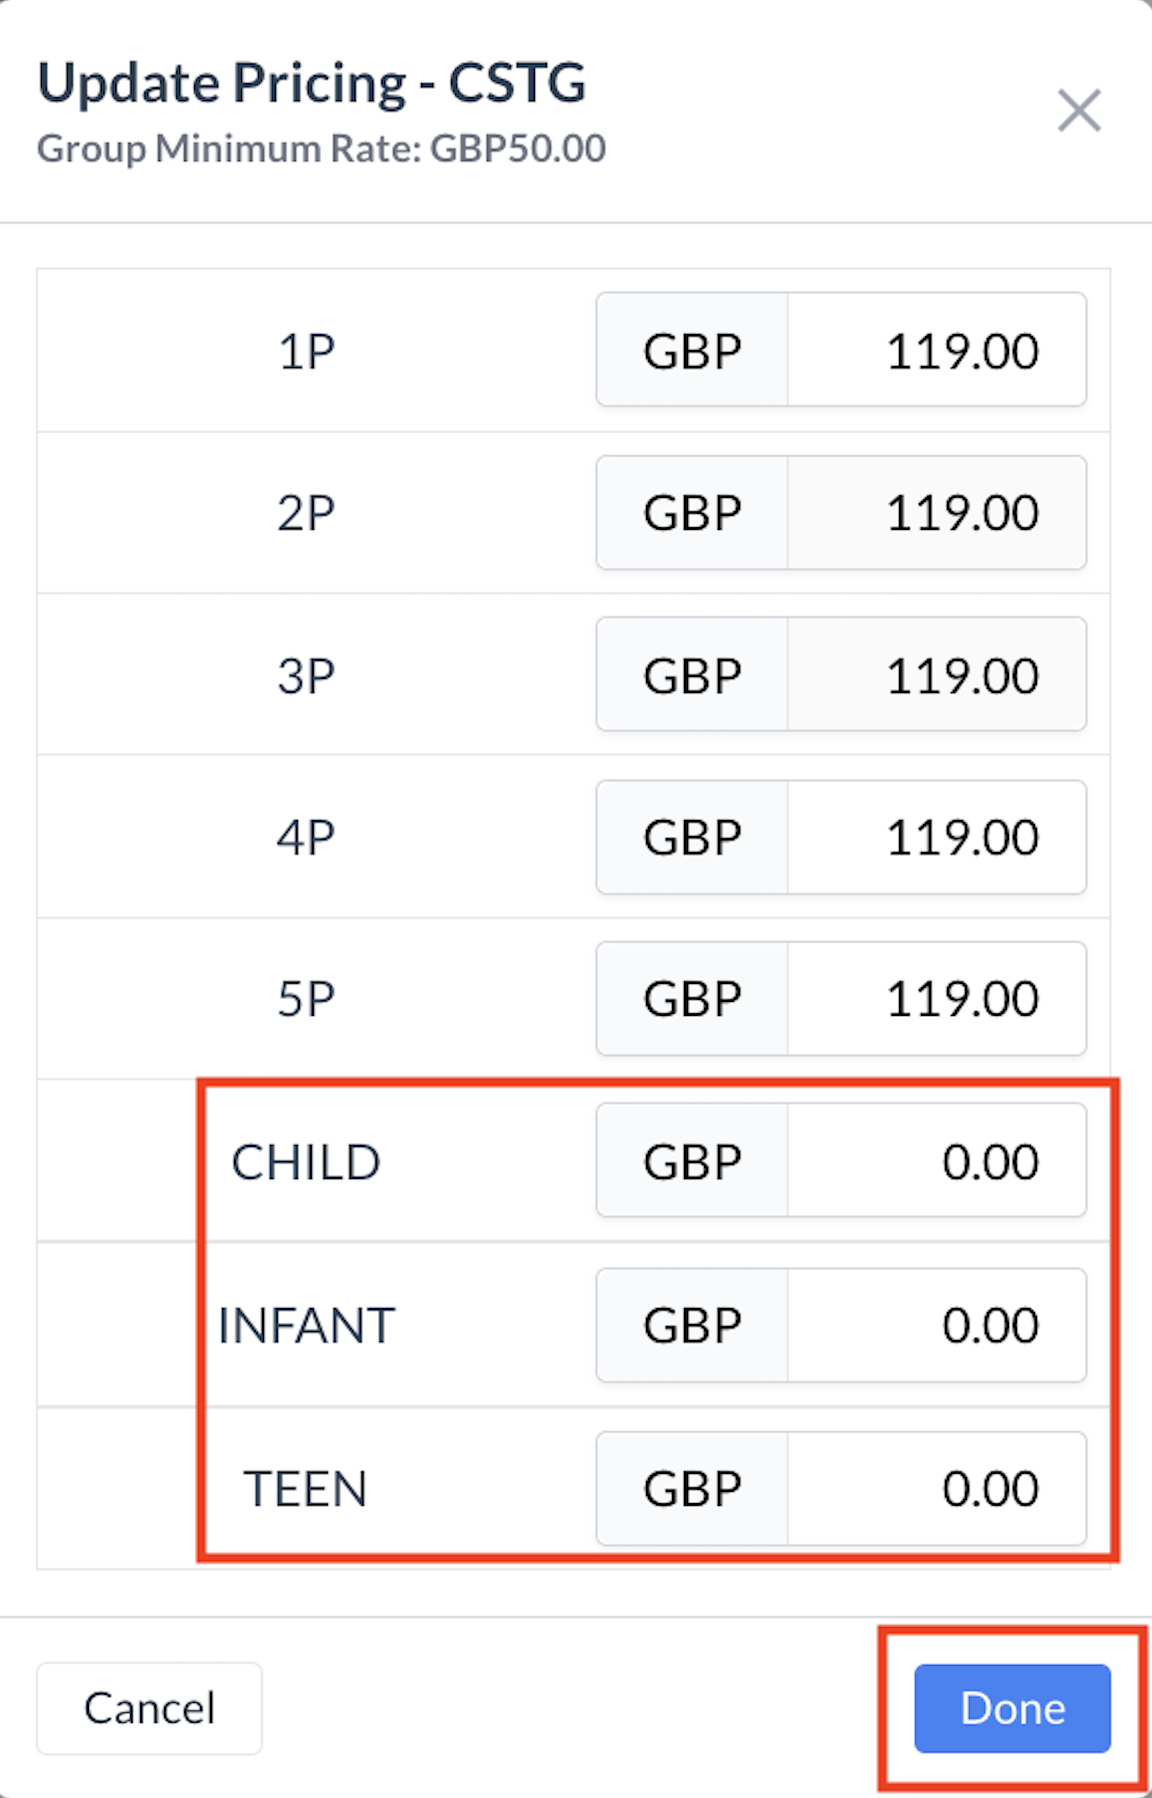
The Update Pricing screen displays the Start Date and End Date of the group block, along with all available room types at the hotel.

1. Understanding Group Block Pricing in HotelKey

In HotelKey, every room type in a group block must have a rate, even if no inventory is currently allocated to that room type.
This is a safeguard to prevent a scenario where inventory is later added to a room type without assigning a rate, which could result in a $0 booking.

2. Entering Rates

  • If the rate is the same for every night of the stay:

    • Enter the rate for the first room type and click the copy button located to the left of the currency box. This will automatically apply the entered rate across all stay nights and room types.

  • If the rate varies by night:

    • Use the End Date Calendar Picker to enter different rates for each stay night.

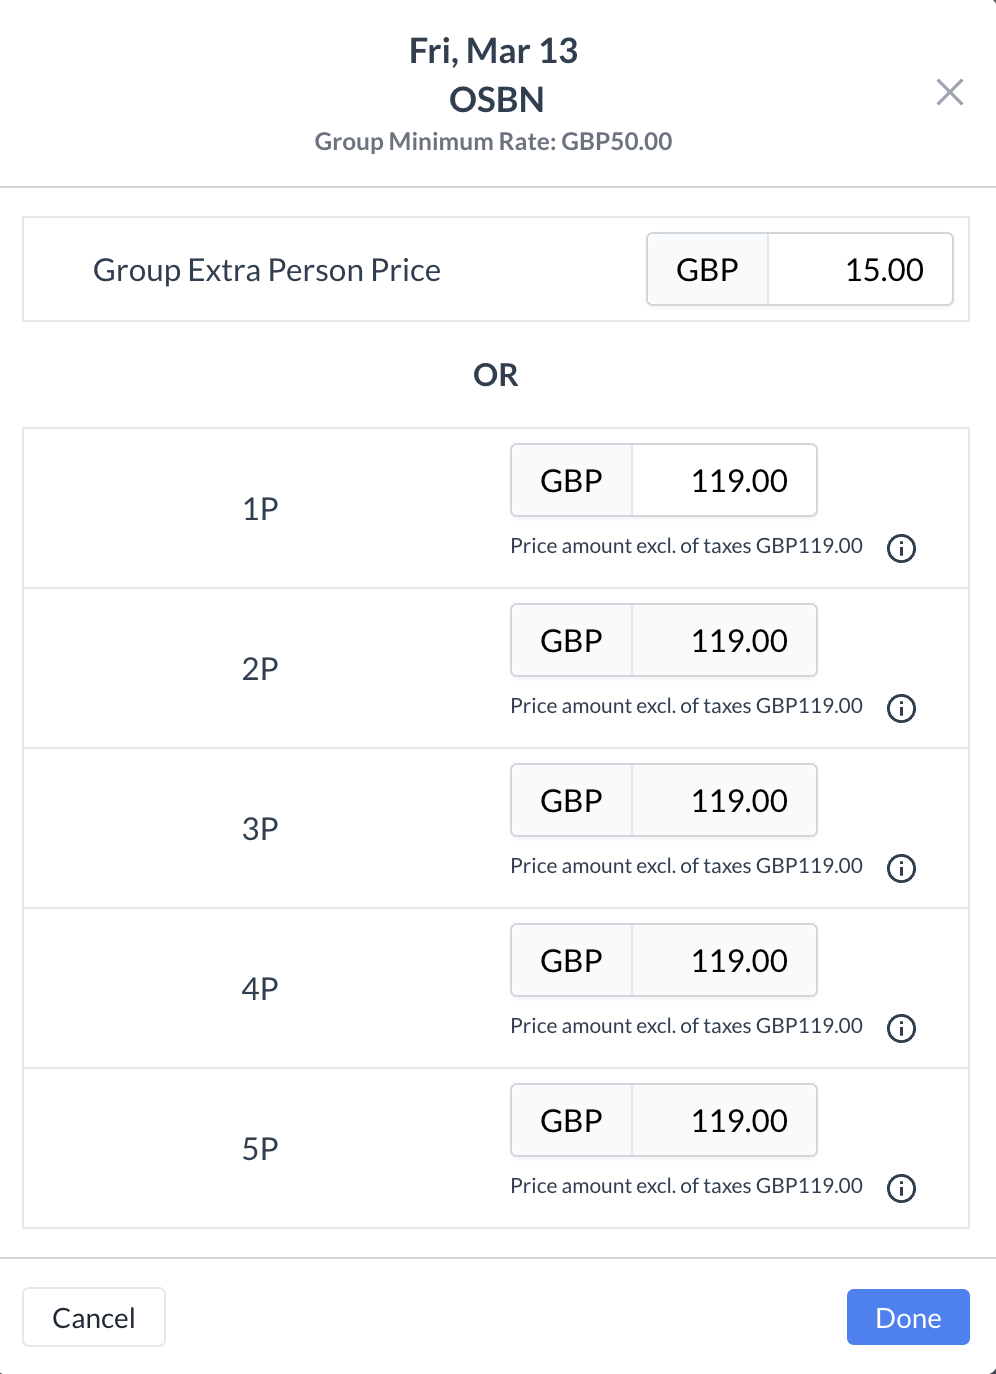
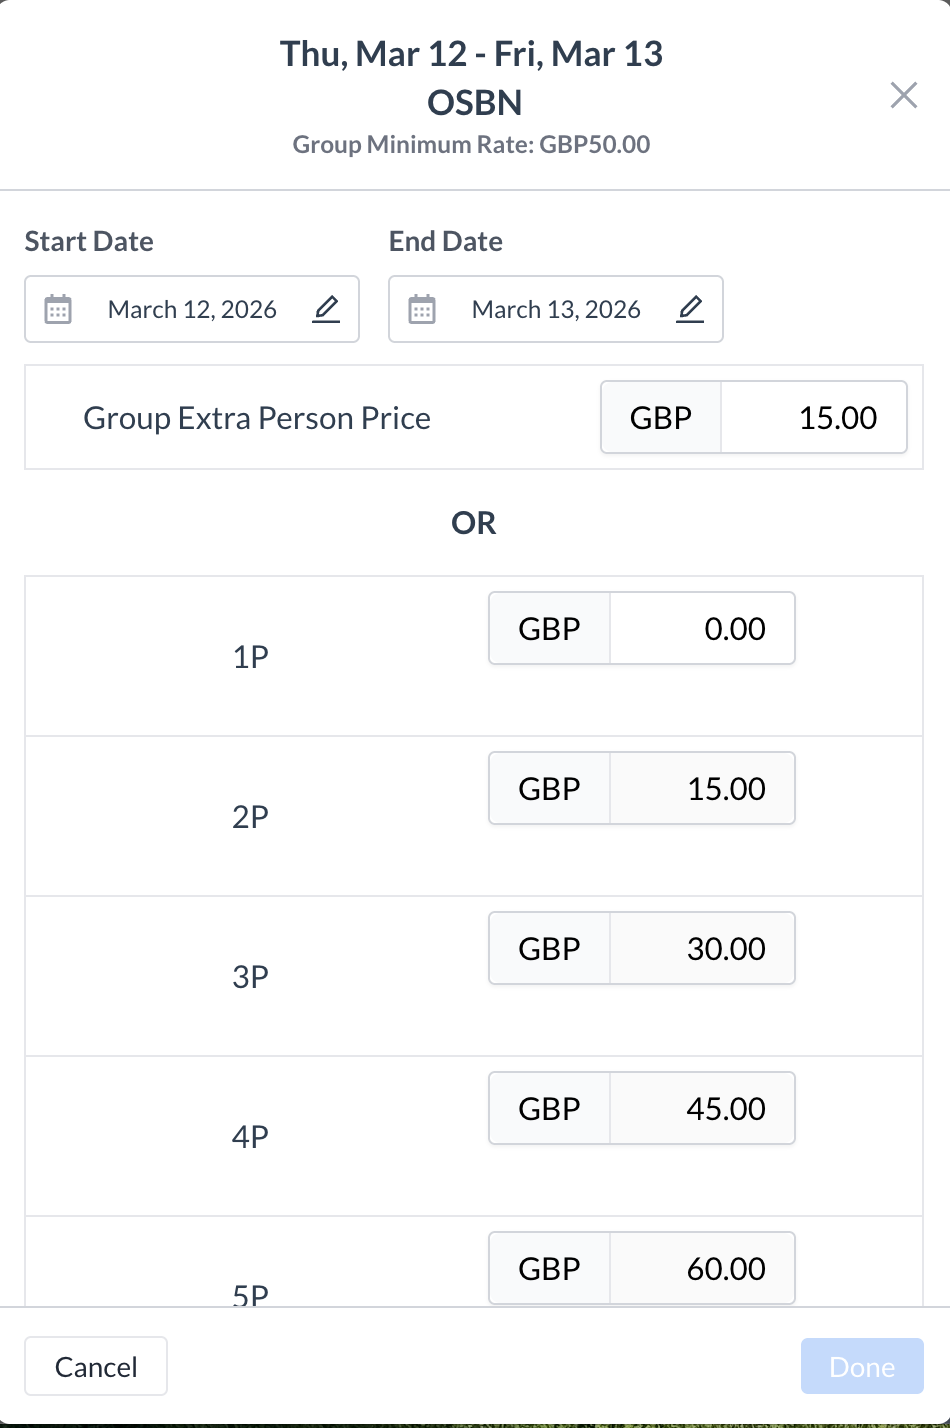
3. Setting Extra Person Pricing

To enter or modify extra person pricing:

  • Click the “Edit” icon (person with a pencil).

  • This opens the detailed pricing view where you can:

    • Set a specific Extra Person Rate

    • If your CRS supports Occupancy-Based Pricing, enter separate rates for each adult in the room.

📌 Note:

  • If Occupancy-Based Pricing is enabled in your CRS, the Extra Person Price field will be disabled.

  • Instead, you will enter rates for each adult directly in the edit screen.

If you do not open the edit screen, the rate entered in the main input field will apply uniformly to all adults in the room.

4. Continue to the Next Step

After entering allocations for each room type, click the blue “Next” button to proceed.

Group Block - Update Pricing Screen

Group Block - Extra Person or Occupancy Base Pricing Button

Extra Person Pricing or Occupancy Base Pricing Screen


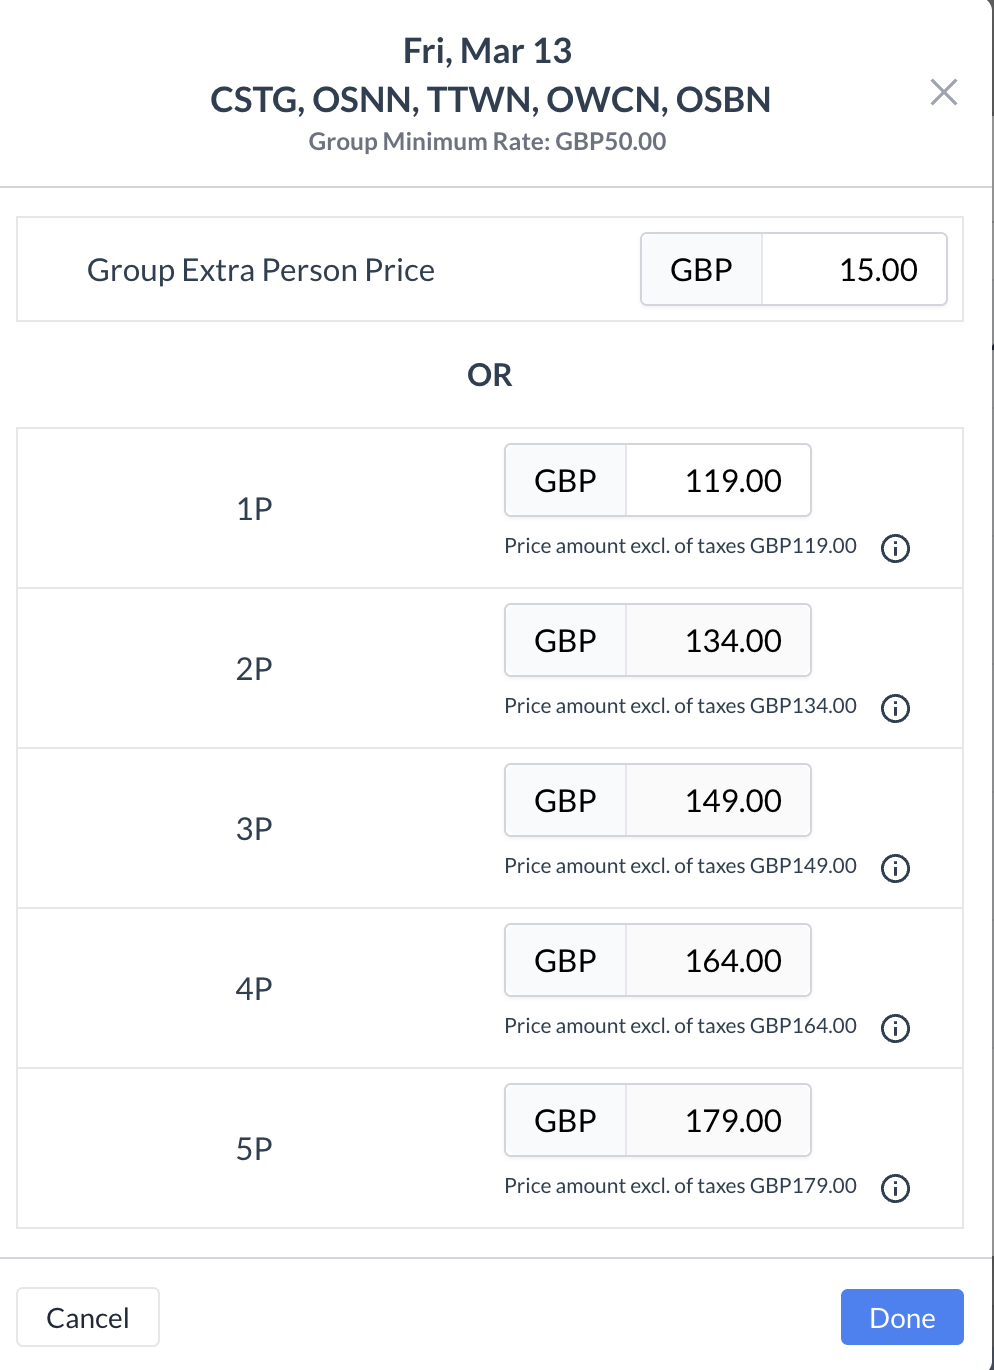
Step 3D: Creating a New Group Block – Pricing Review Screen

After entering the room rates, you will be taken to the Pricing Review screen. This screen provides an overview of the rates for all room types and stay dates, and allows you to make edits if needed.

🔧 Editing Options

You have three ways to update pricing:

1. Edit an Individual Day & Room Type

  • Click directly on the rate amount for a specific day and room type.

  • This will open the Update Pricing screen where you can adjust the rate for that specific day and room type only.

2. Edit All Dates for a Room Type

  • Click the pencil icon next to the room type name.

  • This opens the Update Pricing screen.

  • Any changes made here will apply to all dates for that room type.

3. Edit All Room Types for a Single Date

  • Click the pencil icon next to the date.

  • This opens the Update Pricing screen.

  • Changes made here will apply to all room types for the selected date only.

✅ Final Step

After reviewing and making any necessary changes, click the blue “Next” button to continue to the next step.

Group Block - Pricing Review Screen


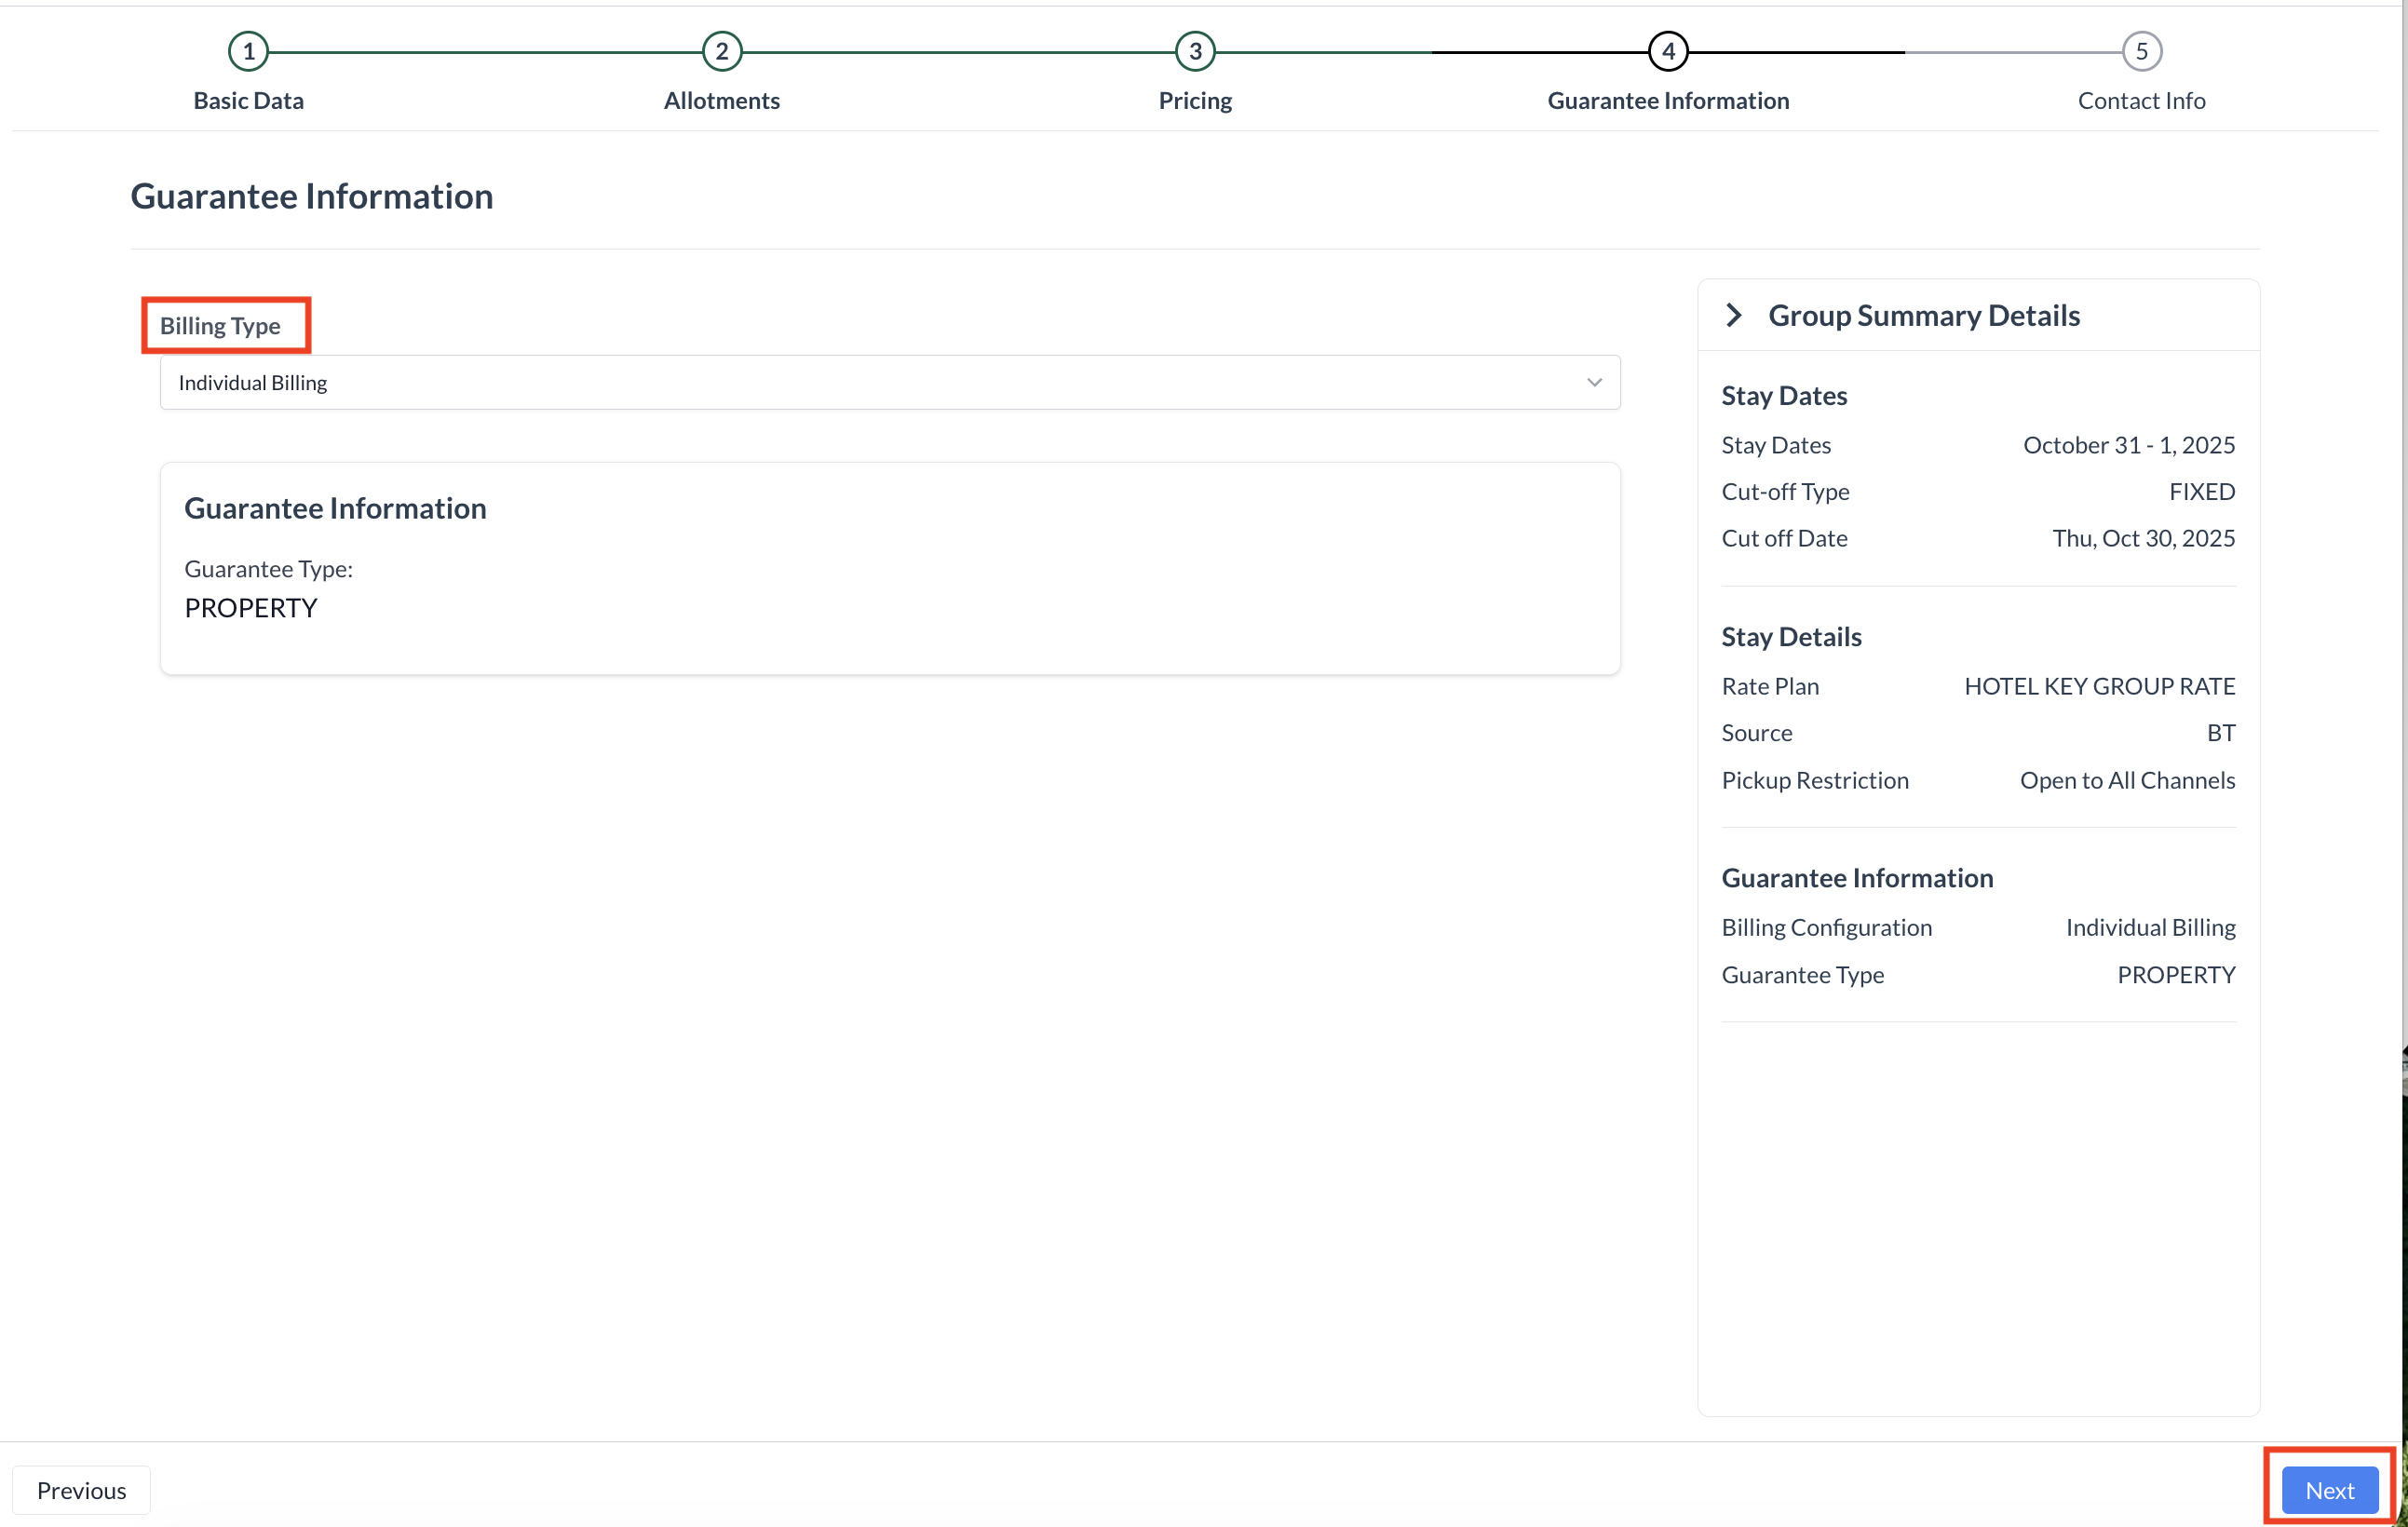
Step 3E: Creating a New Group Block – Guarantee Information Screen

In this step, you will select the Billing Type for the group block. This determines who is responsible for which charges—the group or the individual guests.

Use the Billing Type dropdown menu to select one of the following options:

🔘 Custom Billing

Allows for a combination of charges split between the group and the guest.
Example: The group pays for Room Accommodations and Parking, while the guest is responsible for all other charges.

🔘 Full Coverage

The group is responsible for all charges, including accommodations, incidentals, and any additional services.

🔘 Individual Billing

Each guest is responsible for all charges, with no charges billed to the group.

🔘 Room Coverage Only

The group pays for Room Accommodations only. Guests are responsible for all other charges (e.g., meals, parking, incidentals).

📌 Note: Once the group block is created and reservations are made, you can manage or override the billing type for individual reservations within the PMS, if needed.

When finished, click the blue “Next” button to continue.

Group Block - Guarantee Information Screen


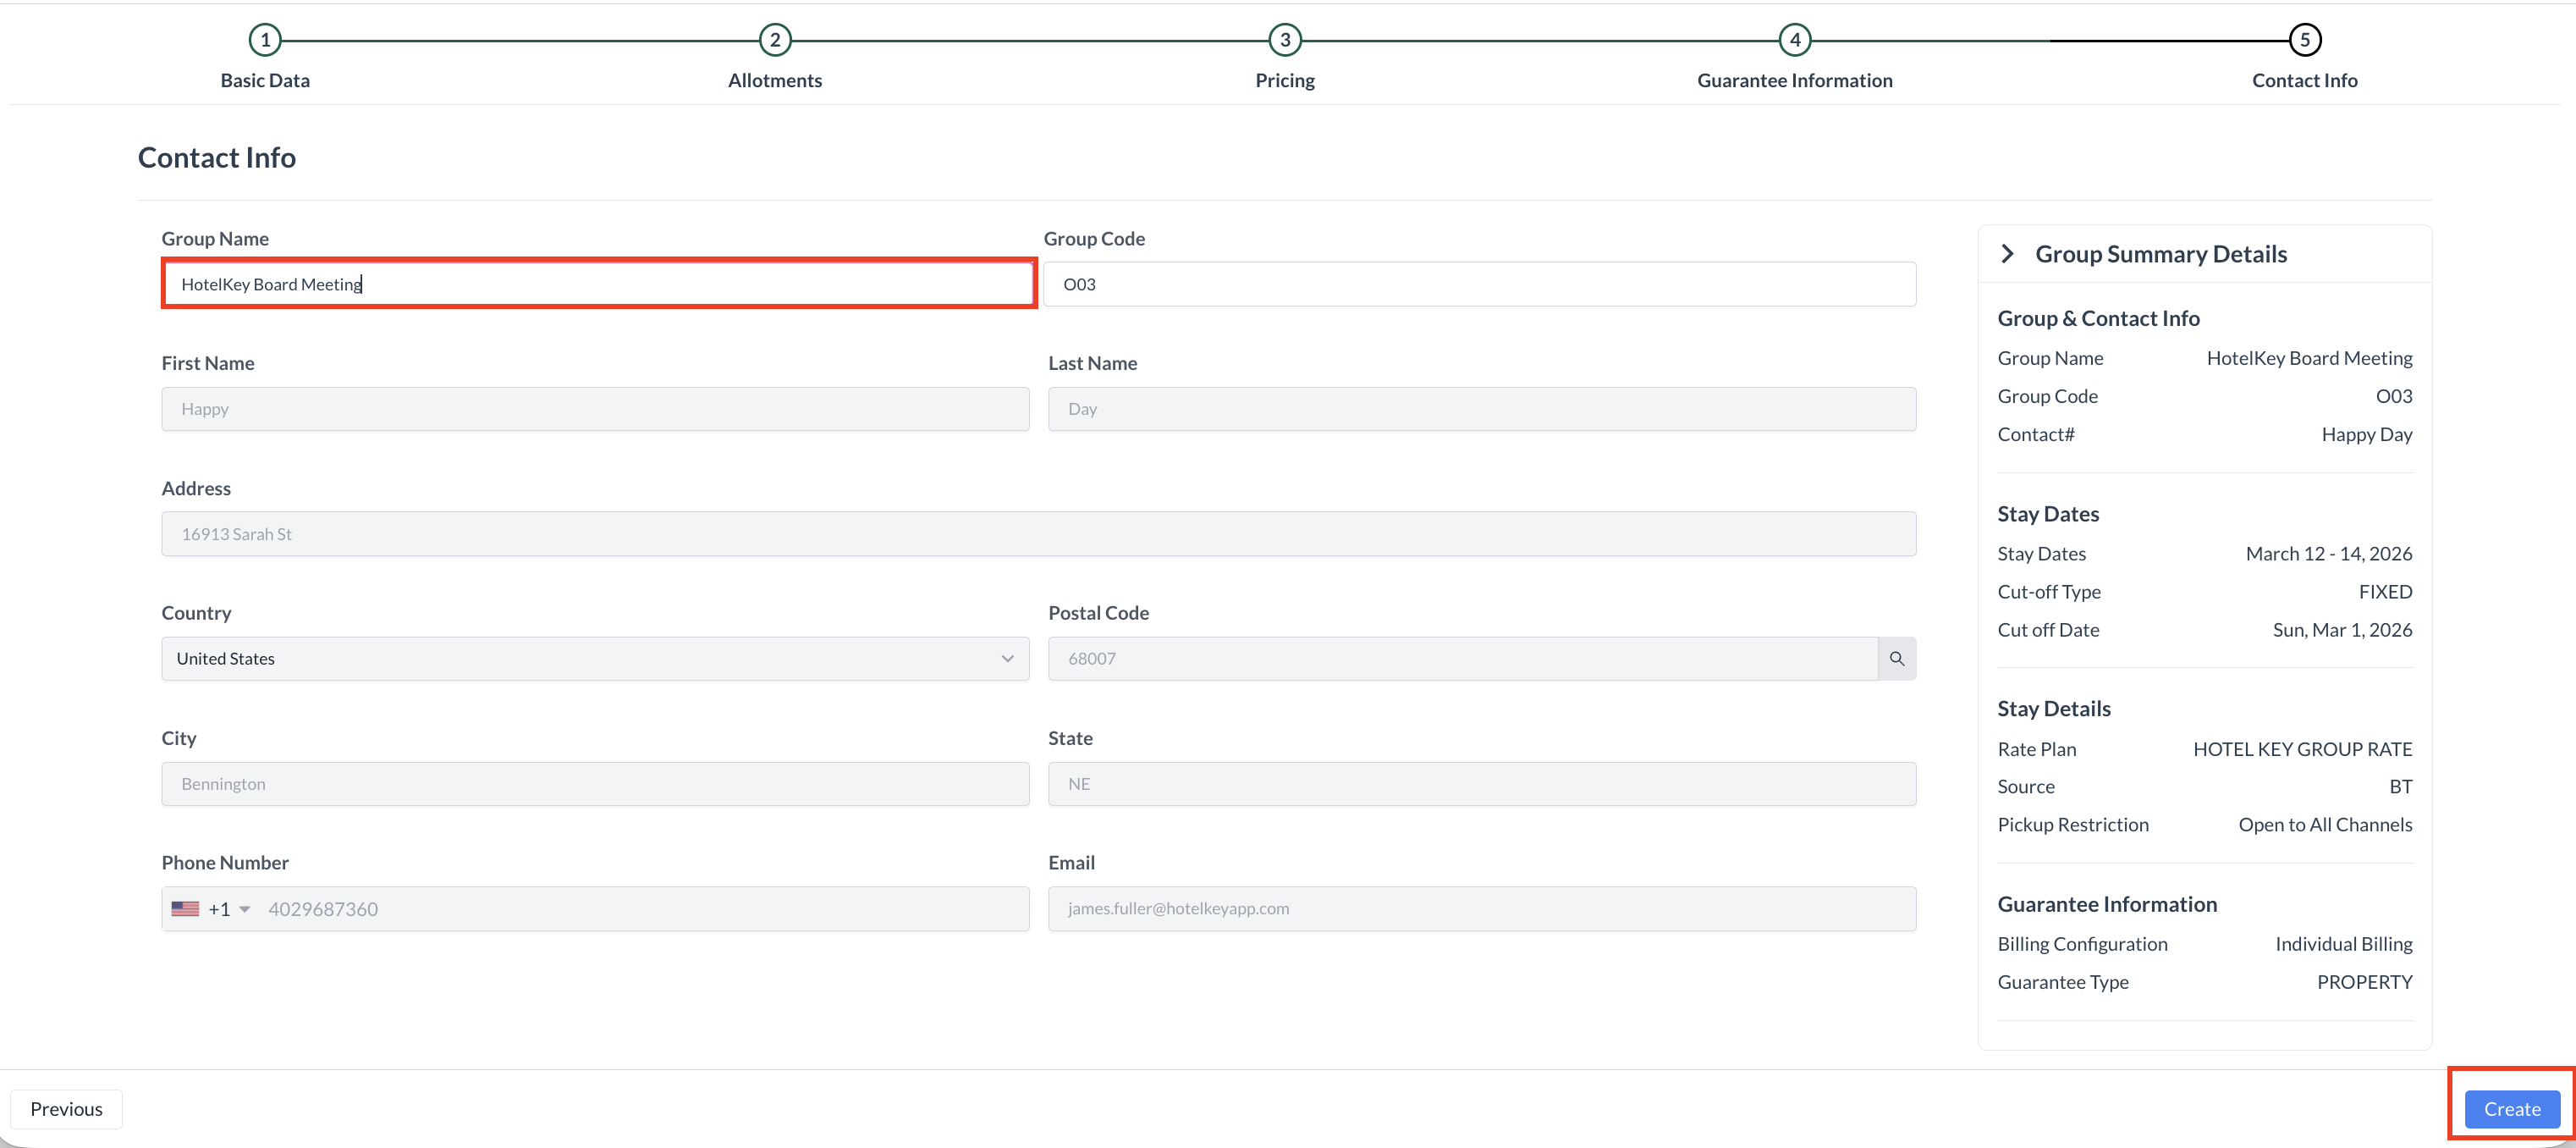
Step 3F: Creating a New Group Block – Contact Information Screen

In this step, you’ll enter the final group details before creating the block in the PMS.

1. Group Contact Information

The Group Contact is automatically populated based on the Booker or Contact selected during Step 2 of the event setup.
This person will serve as the primary contact for the Group Block.

📌 No additional action is required. You can change this information once the block is created in the PMS.

2. Enter the Group Block Name

Enter the Group Block Name — this is the name guests will reference when calling to make a reservation (e.g., "Smith Wedding Block", "ABC Corporation Conference").

3. Enter or Confirm the Group Code

  • Enter a Group Code, which serves as the unique identifier for the group block.

📌 Important Notes:

  • Depending on your CRS integration, the Group Code may be auto-generated.

  • In some systems, this code is used for online booking (e.g., via a brand website).

  • If your CRS does not use or auto-generate a Group Code, you can enter any custom code that helps you easily identify the group in the PMS.

4. Create the Group Block

Once all information has been entered, click the blue “Create” button.

This action will write the Group Block to the PMS, completing the setup process.

Group Block - Contact Information Screen


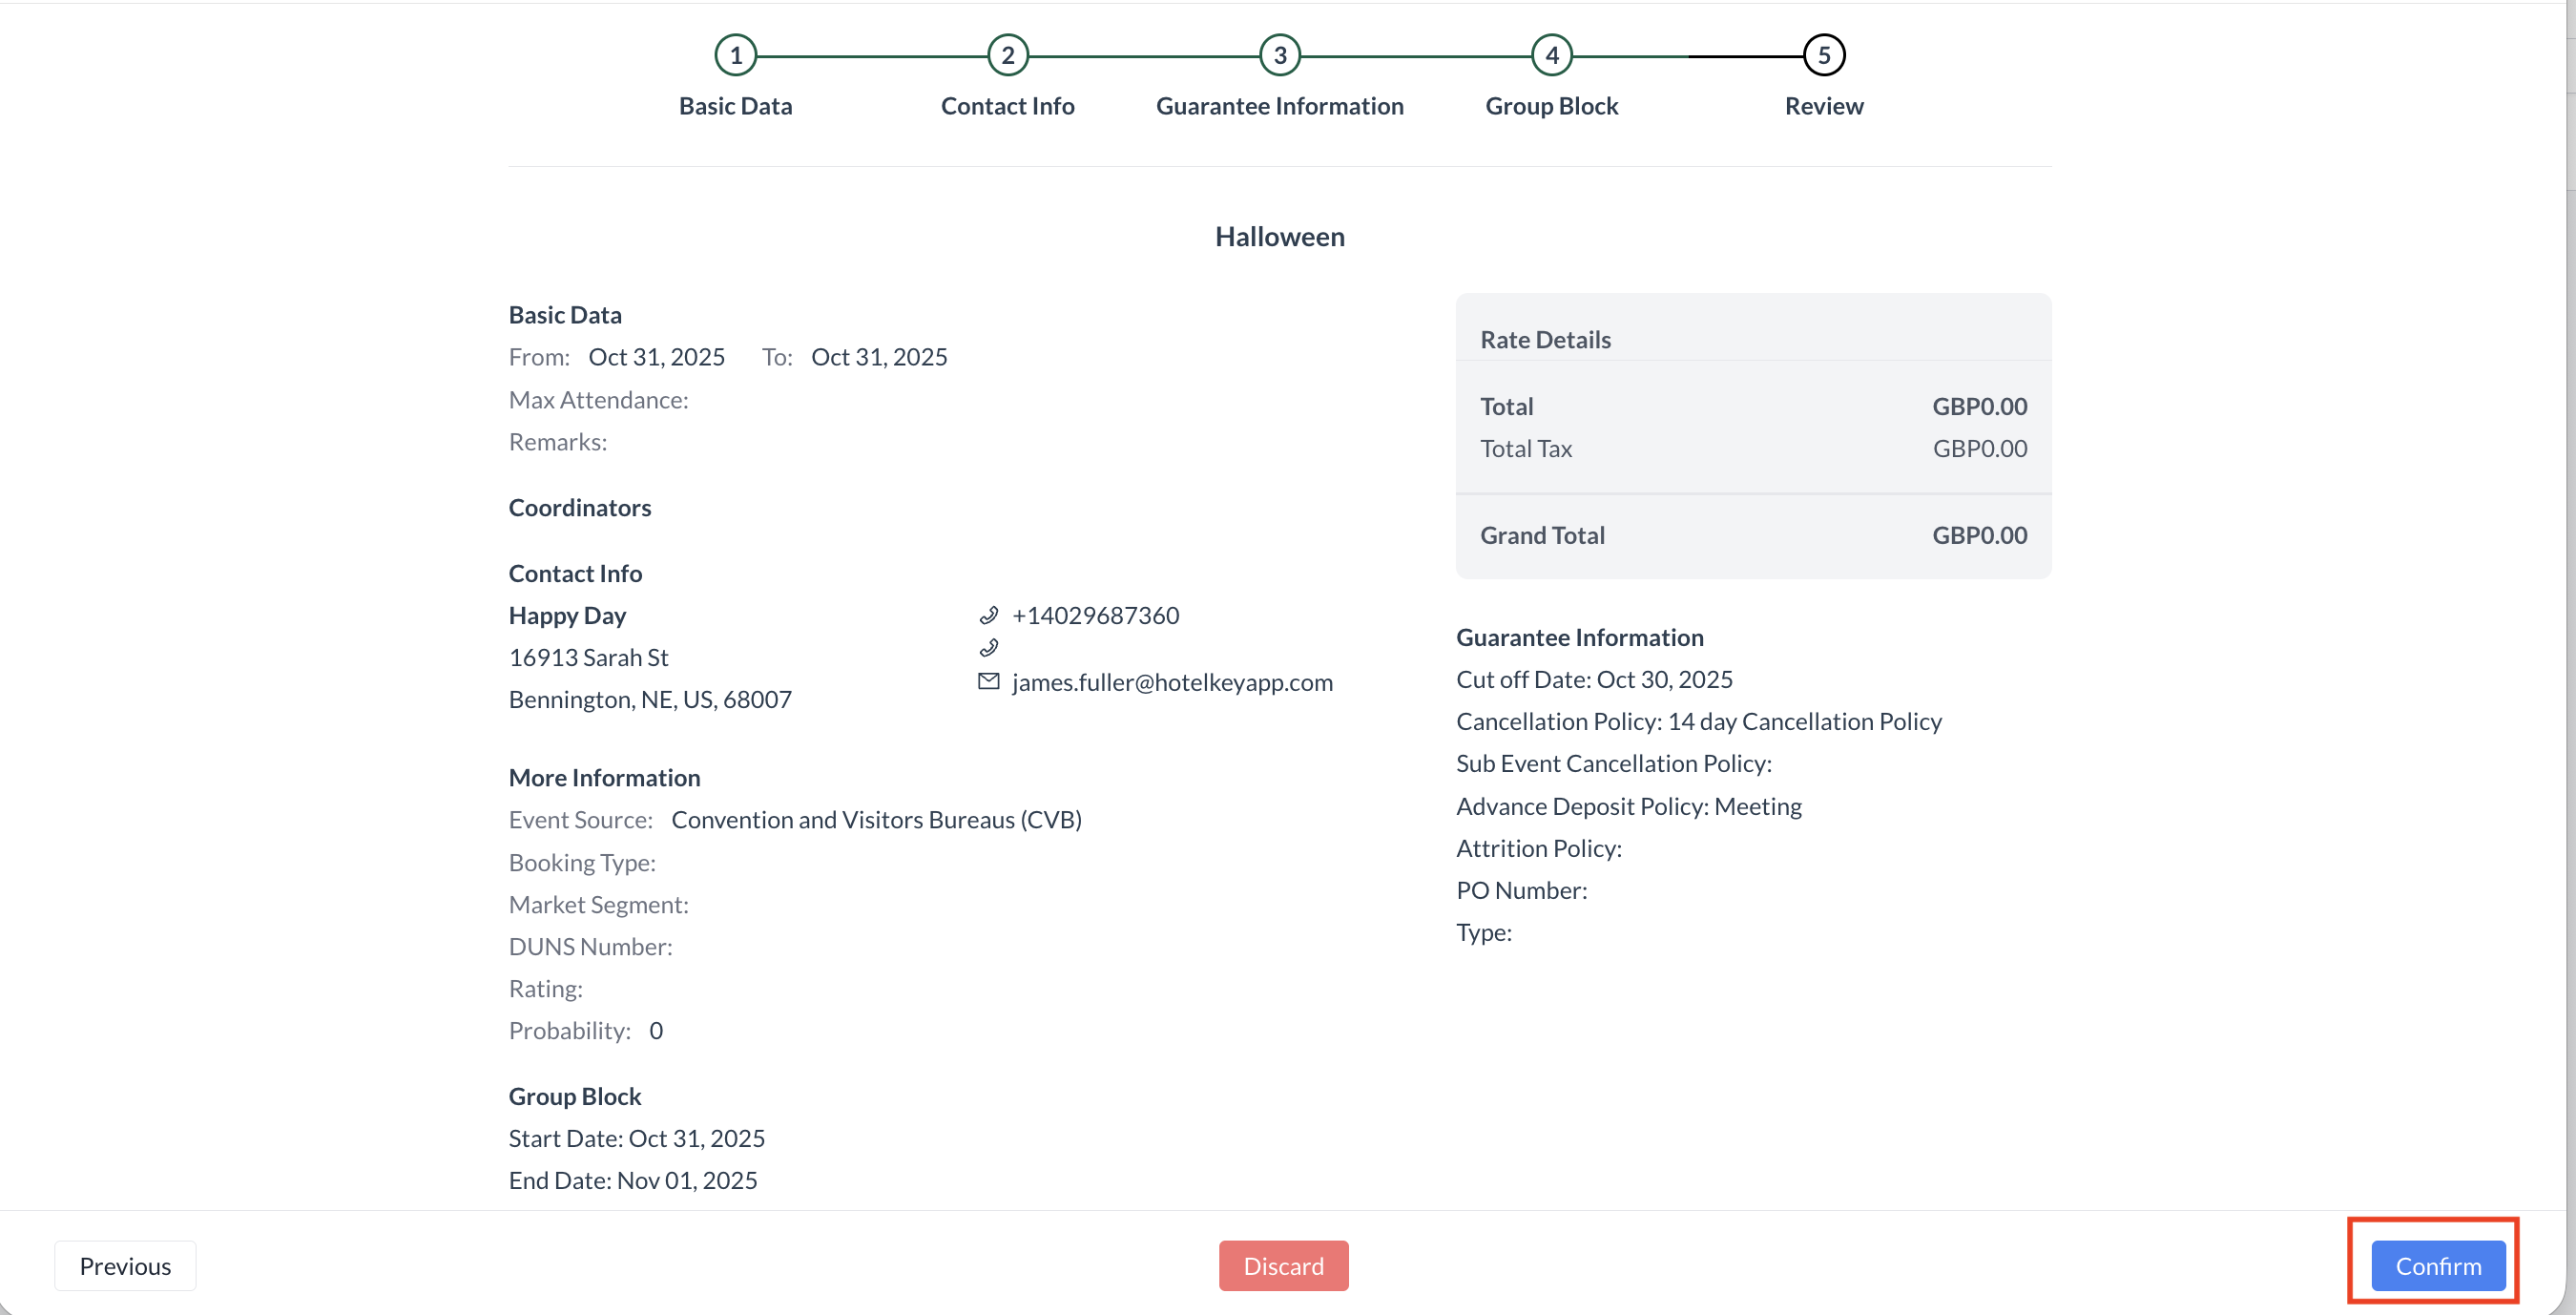
Step 3G: Creating a New Group Block – Review Screen

The Group Block has now been successfully created in the PMS.

On the Review Screen, you’ll see a summary of the key details related to the group block, including:

  • Group Name

  • Stay Dates

  • Billing Type

🔄 If Changes Are Needed

If you need to start over for any reason, you can click the red “Cancel and Create New Group Block” button to discard the current block and begin a new one.

⚠️ Use this option only if you need to fully reset the group block setup. You can make edits from the PMS now that the block is created.

✅ Continue Event Setup

In most cases, you’ll simply click the blue “Next” button to continue building the rest of your Event.

Group Block - Review Screen


Step 4: Group Review Screen

The Group Review screen provides a final summary of all details entered for the group event. This includes:

  • Event Dates

  • Group Block Details

Take a moment to carefully review each section to ensure all information is accurate.

Available Actions:

  • Click the blue “Confirm” button to finalize and create the event.

  • Click the red “Discard” button to cancel and remove the event setup.

  • Click the white “Previous” button to go back and make any necessary edits.

Group Only Event - Review / Confirm

JavaScript errors detected

Please note, these errors can depend on your browser setup.

If this problem persists, please contact our support.