Billing Information is the Cashiering functionality within the Folio Screen providing a centralized interface for managing all financial transactions related to an event or group booking. It is designed to ensure accurate and efficient posting, adjustment, and settlement of charges, and serves as a key tool in maintaining financial integrity throughout the event lifecycle.
Key Functions:
Posting Charges:
Enables users to post room rentals, food and beverage charges, equipment rentals, service fees, and other billable items directly to the folio.
Adjustments:
Allows authorized users to correct or modify previously posted charges, apply discounts, or accommodate billing changes. All adjustments are tracked with audit trails for accountability.
Processing Payments:
Supports the application of various payment methods (credit card, check, wire transfer, etc.) against open balances. Partial payments and deposits can also be applied and tracked through the folio.
Folio Management:
Multiple folios per event or account can be created for separate billing needs.
Invoice Generation:
Finalized folios can be converted into invoices for distribution to clients.
❗Important Note:
The Folio and Cashiering functionality in EventKey mirrors that of the PMS House Account. When an event is moved to Tentative status, a corresponding House Account is automatically opened in the PMS. The folio and cashiering details from this House Account are then displayed in EventKey, allowing transactions to be posted and managed directly within the system. Any transactions posted in EventKey will automatically appear in the PMS House Account, and vice versa.
Navigate to Home > Event Management
EventKey Dashboard (Home Screen)
To begin, navigate to the Dashboard and use the Search box to locate the event.
Enter the full or partial Event Name into the search field. The system will display a list of matching events, or, if there is an exact match, it will appear directly.
Once you’ve identified the correct event, simply click on the event name to open it.
Event Search Field
Event Search Results
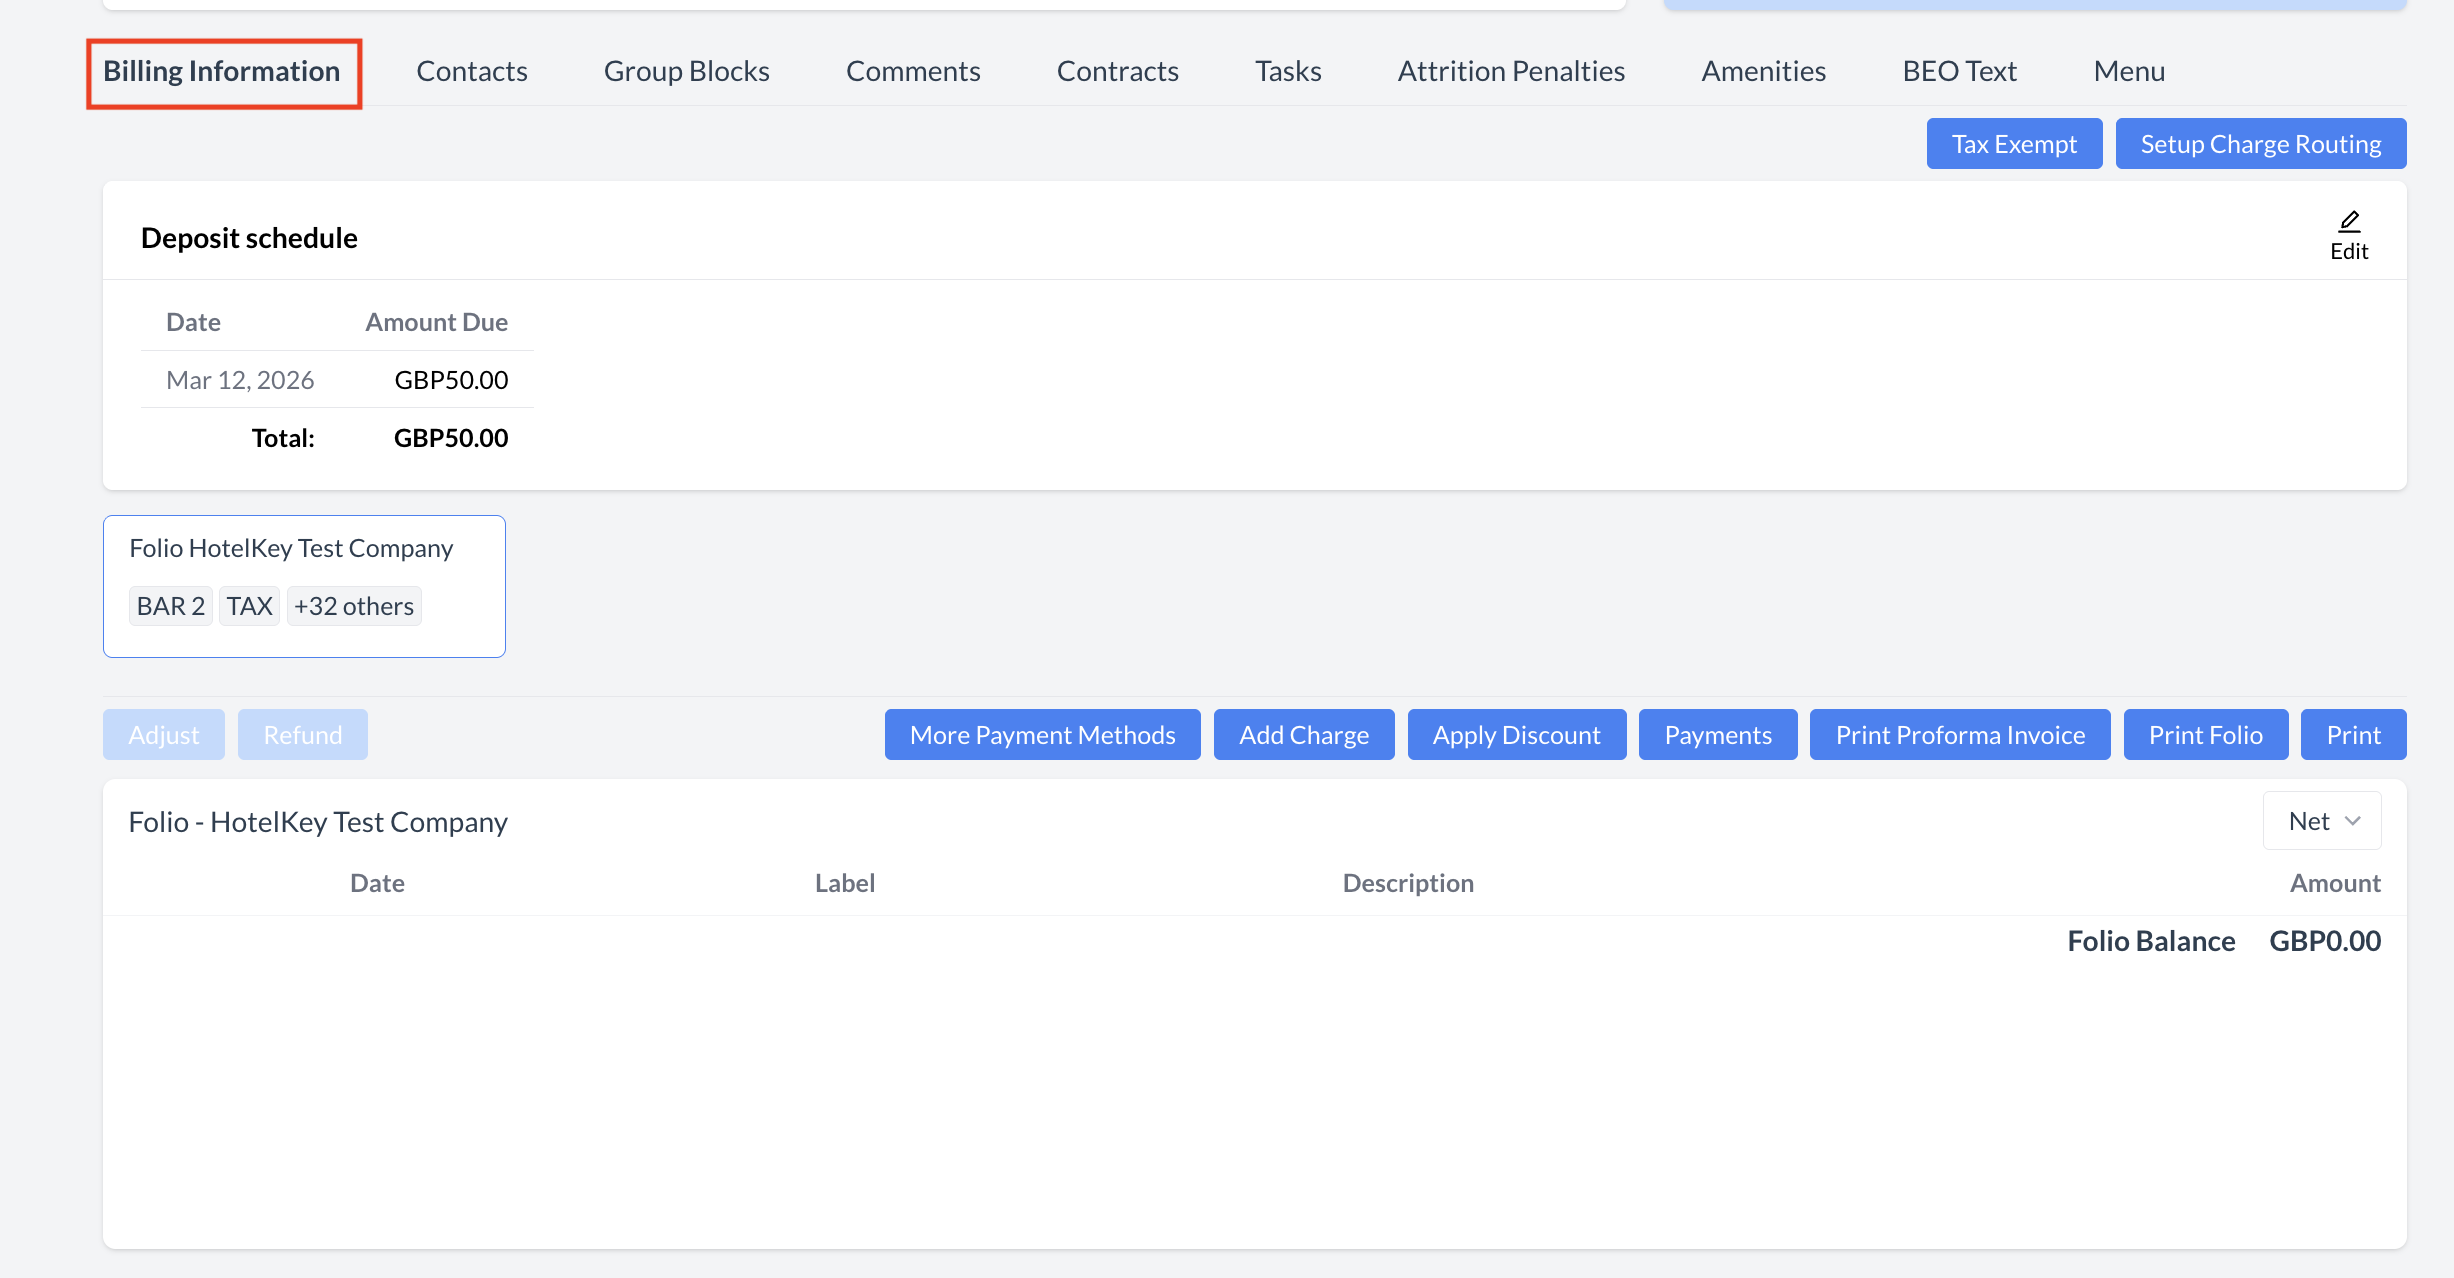
Accessing the Billing Information Section
On an Event Record (Reservation):
Scroll to the bottom of the Event Record page.
Locate the Billing Information section.
Click on "Billing Information" to expand and open the folio screen.
Billing Information Section on Event Record
Key Features and Functions
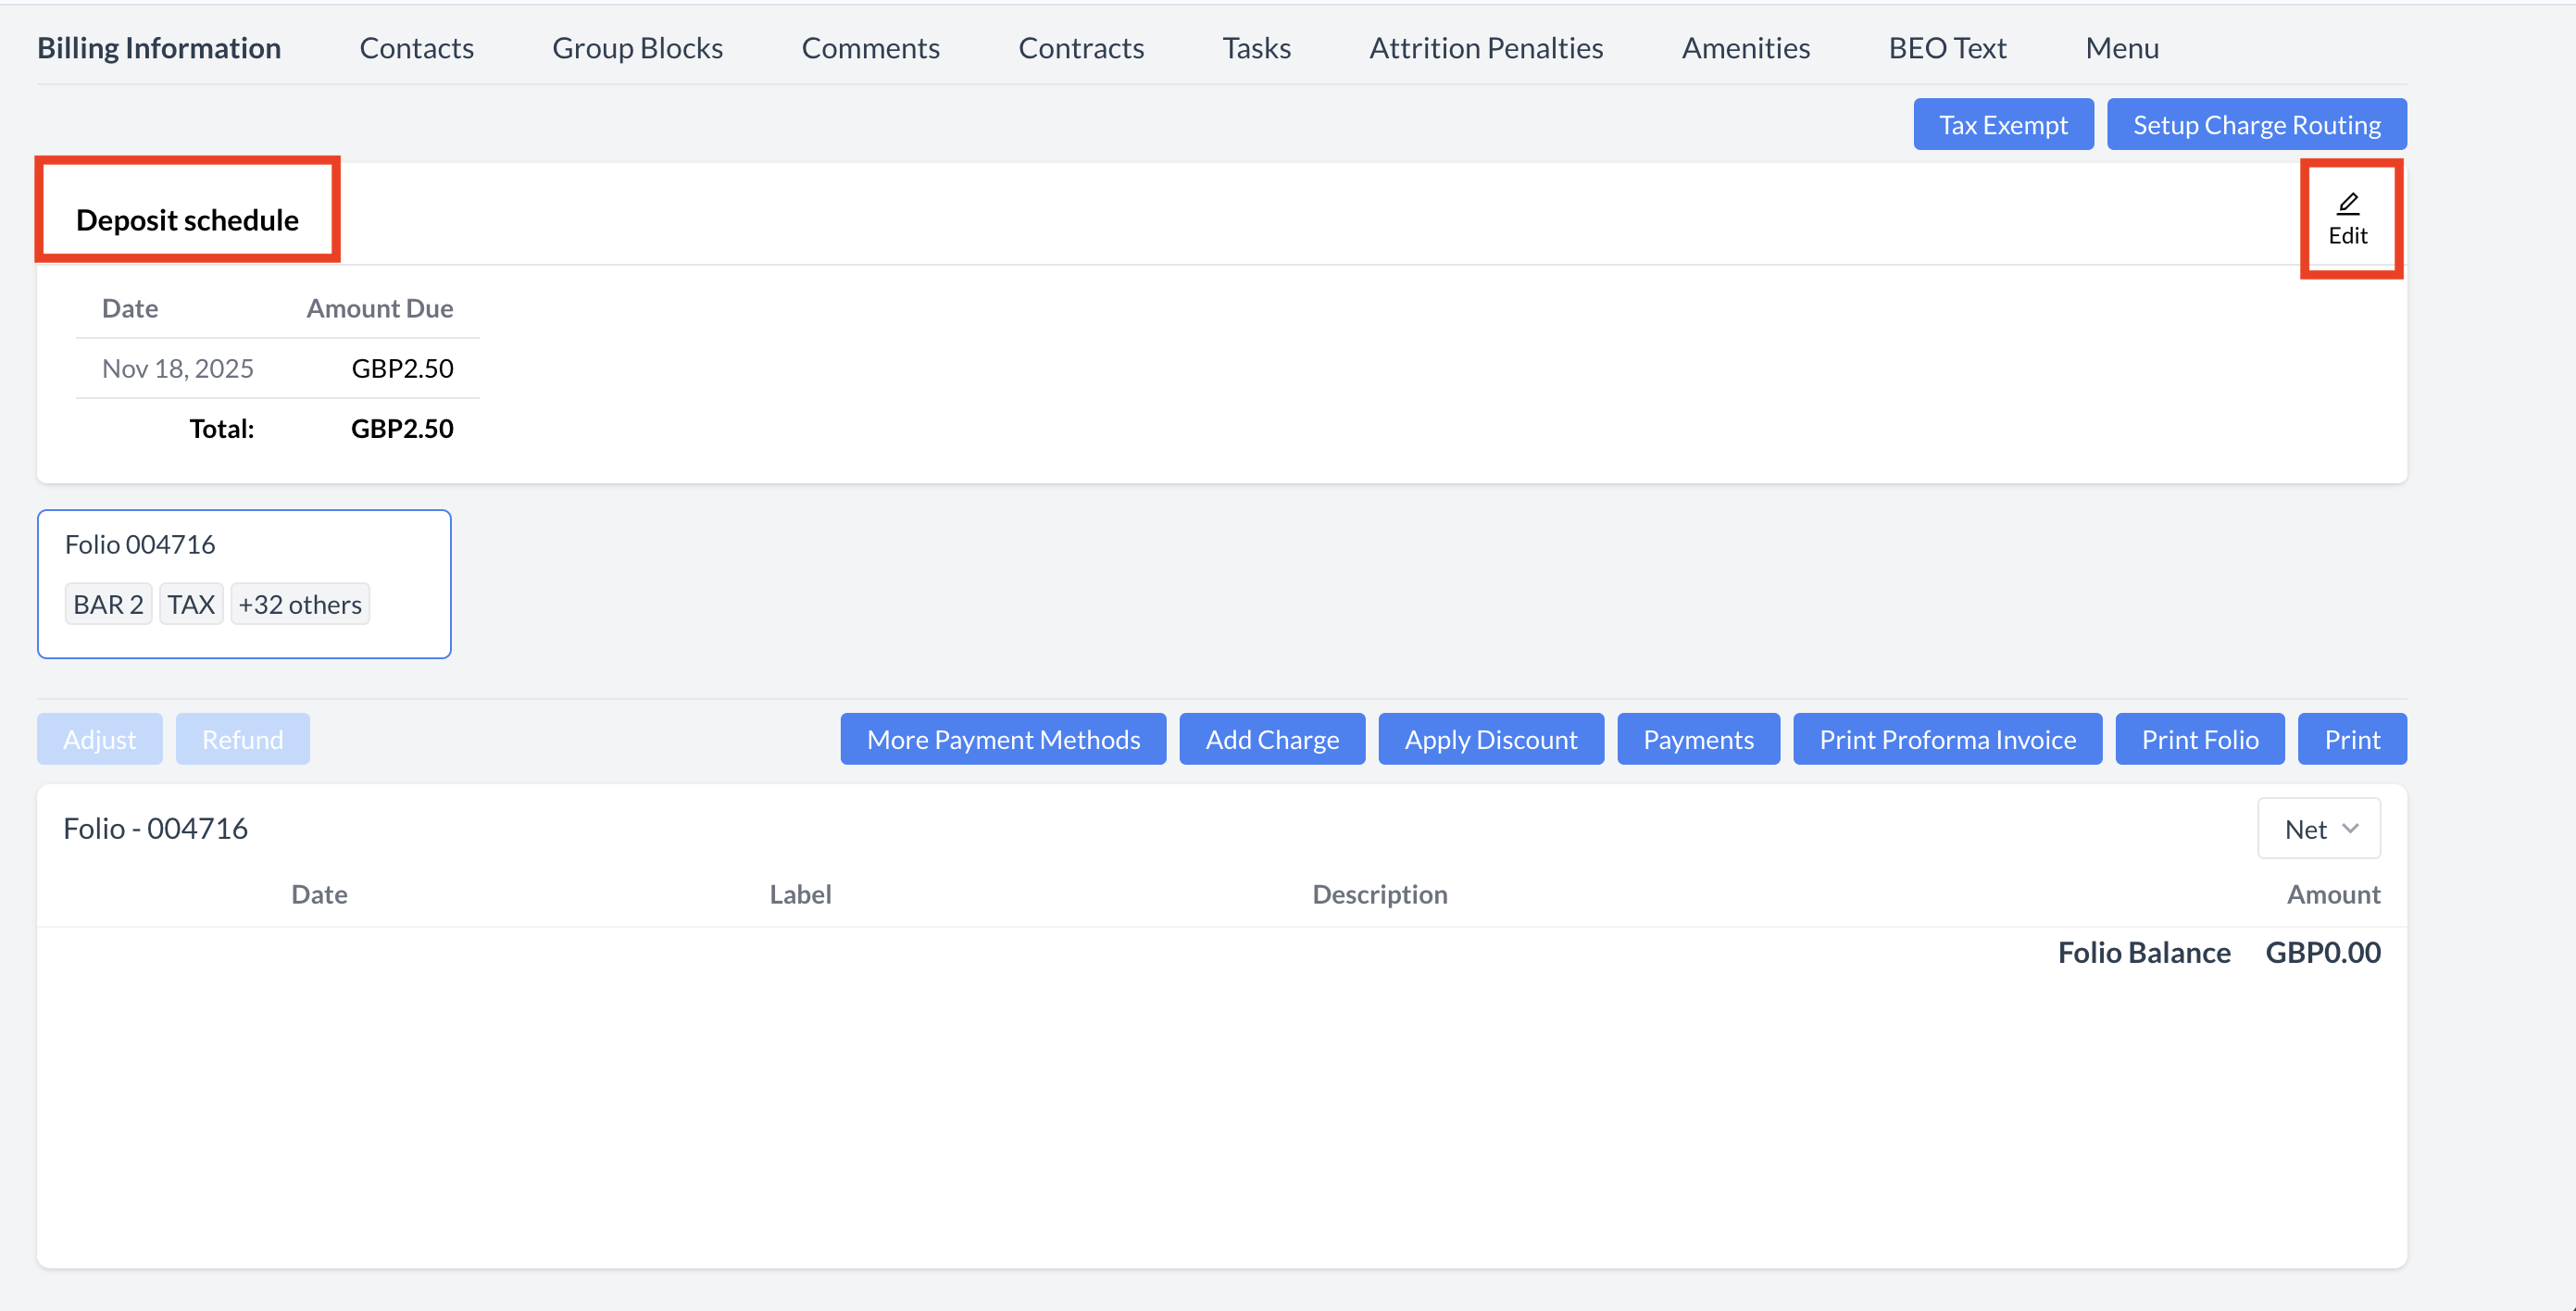
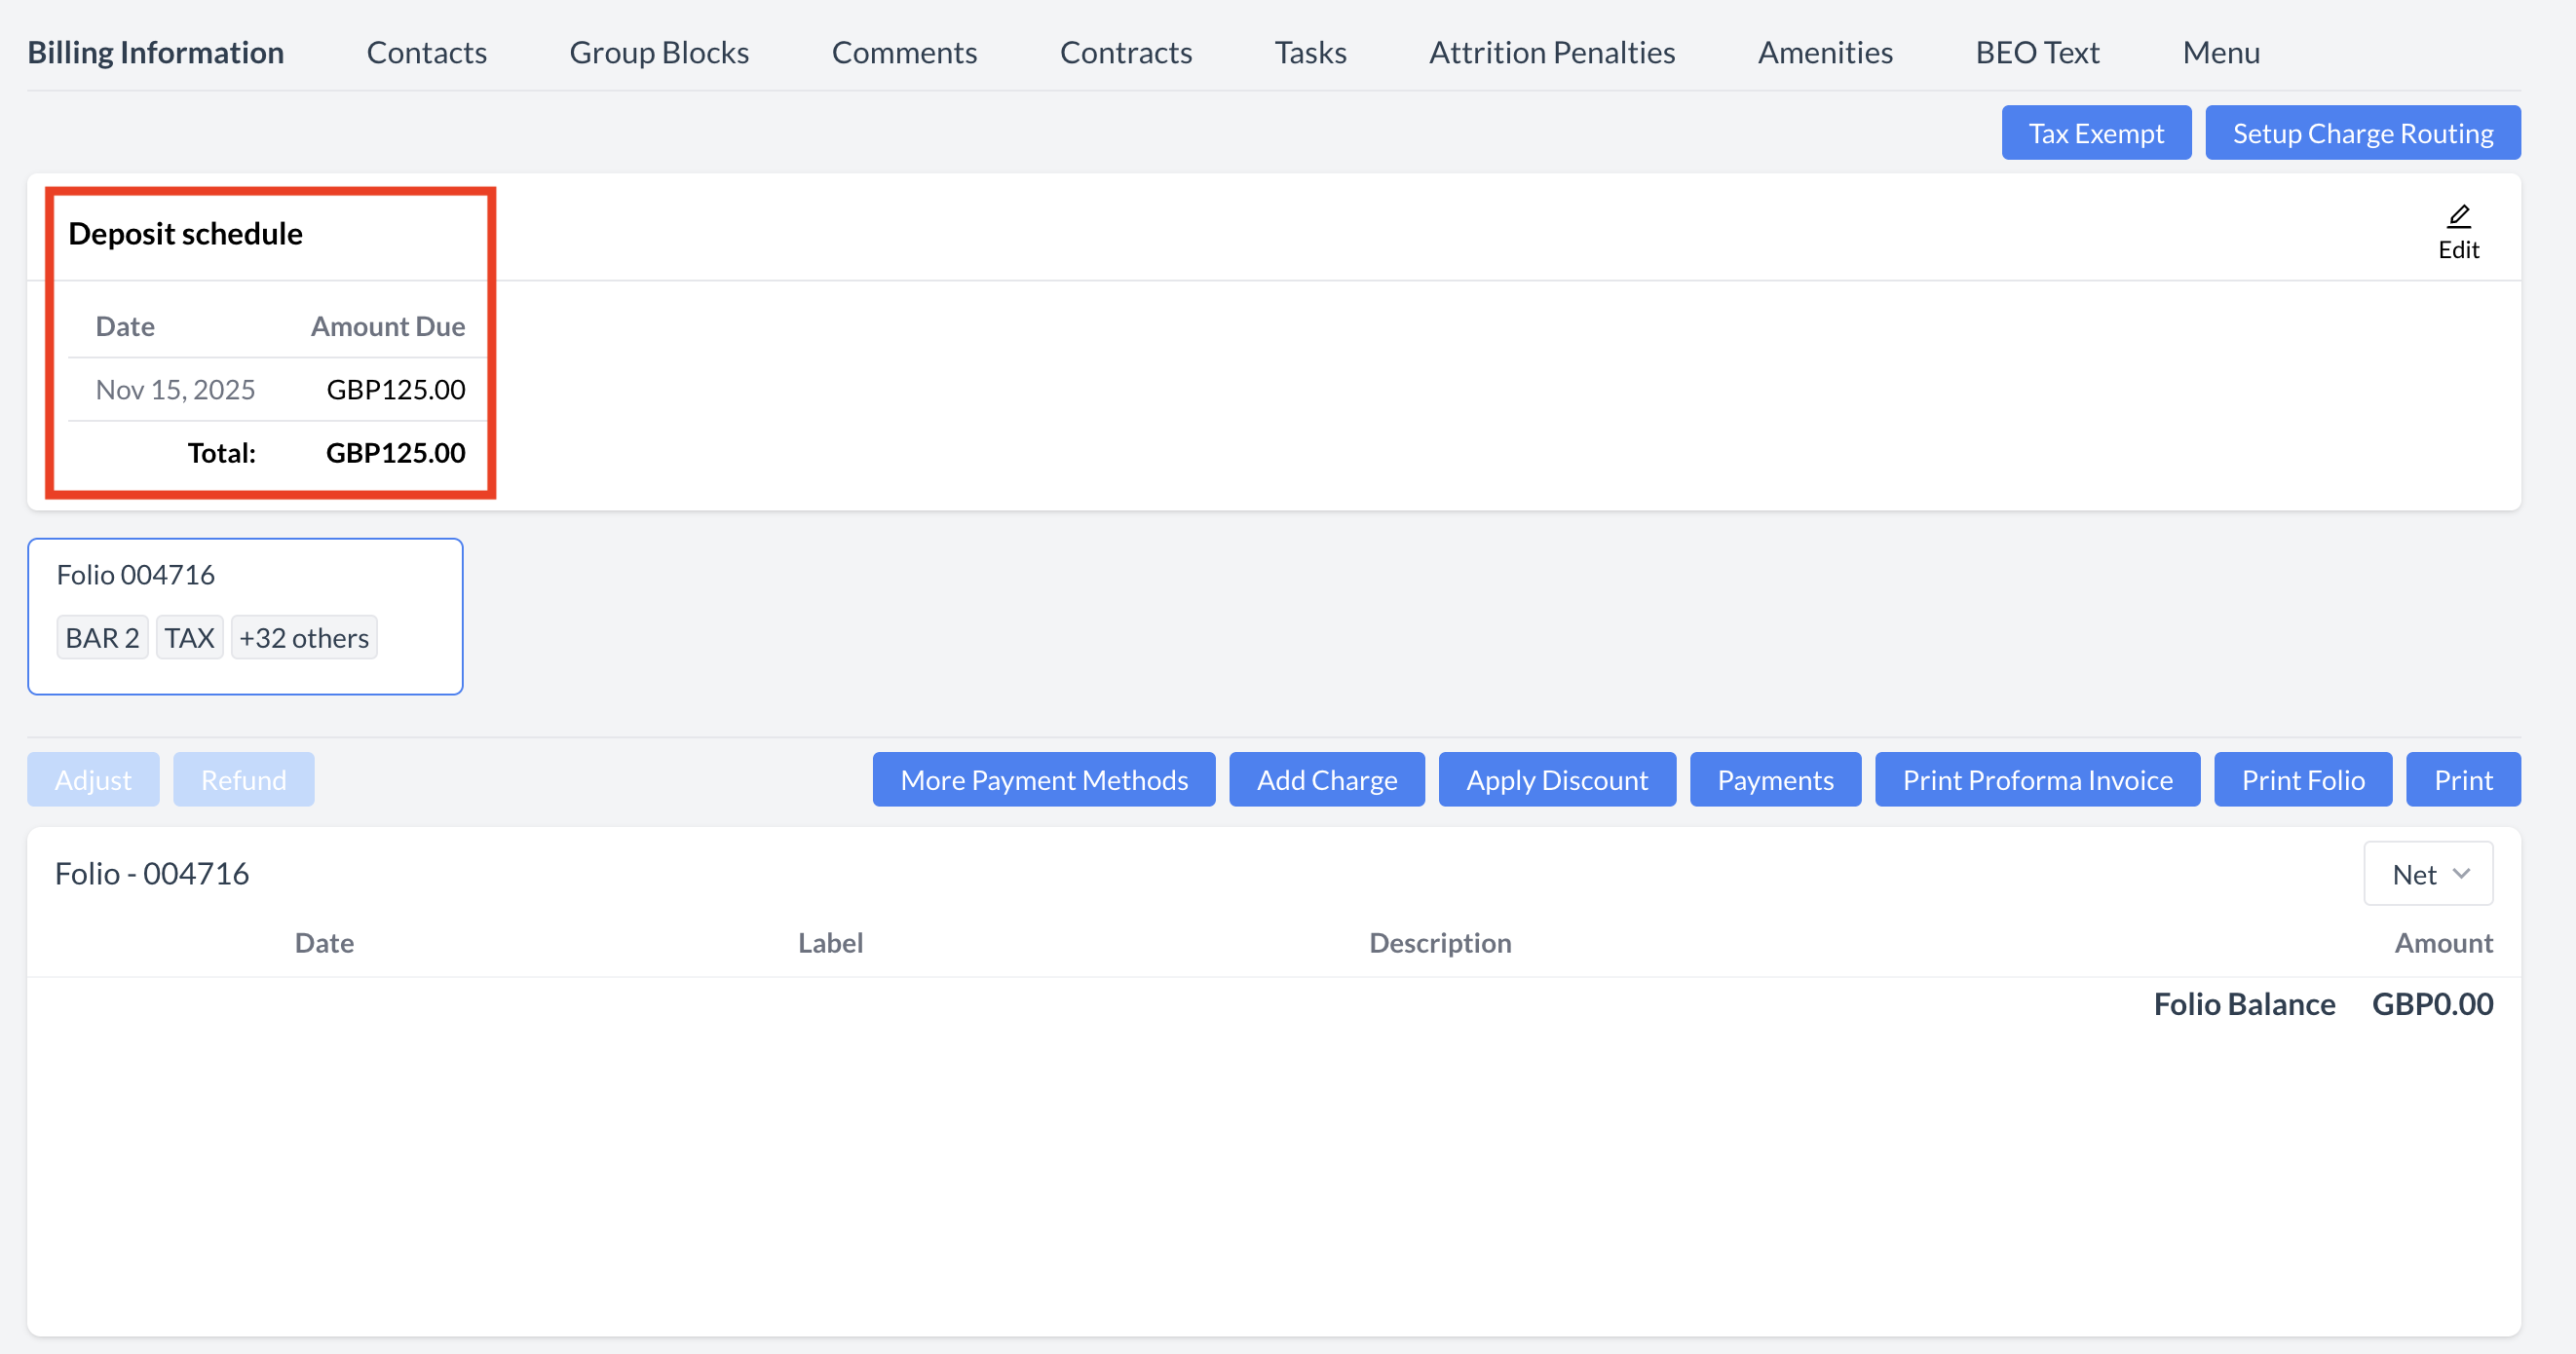
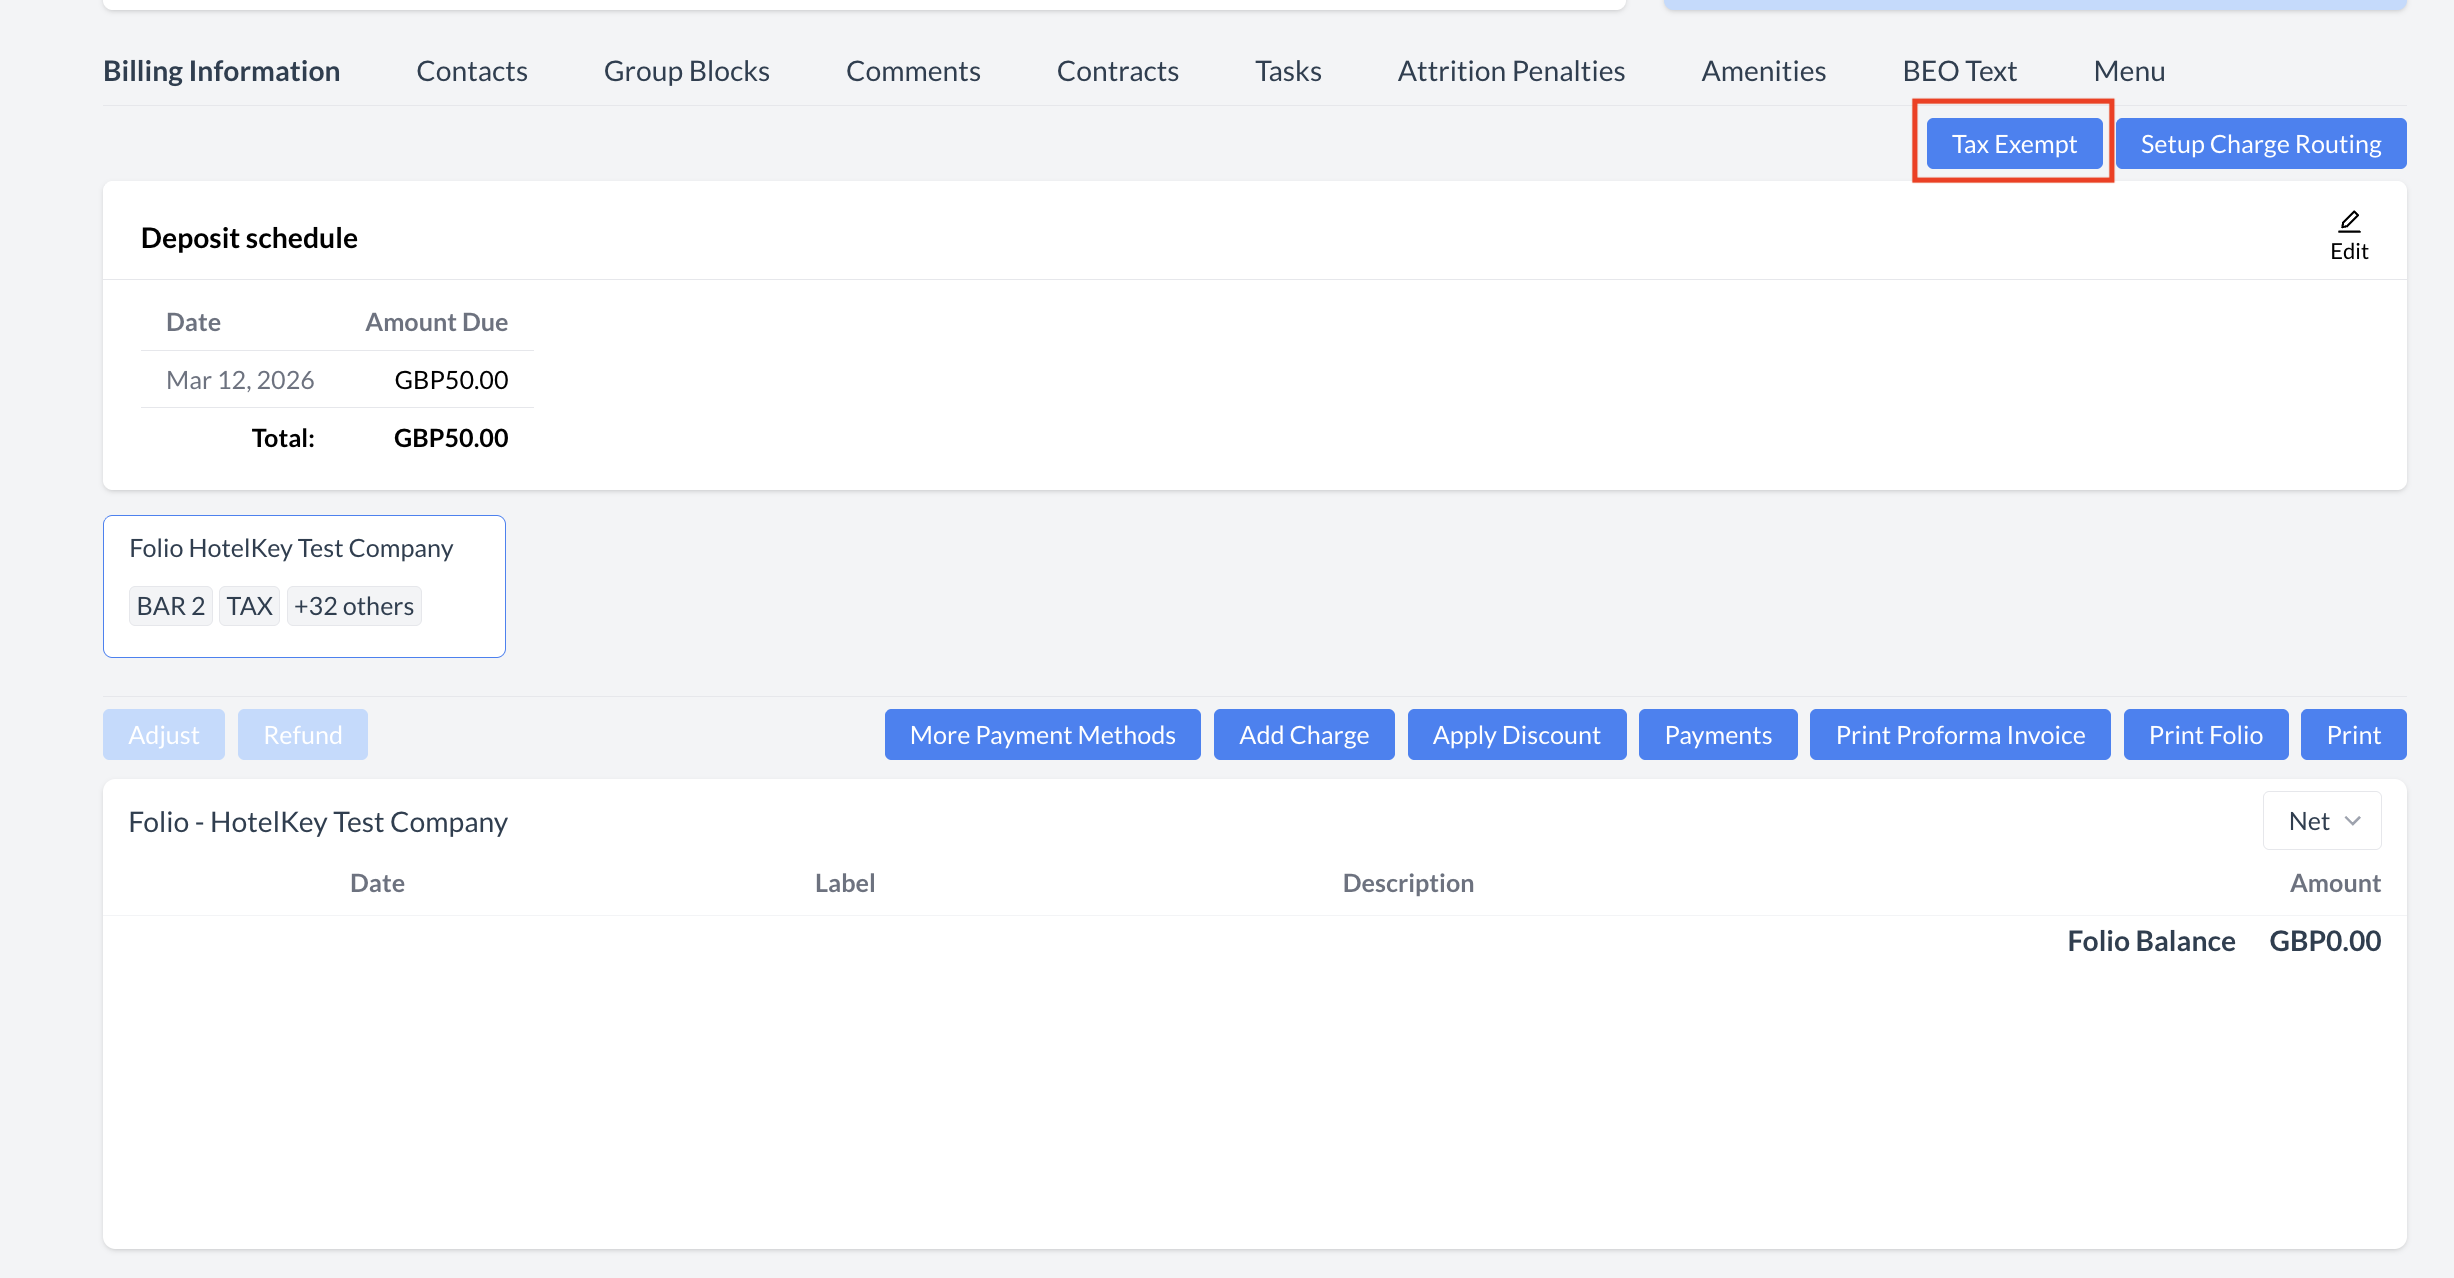
💰 Deposit Schedule
View upcoming deposit due dates and amounts. You can also edit the due dates and adjust the amounts as needed.
🏷️ Tax Exempt
Apply tax exemptions from the event folio. Useful for qualifying non-profit or government entities.
🔁 Setup Charge Routing
Configure charge routing to direct specific charges (e.g., F&B, AV, rooms) to designated outlets or folios.
📝 Adjust
Modify or correct posted charges on the event folio.
💸 Refund
Issue refunds for payments that have already been posted to the folio.
🔗 More Payment Links
Generate and send secure payment links to clients for deposits or final payments.
➕ Add Charge
Manually post charges to the event folio, such as miscellaneous fees or services.
🏷️ Apply Discount
Apply discounts to the overall folio total.
💳 Payments
Post payments received from the client to the event folio.
🧾 Print Proforma Invoice
Generate and print a Proforma Invoice, showing an estimate of all expected charges for the event.
🧾 Print Folio
Print the current folio, reflecting all posted charges, payments, and adjustments.
🖨️ Print (Invoice or Folio)
Print either a finalized Invoice or Folio, depending on the billing stage.
Billing Information Screen on Event Record
Steps to Manage Deposit Schedules:
Access Deposit Schedules
From the Billing Information screen, you will see a list of upcoming deposit due dates and amounts.
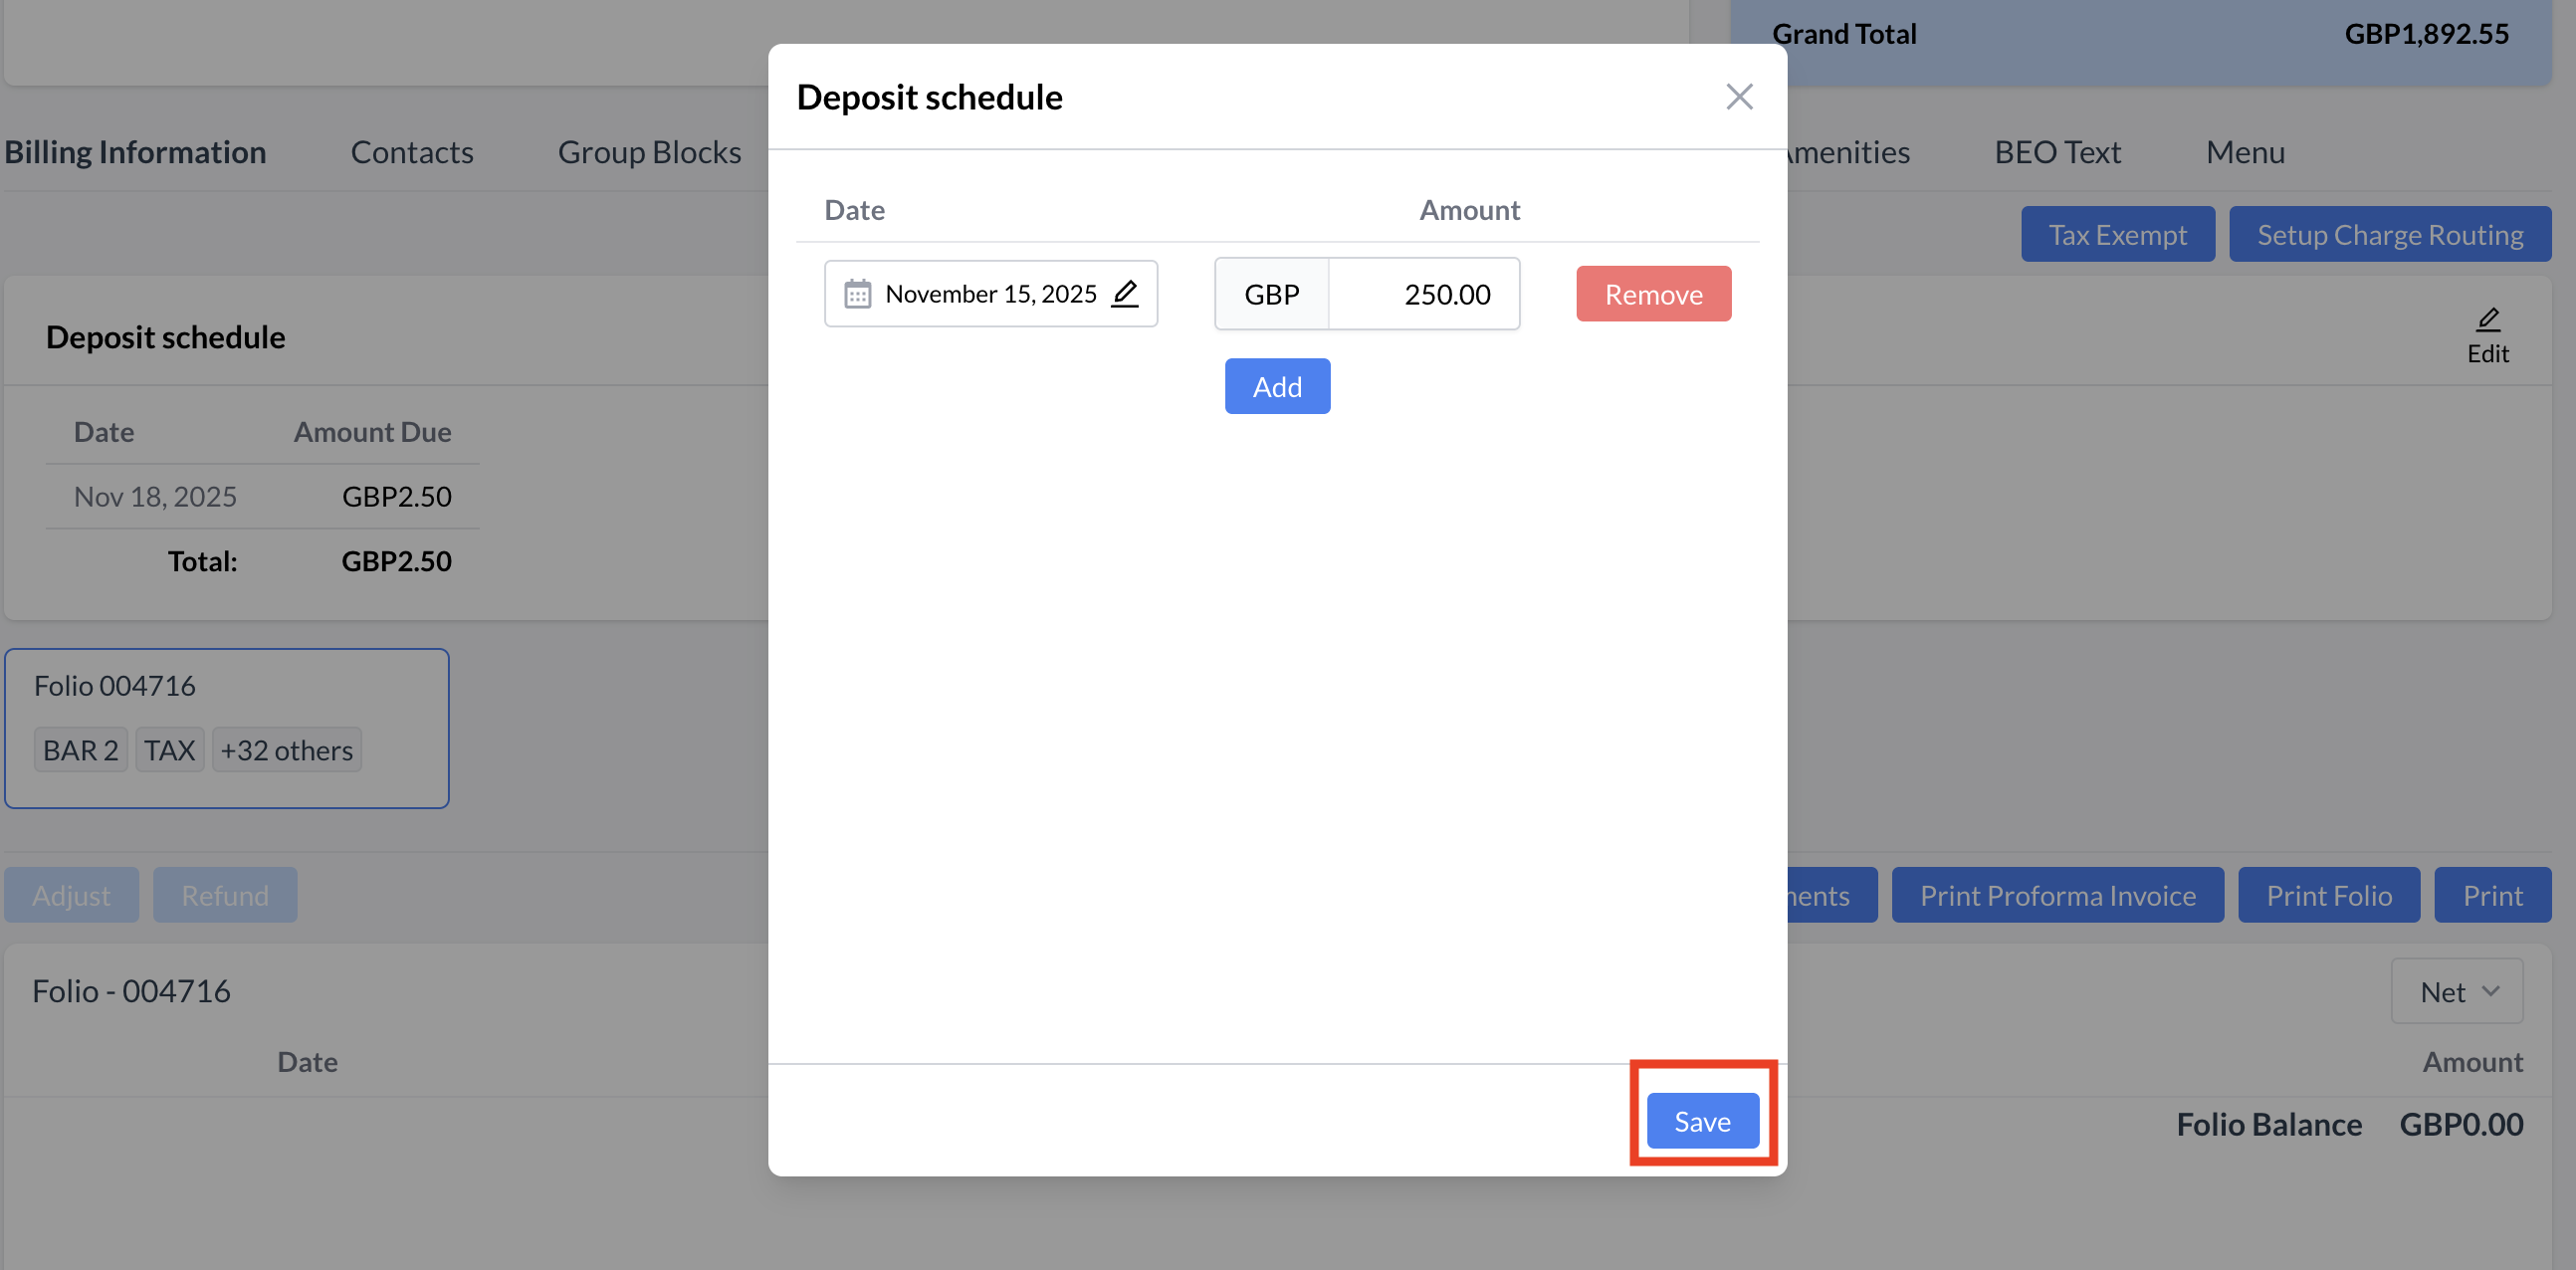
Edit an Existing Deposit Schedule
Click the ✏️ Edit (pencil) icon next to the deposit schedule you want to update.
To change the deposit due date, click on the date field to open the date picker, then select the new date.
To update the deposit amount, click inside the Amount field, delete the existing value, and enter the new amount.
Add a New Deposit Schedule
Click the blue Add button.
A new row will appear where you can enter a new deposit due date and amount.
Remove a Deposit Schedule
To delete a deposit schedule, click the red Remove button next to the row you wish to remove.
Save Your Changes
Once all updates are complete, click the blue Save button.
You will be returned to the Event Record screen.
Scroll down and click on Billing Information to confirm your changes have been applied to the event.
Billing Information - Deposit Schedules
Billing Information - Edit Deposit Schedules
Billing Information - Deposit Schedules
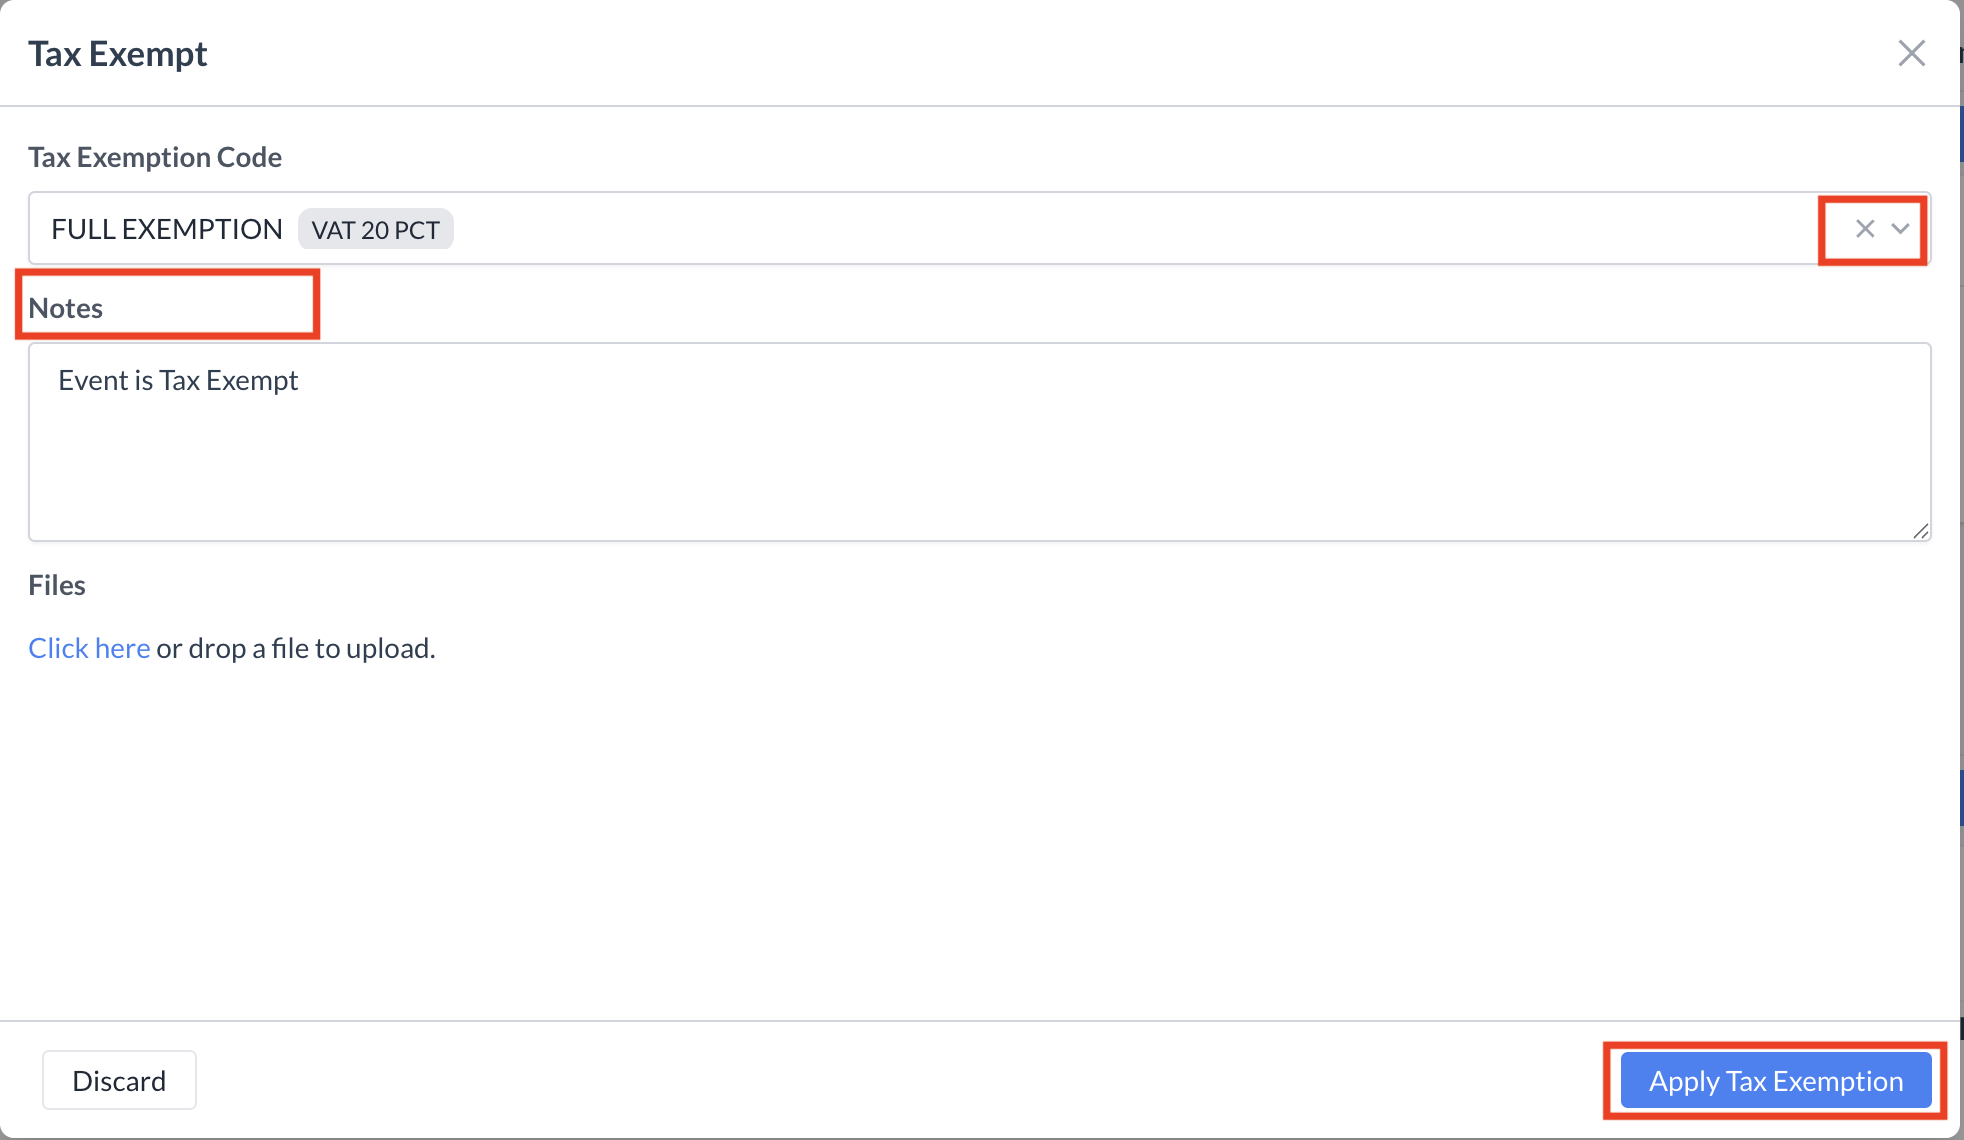
Steps to Apply a Tax Exemption:
Open the Tax Exemption Screen
From the Billing Information screen, click the blue “Tax Exempt” button.
This will open the Tax Exempt configuration screen.
Select a Tax Exemption Code
In the Tax Exemption Code field, click the drop-down menu and select the appropriate exemption code.
Enter any relevant notes in the Notes section.
If required, attach supporting documentation by uploading files.
Apply the Tax Exemption
Click the blue “Apply Tax Exemption” button to proceed.
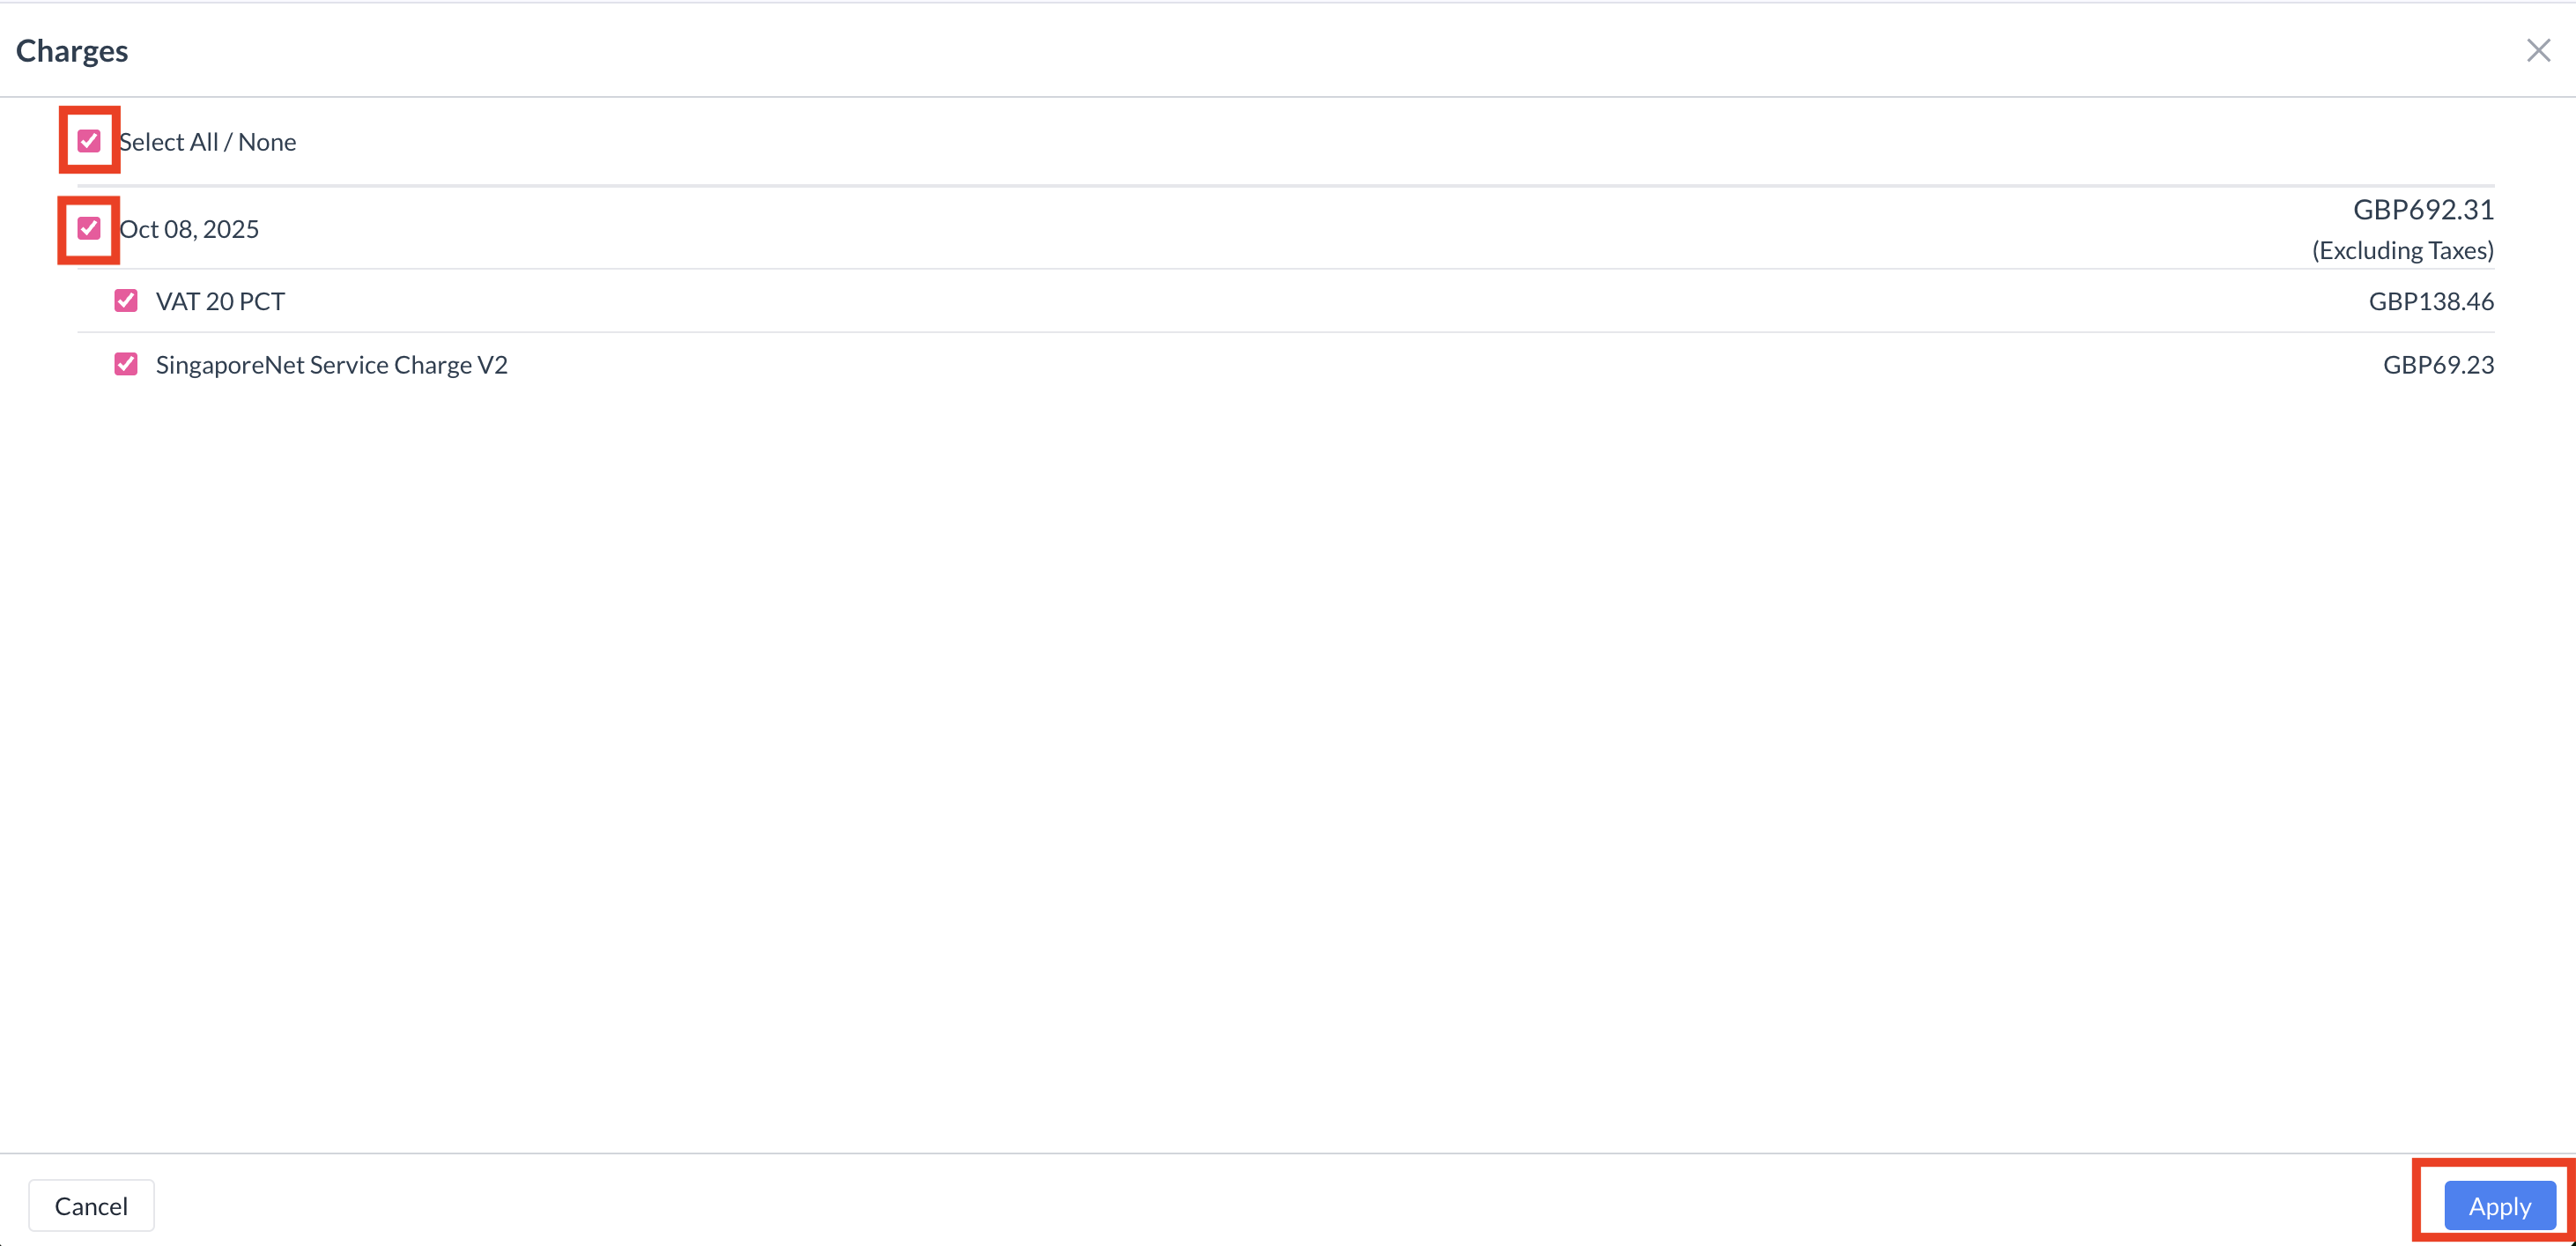
Select Charges to Exempt
A new Charges screen will appear, displaying all posted charges on the folio.
Use the checkboxes to select the charges you want to apply the exemption to.
You can choose “Select All” or pick individual charges.
Click the blue “Apply” button to save your selections.
Note: Charges must already be posted to the event folio before you can select them for tax exemption. If no charges are posted, this step cannot be completed.
Review Tax Exemptions
Return to the Billing Information screen.
Change the folio view from Net to Detail to verify that the tax exemptions have been applied correctly.
Tax Exempt Button
Tax Exempt - Select Tax Exemption Code
Tax Exempt - Select Charges to Exempt
Billing Information - Tax Exempt Charges
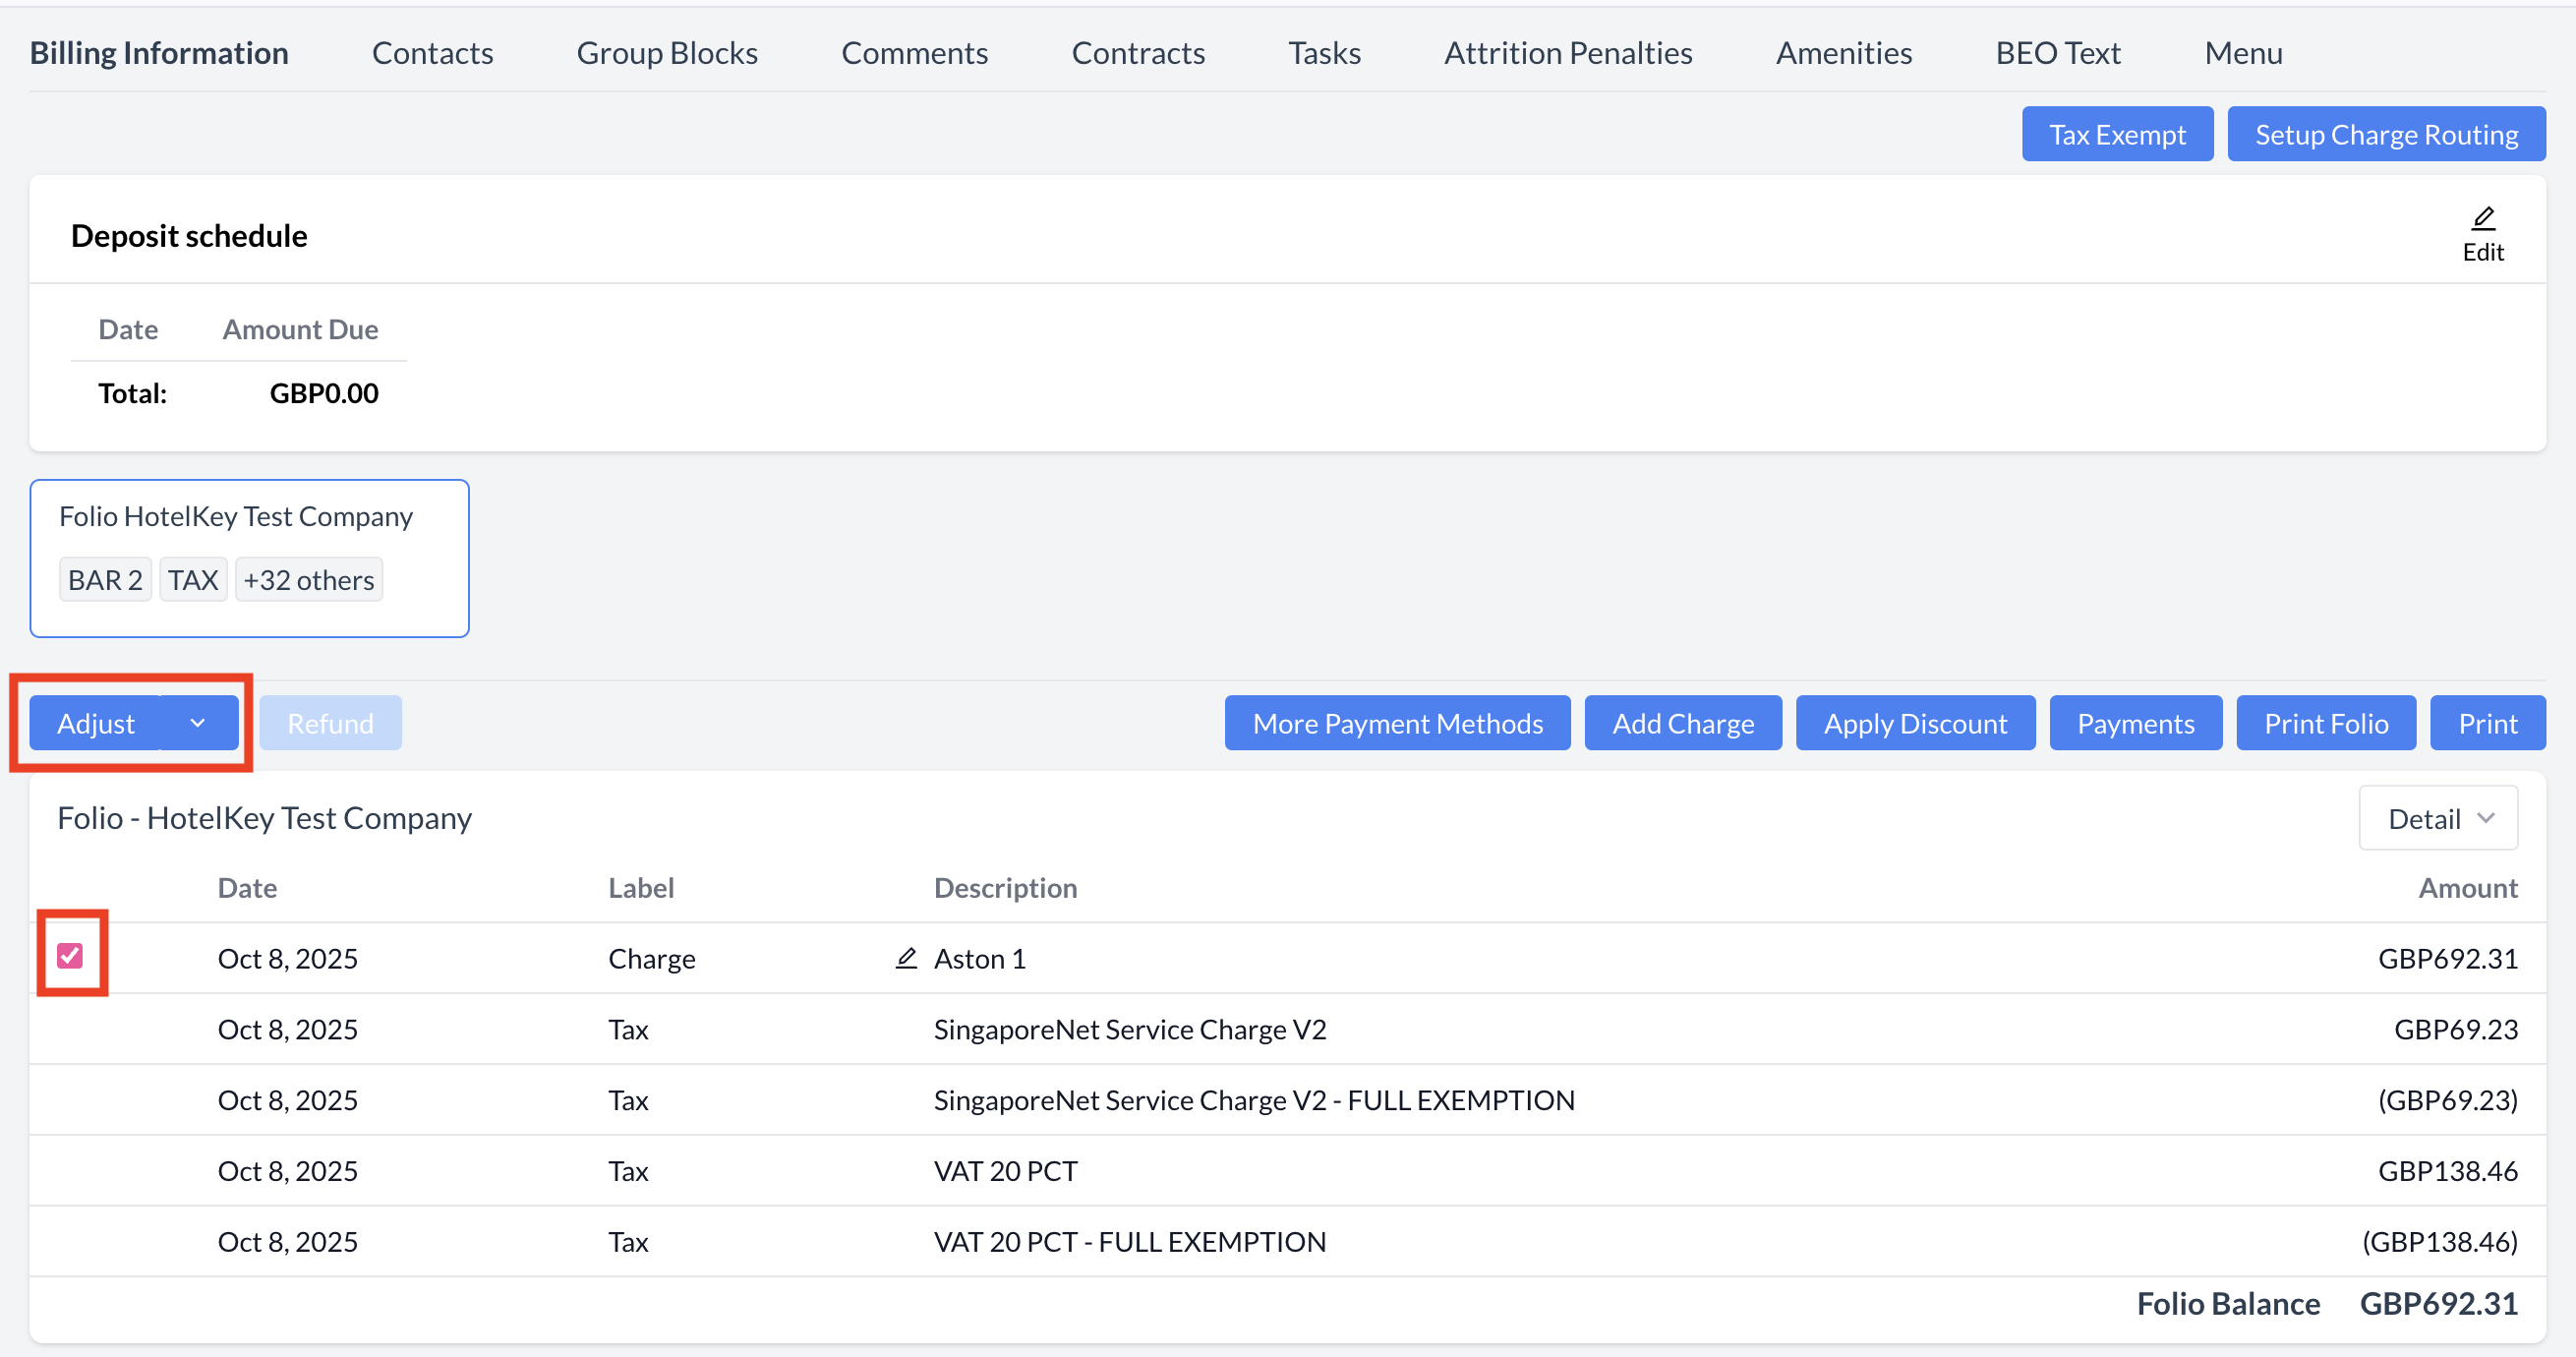
Steps to Adjust a Posted Charge:
Select the Charge to Adjust
From the Folio section, locate the charge you need to adjust.
Use the checkbox to select the applicable charge.
Click the blue “Adjust” button.
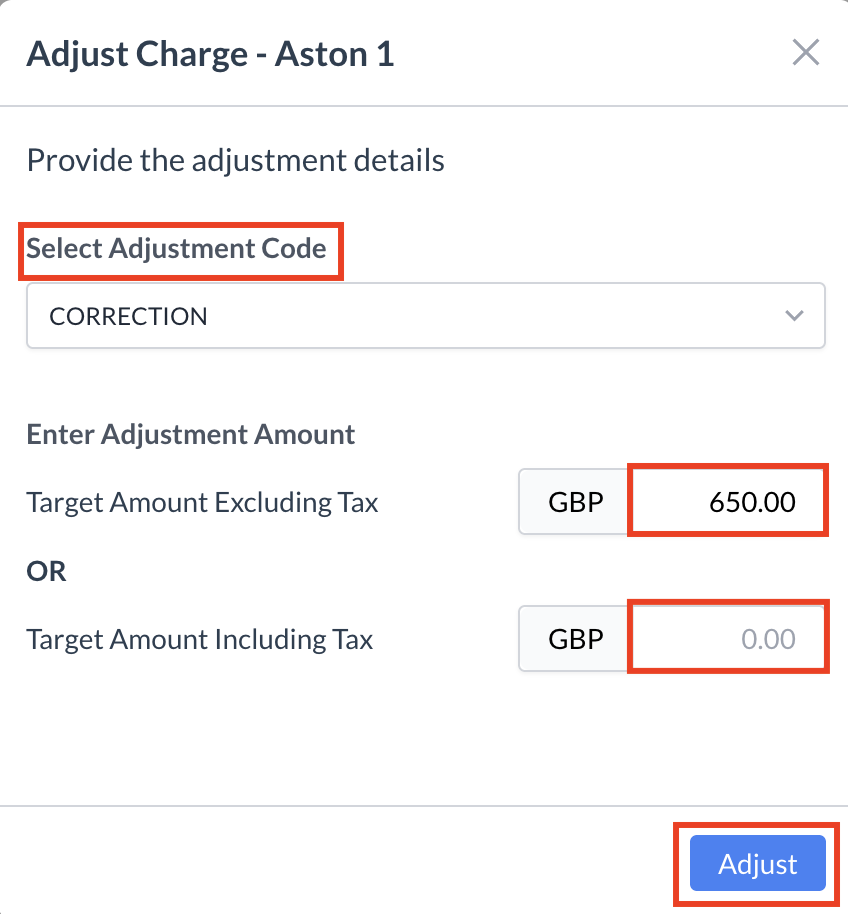
Open the Adjust Charge Screen
The Adjust Charge screen will appear, displaying the selected charge type in the header.
Enter Adjustment Details
From the Adjustment Code drop-down menu, select the appropriate code. This represents the reason for the adjustment.
Enter the Target Amount — the new amount that should be applied to the charge.
You may enter the amount excluding tax or including tax, but not both.
Once complete, click the blue “Adjustment” button to apply the change.
Review the Adjustment
Return to the Billing Information screen.
Change the folio view from Net to Detail to verify that the adjustment has been applied correctly.
Billing Information - Adjust Charges
Adjust Charges - Adjust Charge Screen
Billing Information - Adjusted Charge
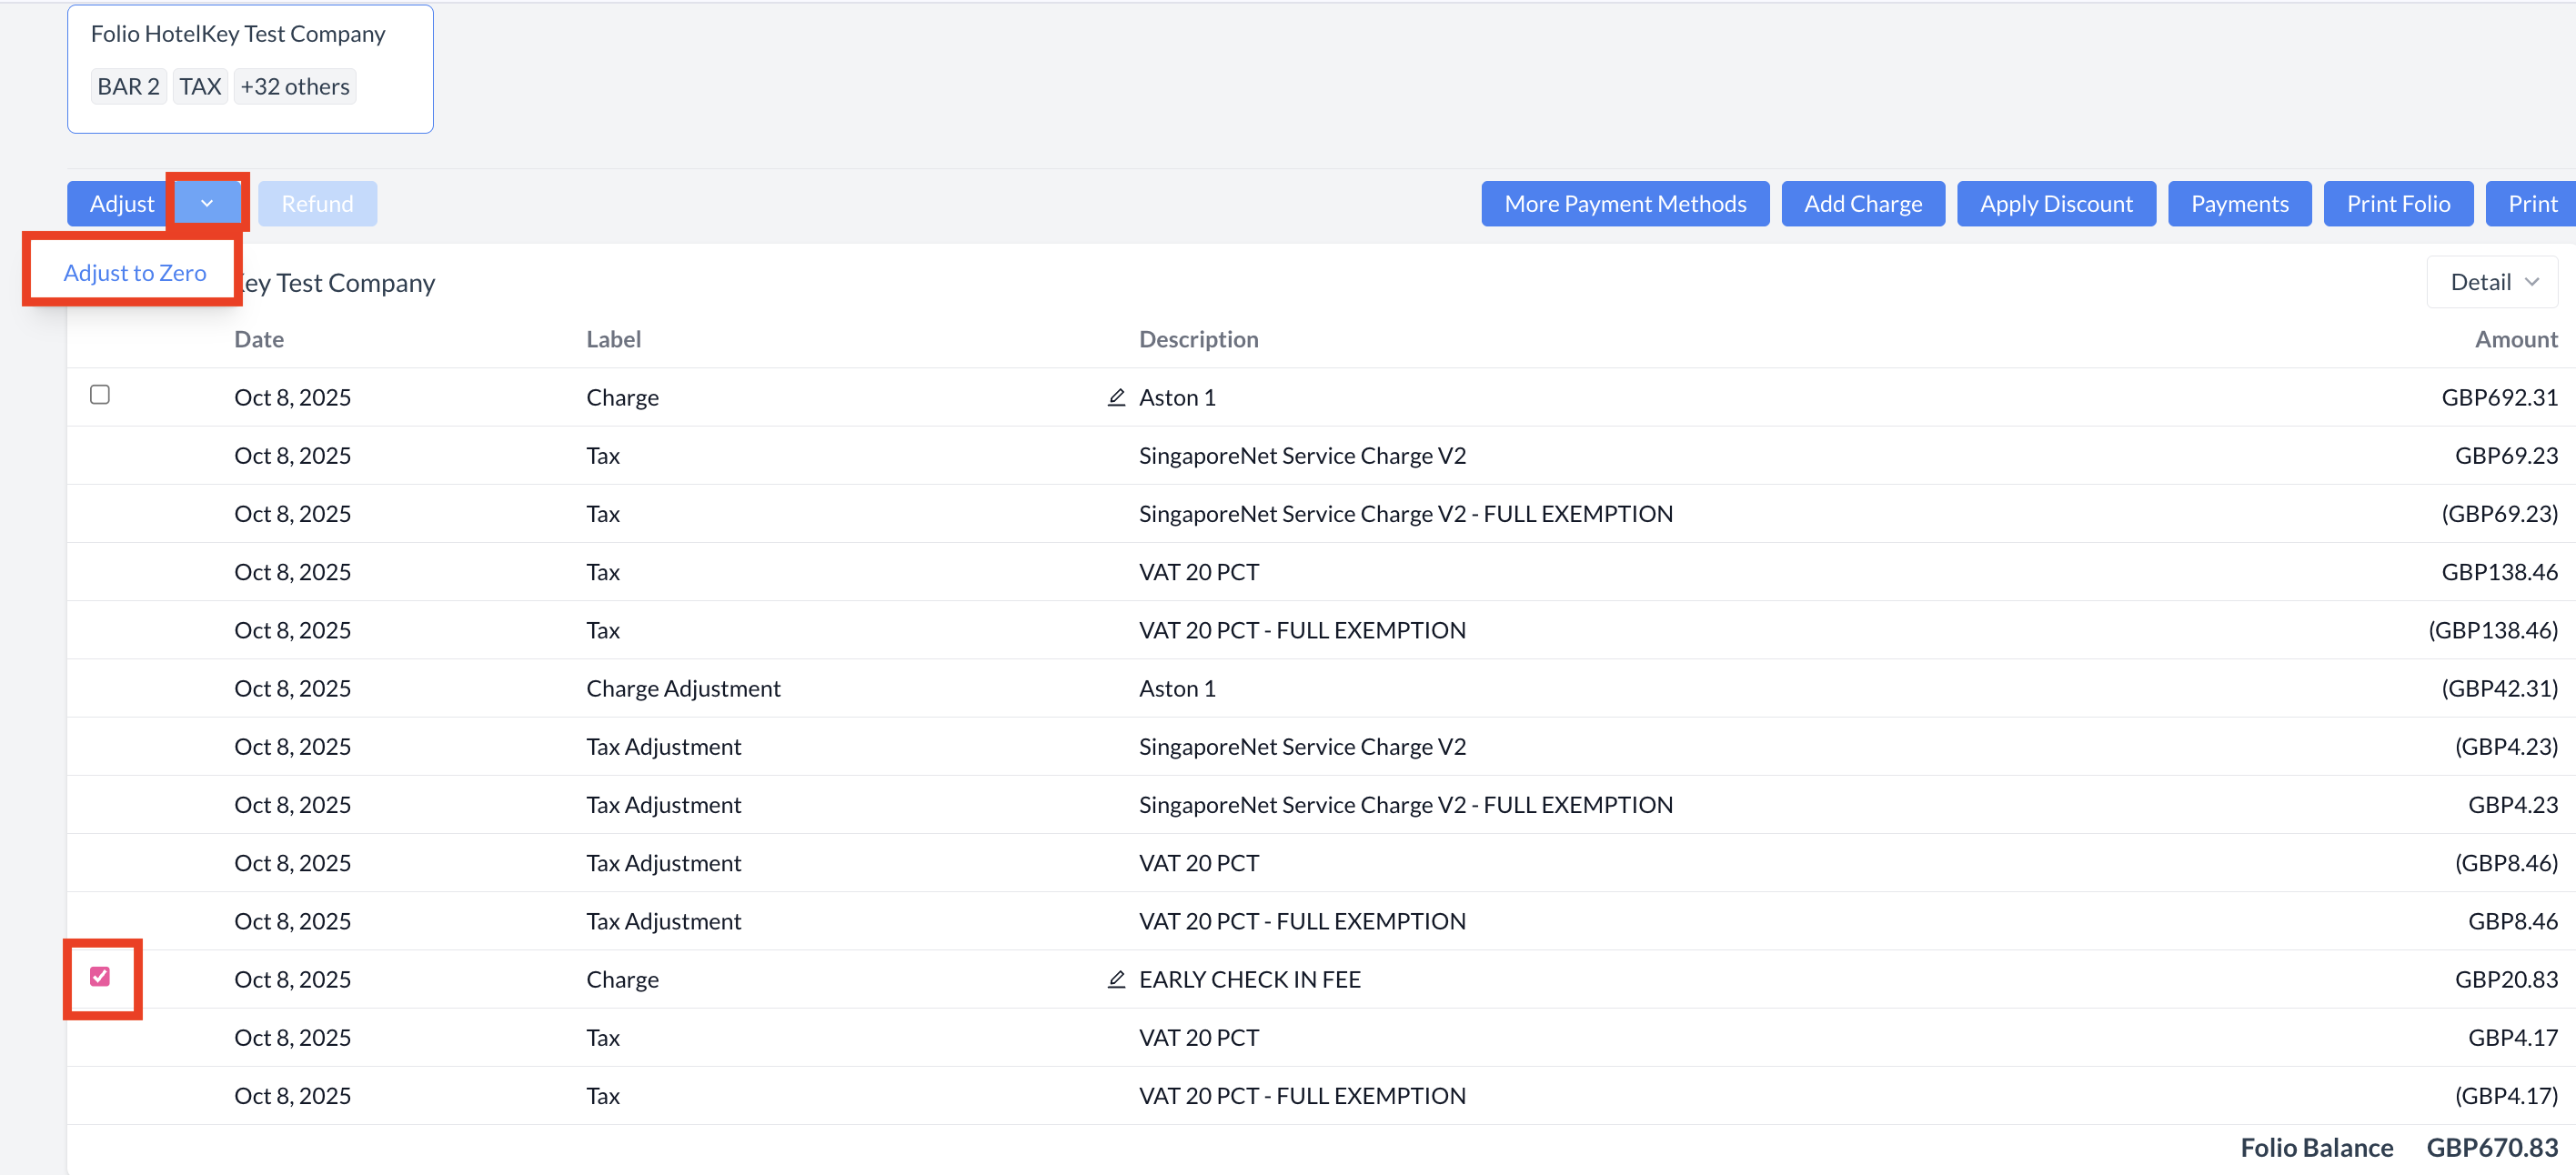
Steps to Adjust a Charge to Zero:
Select the Charge to Adjust
From the Folio section, locate the charge that needs to be adjusted.
Use the checkbox to select the applicable charge.
Apply the Adjustment
Click the dropdown arrow next to the blue “Adjust” button.
Select “Adjust to Zero” from the menu.
Confirm Adjustment
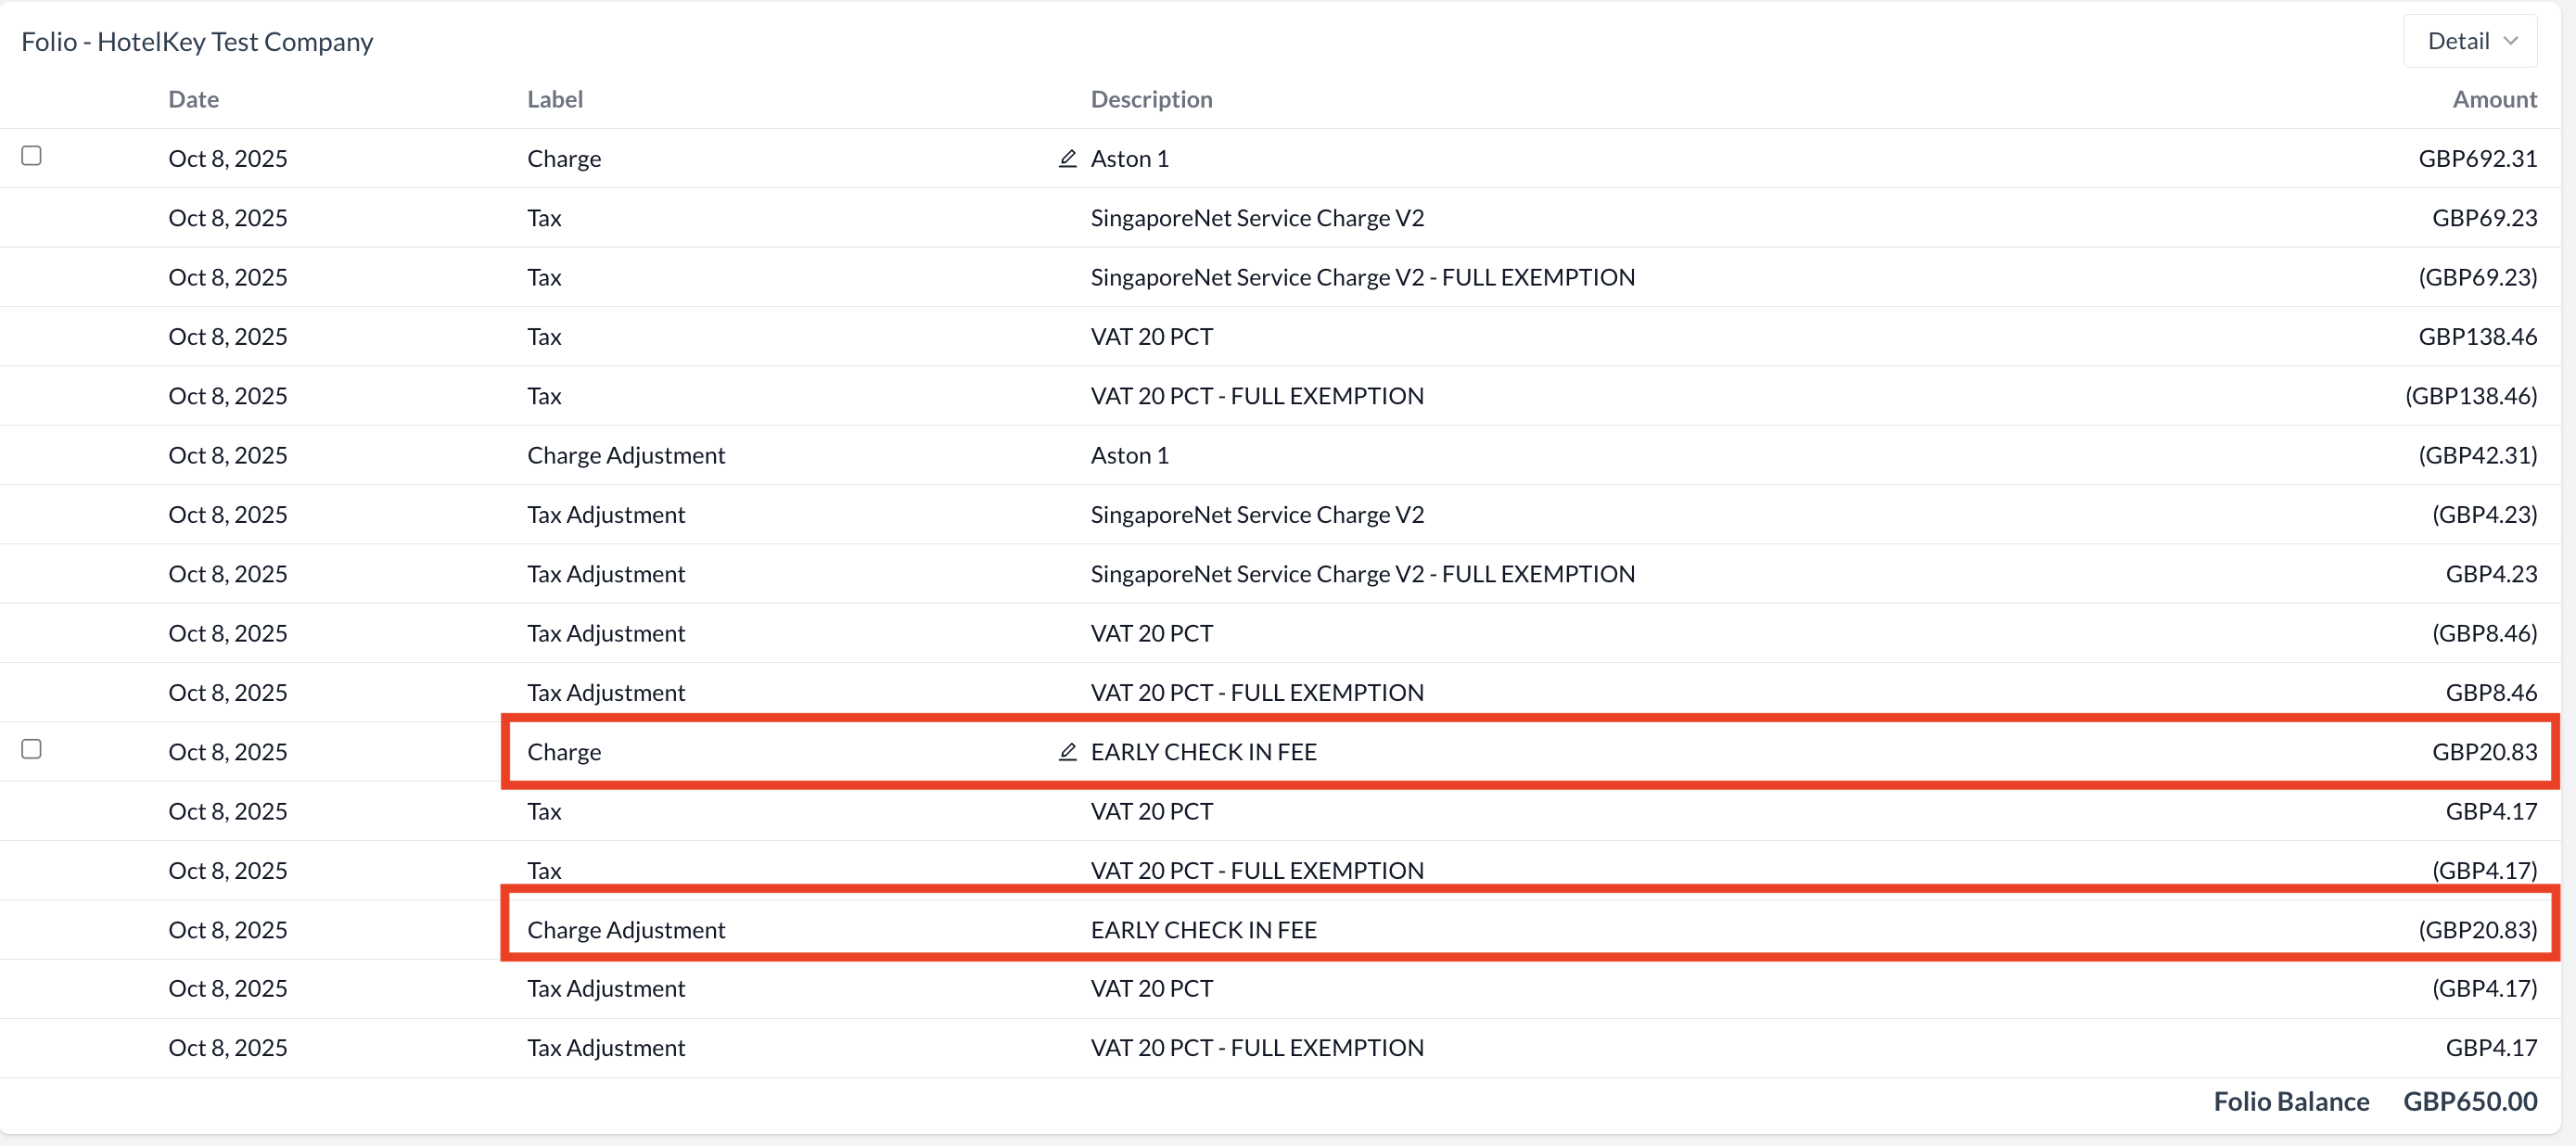
The selected charge will be automatically adjusted to zero and updated on the folio.
Billing Information - Adjust to Zero
Billing Information - Adjusted Charge
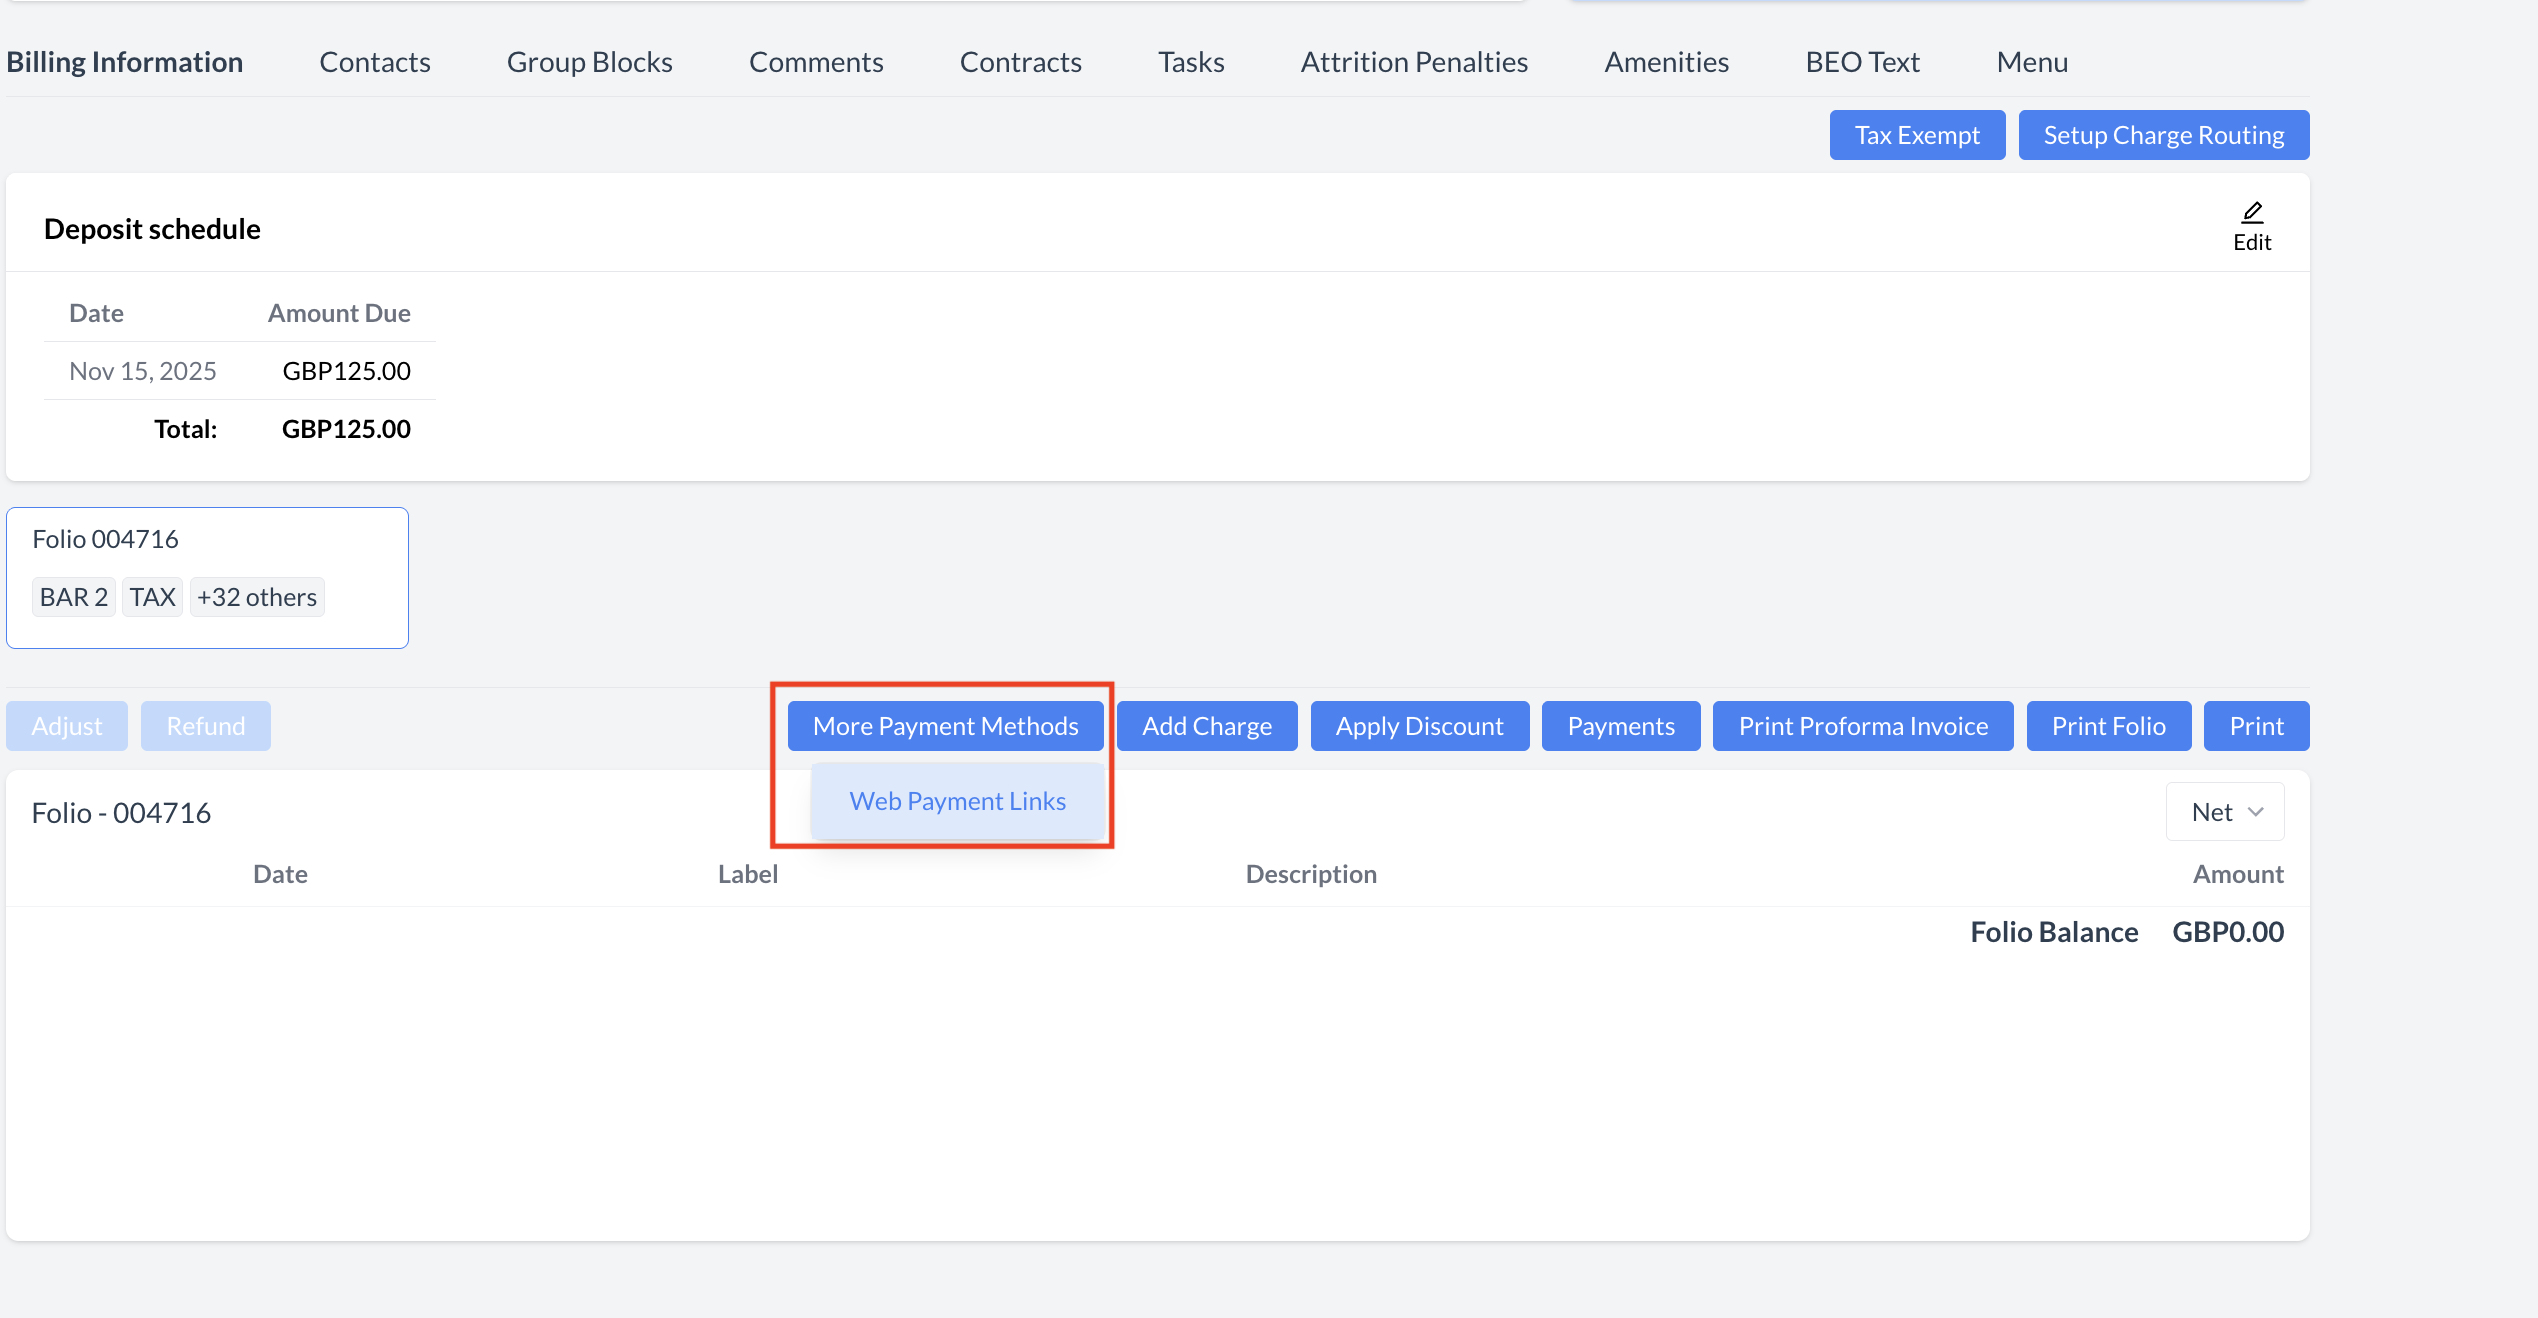
Sending a Web Payment Link to a Client
You can send a secure payment link to clients directly from the Billing Information screen. This allows the client to submit a credit card payment online through a secure portal.
Step 1: Open the Web Payment Link Menu
From the Billing Information screen, click the blue "More Payment Methods" button.
Select "Web Payment Link" from the dropdown.
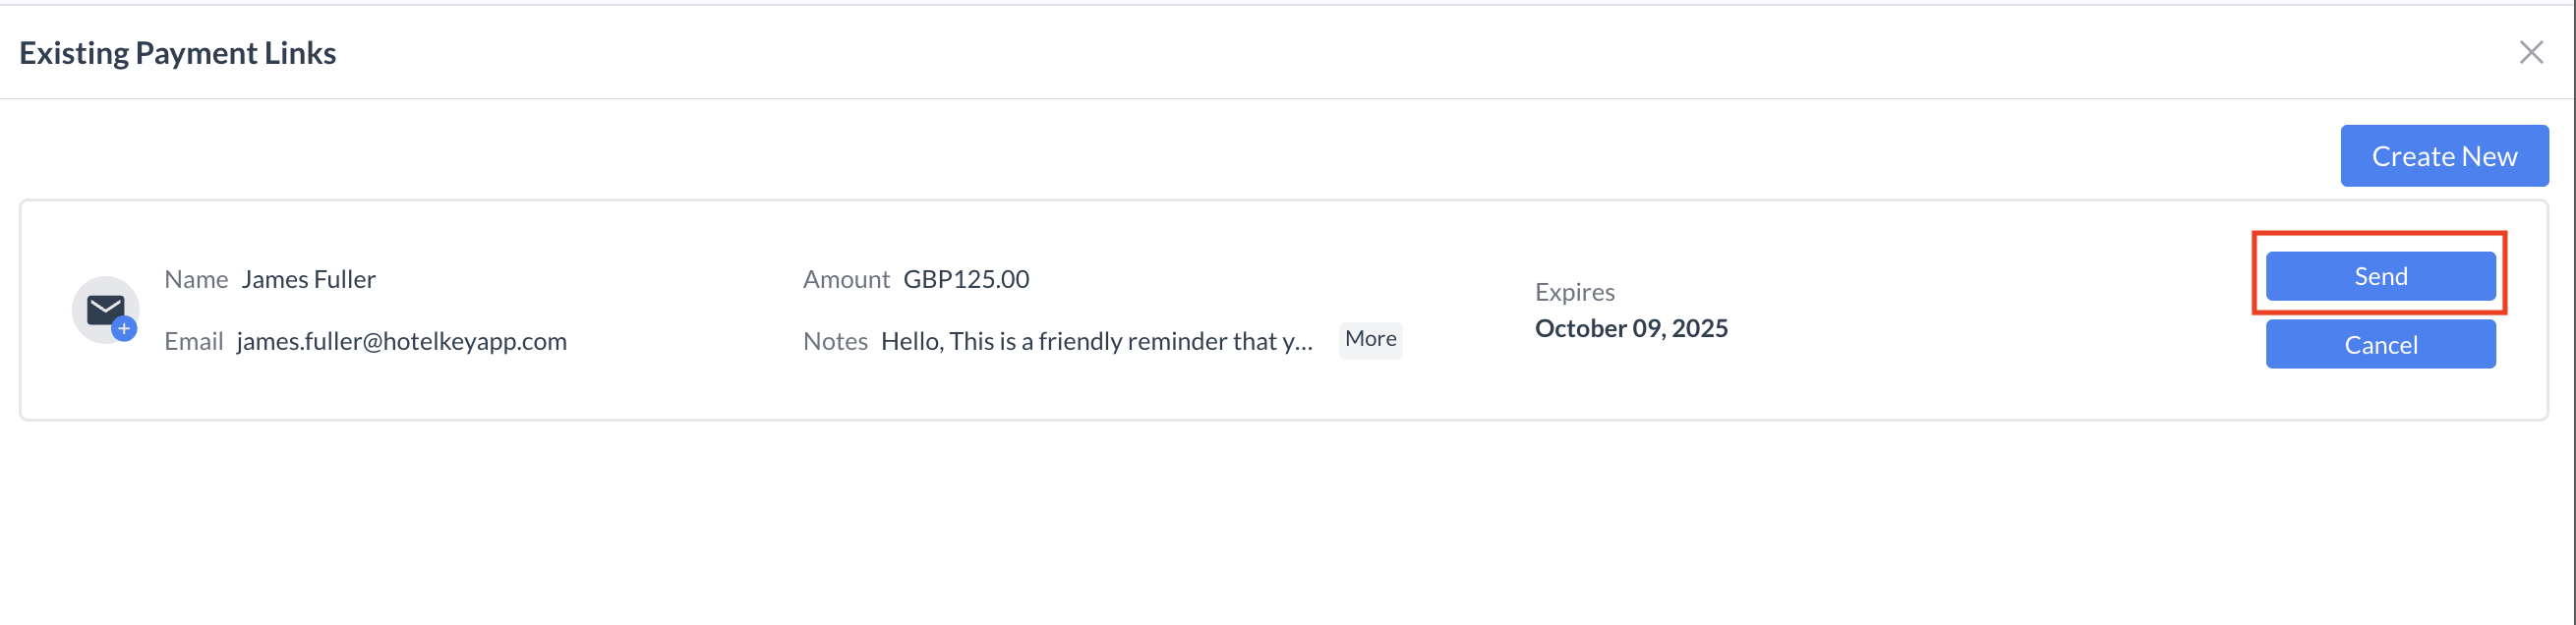
Step 2: Manage Existing or Create a New Payment Link
The Existing Payment Links window will open. From here, you can:
Click Send or Resend to email an existing payment link.
Click Cancel to deactivate an existing link.
Click Create New to generate a new payment link.
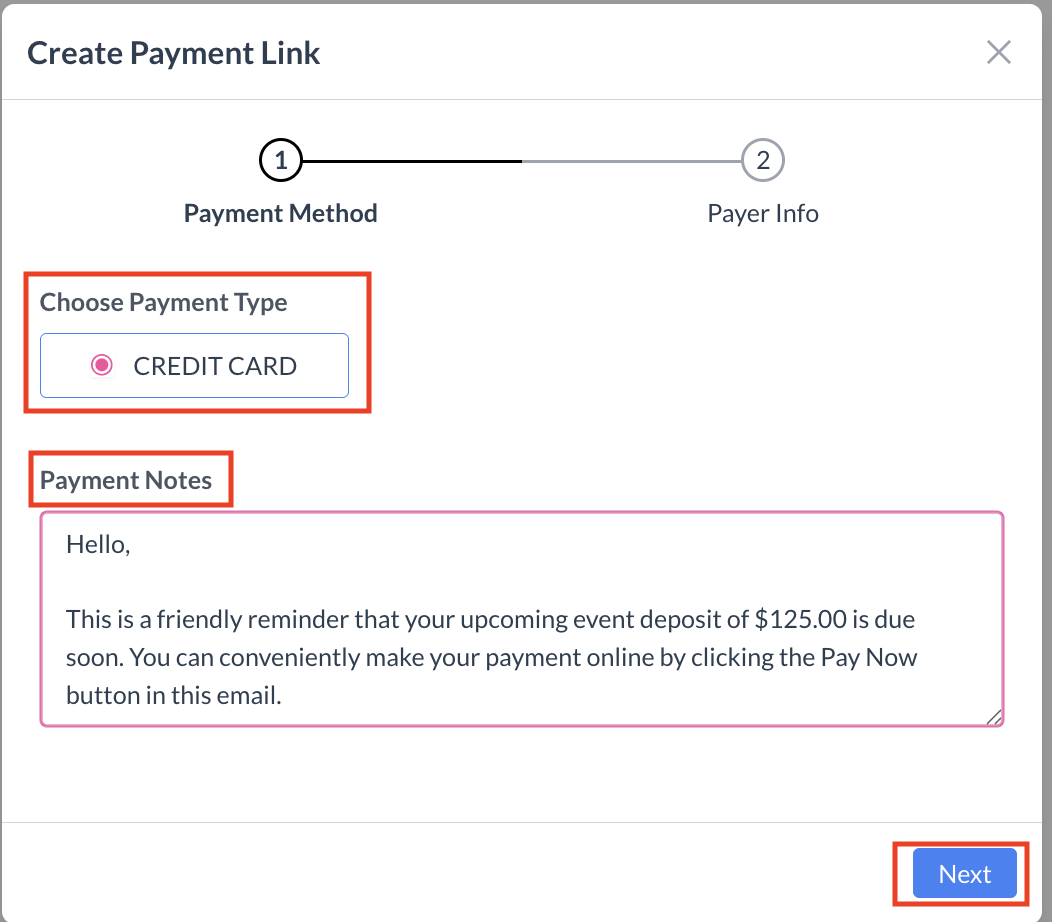
Step 3: Create a New Payment Link
In the Create Payment Link window, select Credit Card under Choose Payment Type.
Enter Payment Notes in the designated field.
⚠️ Note: These notes are client-facing and will be visible in the payment request email.
Click the blue "Next" button.
Step 4: Enter Client and Payment Details
Enter the Payer’s Name and Email Address.
Input the Payment Amount to be collected.
Under Expire After, choose how long the link should remain active.
You can enter this in days or minutes.
If unused before expiration, the link will become inactive automatically.
Review your Payment Notes. Make edits if needed.
Click the blue "Create" button.
Step 5: Send the Payment Link
You’ll return to the Existing Payment Links screen.
Your newly created payment link will appear in the list.
Click the blue "Send" button to email the link to the client.
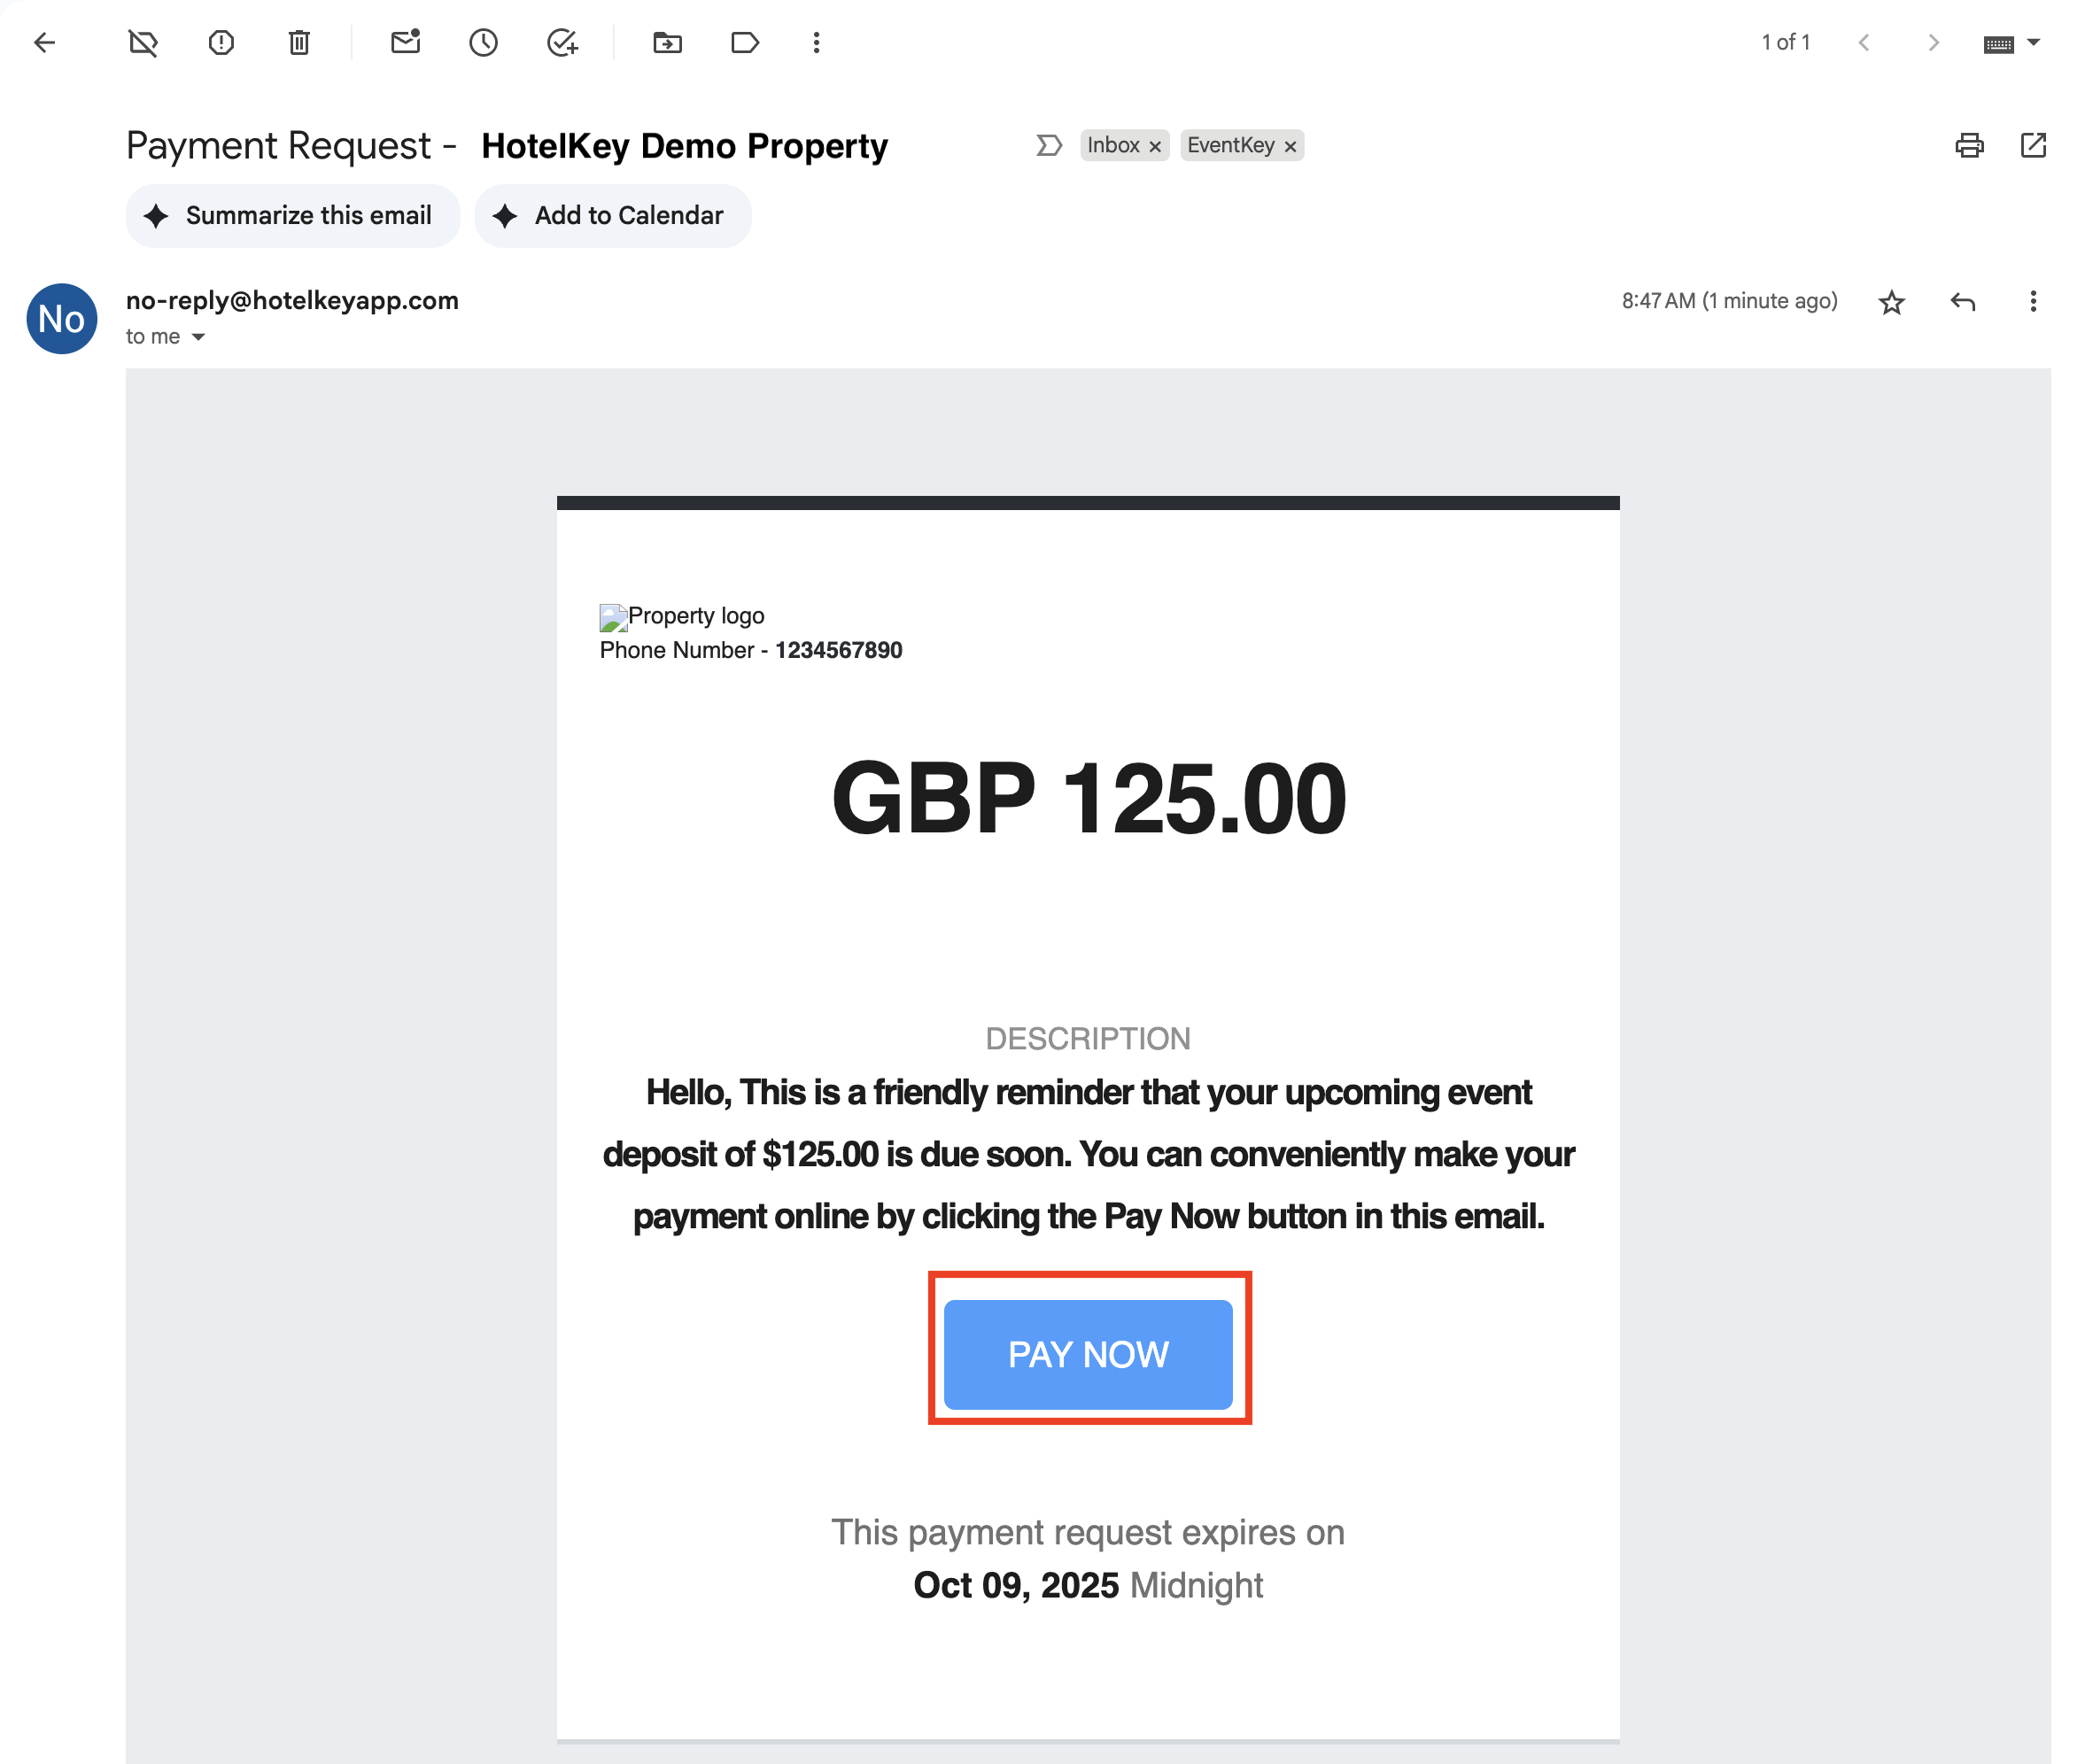
Client Experience: Making a Payment
The client receives a Payment Request email.
The email will display:
The requested amount
Your Payment Notes
A blue "Pay Now" button
Upon clicking Pay Now, a secure payment window (iFrame) opens.
🛡️ This is hosted by the payment processor—not EventKey—similar to a secure online checkout page.
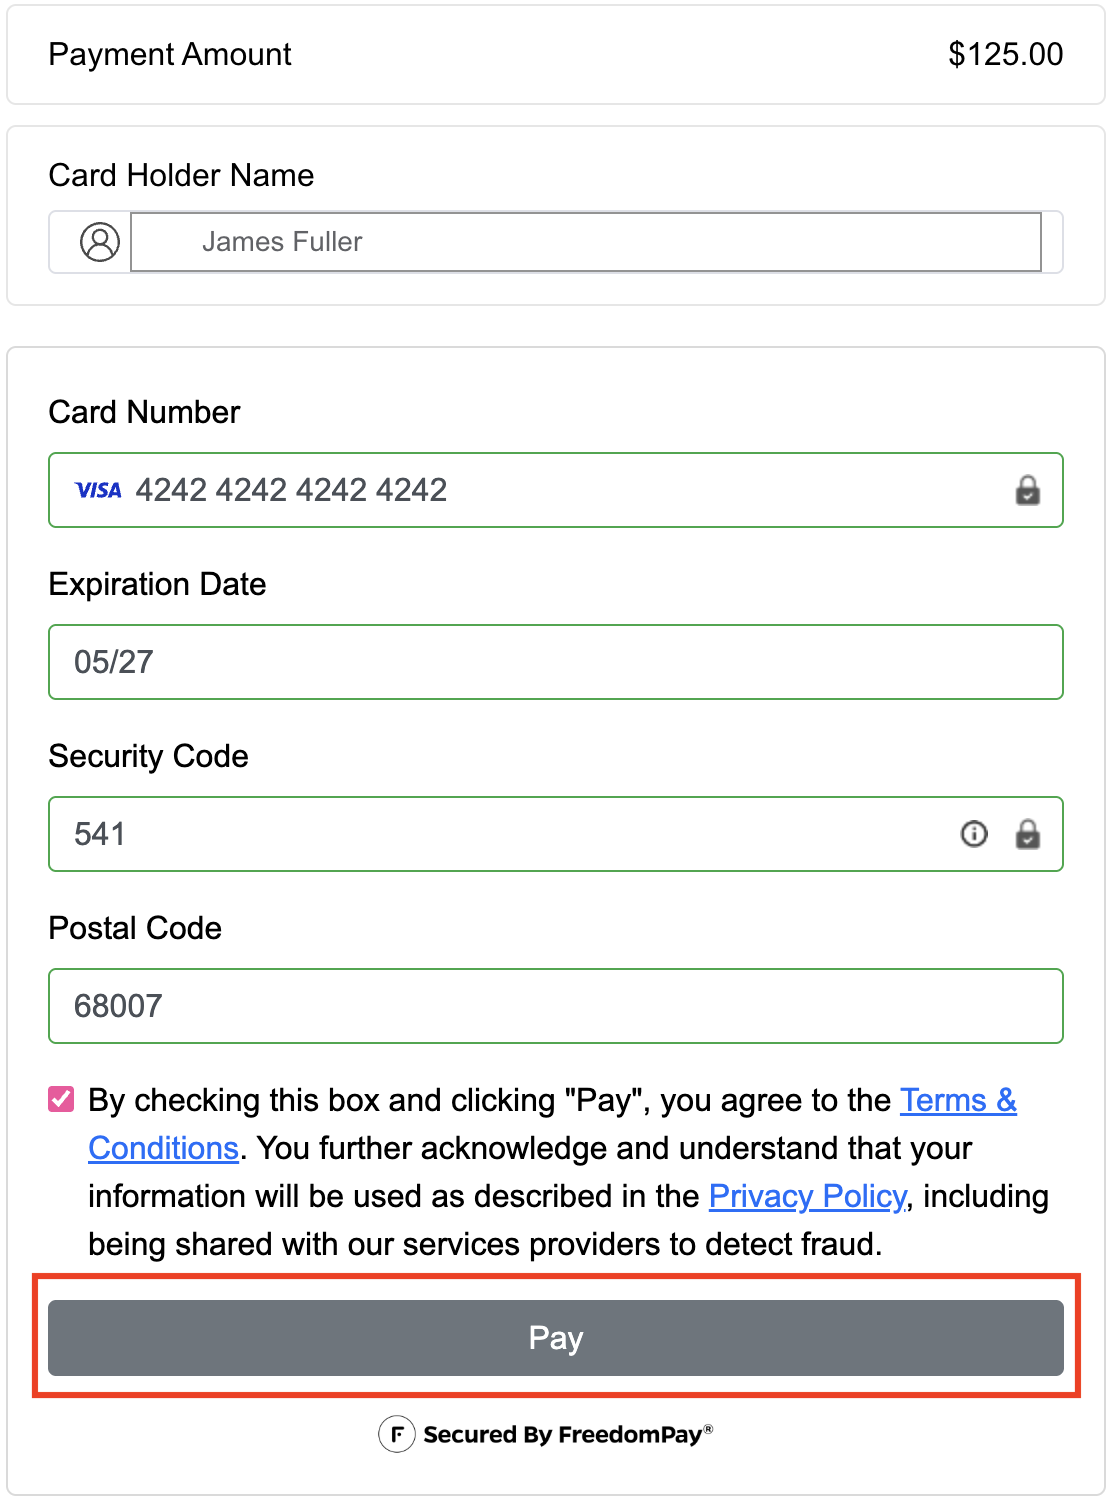
The client enters the following information:
Cardholder Name
Card Number
Expiration Date
Security Code (CVV)
Postal Code
The client must check the Terms & Conditions box, then click the gray "Pay" button.
Step 6: Confirm Payment
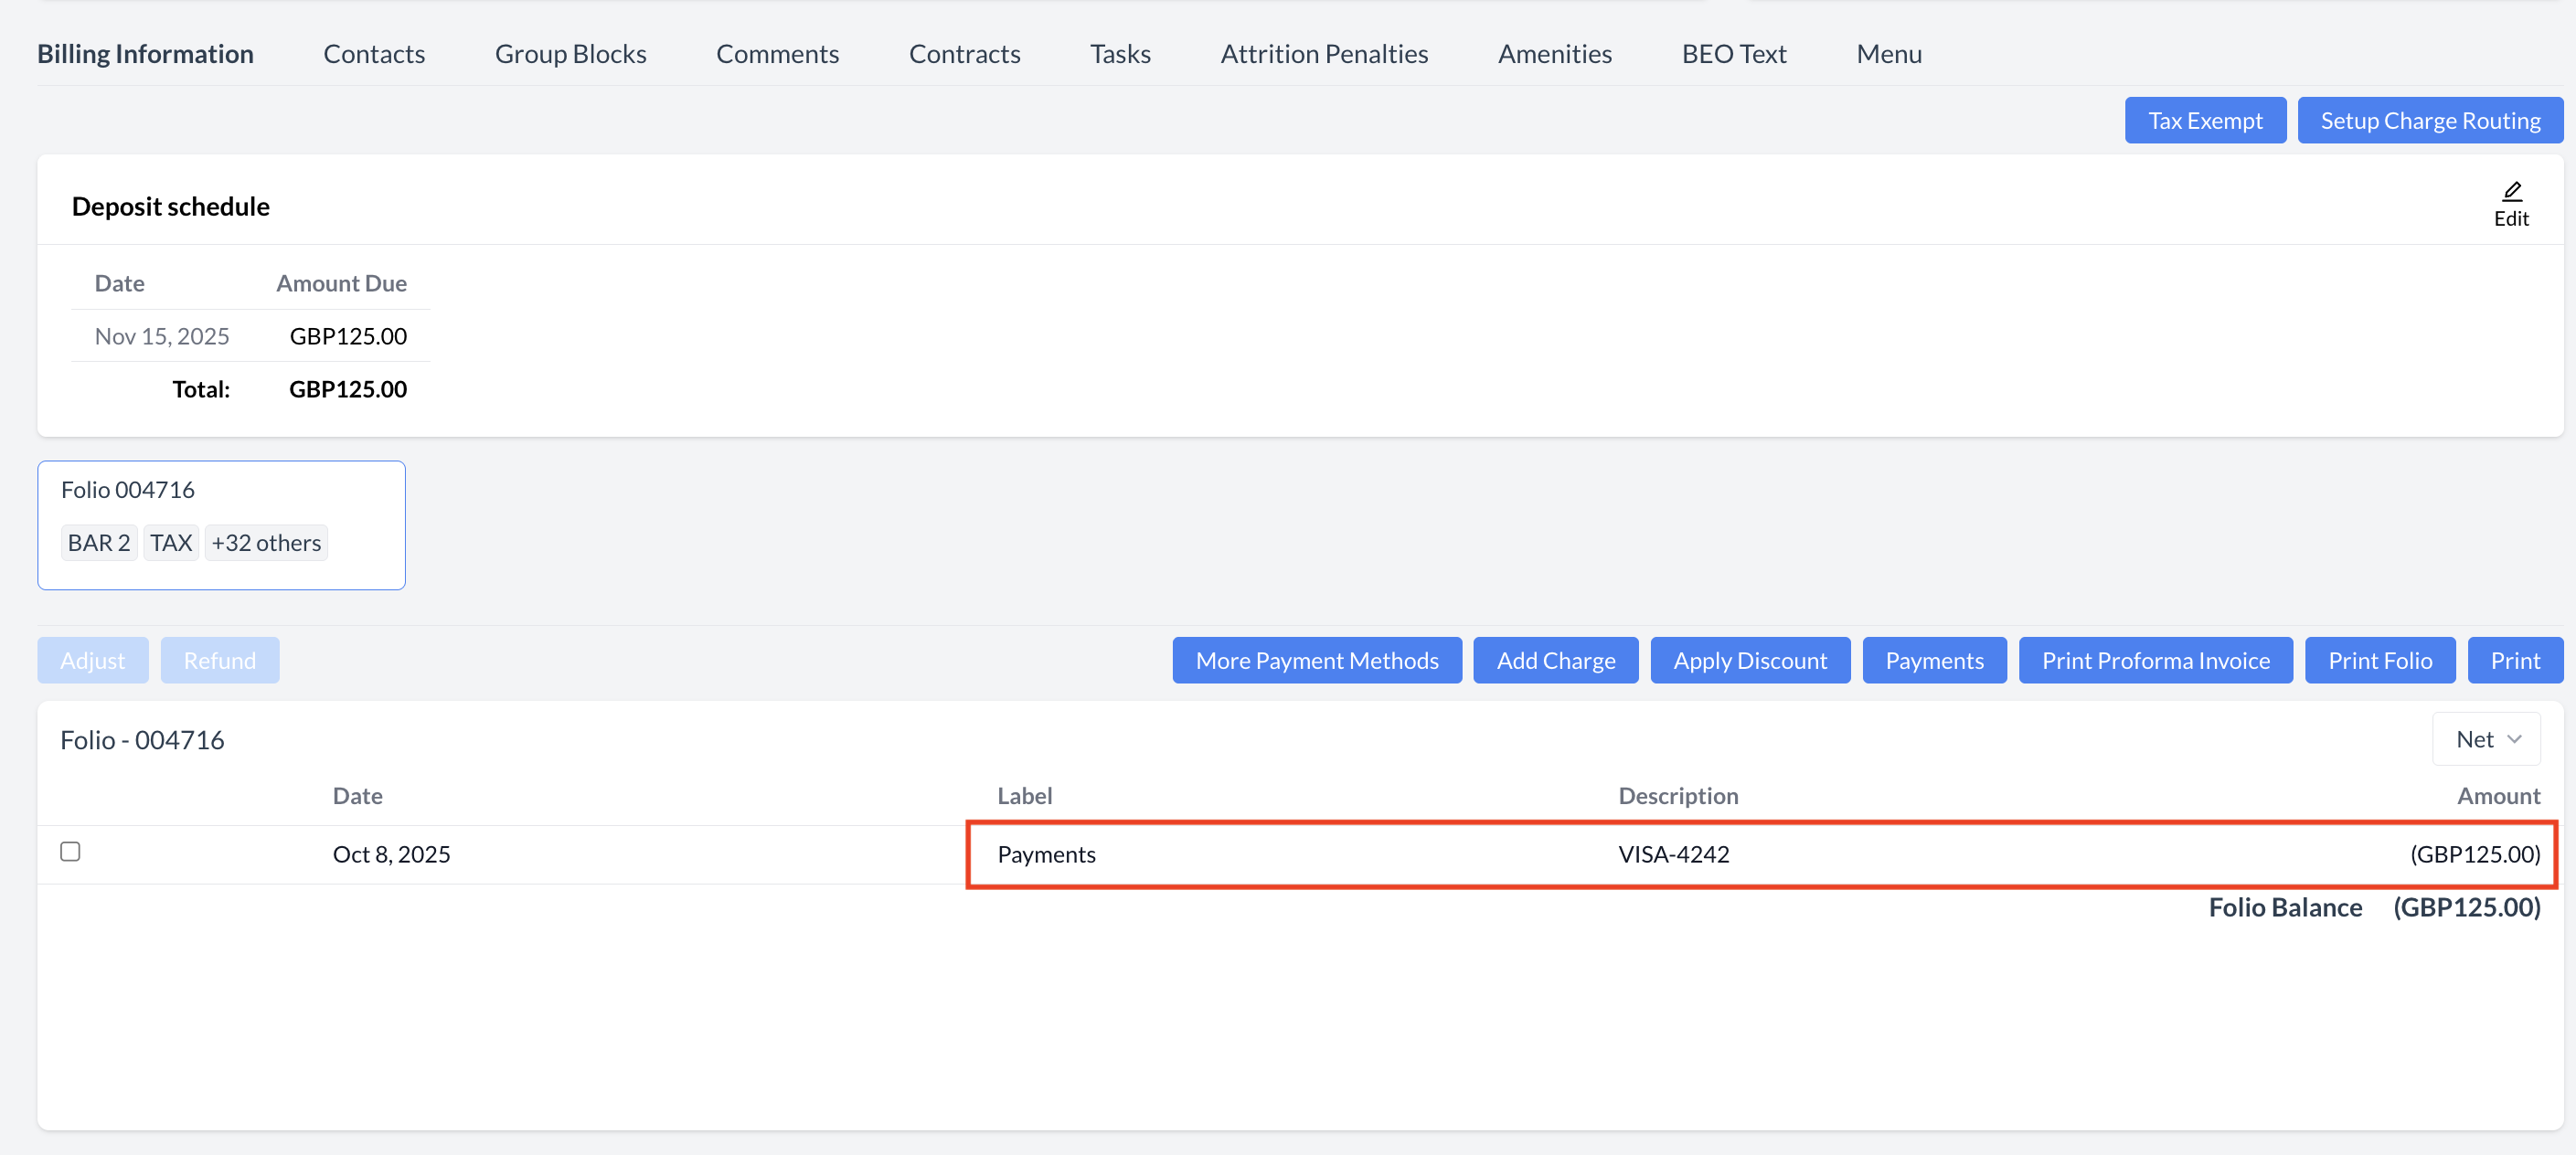
If successful, the client sees a "Payment Collected Successfully" confirmation message.
When you return to the Billing Information screen in the Event Record, the payment will now be posted on the event folio.
Billing Information - More Payment Methods
Web Payment Link - Create New
Web Payment Link - Create Payment Link
Web Payment Link - Guest Details
Web Payment Link - Send
Web Payment Link - Guest Email Inbox
Web Payment Link - Checkout Screen
Web Payment Link - Payment Confirmation
Web Payment Link - Posted Payment
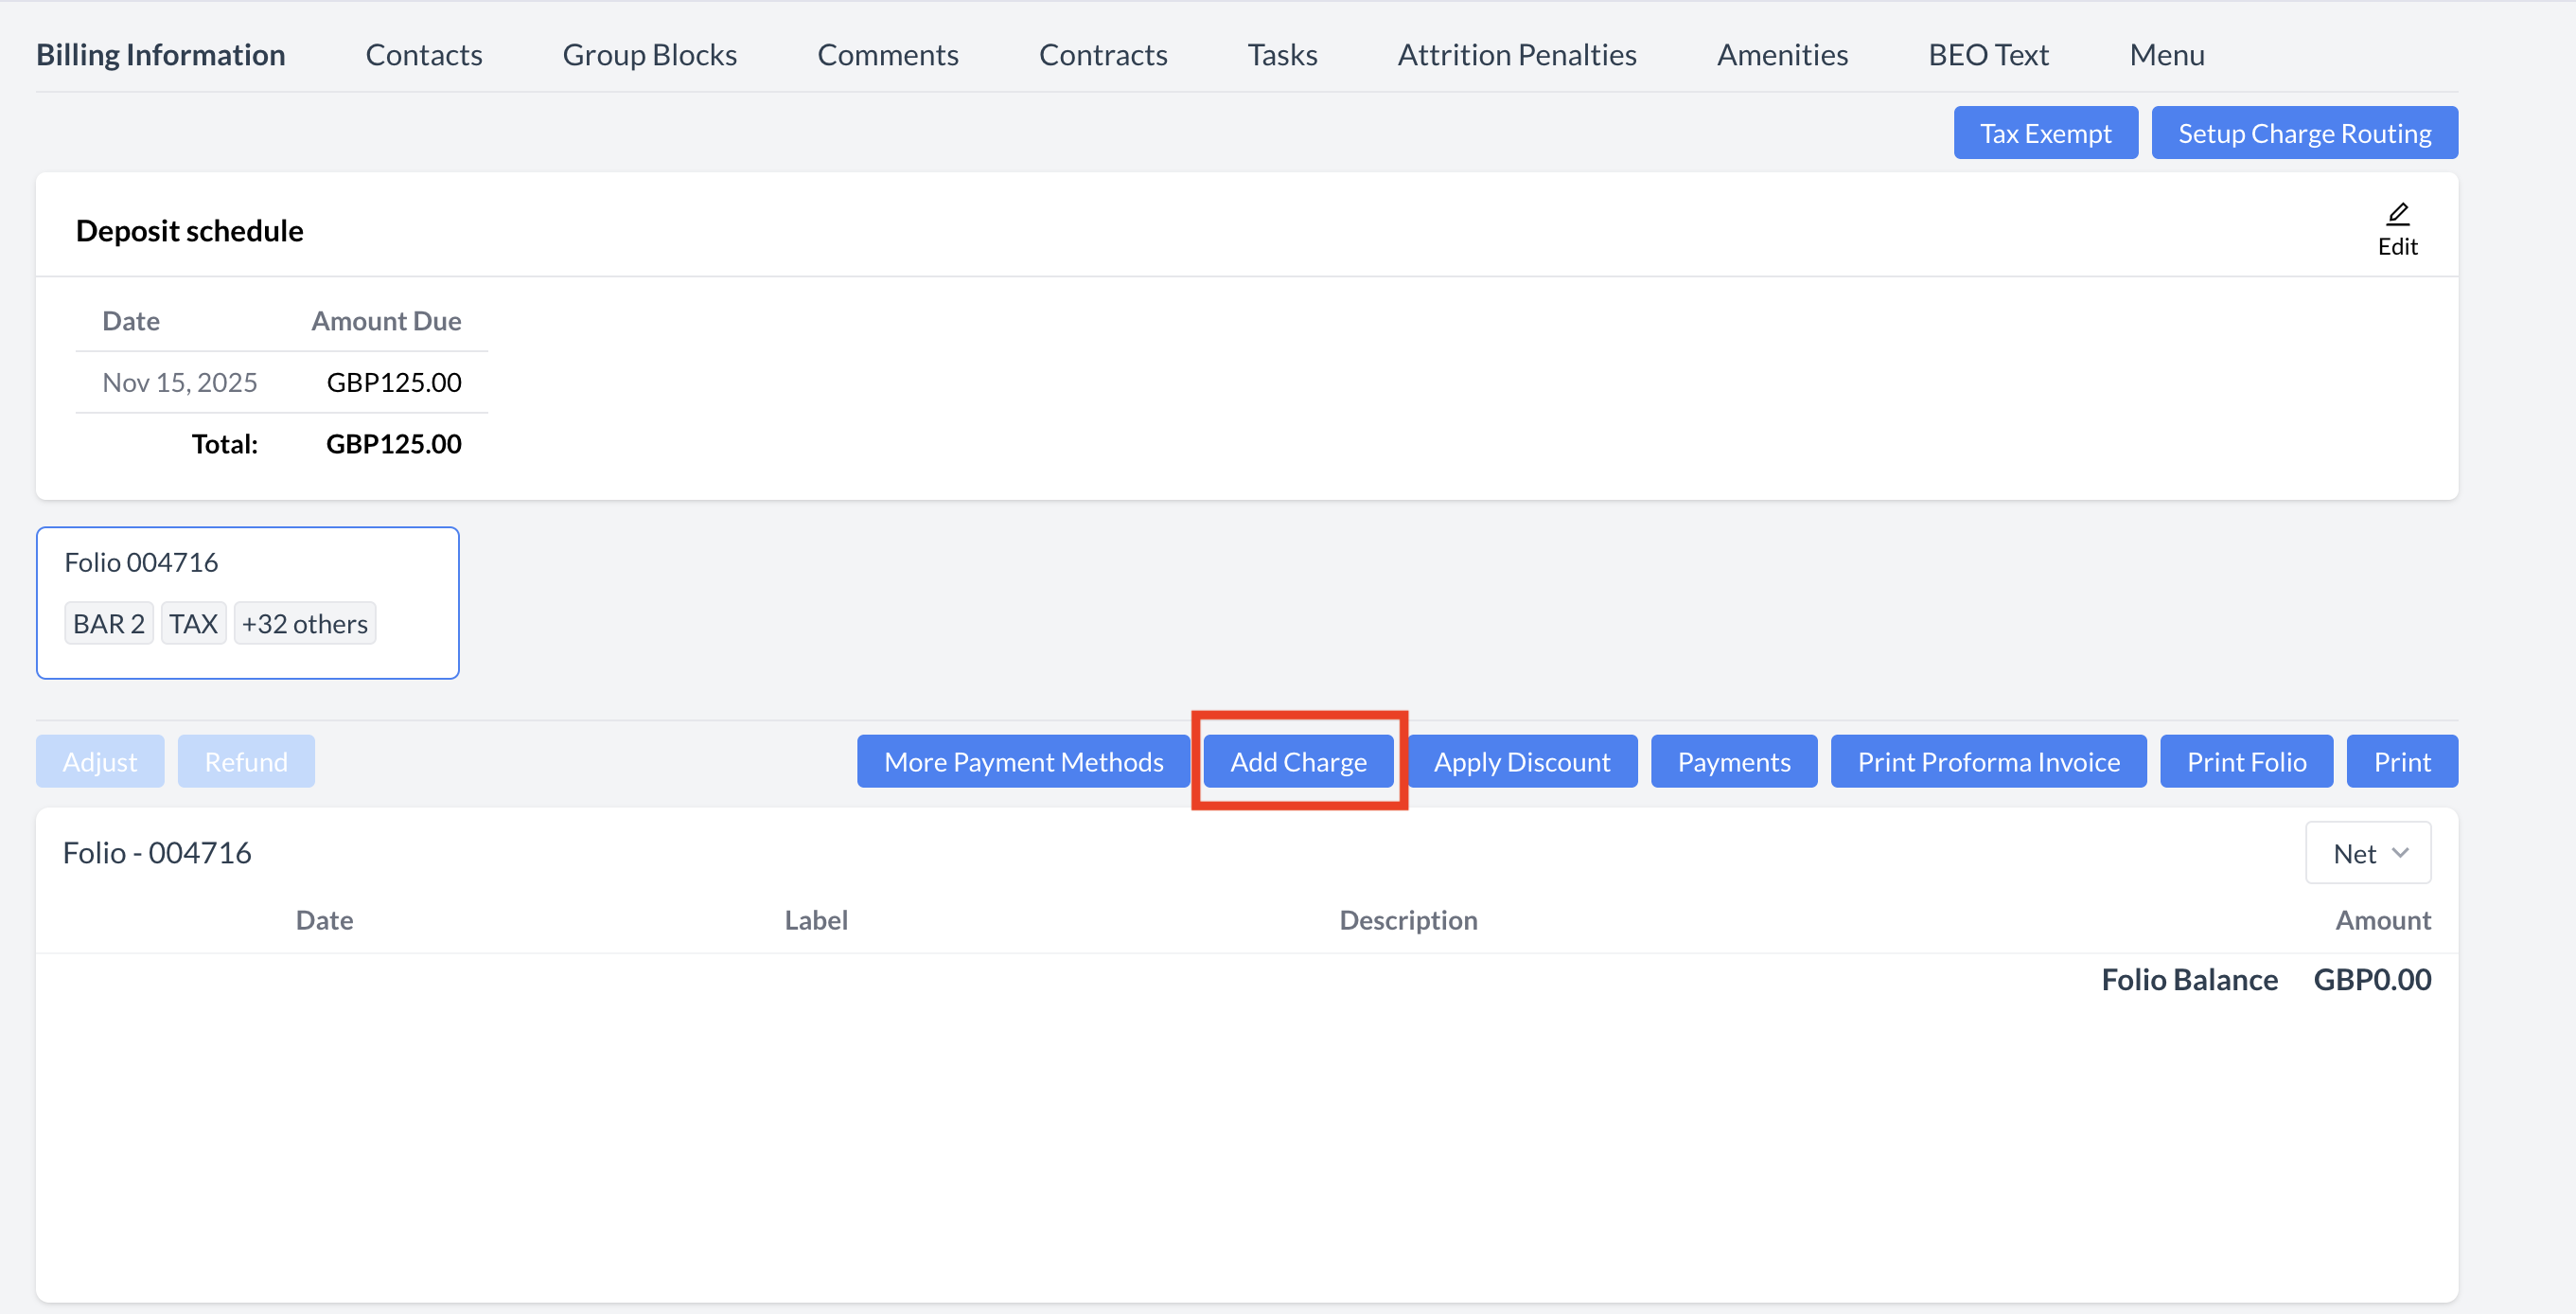
Steps to Add a Charge Manually:
Click the “Add Charge” Button
From the Billing Information screen, click the blue “Add Charge” button to begin.
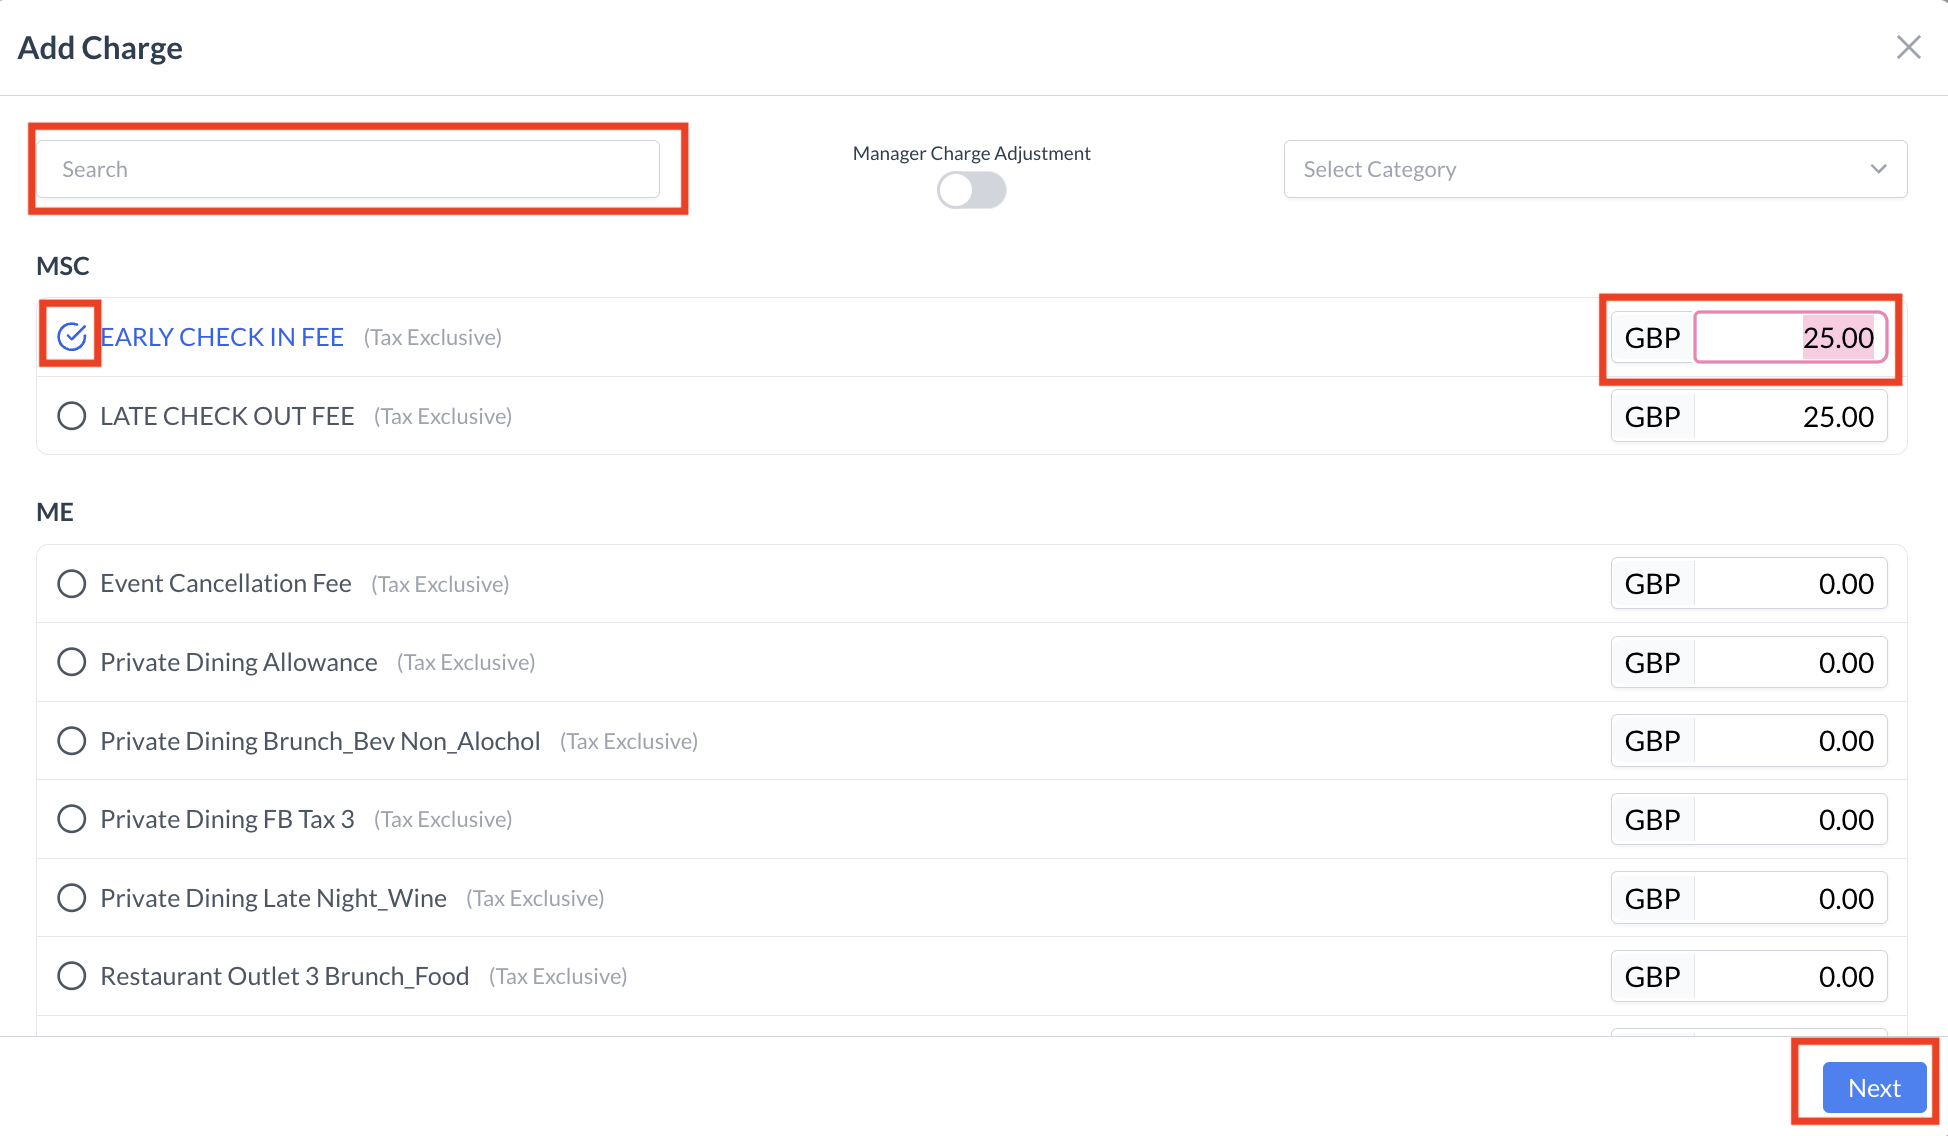
Select a Charge Type
The Add a Charge screen will appear.
In the search box, begin typing the name of the charge type to locate it quickly, or scroll through the list to find the desired charge.
Click to select the charge you want to post.
Enter or confirm the Amount.
Note: Some charge types may auto-populate with a fixed amount that cannot be edited.
Click the blue “Next” button to continue.
Set Charge Frequency
By default, the Charge Frequency is set to One Time.
To post the charge multiple times, select Recurring.
For recurring charges, enter the Start Date and End Date to define the charge period.
Enter Quantity
Specify the Quantity for the charge.
Example: If posting a manually entered plated dinner, enter the number of dinners served for your quantity.
Add the Charge
Click the blue “Add Charge” button to complete the process.
Review the Charge
You’ll be returned to the Billing Information – Folio screen, where the newly added charge will now appear.
Billing Information - Add a Charge
Add a Charge - Charge Selection Screen
Add A Charge - Frequency and Quantity
Billing Information - Posted Charge
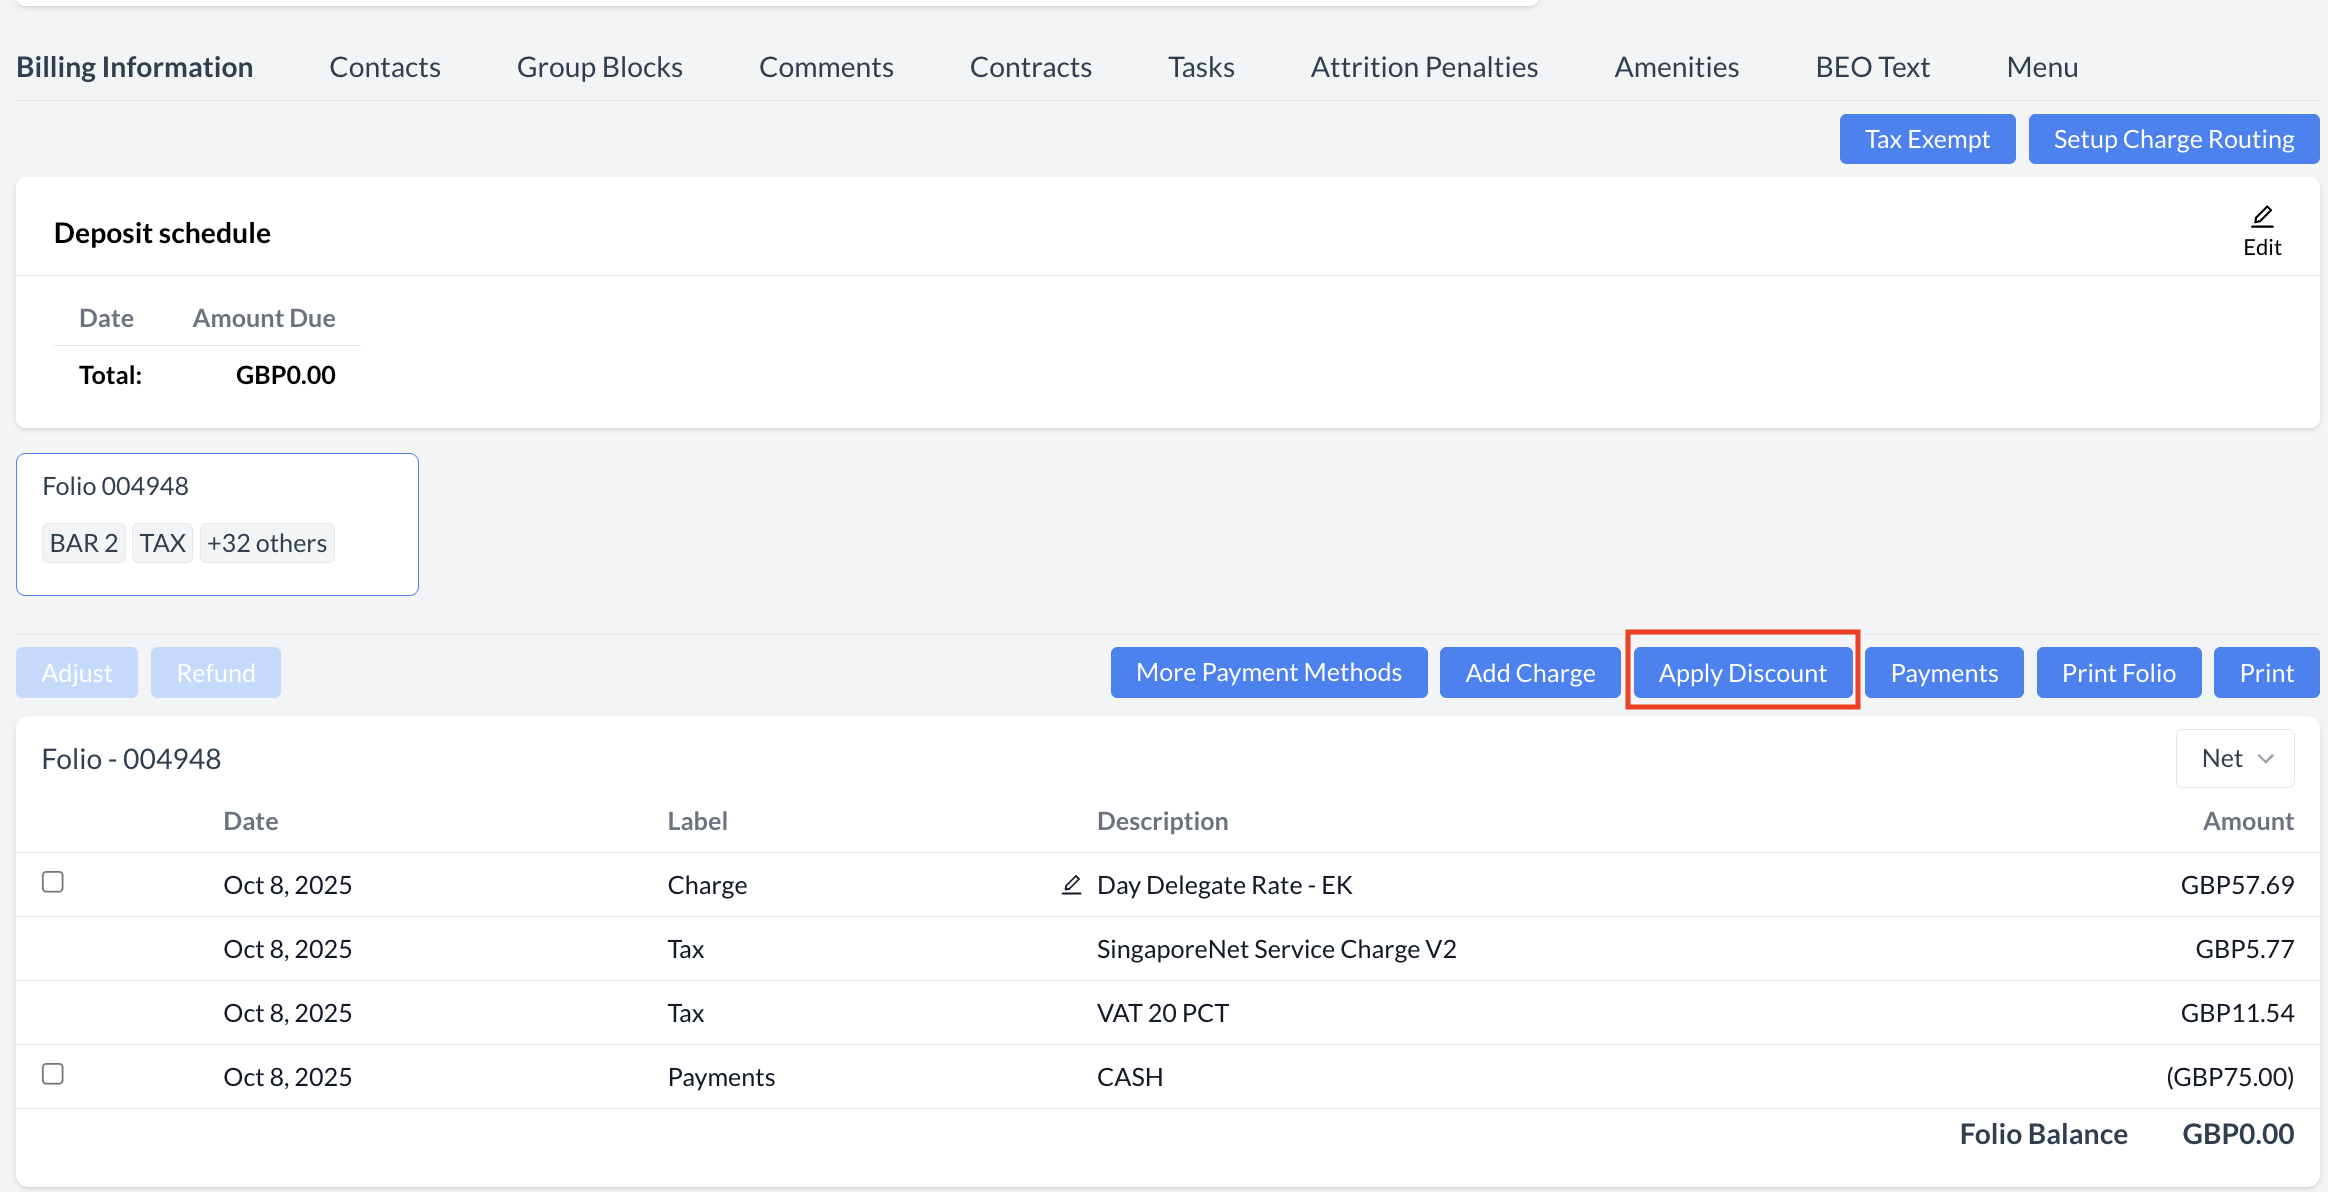
Steps to Apply a Discount:
Open the Apply Discount Screen
From the Billing Information screen, click the blue “Apply Discount” button.
Select a Discount
The Apply Discount screen will appear.
Use the drop-down menu to select the appropriate discount from the list.
Click the blue “Save” button to apply the discount.
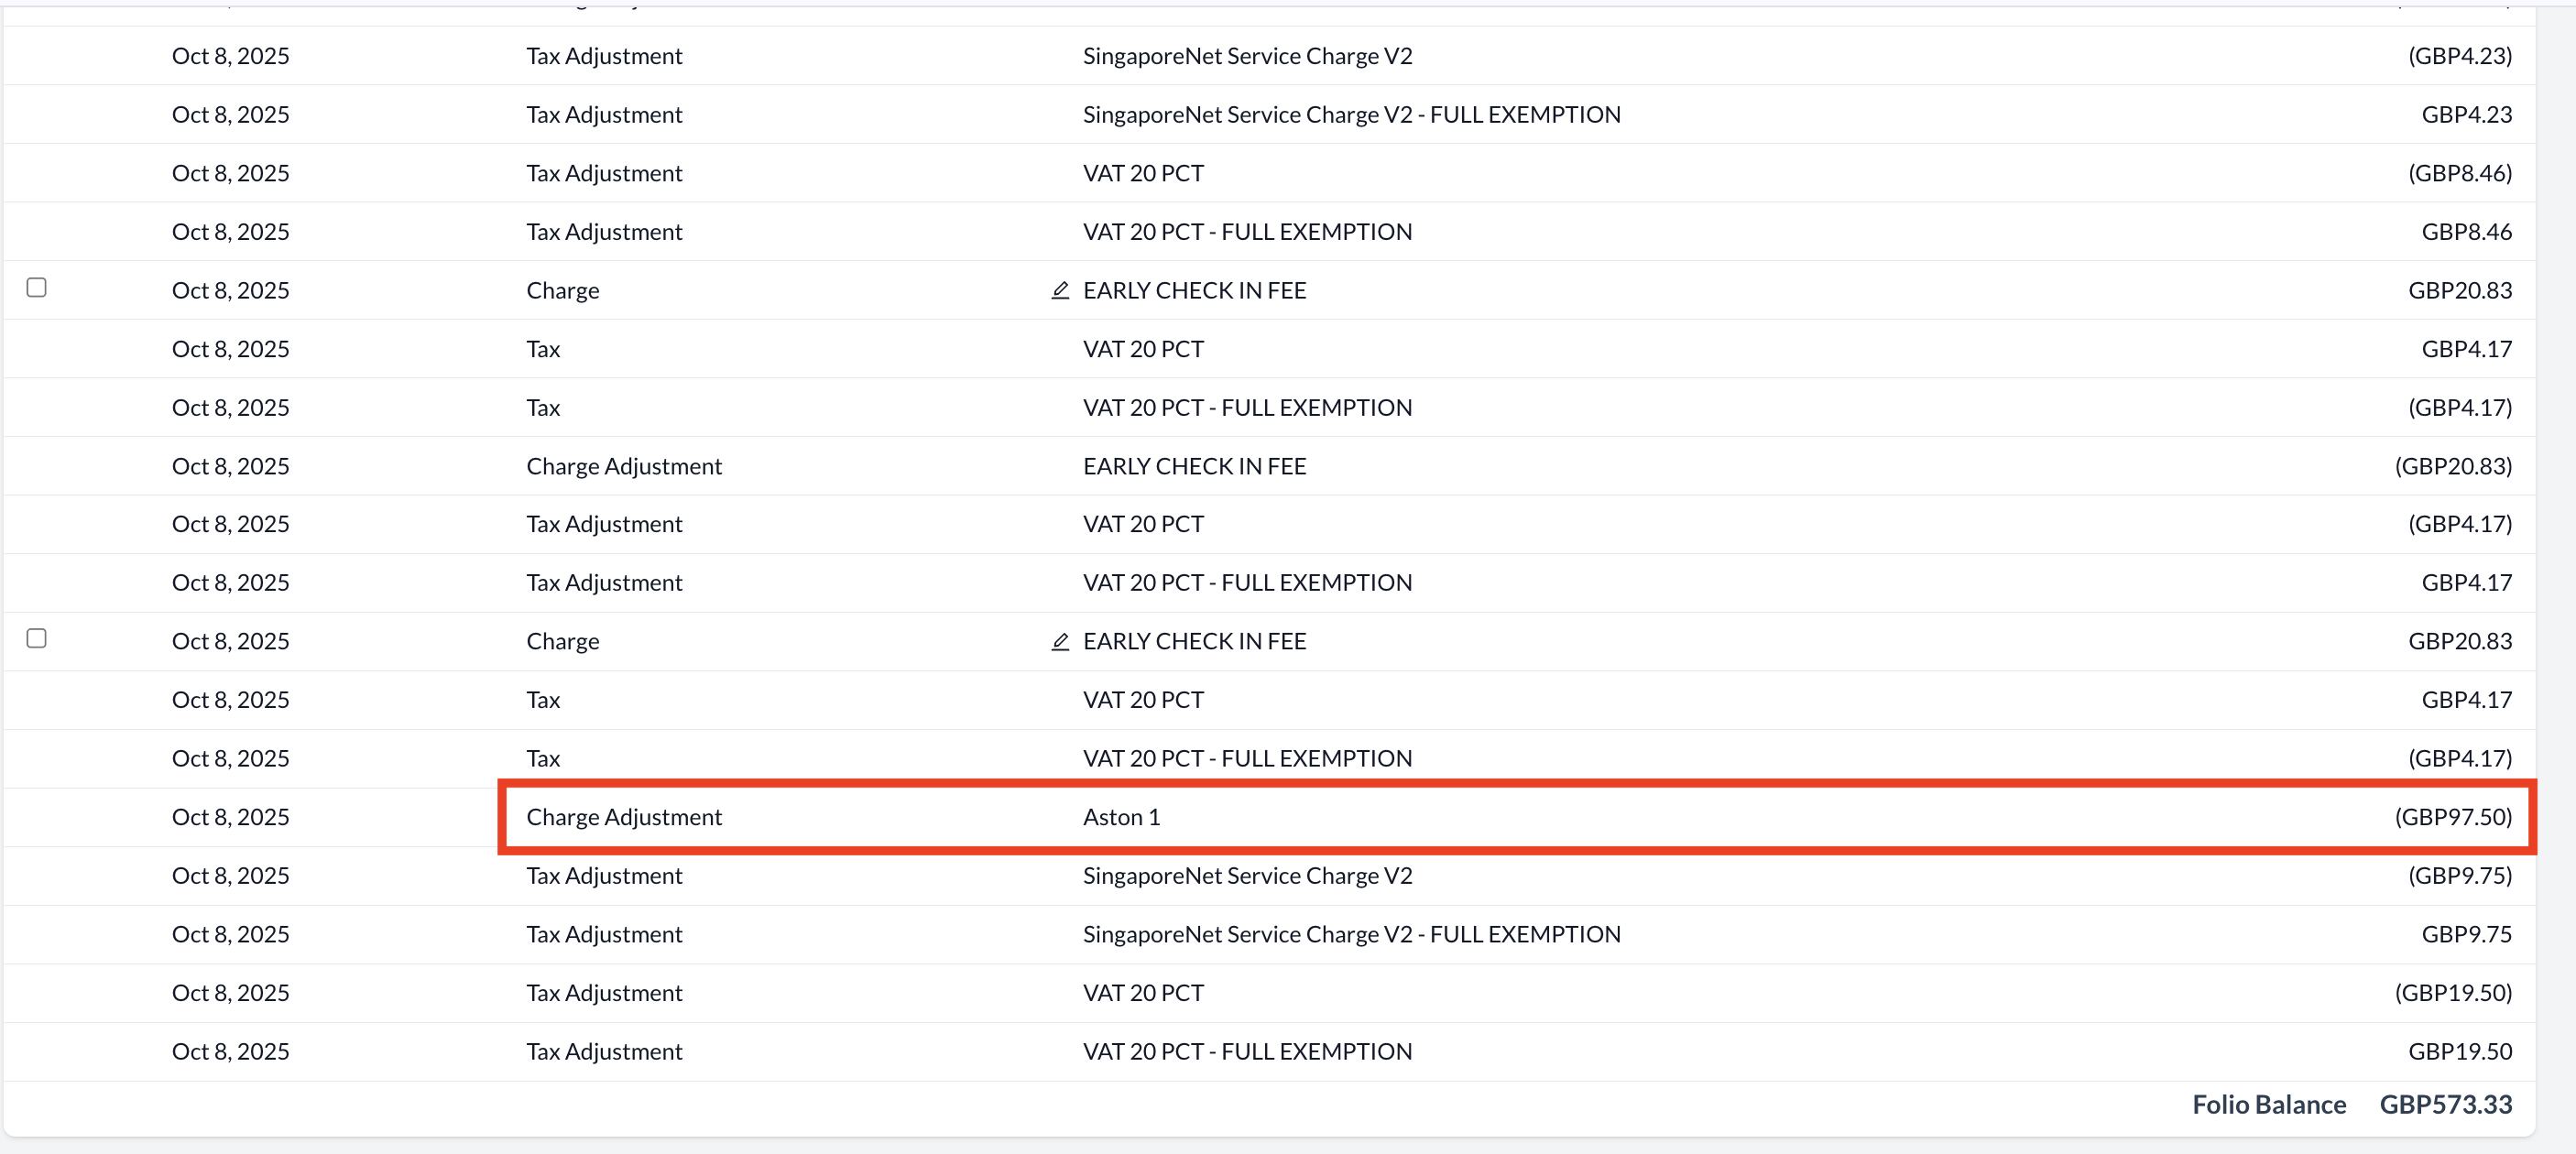
Review the Applied Discount
The discount is now applied to the event folio as a charge adjustment.
To view the adjustment, change the folio view from Net to Detailed. Discounts are applied as Charge Adjustments.
Note: Discounts are not shown as separate line items under Net view. Switching to Detailed view will show all adjustments, including discounts.
Apply Discount Button
Apply Discount - Select Discount to Apply
Billing Information - Discount Applied
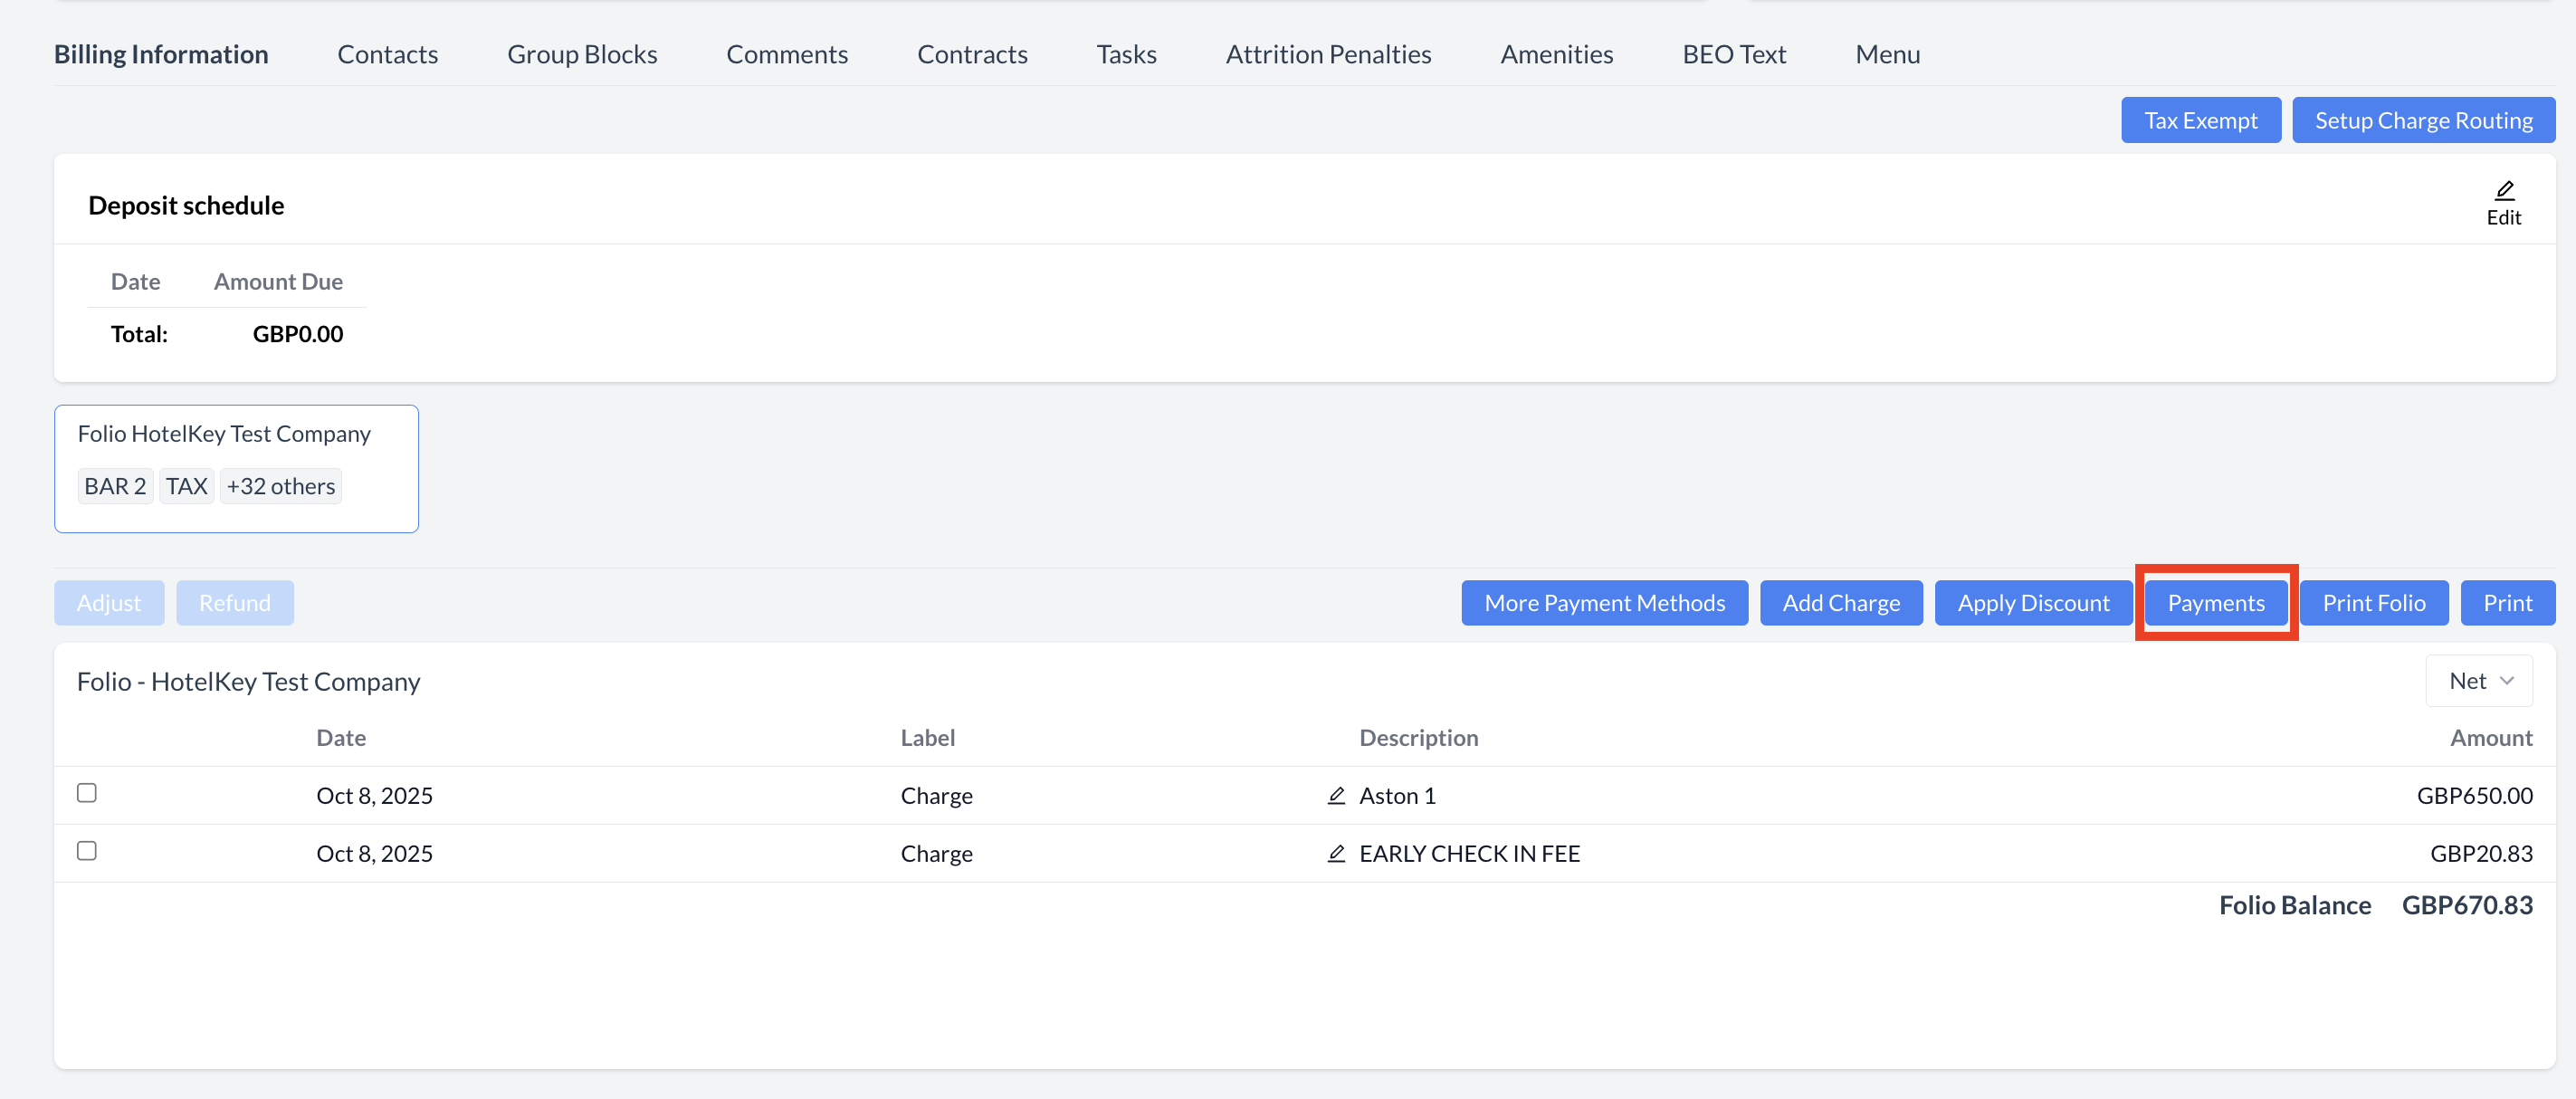
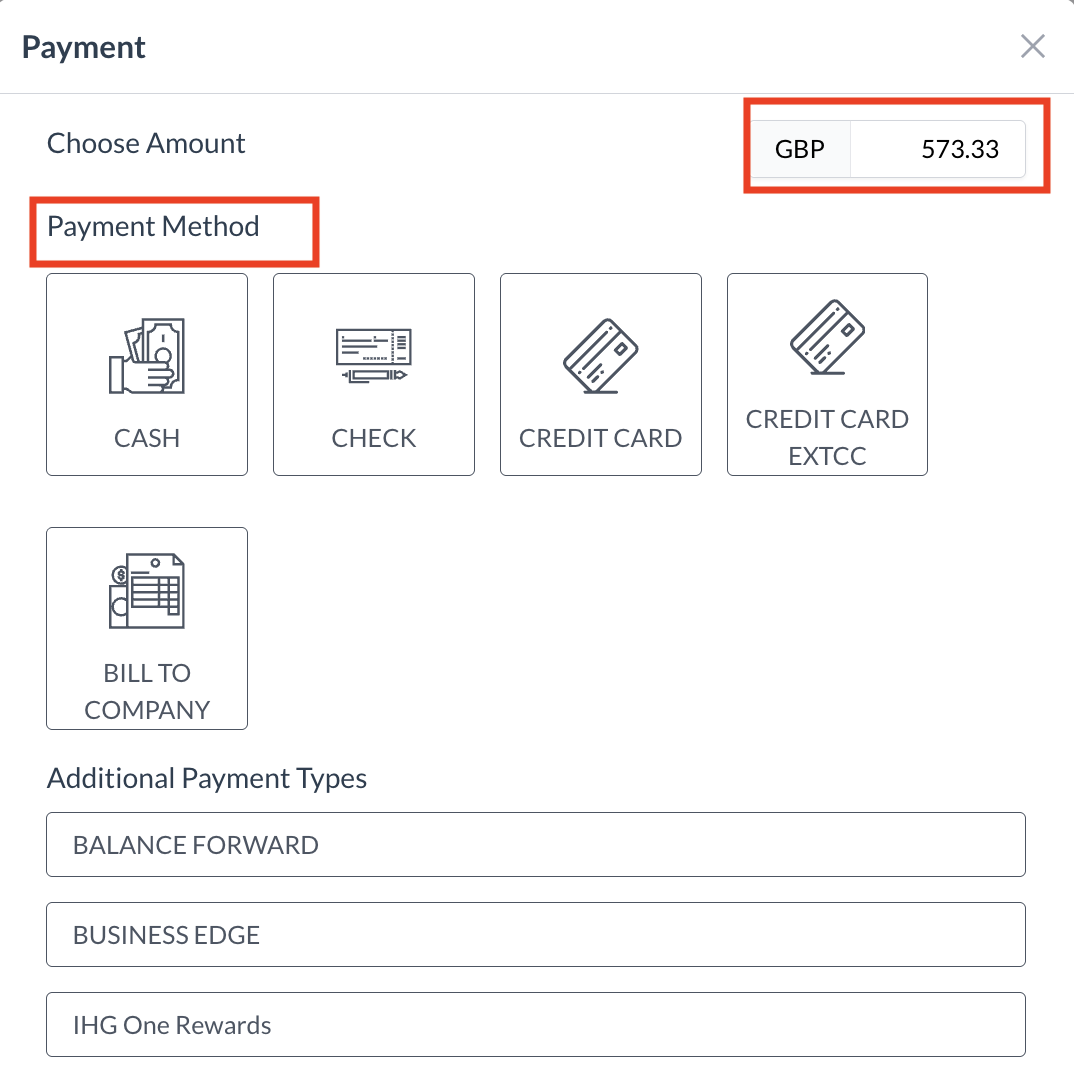
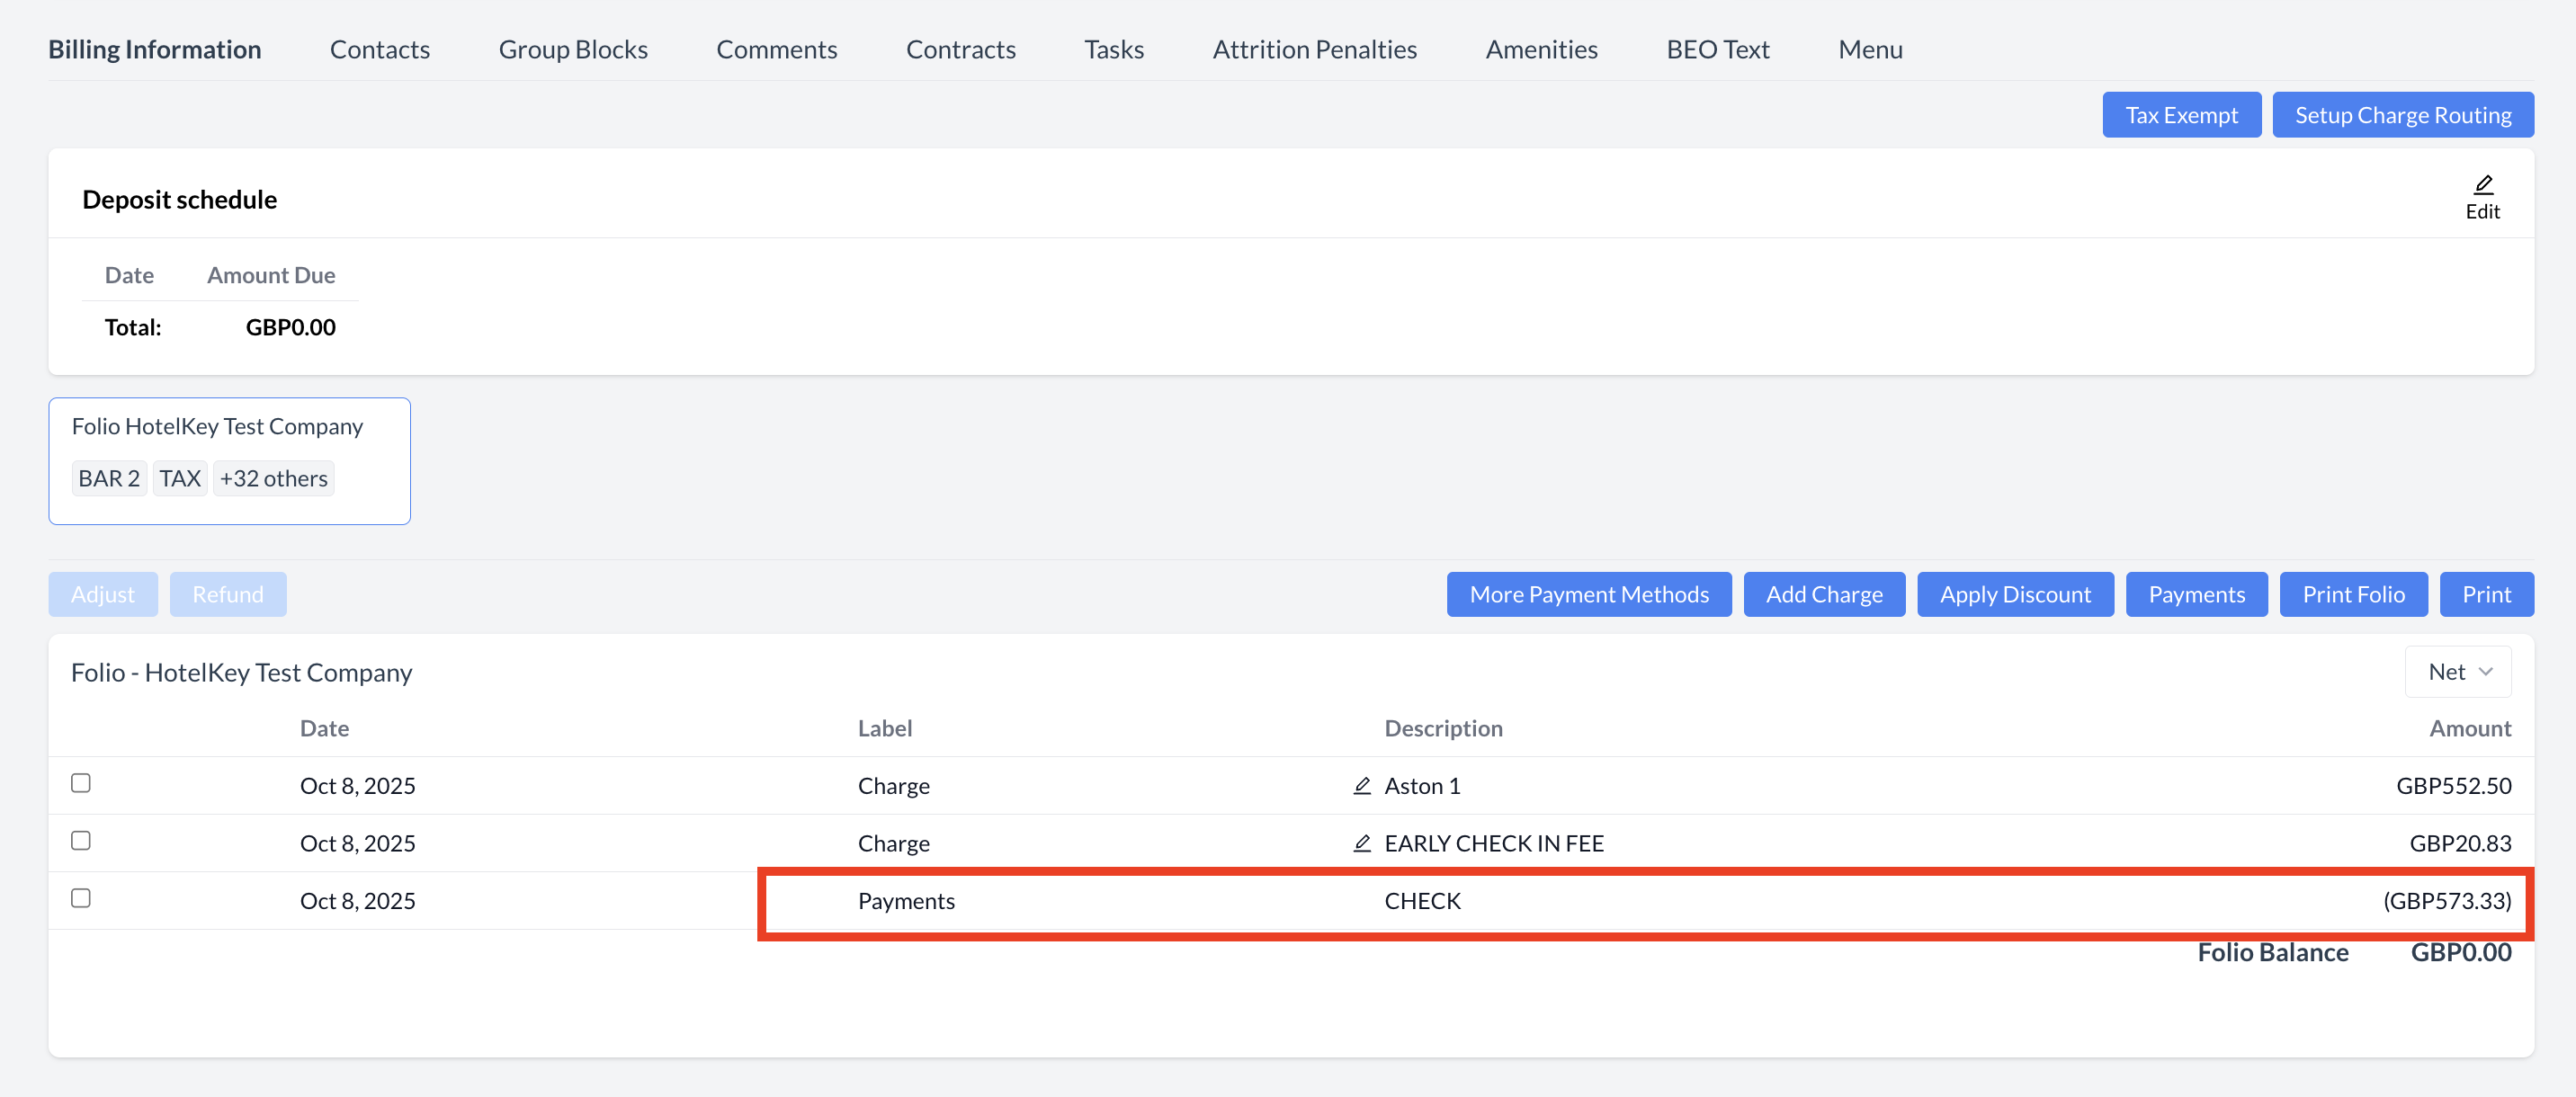
Steps to Apply a Payment:
Open the Payment Screen
From the Billing Information screen, click the blue “Payments” button.
The Payment screen will appear.
Enter the Payment Amount
In the Choose Amount field, enter the amount being applied to the folio.
Select a Payment Method
Choose the appropriate Payment Method from the drop-down list.
Note: Available payment methods may vary by property. Common methods include:
Cash
Check
Credit Card
Bill to Company
Complete Payment Based on Method
For Cash Payments:
After selecting Cash, a Cash Payment screen will appear.
Select the appropriate Tender (e.g., USD).
The system will calculate any change due.
Click the blue “Accept” button to complete the payment.
For Check Payments:
After selecting Check, a Check Payment screen will appear.
Enter the Check Number in the designated field.
Click the blue “Accept” button to complete the payment.
Review the Payment
Once accepted, the payment will be posted to the event folio.
Return to the Billing Information screen to verify that the payment has been applied.
Billing Information - Payments
Payment - Select Payment Method
Payment - Cash
Payment - Check
Billing Information - Payment
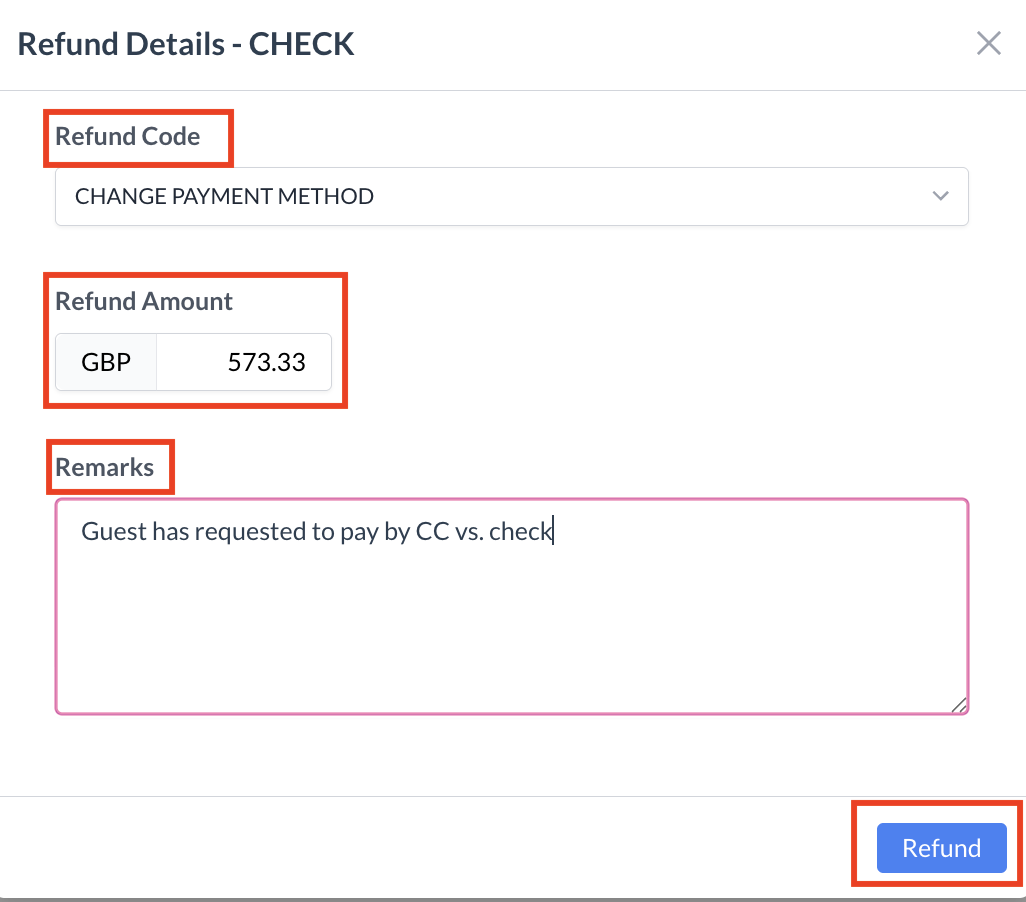
Steps to Issue a Refund:
Select the Payment to Refund
From the Folio section of the Billing Information screen, locate the payment you wish to refund.
Use the checkbox to select the payment.
Open the Refund Screen
Click the blue “Refund” button.
The Refund Details screen will appear.
Select Refund Code
From the Refund Code drop-down menu, select the appropriate reason for the refund.
Enter Refund Amount
By default, the system assumes you are issuing a full refund and will populate the full amount in the Refund Amount field.
To issue a partial refund, simply edit the amount.
Example: To refund only $20.00, enter “20.00” in the Refund Amount field.
Enter Refund Remarks
Provide a brief explanation in the Remarks field to document the reason for the refund.
Complete the Refund
Click the blue “Refund” button to process the transaction.
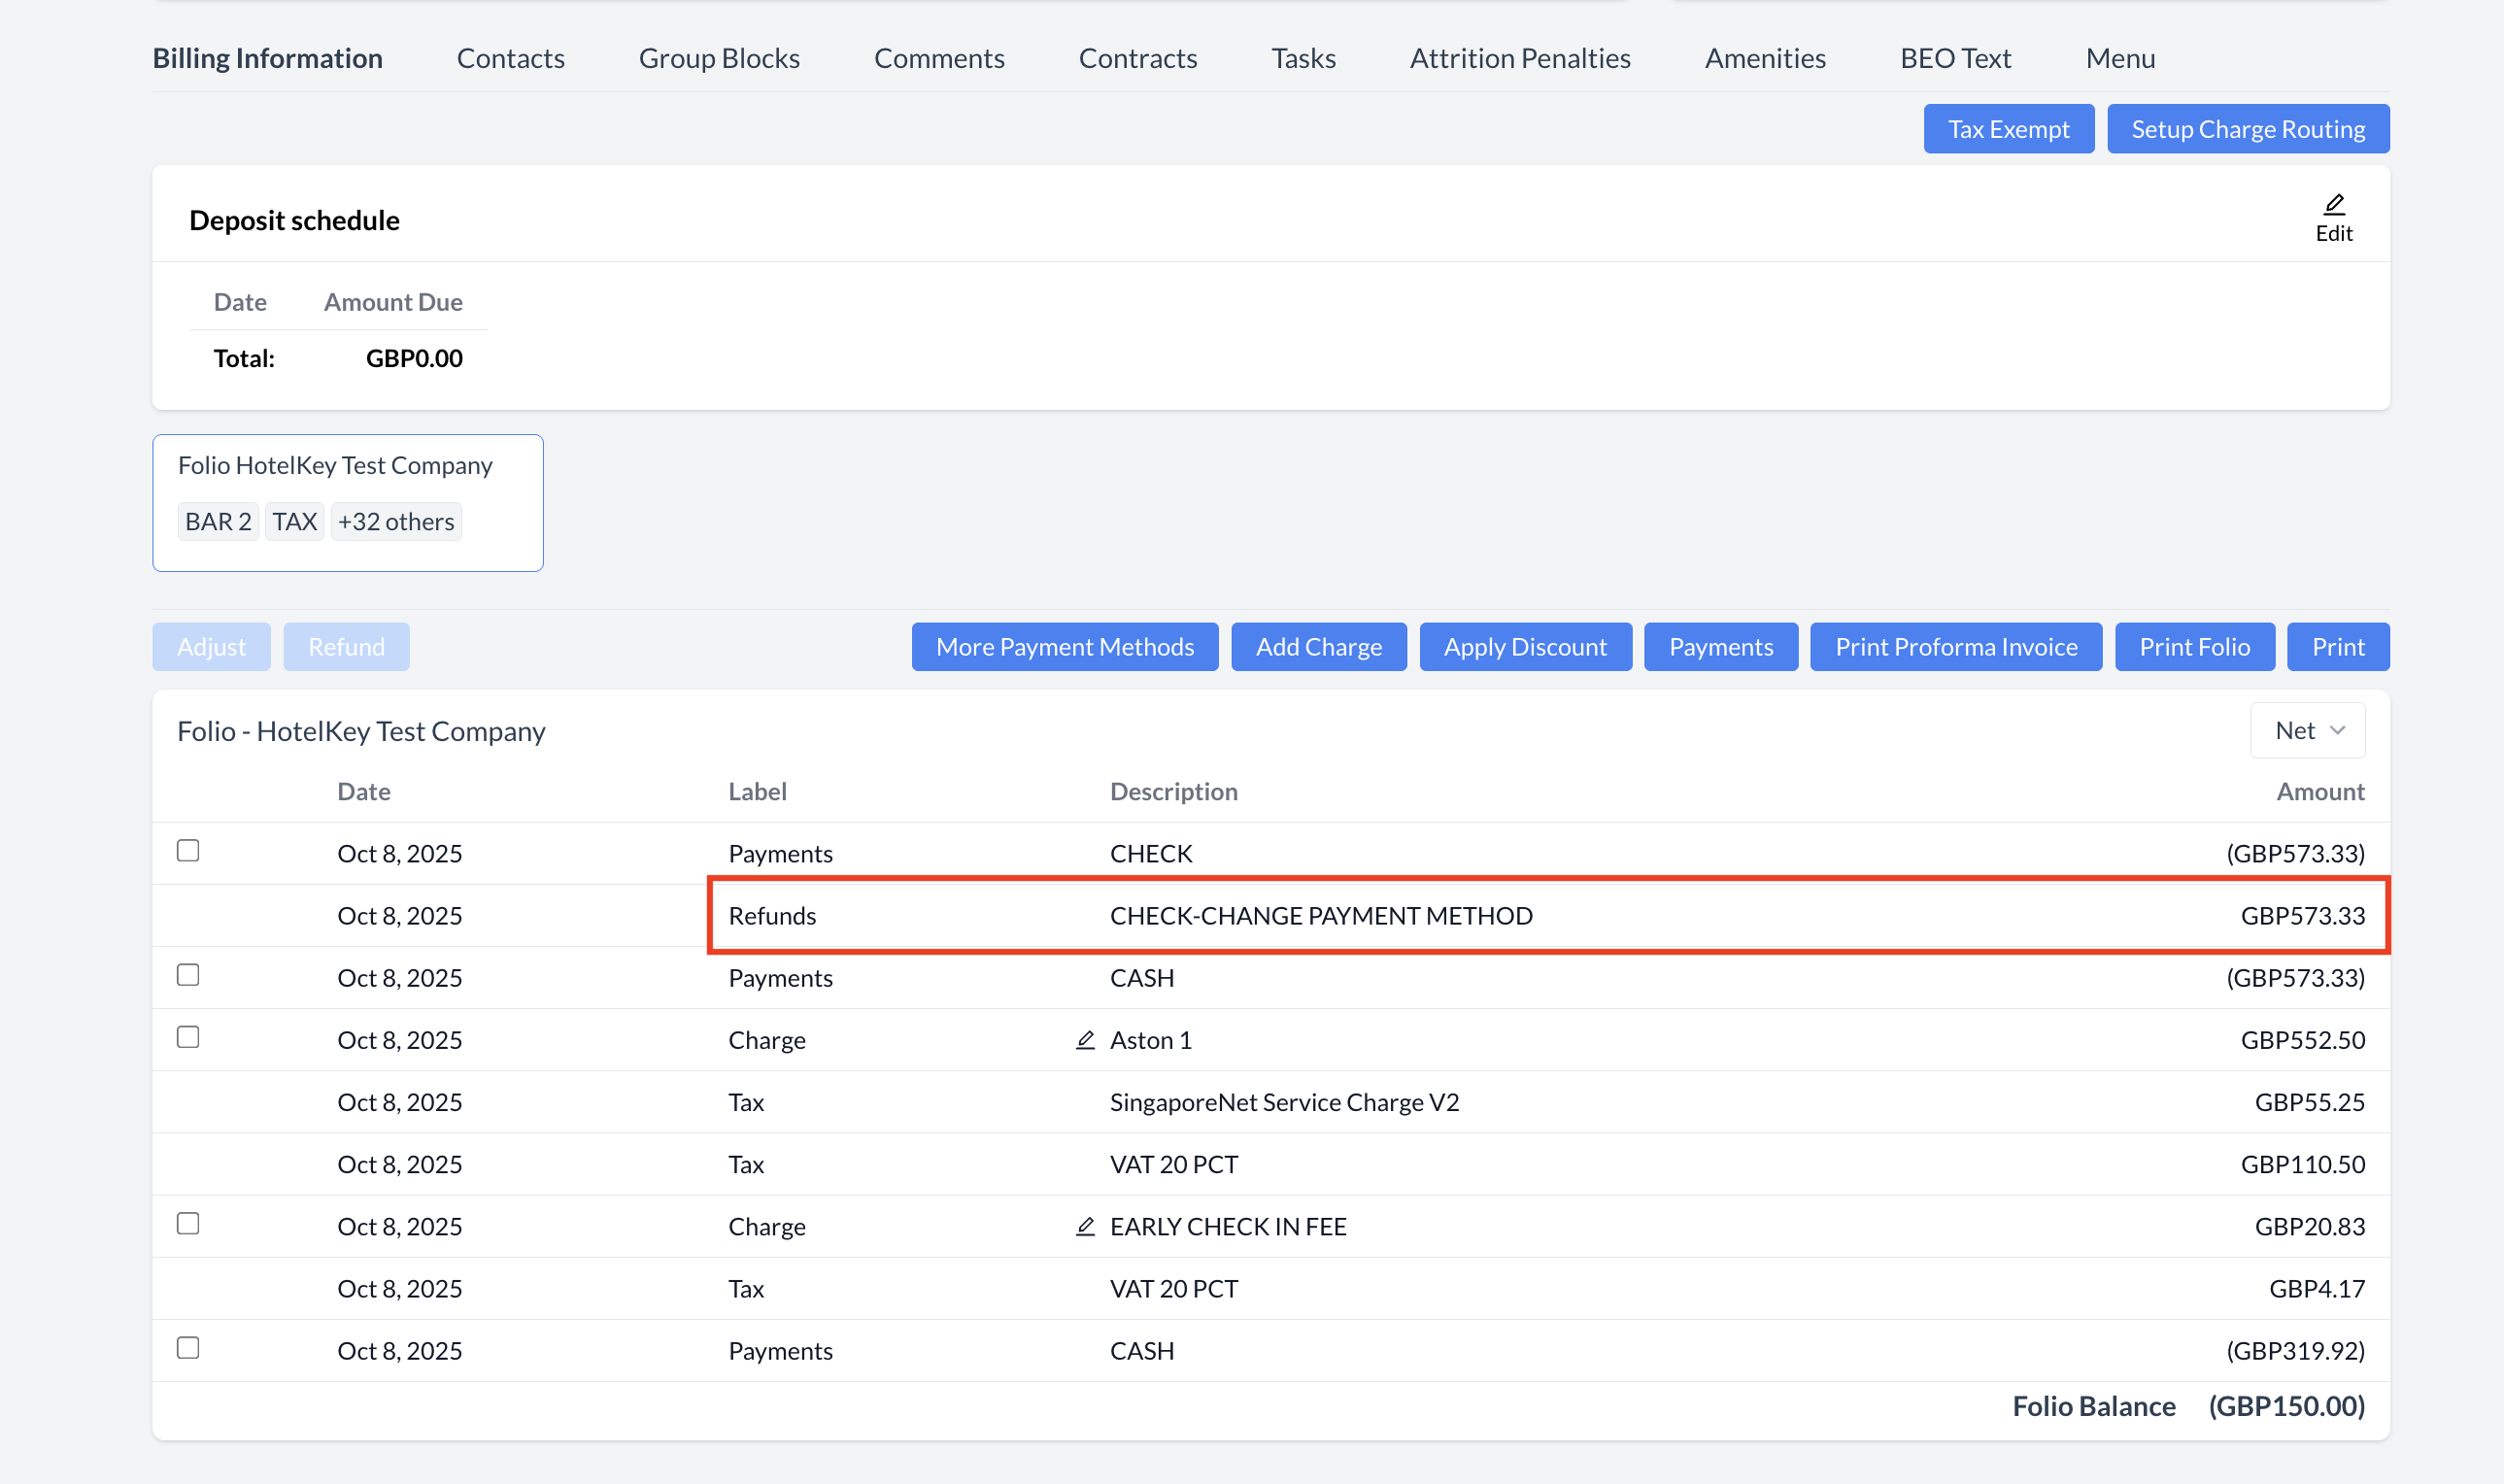
Review the Updated Folio
The refund will now appear on the event folio, and the folio balance will be updated accordingly.
Note: Depending on the refund amount, the folio may now show a balance due or a credit. Be sure to review and settle any outstanding balances.
Billing Information - Refund Payment
Refund Payment - Refund Details Screen
Refund Payment - Refund Posted to Folio
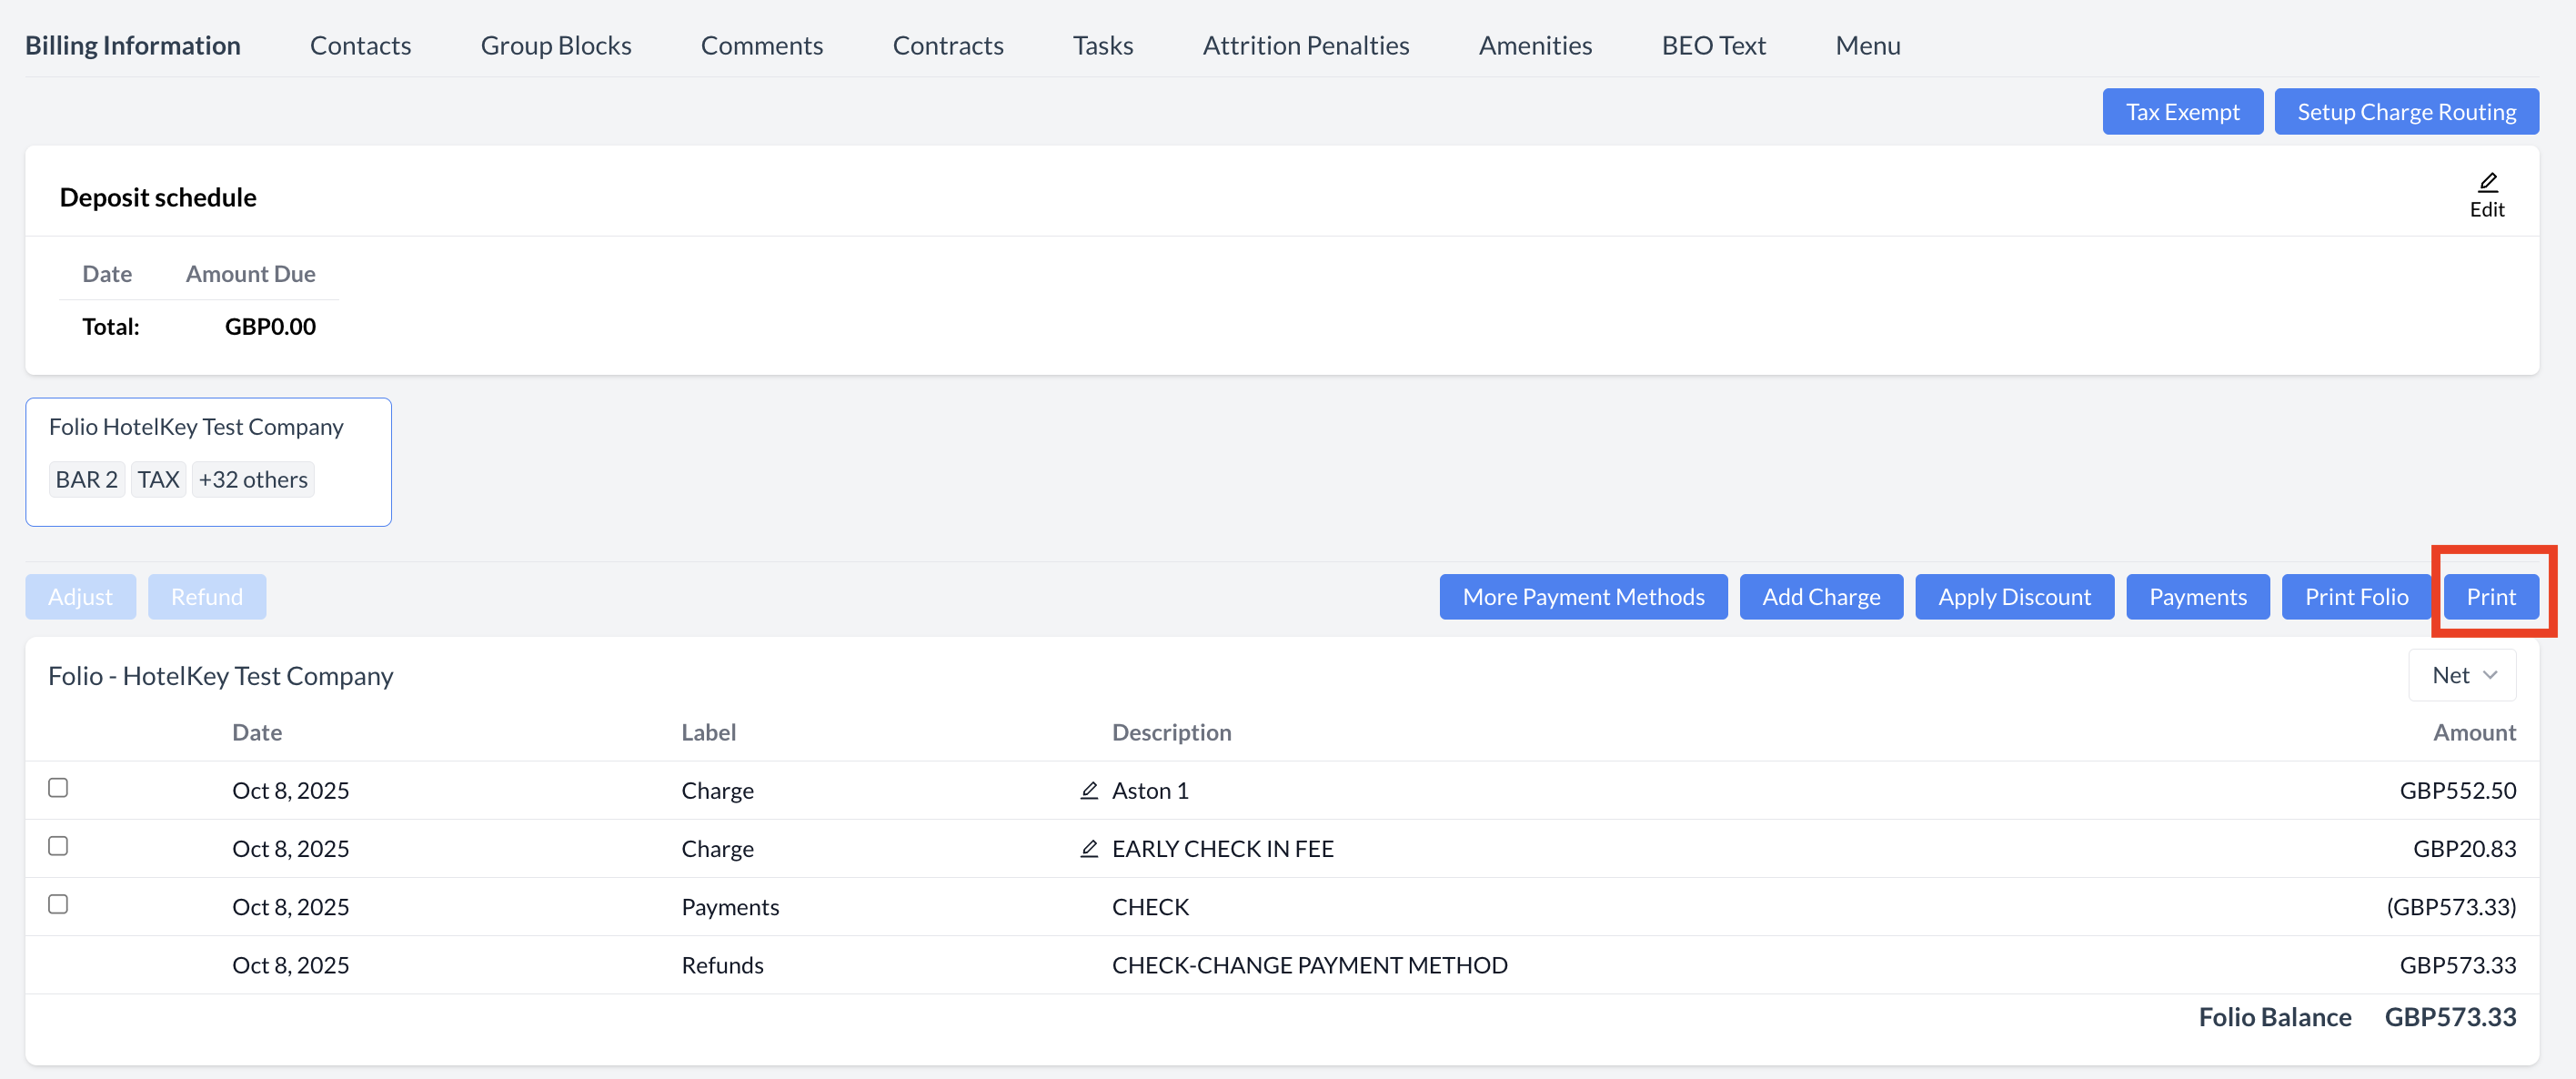
Steps to Print or Download the Folio:
Click the “Print Folio” Button
From the Billing Information screen, click the blue “Print Folio” button.
View the Folio in PDF Format
The folio will open in a PDF viewer in a new window or tab.
Choose an Action:
To Print the Folio:
Click the print icon (usually represented by a printer symbol) in the PDF viewer toolbar.
Follow your browser or system print settings to complete the print job.
To Download the Folio:
Click the download icon (commonly shown as a downward-facing arrow).
Choose a folder on your computer where you'd like to save the file.
Email the Folio (Optional)
Once downloaded, you can attach the PDF to an email and send it to the client from your email application.
Tip: When saving the PDF file, use a clear and consistent naming convention such as:
EventName_EventDate_Folio.pdf
This makes the file easy to identify and retrieve later.
Billing Information - Print Folio
Billing Information - Folio
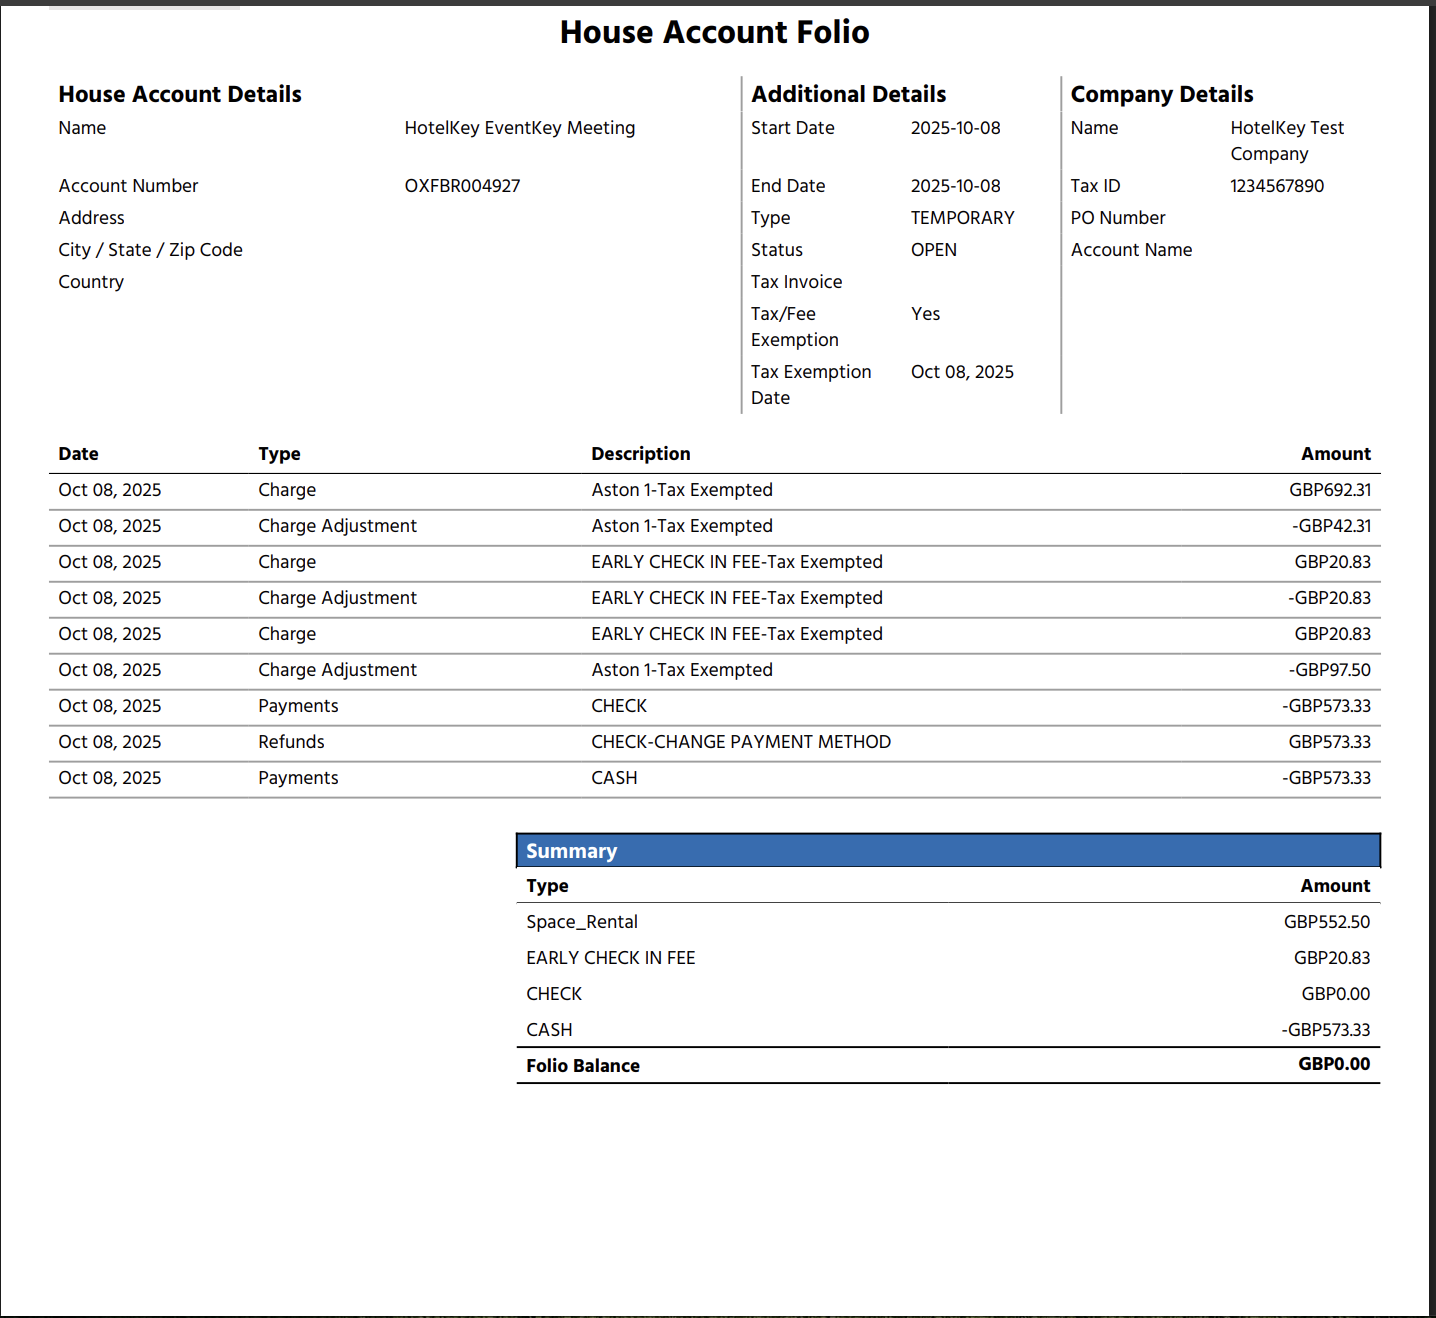
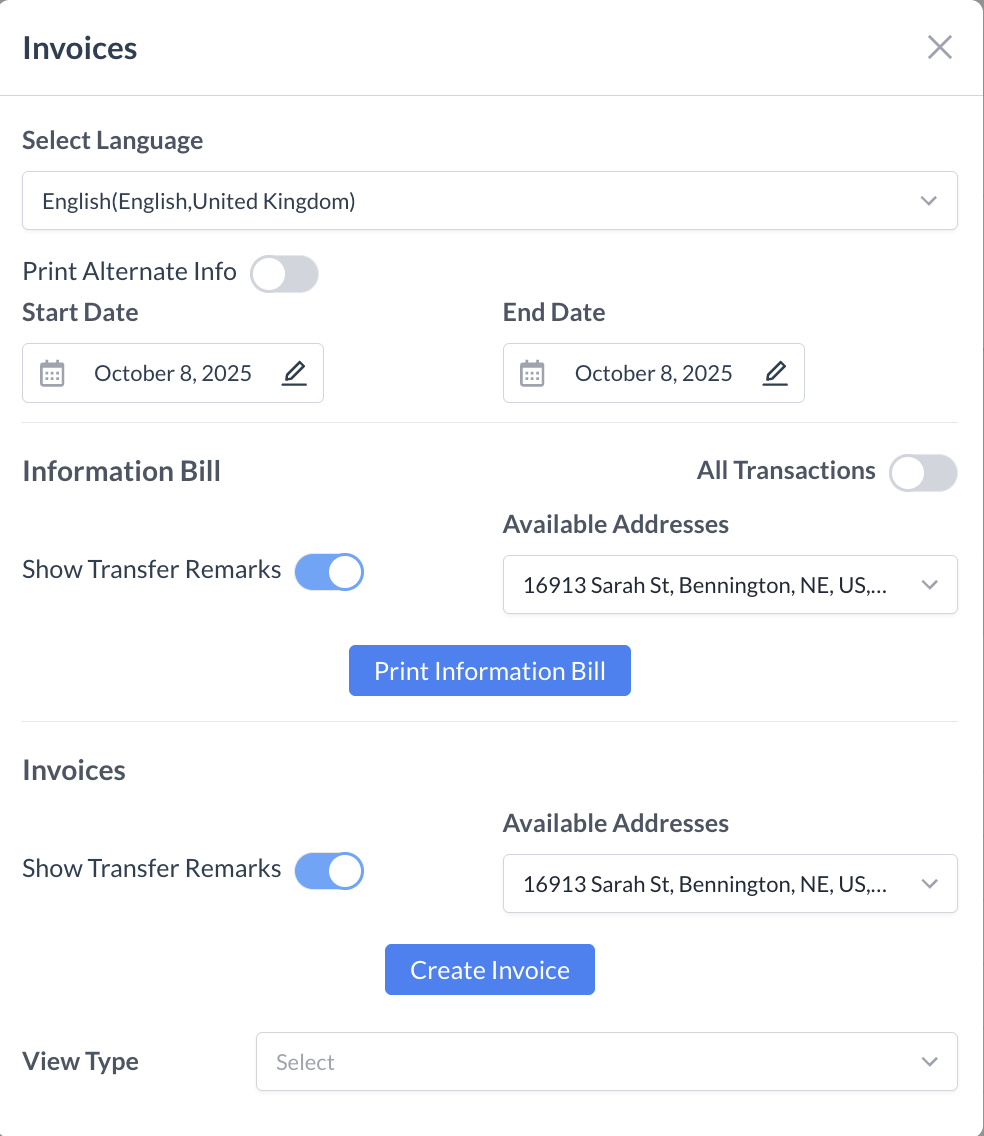
Printing the Final Folio or Invoice
Depending on the billing model your property uses, you will have different options for printing the final billing document. This could be either a folio or an invoice.
Steps to Print the Final Folio or Invoice:
Click the “Print” Button
From the Billing Information screen, click the blue “Print” button.
Choose Your Print Option Based on Billing Model
If your property uses the Folio model:
You will see the option to “Print as PDF.”
Click this option to generate a final folio for the event.
If your property uses the Invoice model:
You will first see the option to print the informational bill.
After reviewing, you can proceed to create and print the final invoice.
View the PDF
The folio or invoice will open in a PDF viewer in a new window or tab.
Print or Download
From the PDF viewer, you can:
Print the document by clicking the printer icon.
Download it by clicking the download icon (typically a downward arrow), and save it to your computer.
Tip: Always review the document for accuracy before sending to the client. Use a clear filename when saving, such as:
EventName_EventDate_Invoice.pdf or EventName_Folio.pdf


.png?cb=ef3c564288a3354eda95b6212932580e)
.png?cb=45e0dfb212475c033af6d682b5ea38f5)
.png?cb=bed5bed46ec1150db2170c13b1b9166e)
.png?cb=2f4fb2029696a208f66a69997b18e4be)
.png?cb=2be6227c4621f78c5b5826a08e9c6c1e)
.png?cb=2a0d68ab67668fb09371064f89a85e82)