Skip table of contents

Packages Setup

📆 Revision Date:

Event Packages Setup Overview

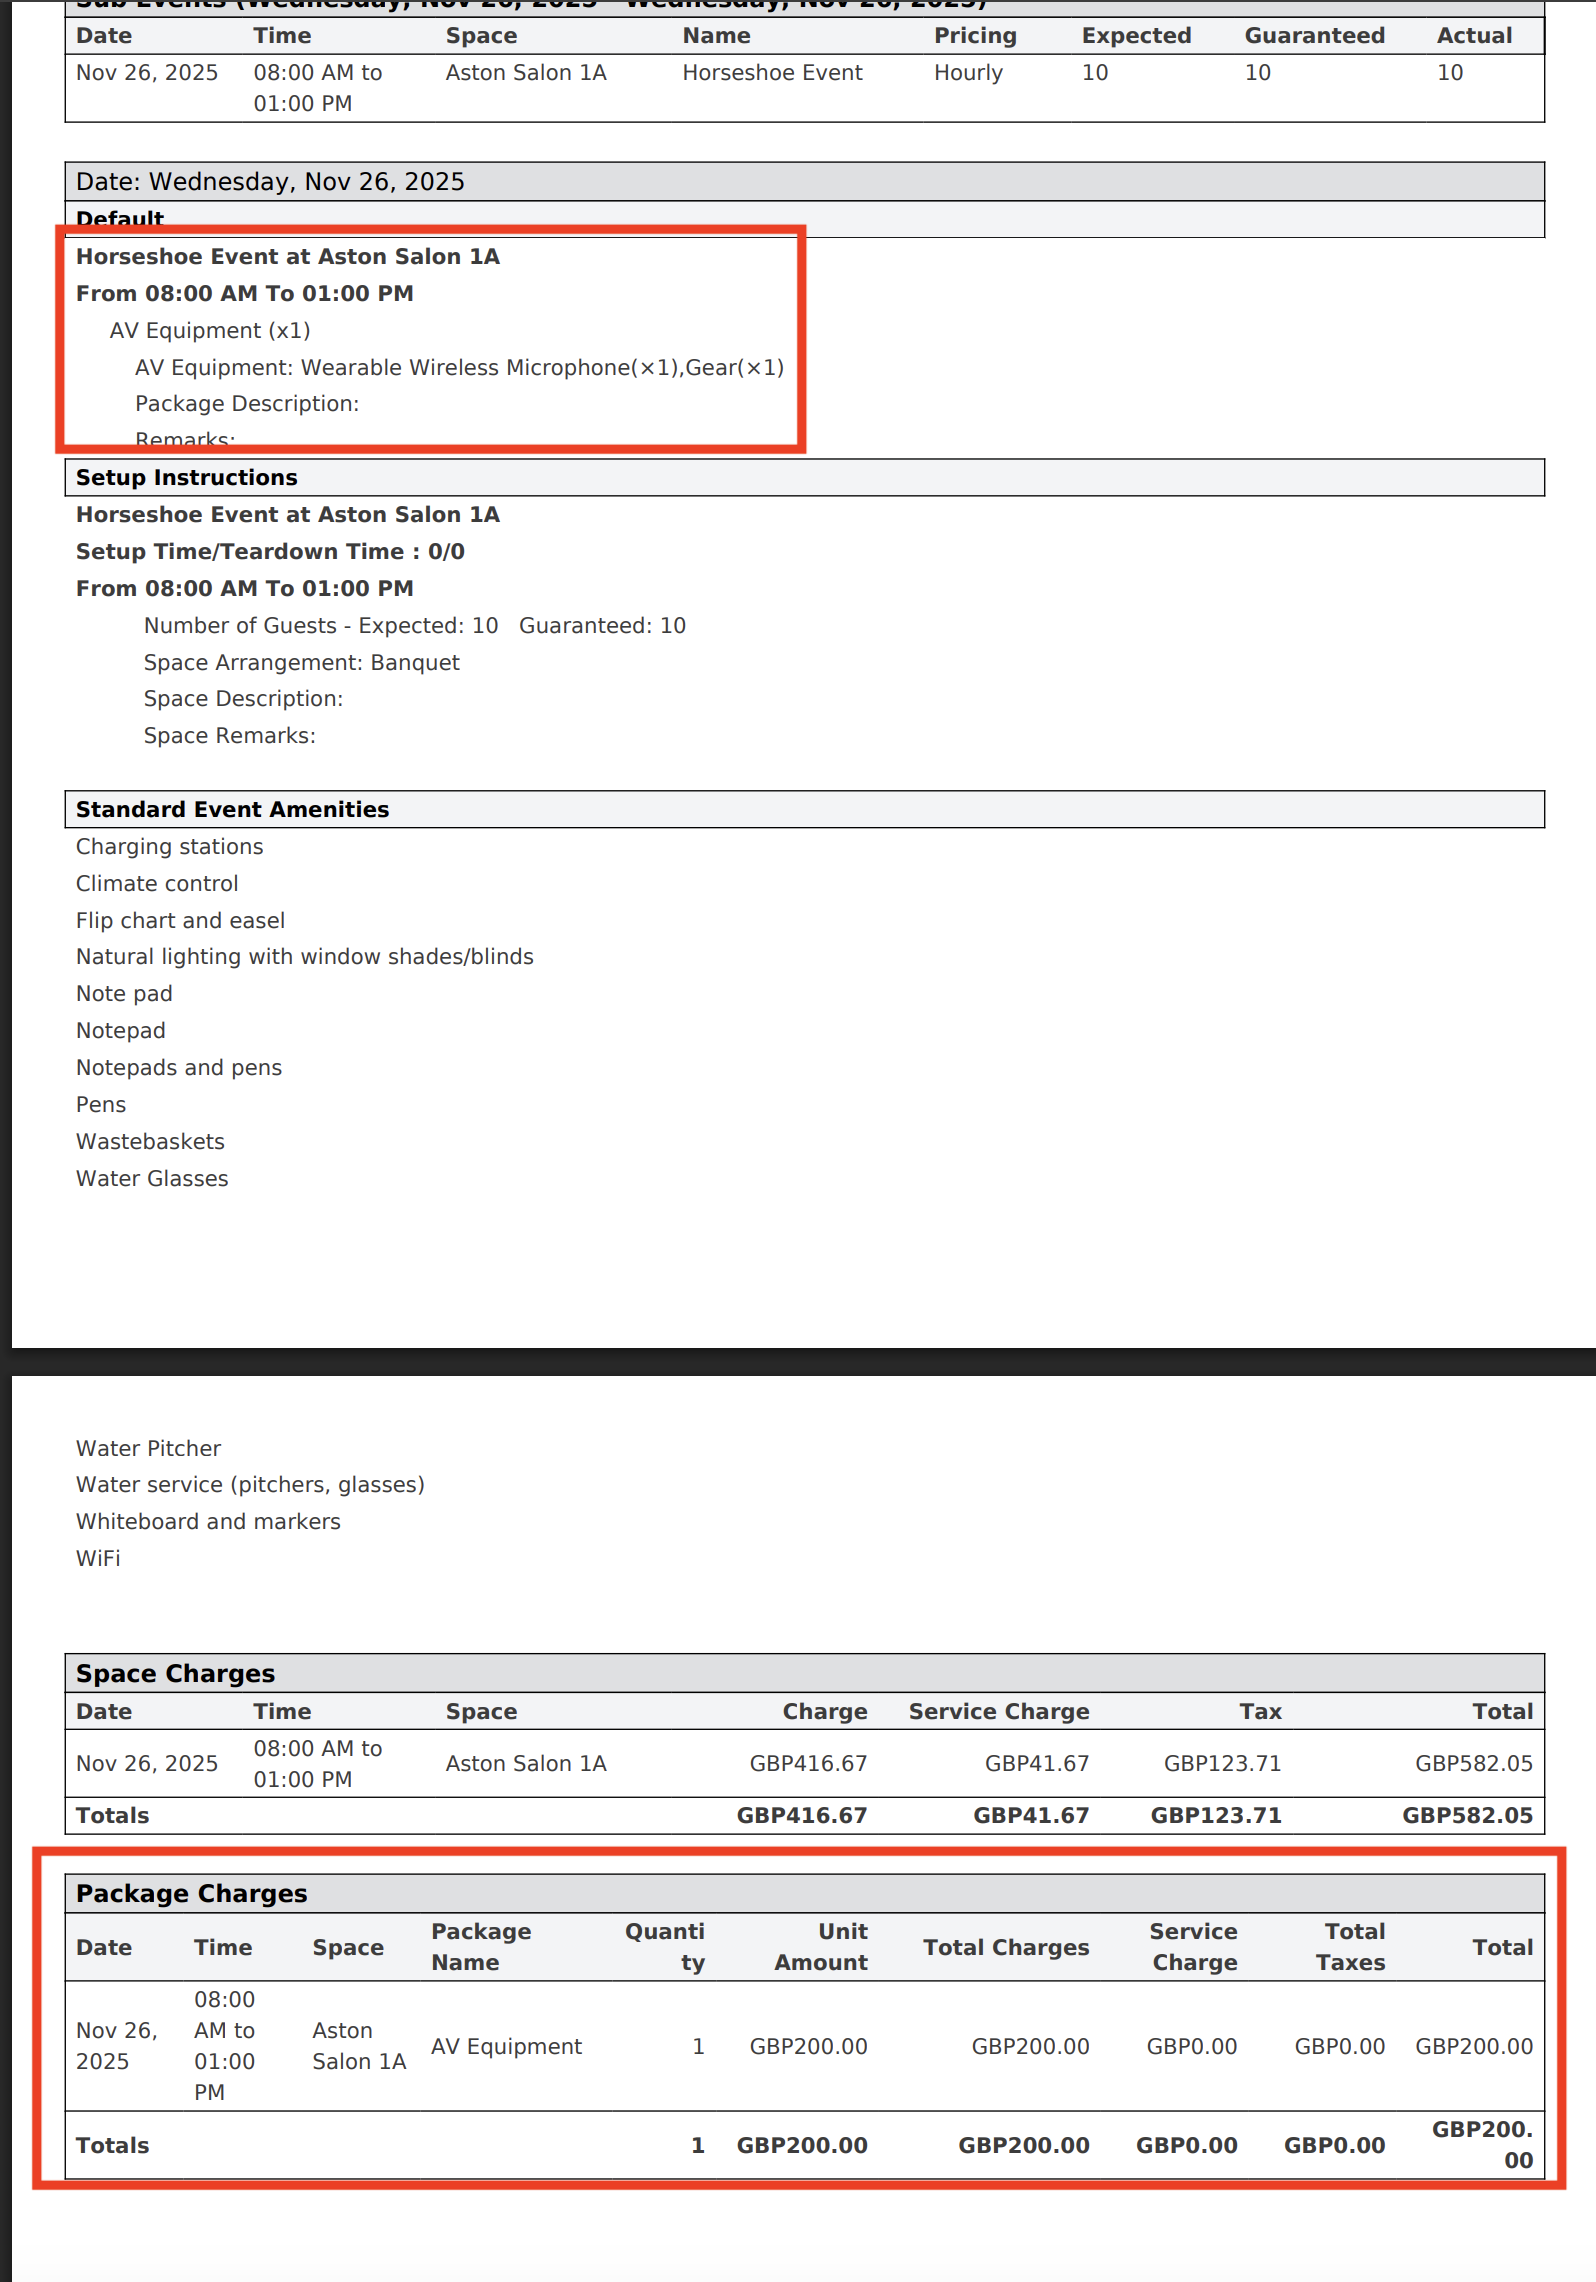
In EventKey, Event Packages (also known as Add-On Packages) are optional services or enhancements that can be added to a space rental. These might include offerings such as an AV Package, Buffet Dinner, or Plated Dinner. Event Packages are typically associated with an additional charge, which may be applied as either a flat fee or a per-person rate. These packages allow for flexible customization of events based on client needs and help ensure all necessary services are captured in the final proposal and billing.

🛑 Prerequisites

Before creating a Package, the following items must be set up to ensure proper configuration and functionality:

1. Event Type

Why it’s needed:
Defines which types of events the Package can be offered with.

Action required:
Create the required Event Type before setting up the Package.

2. Charge Type

Why it’s needed:
Determines where the revenue from the Package is recorded for reporting purposes.

Action required:
Create the required Charge Type before setting up the Package.

3. Package Category

Why it’s needed:
Categorizes the Package to make it easier to find and attach to an event.

Action required:
Create the required Package Category before setting up the Package.

4. Product

Why it’s needed:
Attaching Products to the Package creates a “menu” of items the client can choose from when selecting this Package.

Action required:
Create the required Products (menu options) before setting up the Package.

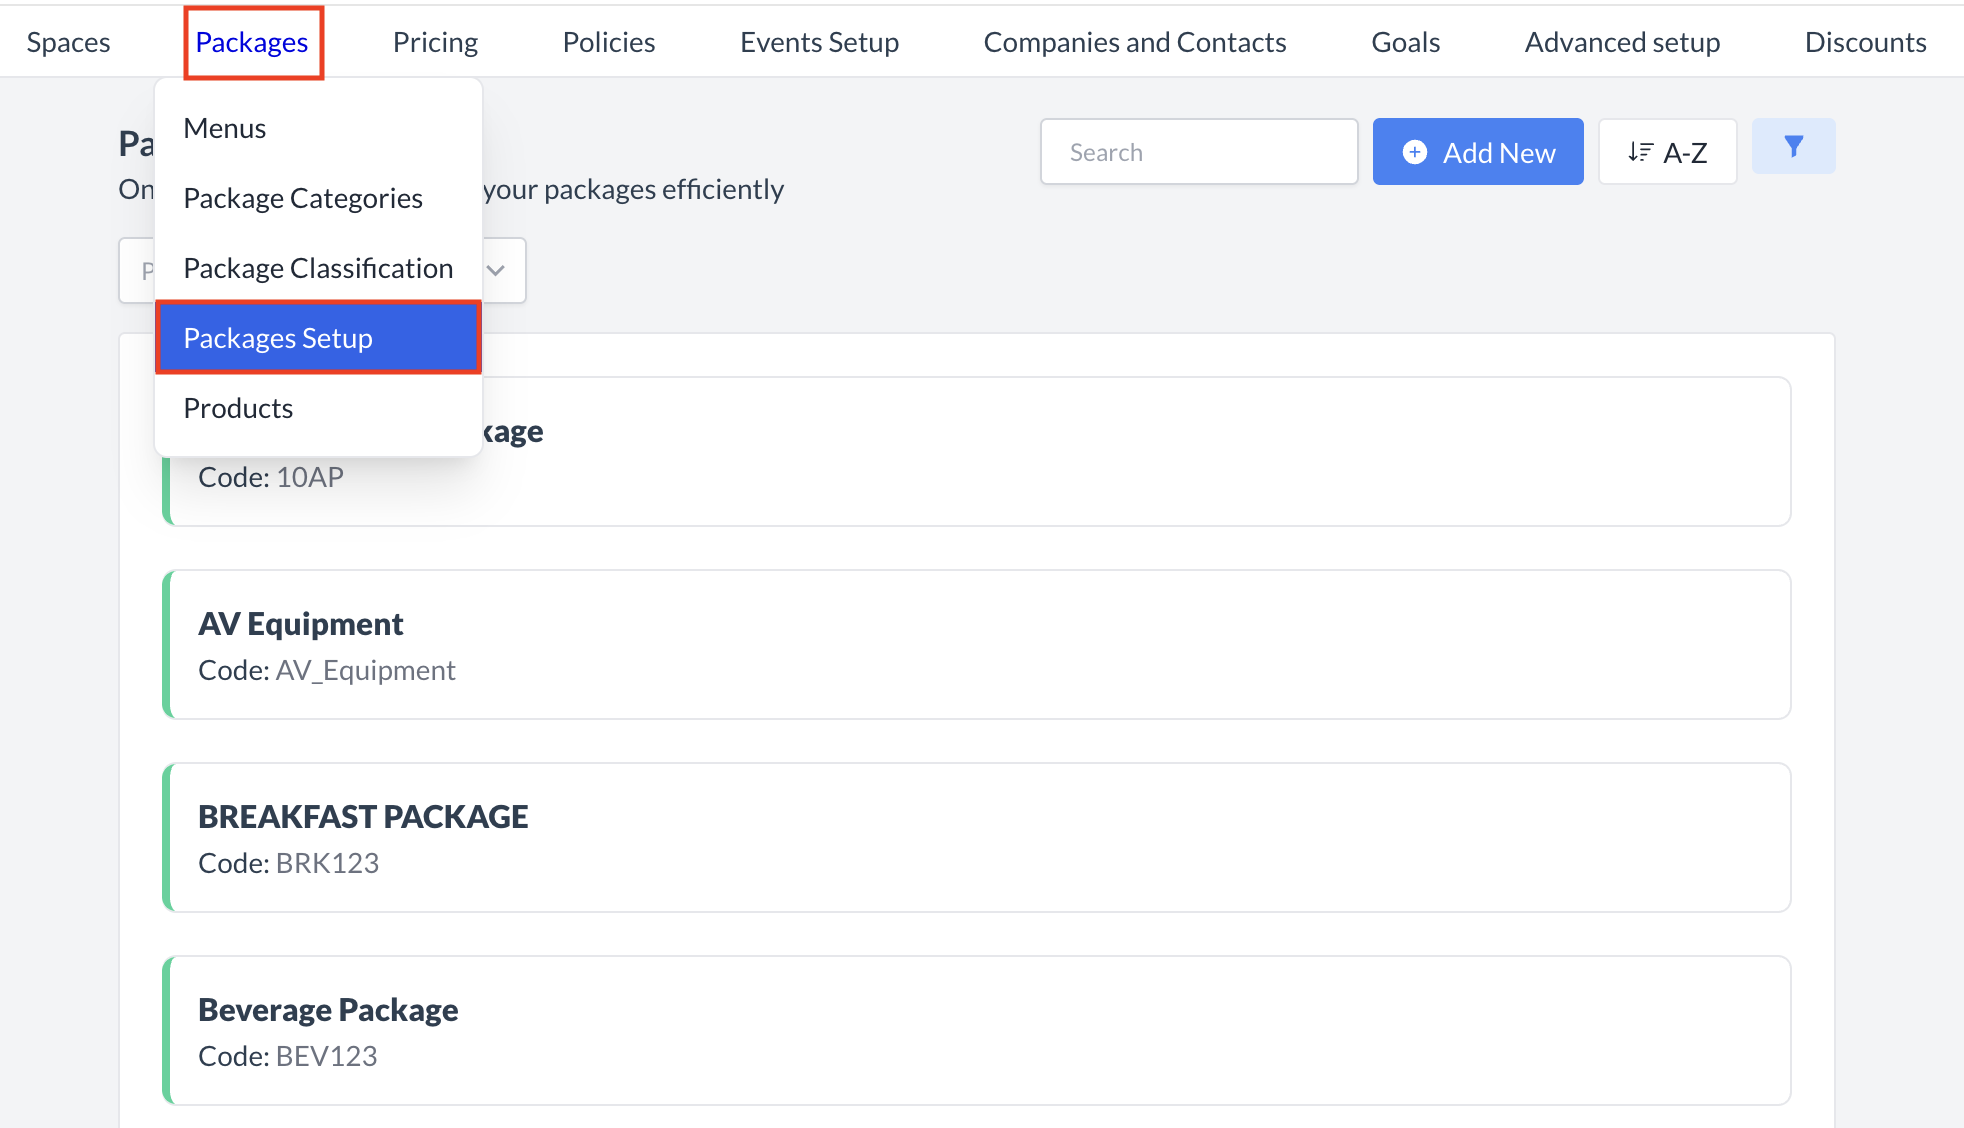
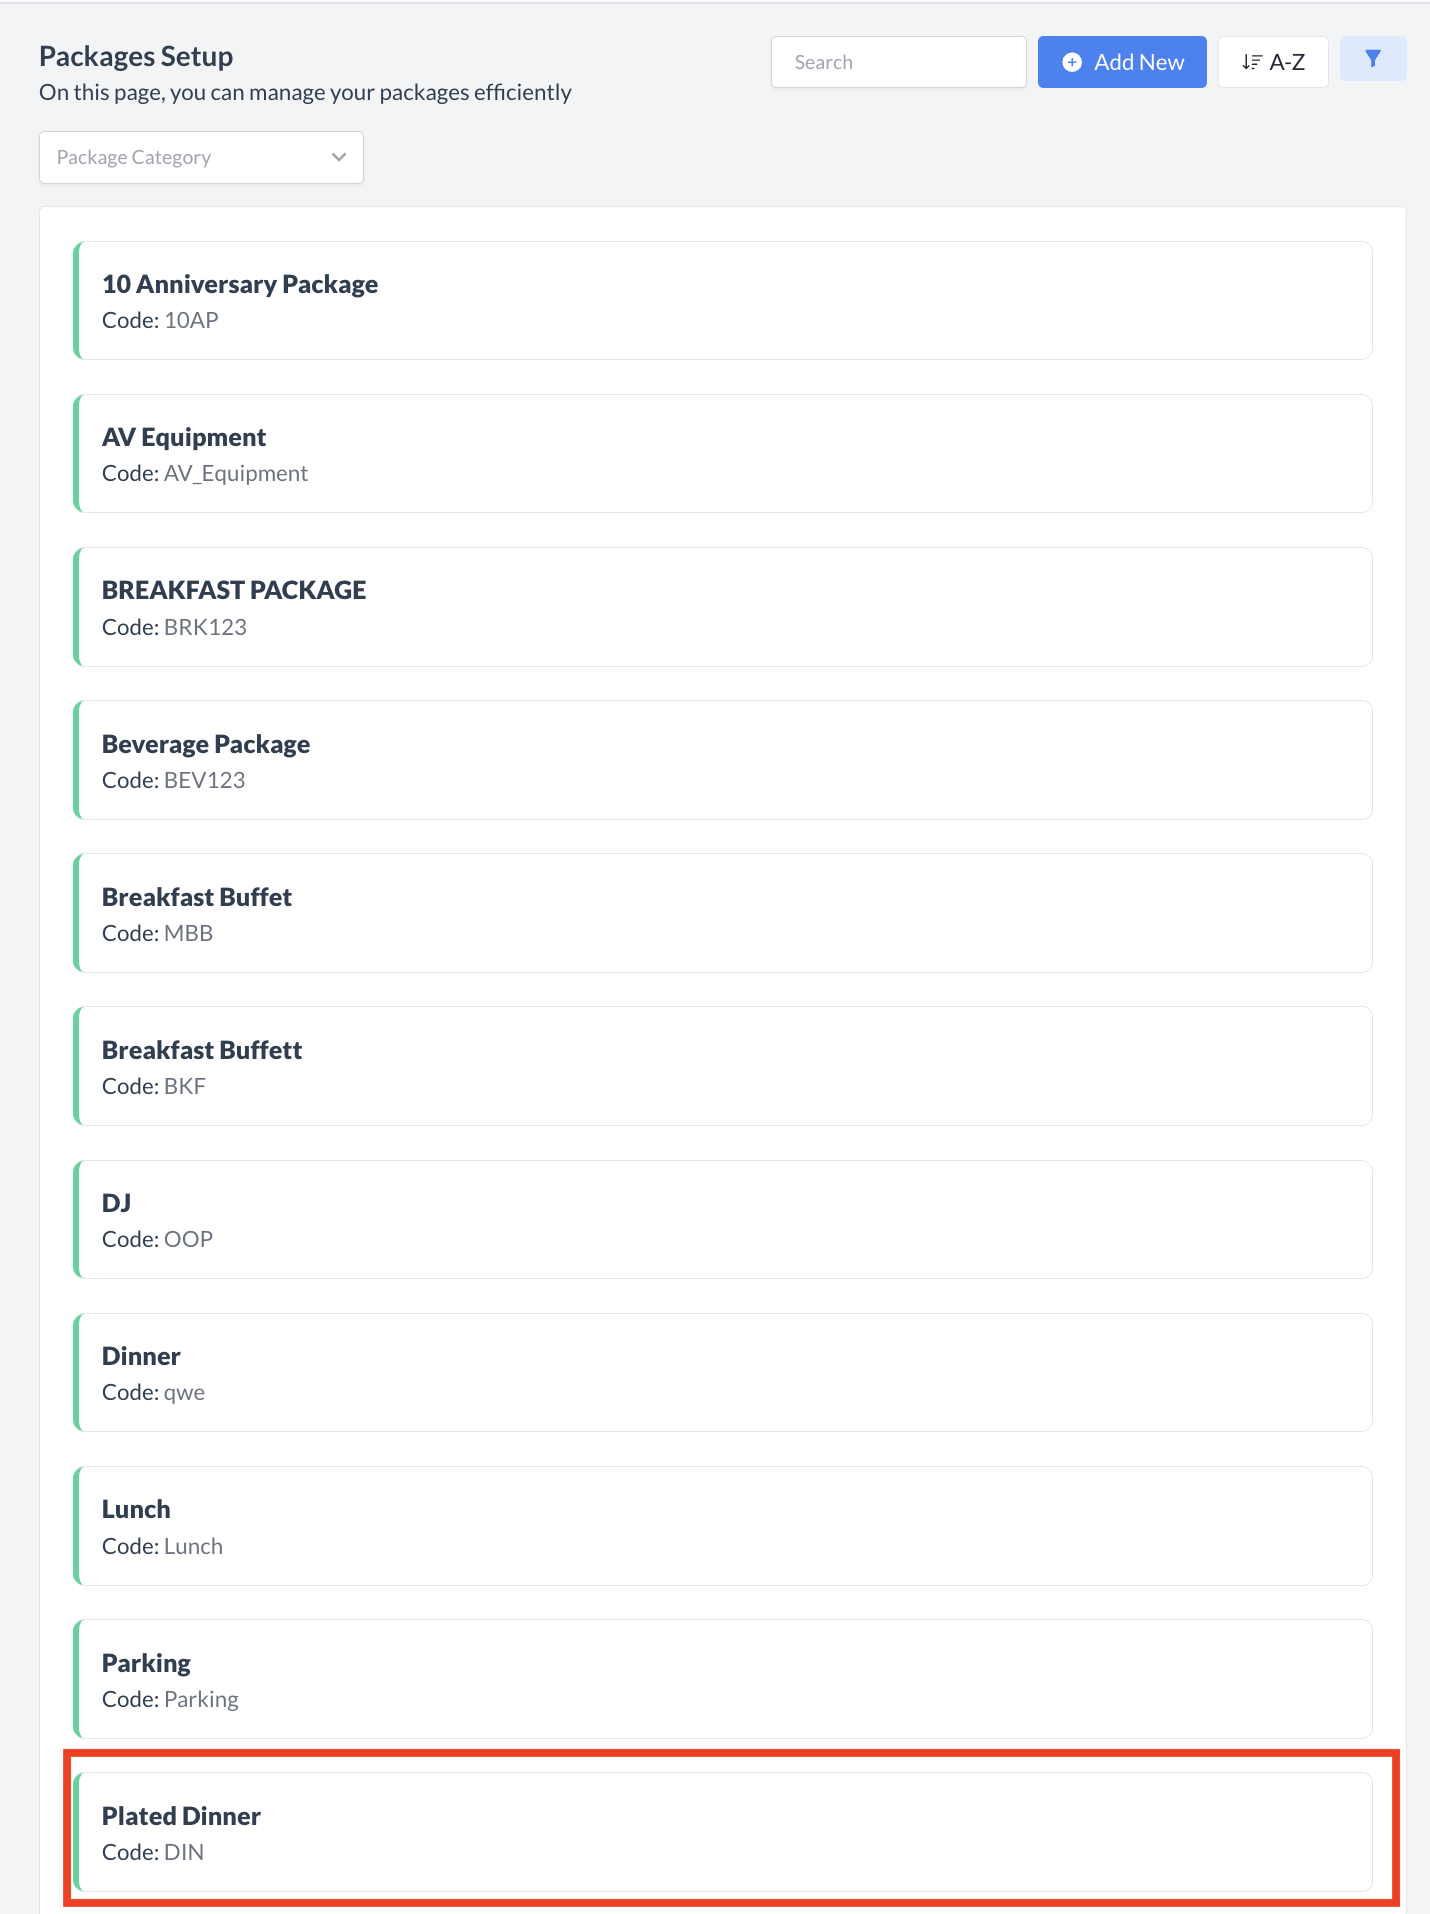
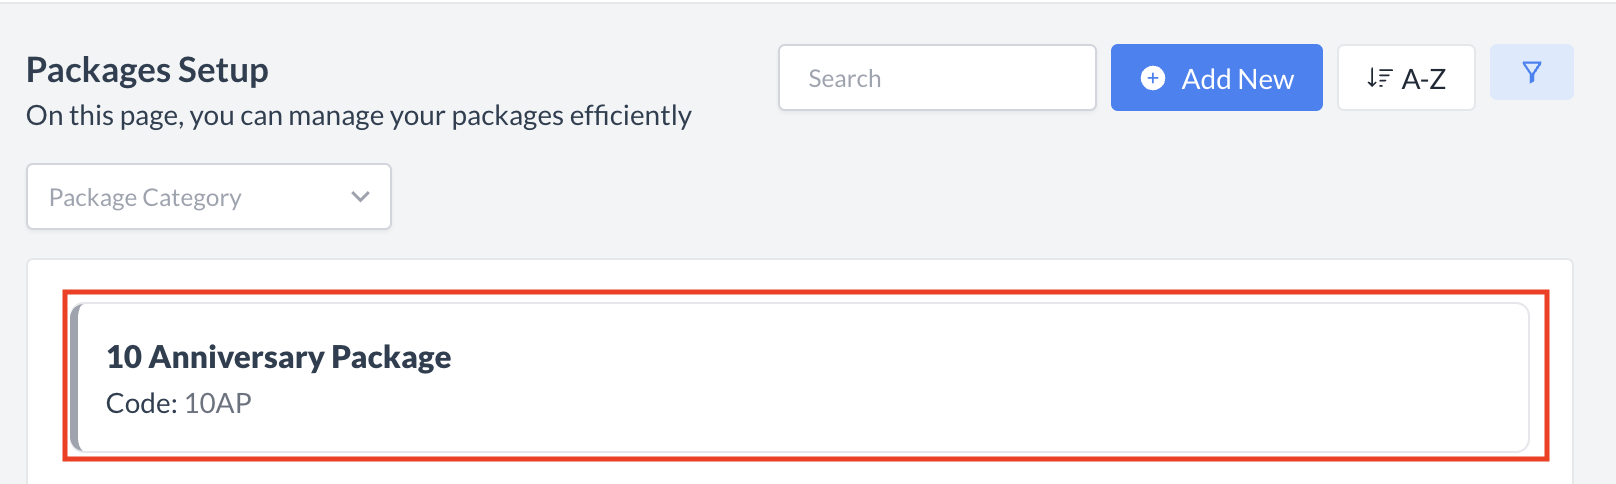
Navigate to Home > Event Administration > Packages > Packages Setup

Packages_Packages Setup.png

Packages > Packages Setup

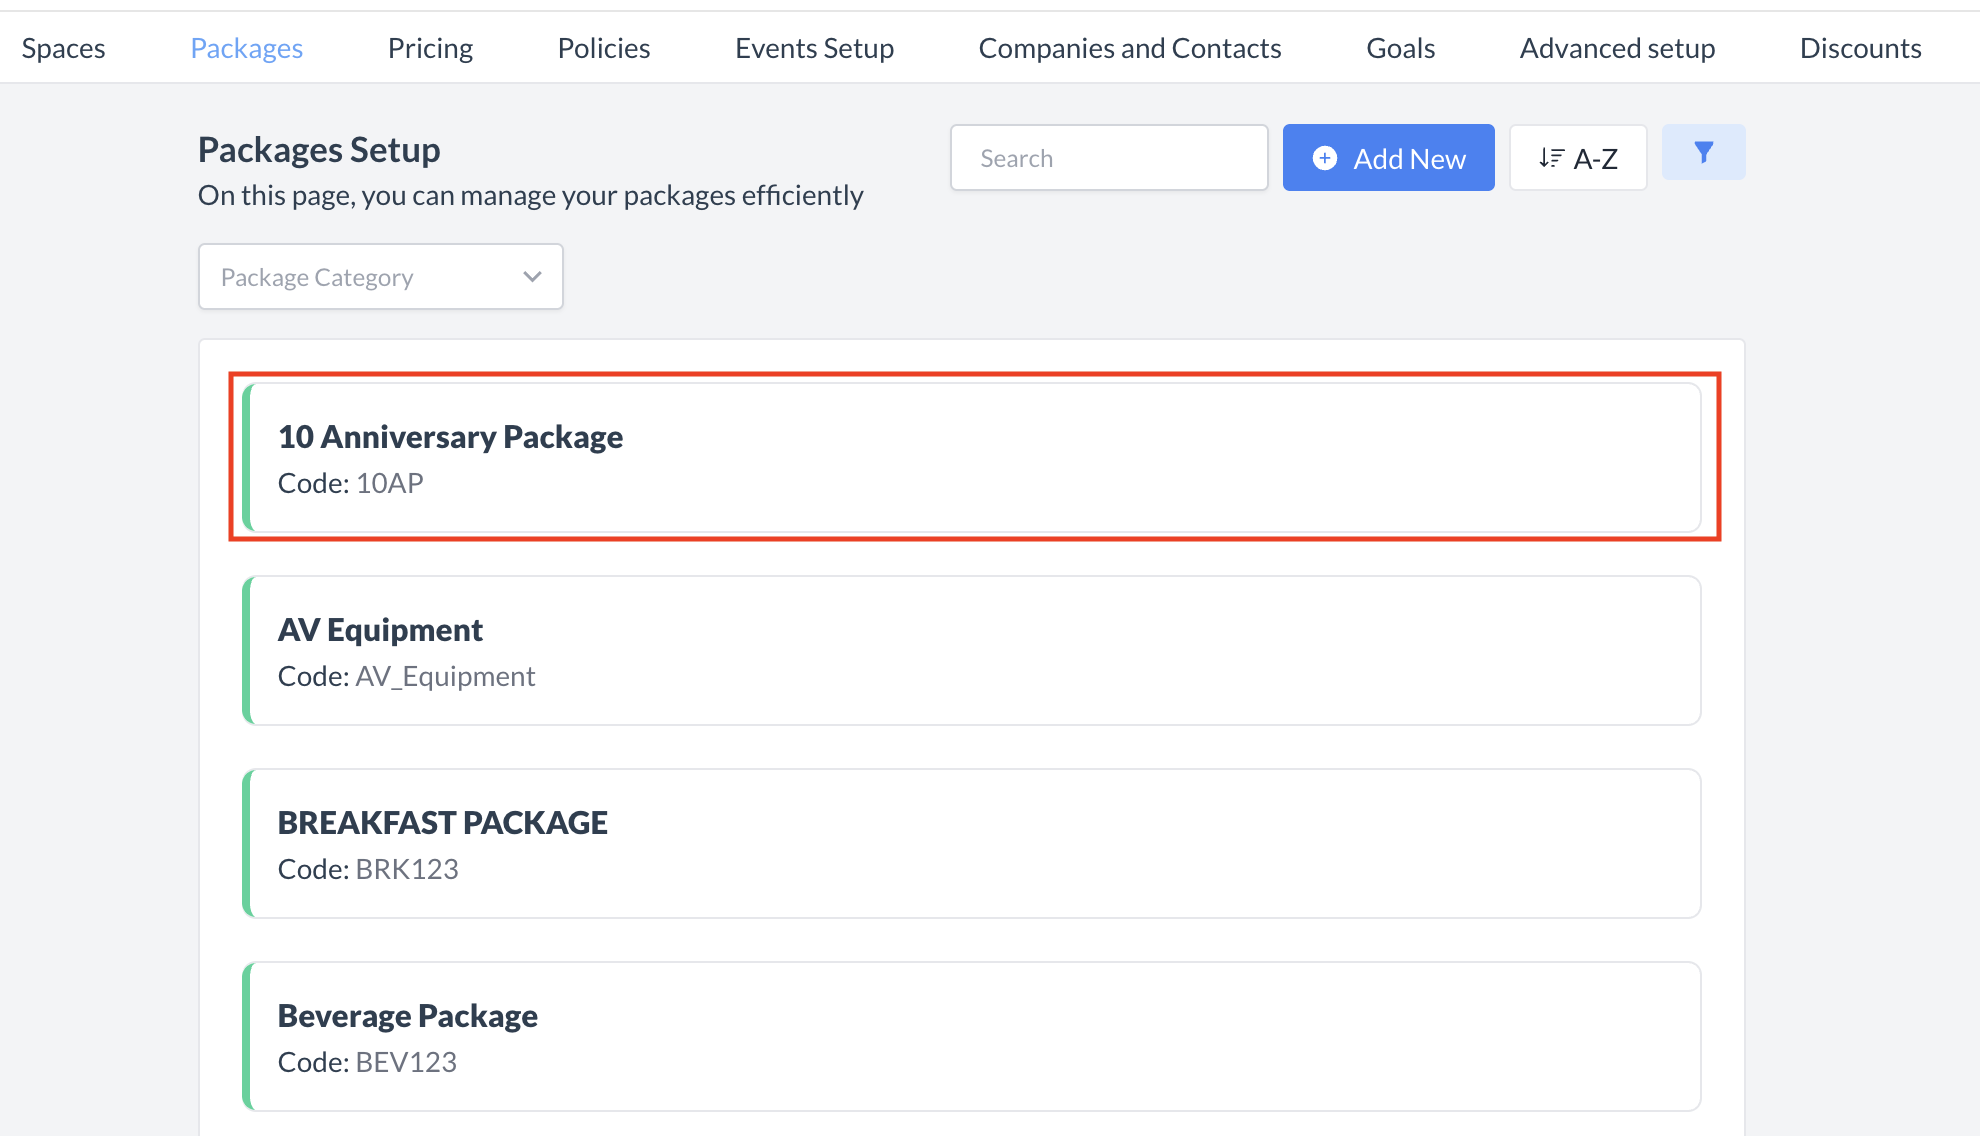
Accessing and Creating Packages

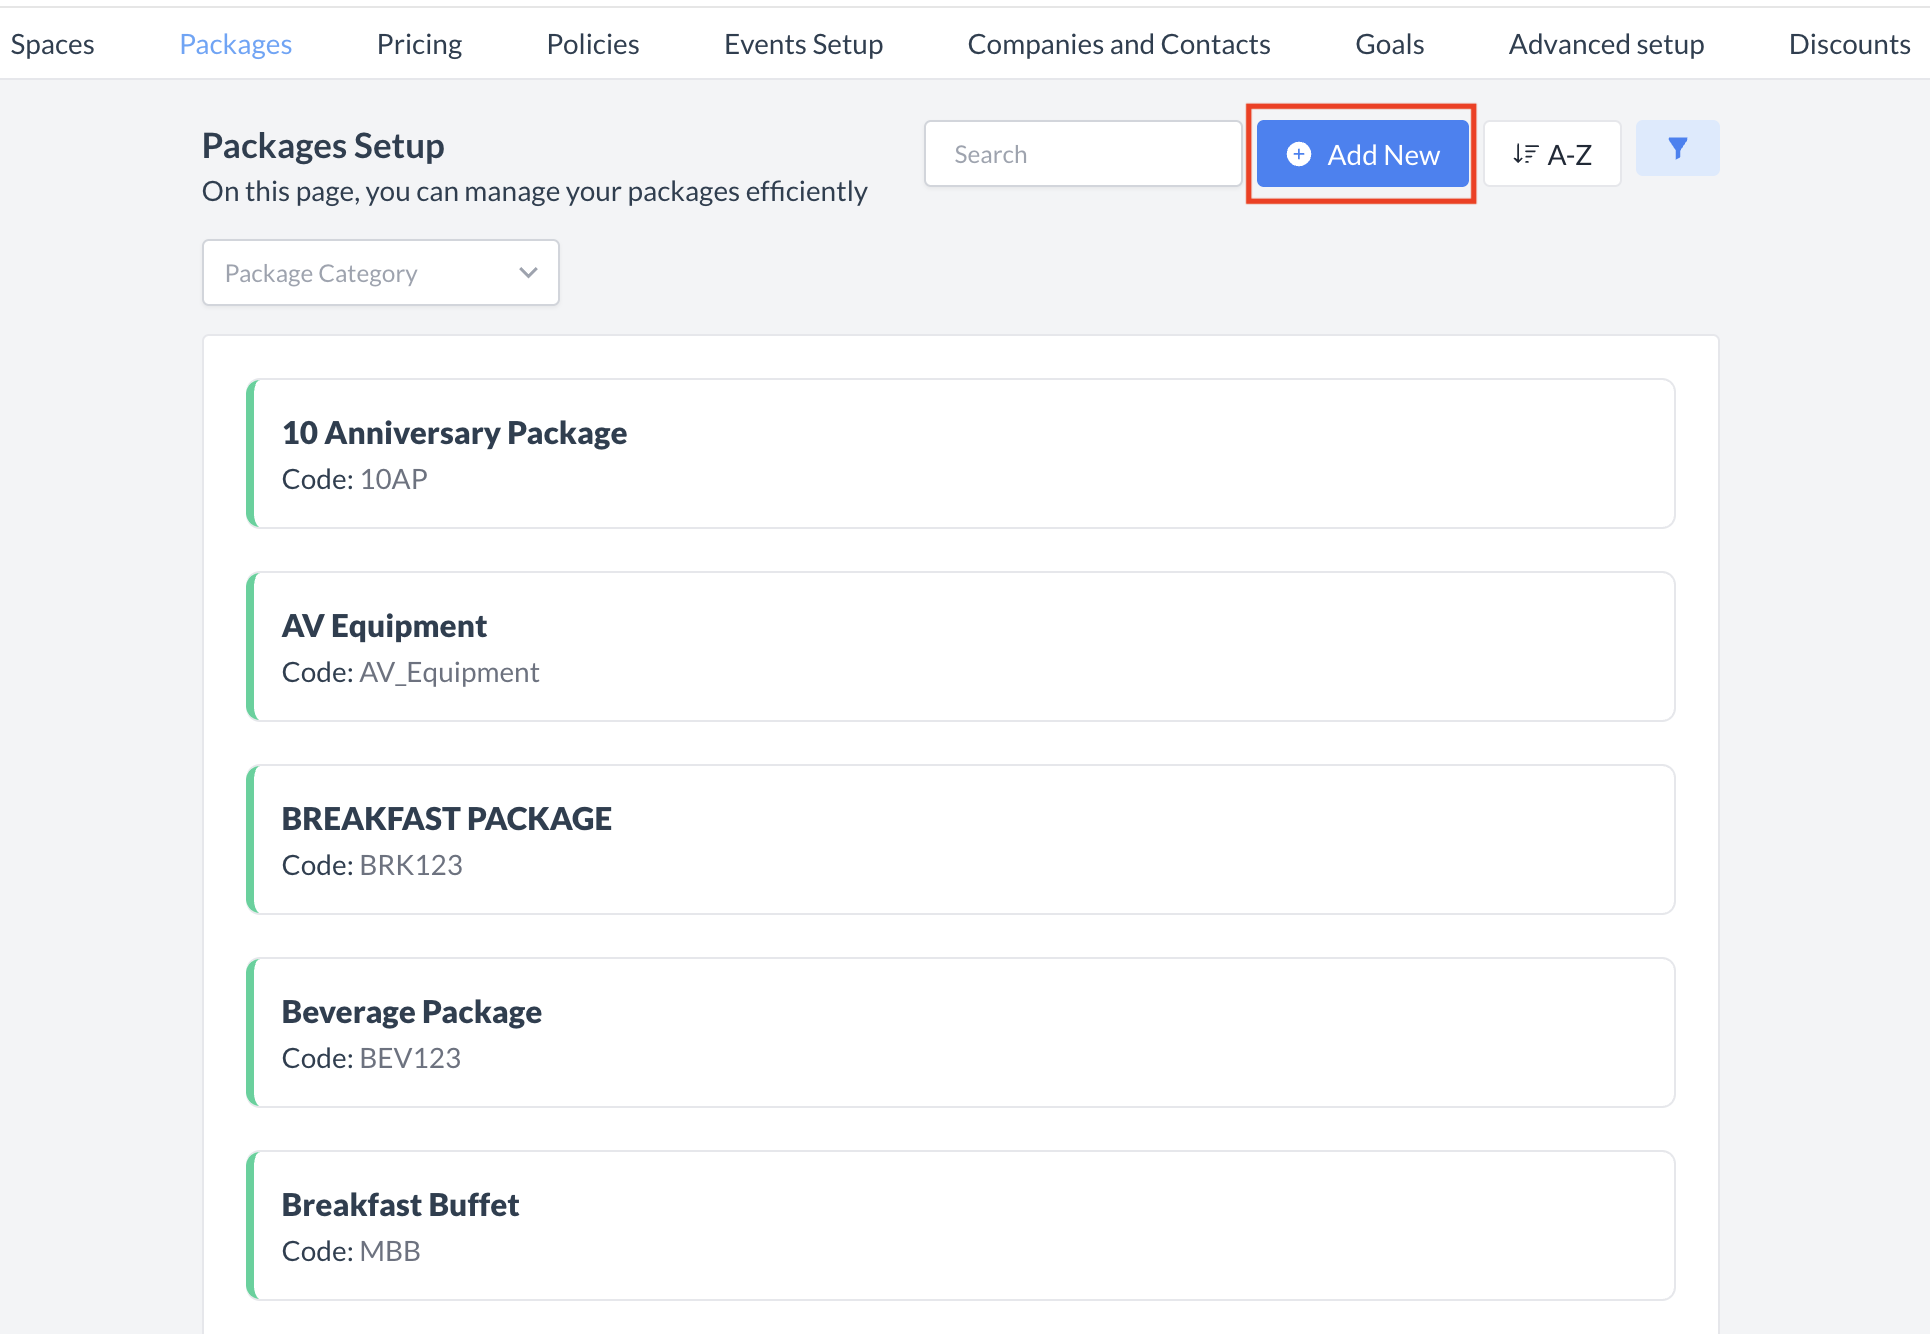
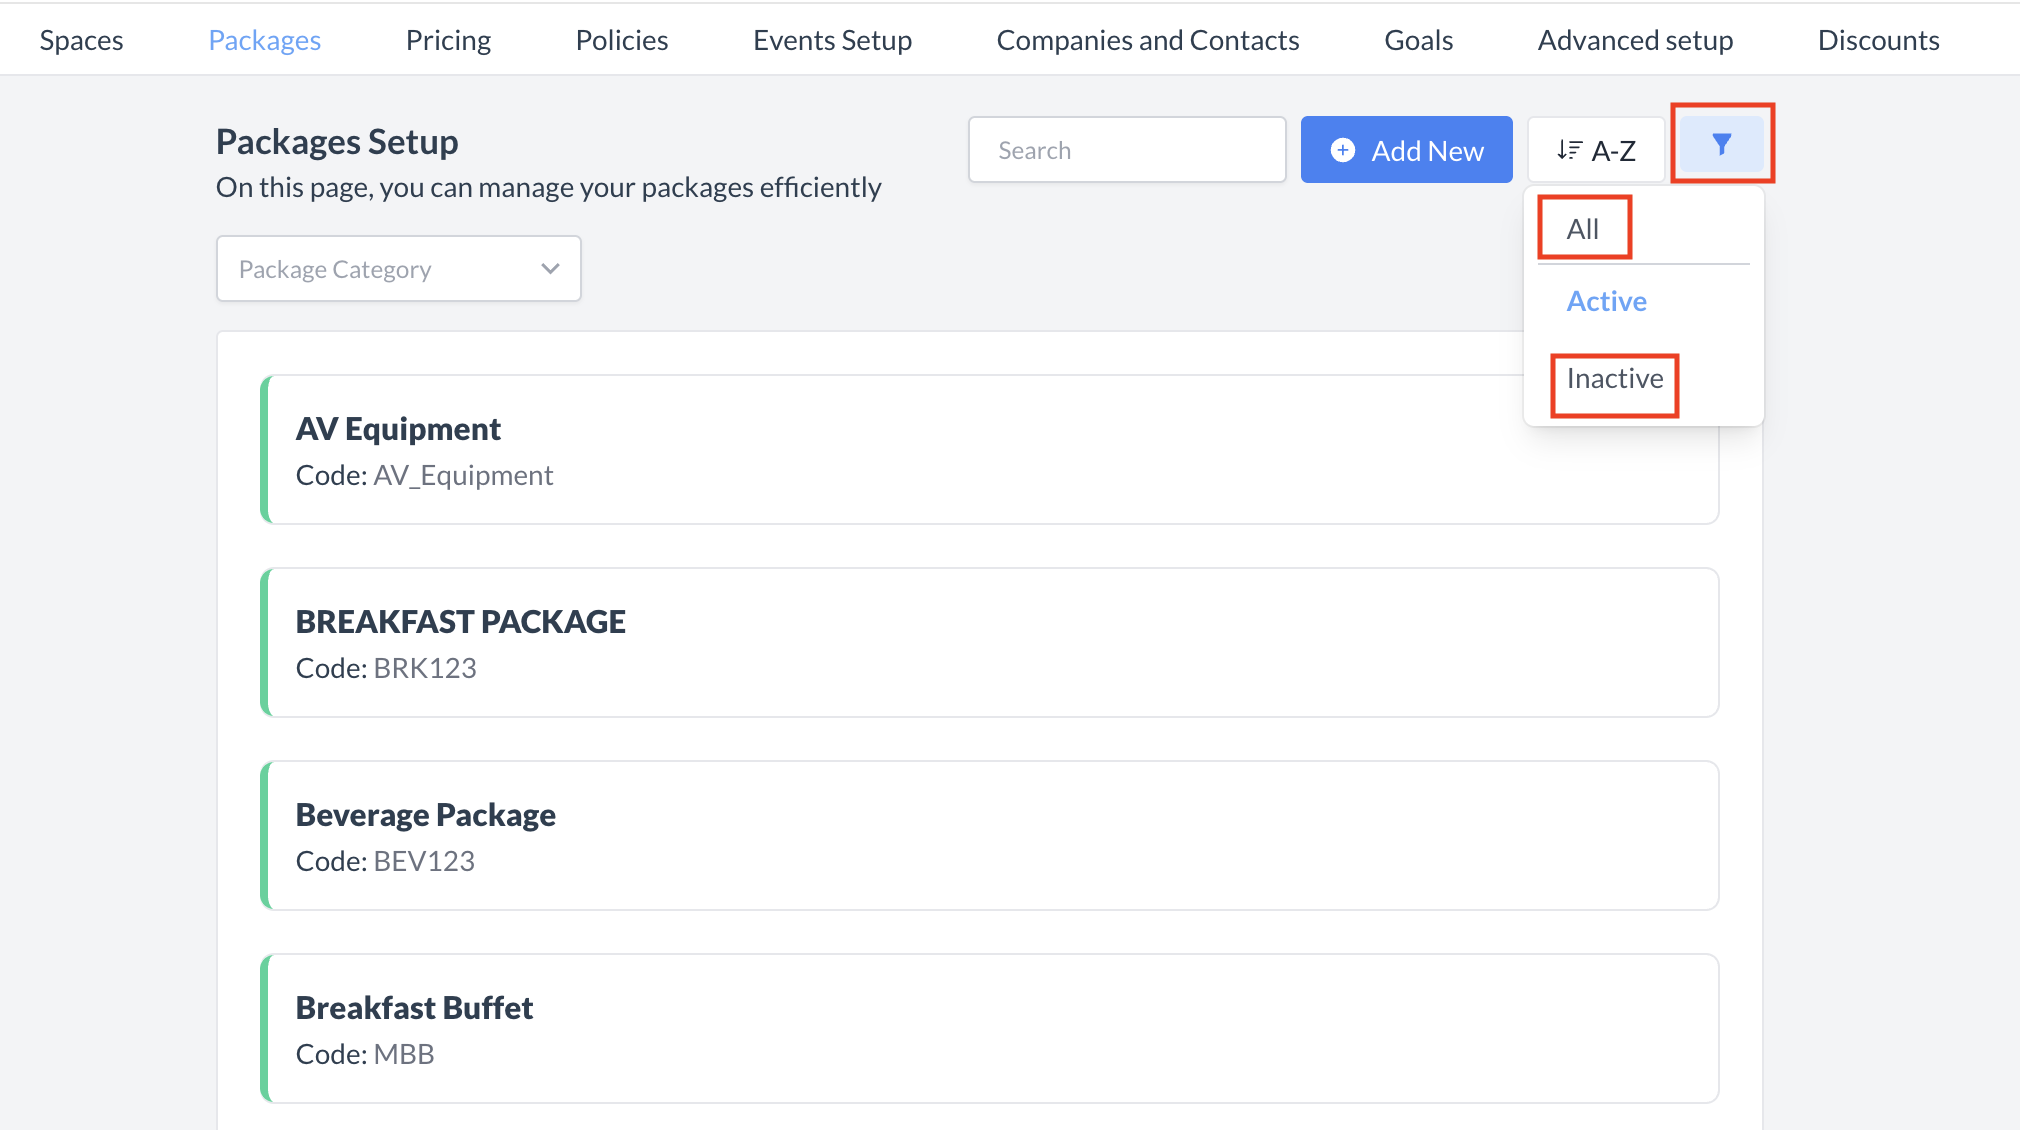
The Package Setup screen displays a list of all existing active packages available..

To create a new package:

  1. Navigate to the Package Setup screen.

  2. Click the blue Add New button in the top-right corner to begin creating a new package.

Packages_Add New.png

Packages: Add New Package

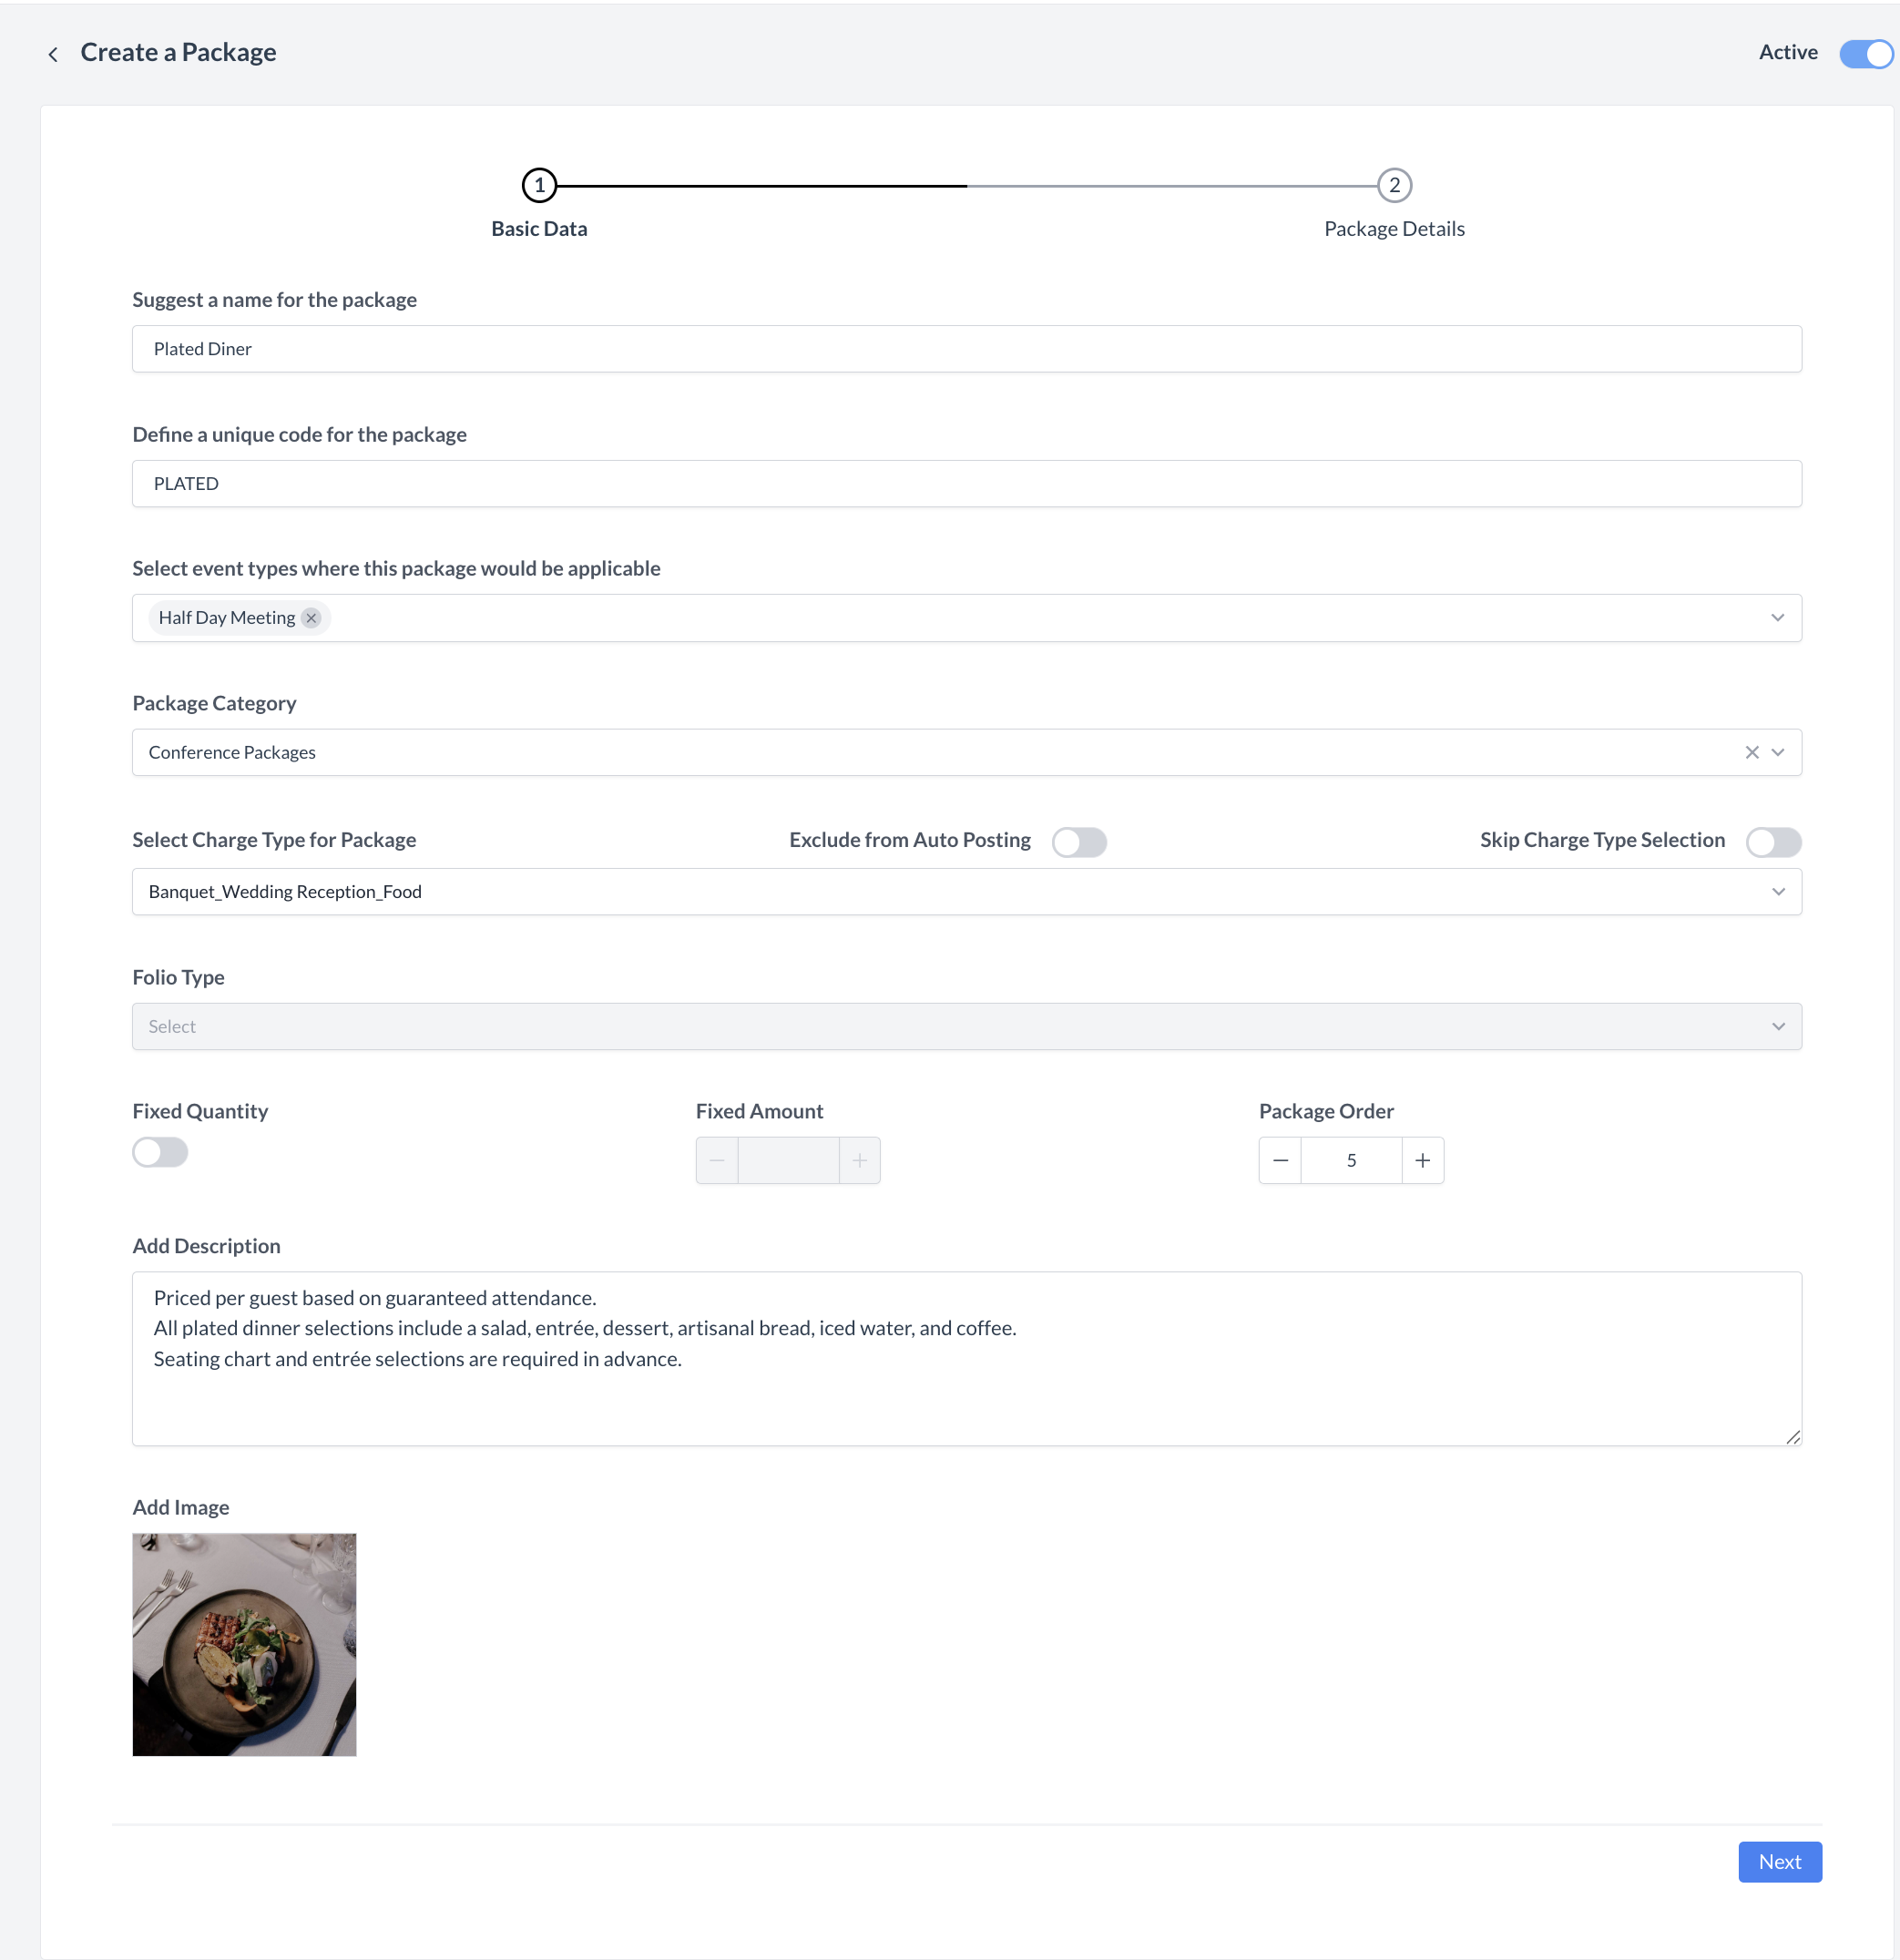
Step 1: Enter Basic Package Information

When the Create a Package screen appears, begin by completing the Basic Data section. This step defines the core details of the package:

  • Name: Enter a clear and descriptive name for the package.
    Example: "Plated Dinner"

  • Code: Provide a unique code or identifier for the package.

  • Event Type: Use the dropdown menu to select one or more event types for which the package will be available.
    Note: Multiple event types can be selected.

  • Package Category: Choose the appropriate category that the new package should be associated with using the dropdown menu.

  • Charge Type: Select the charge type that will be used to post the package charges.
    ⚠️ Important: If F&B charges must be posted from your POS system, make sure to enable the Exclude from Auto Posting toggle. This ensures the package charges do not automatically post to the EventKey folio.

  • Fixed Quantity: If the package is based on a fixed quantity (e.g., AV Package), set the toggle to ON. Then, enter the Fixed Amount that should be included with the package. If the toggle is OFF, then the package is considered per person.

  • Package Order: Set the display order for the package as it will appear in the package listing screen.

  • Description: Provide a brief summary explaining the purpose or any relevant conditions of the package.

  • Image (Optional): Upload an image for the package. While it doesn’t currently appear in the EventKey UI, it will display on the EventKey booking engine (web).

Once all required fields are complete, click the Next button to continue to the next step.

Packages: Create a Package_Basic Data

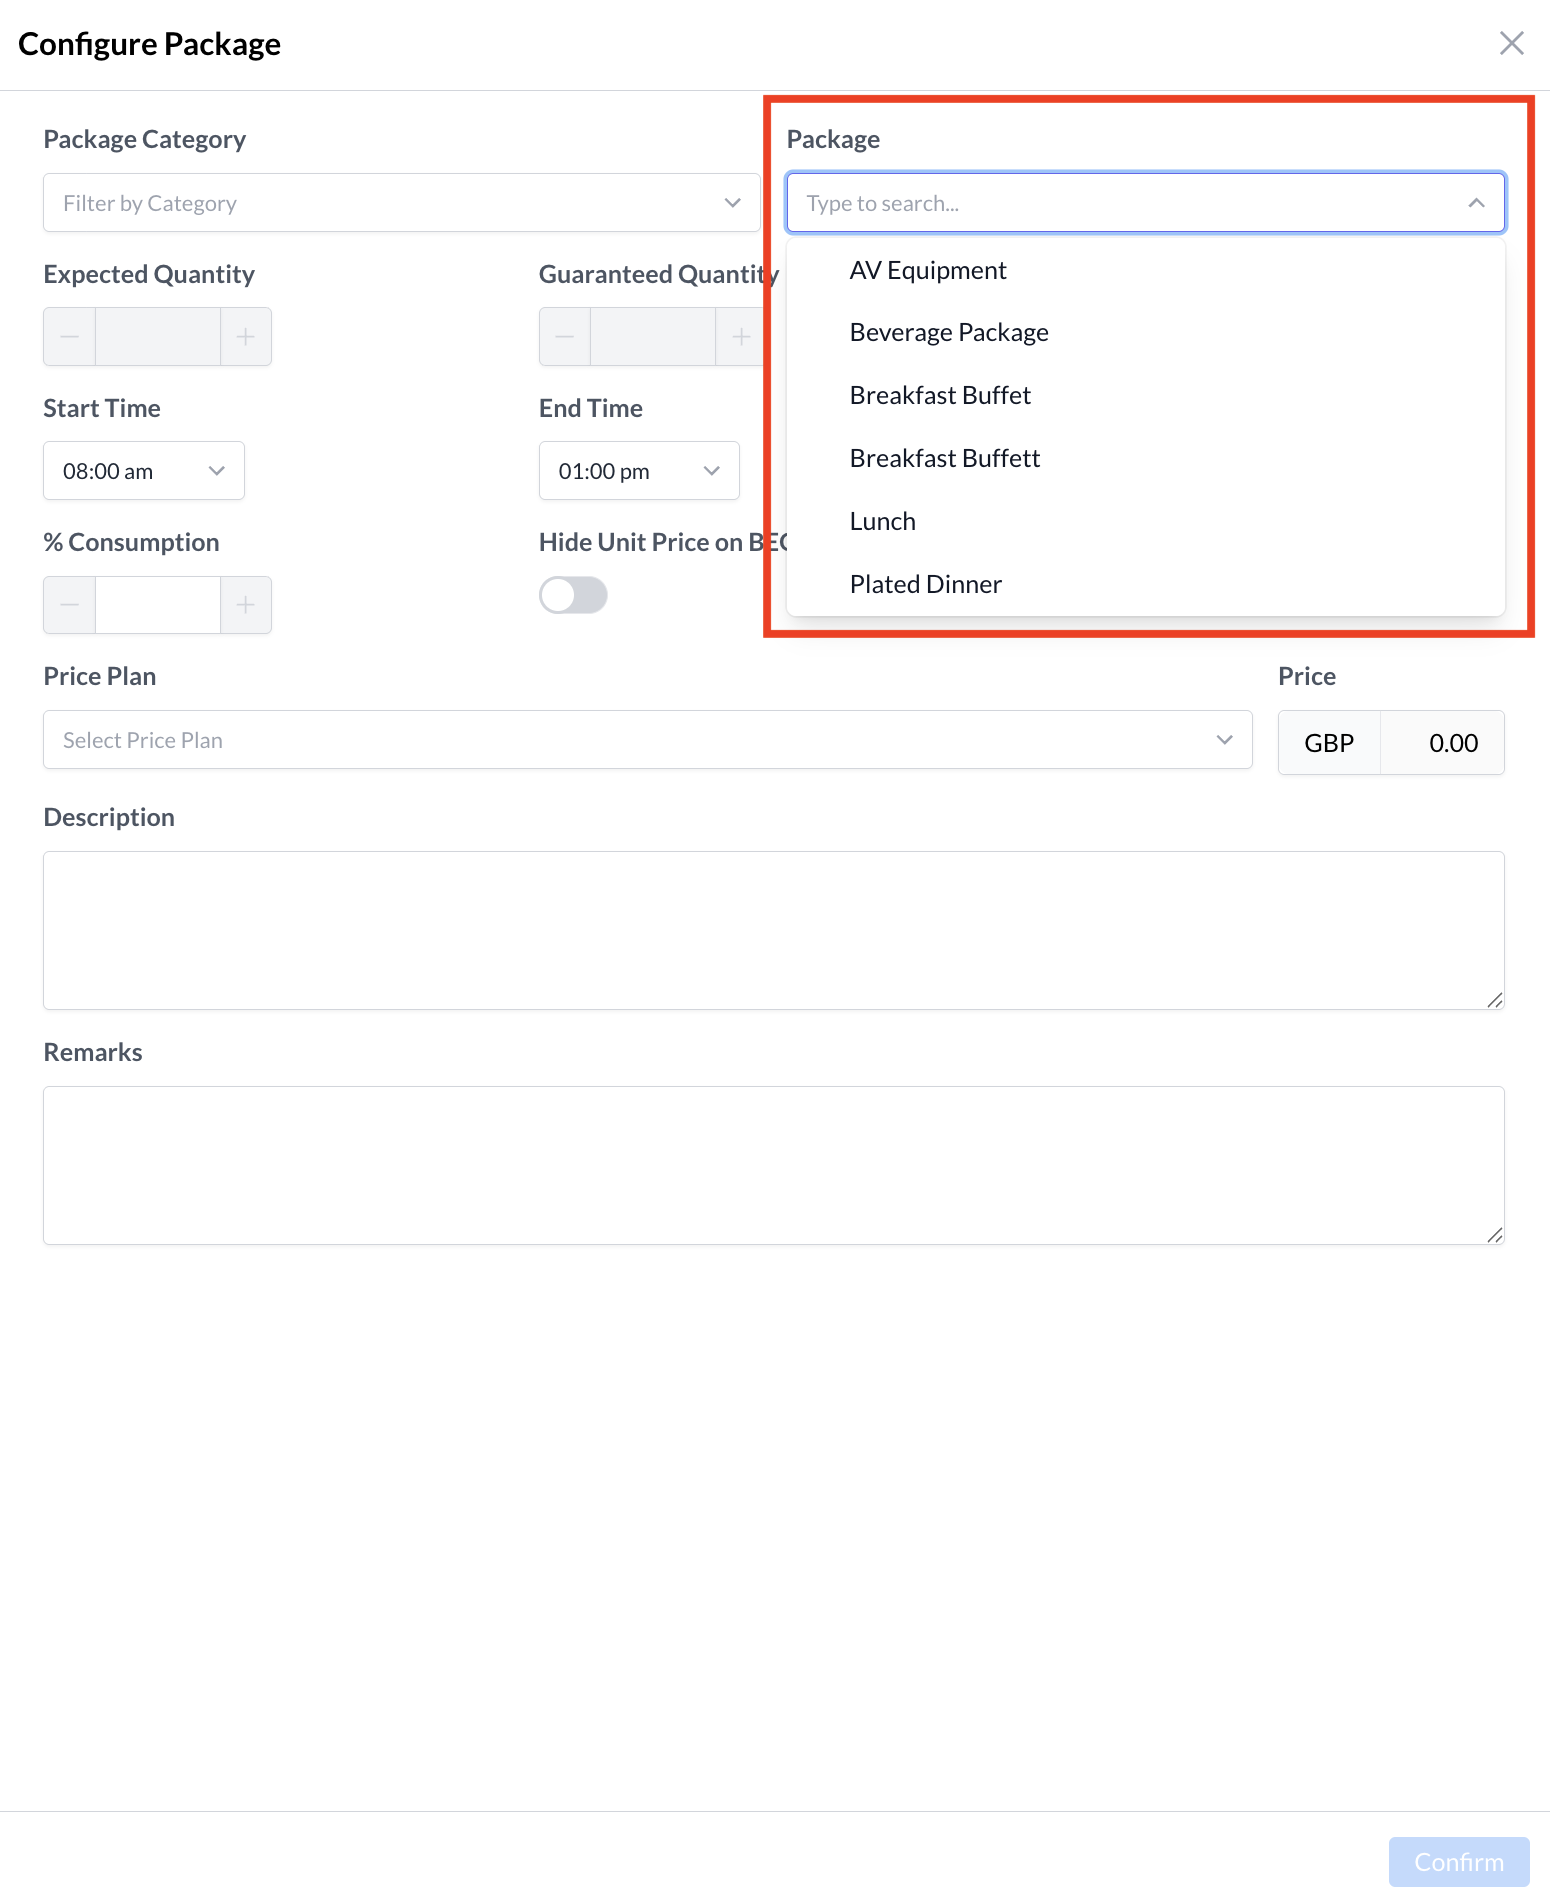
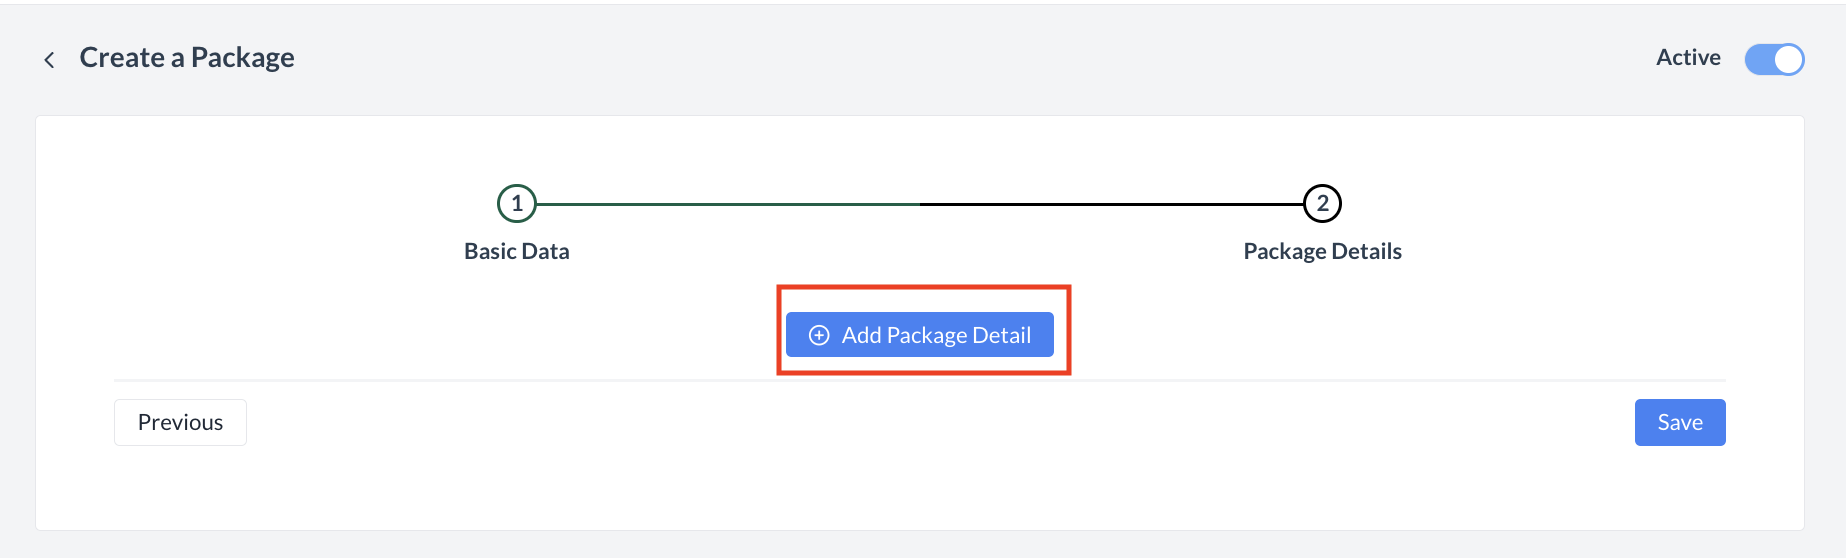
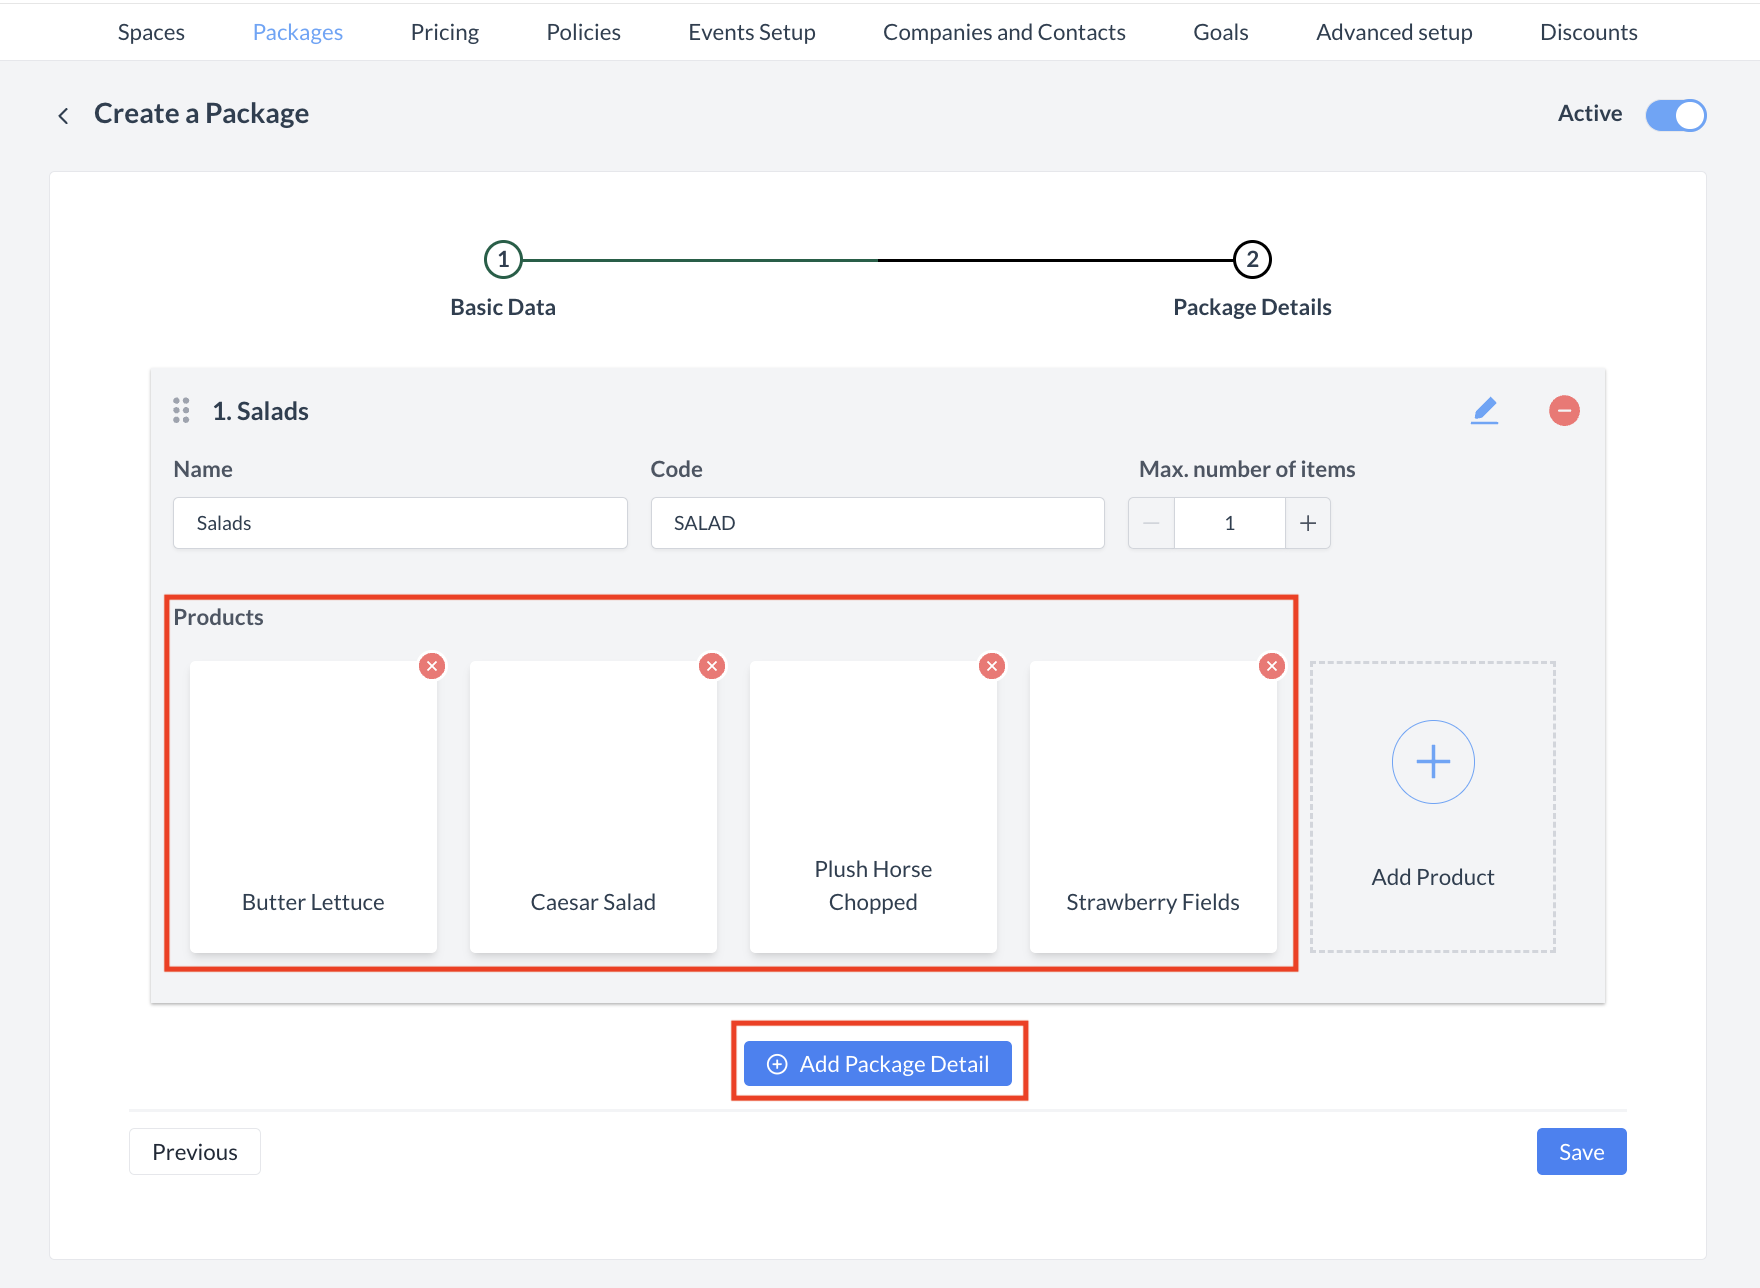
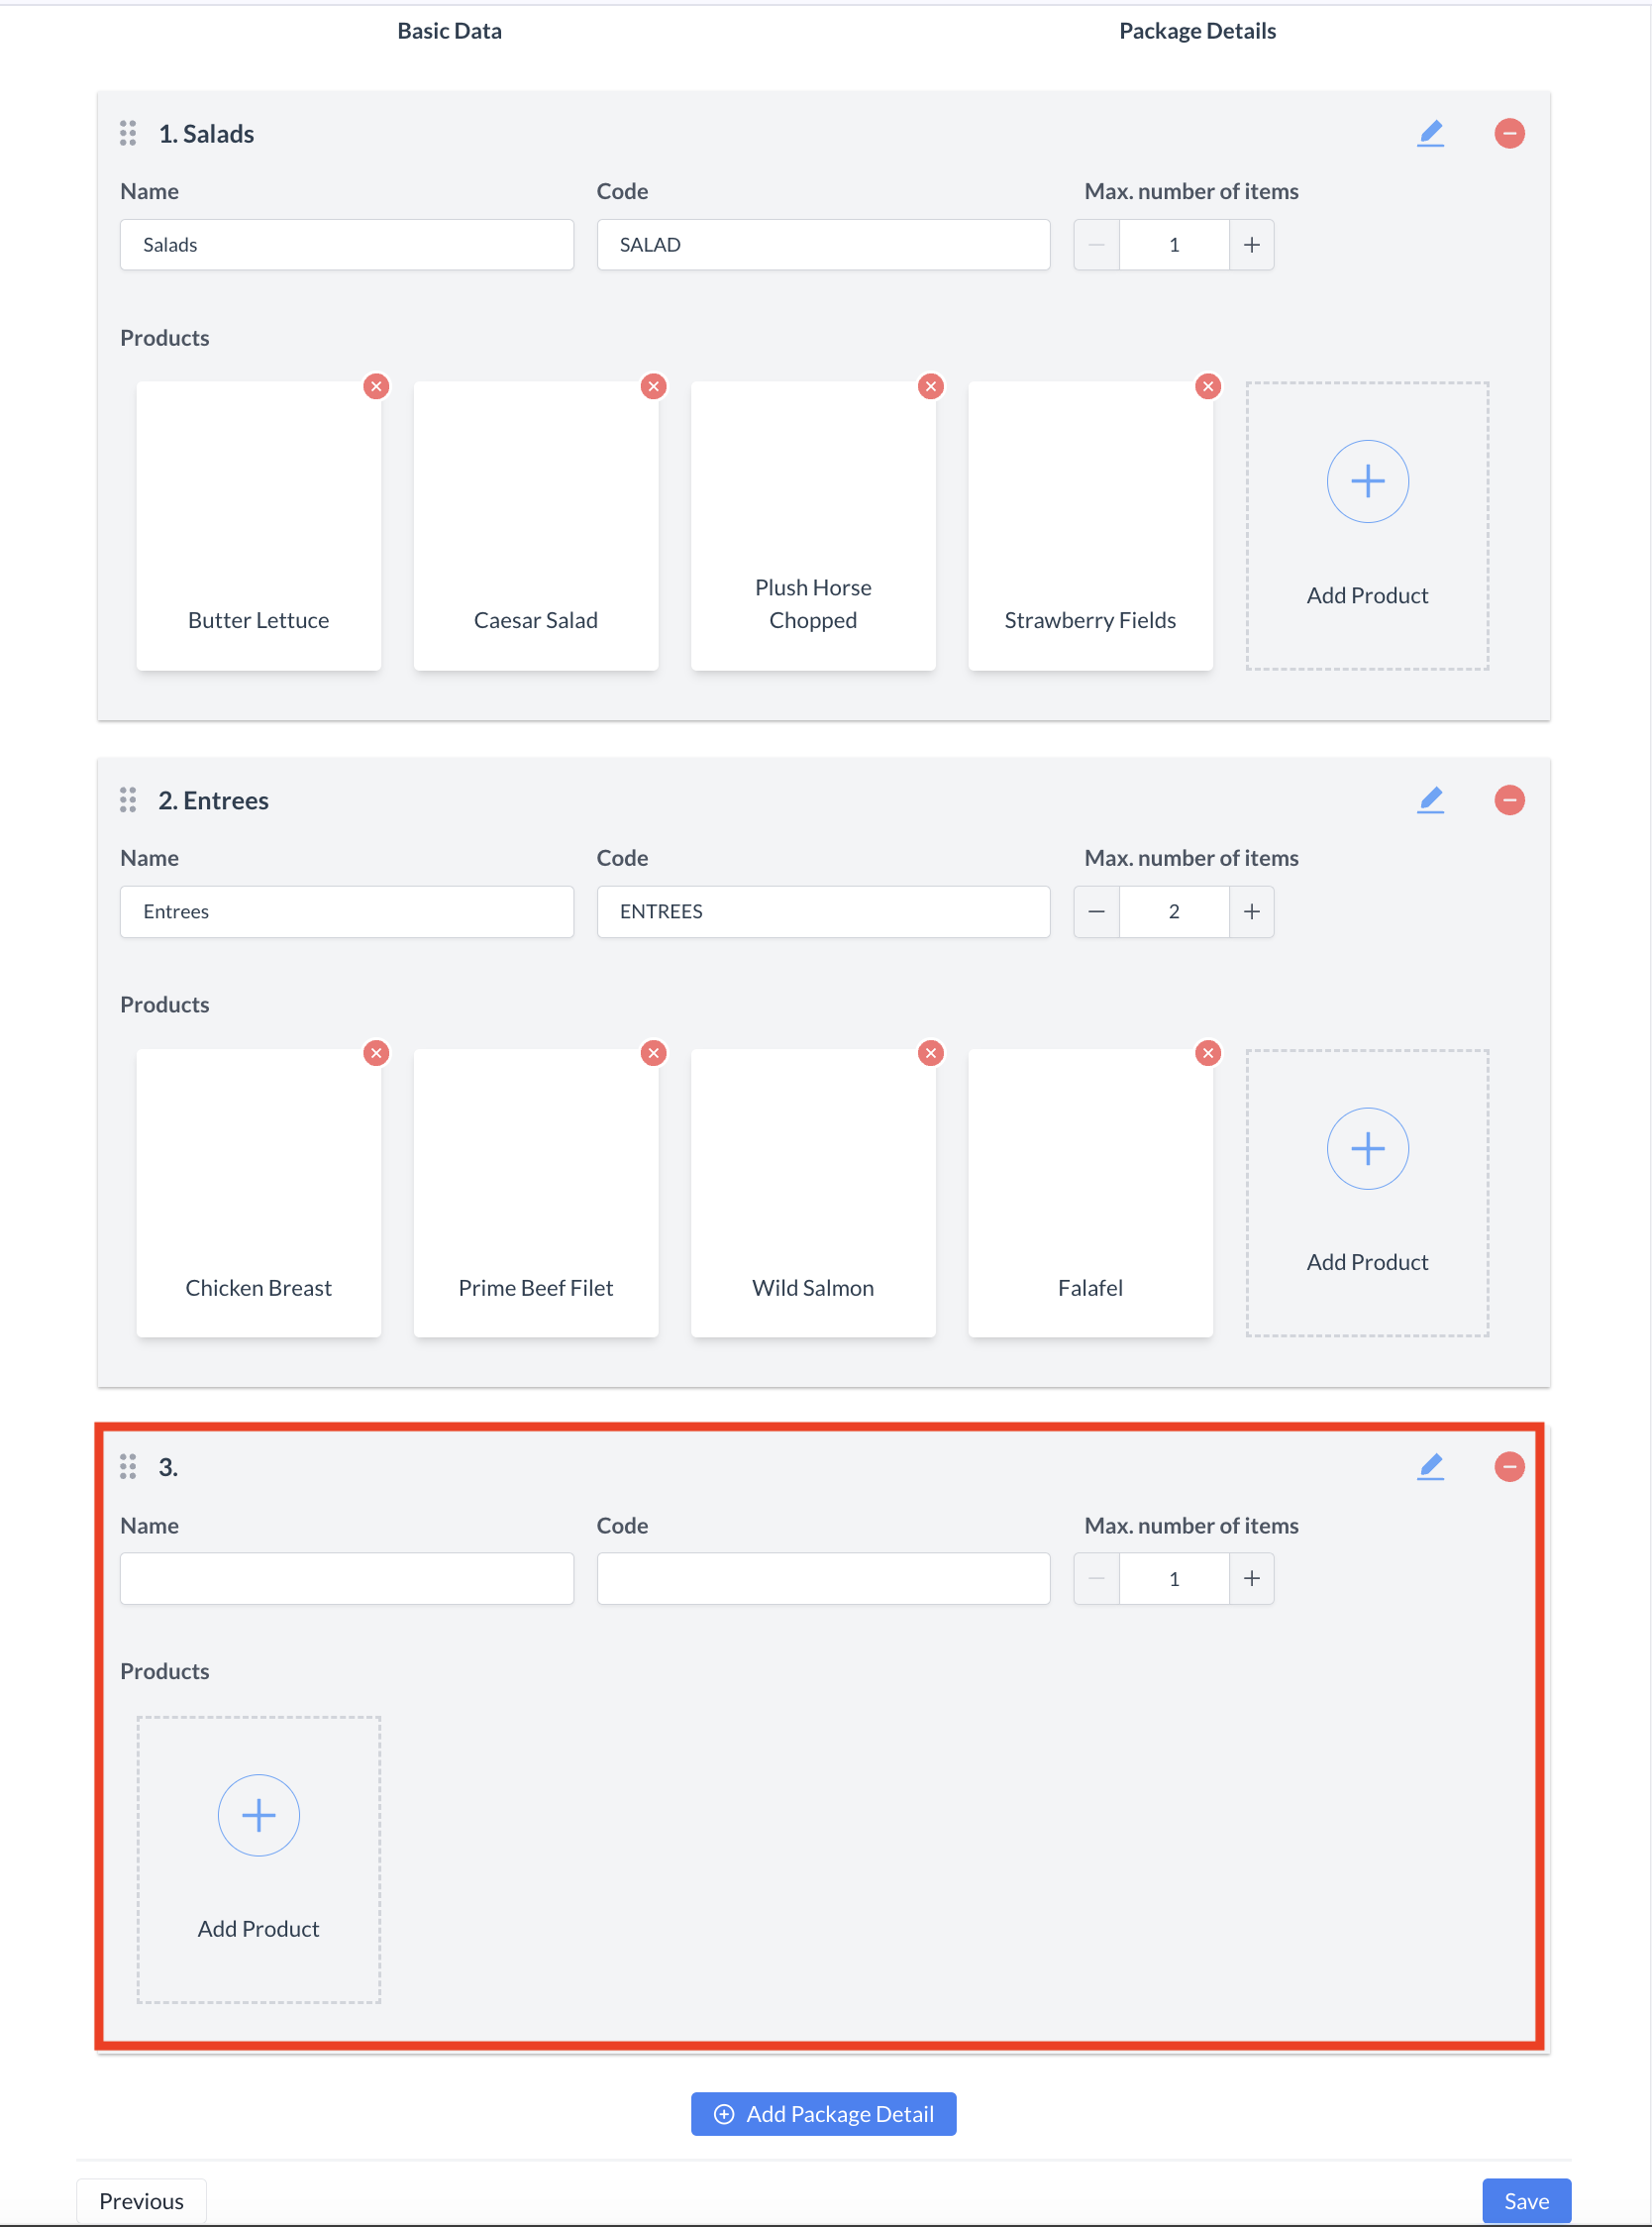
Step 2: Define Package Details

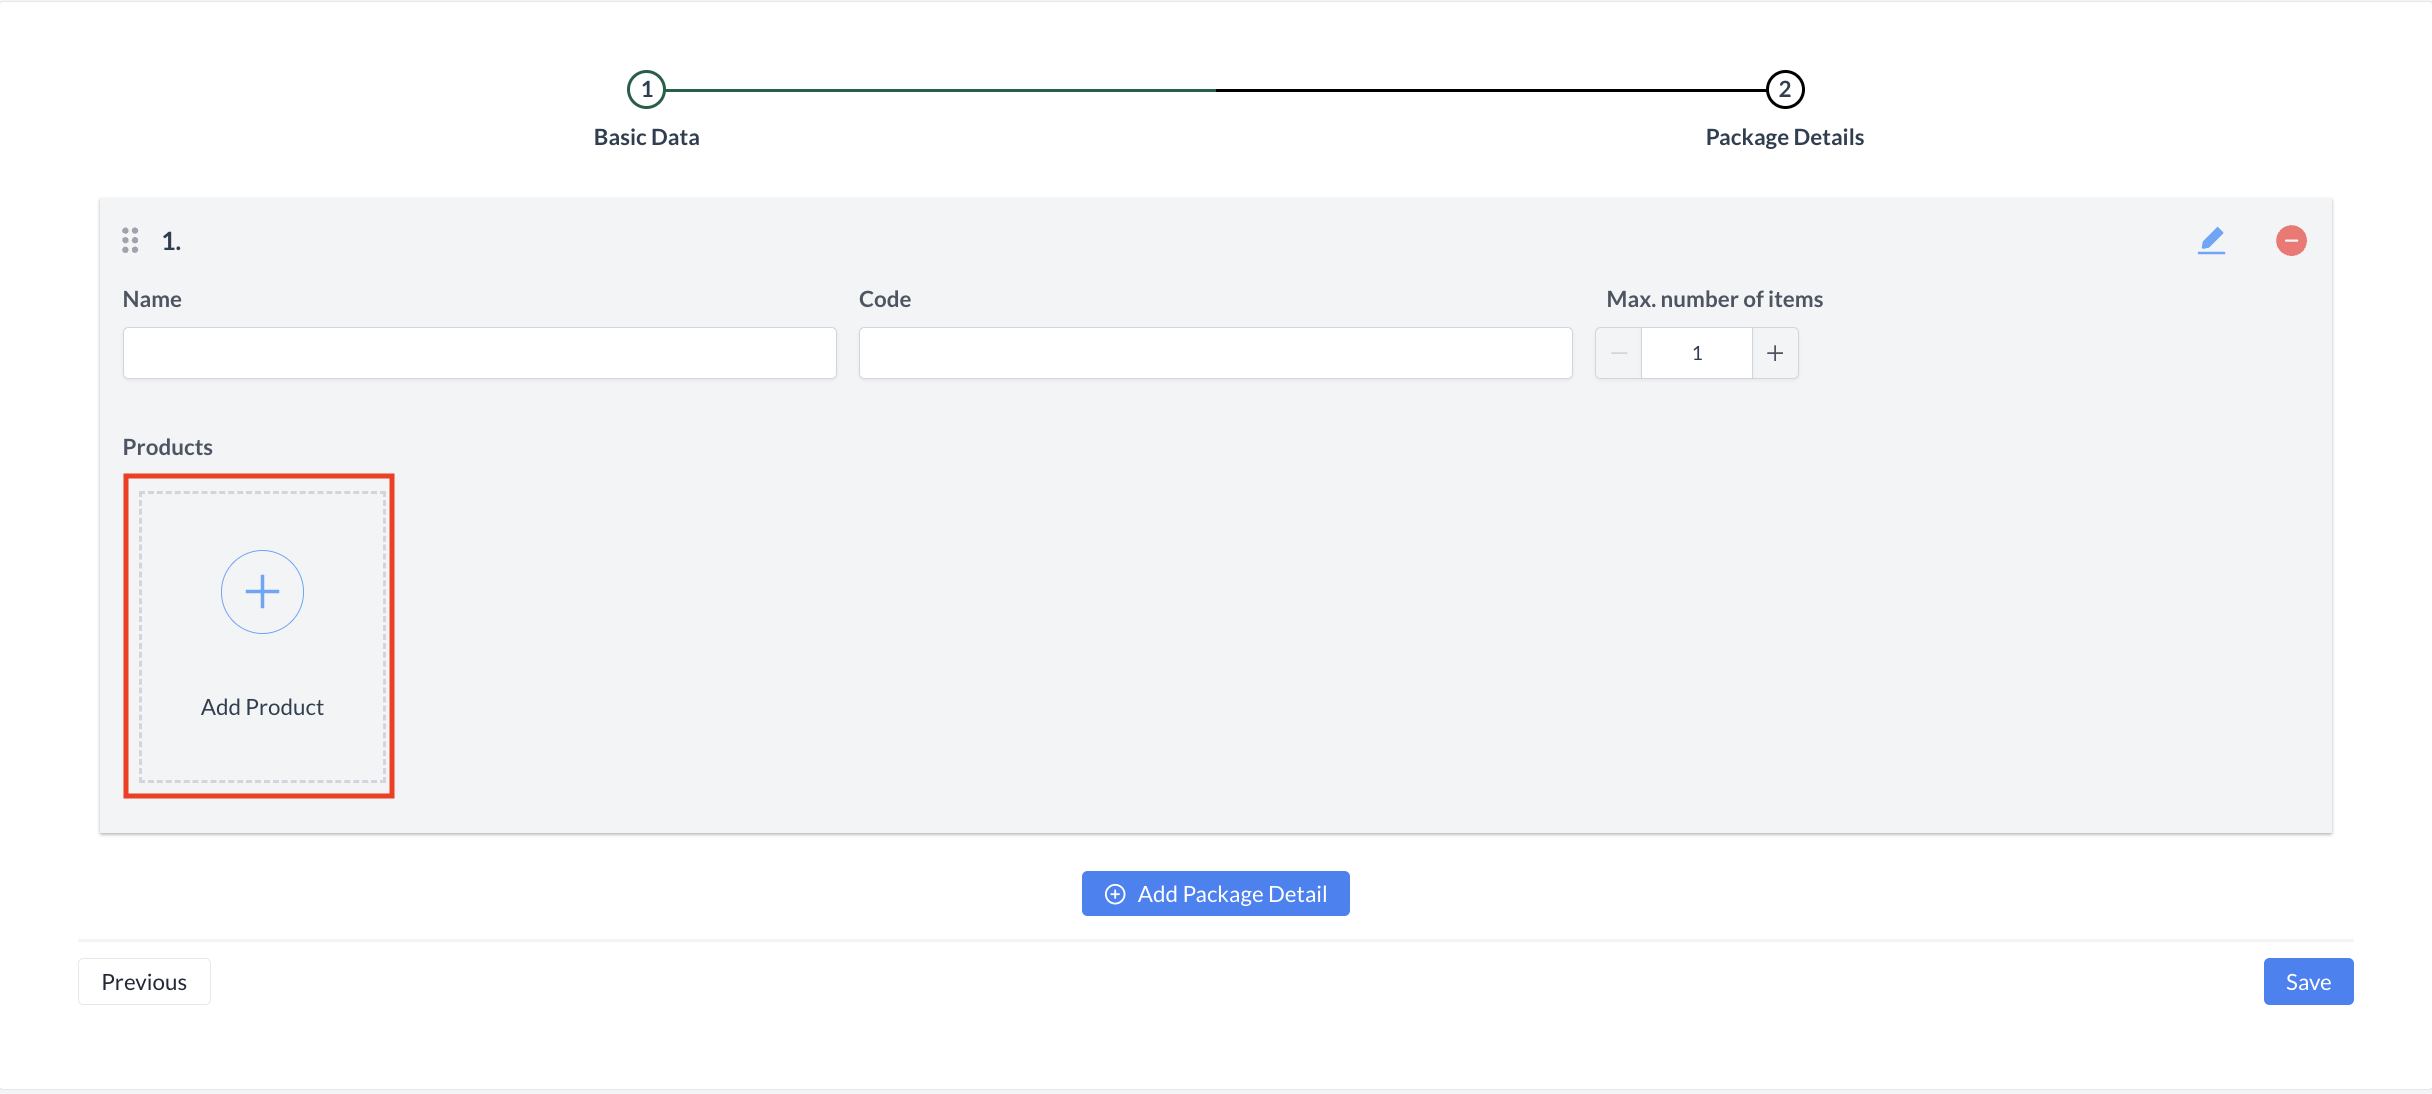
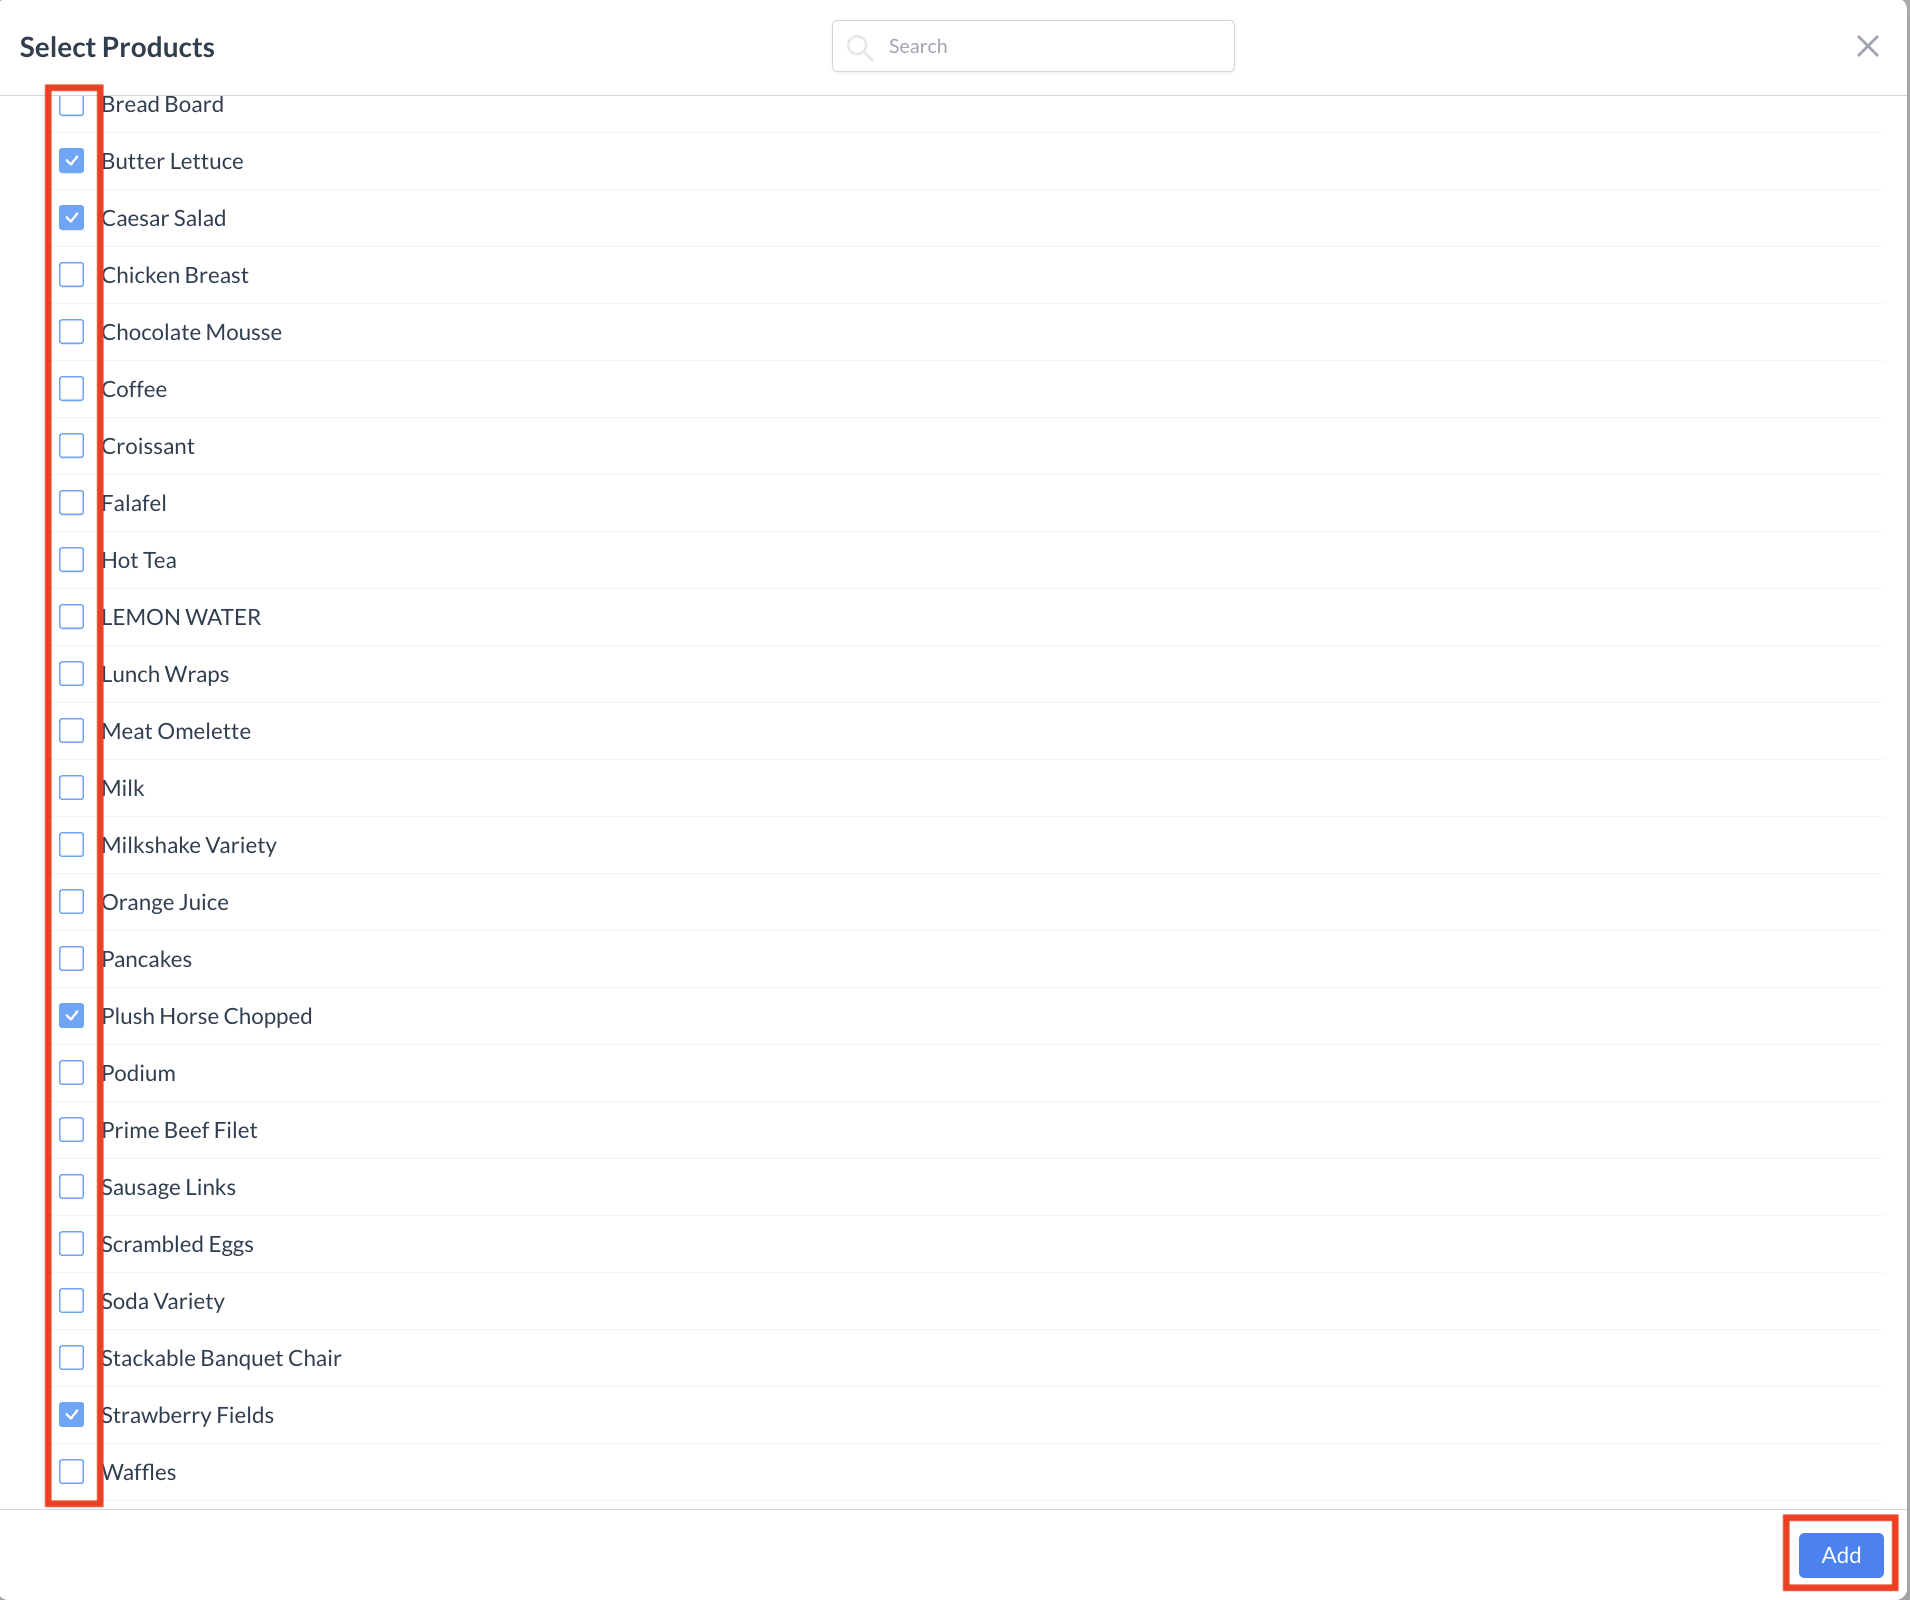
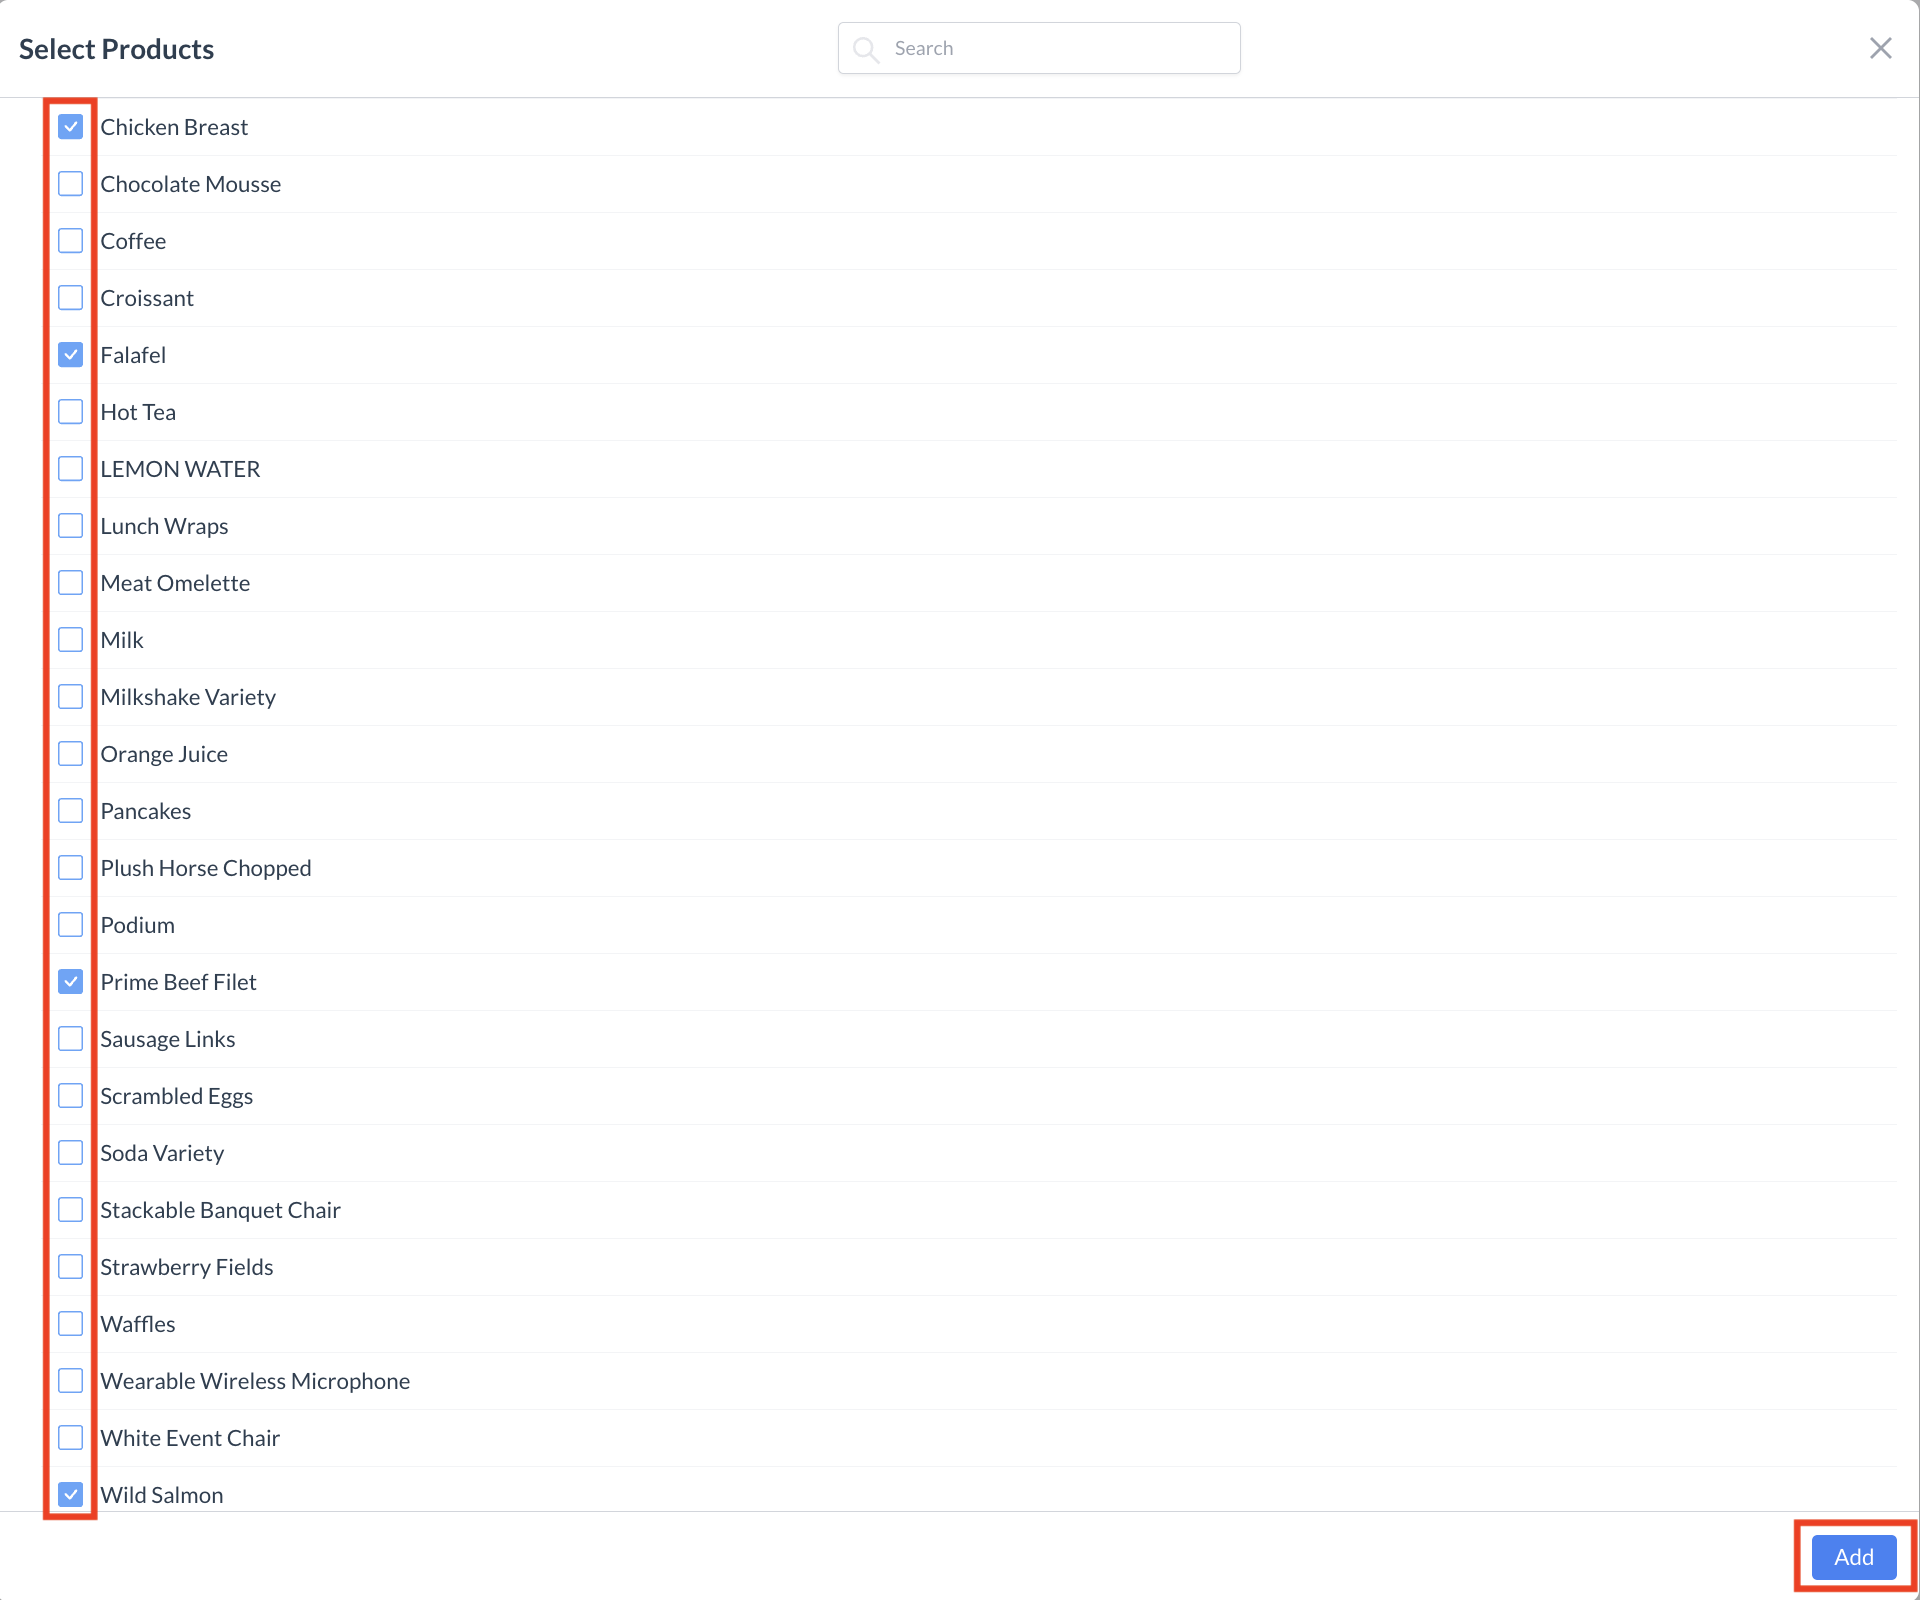
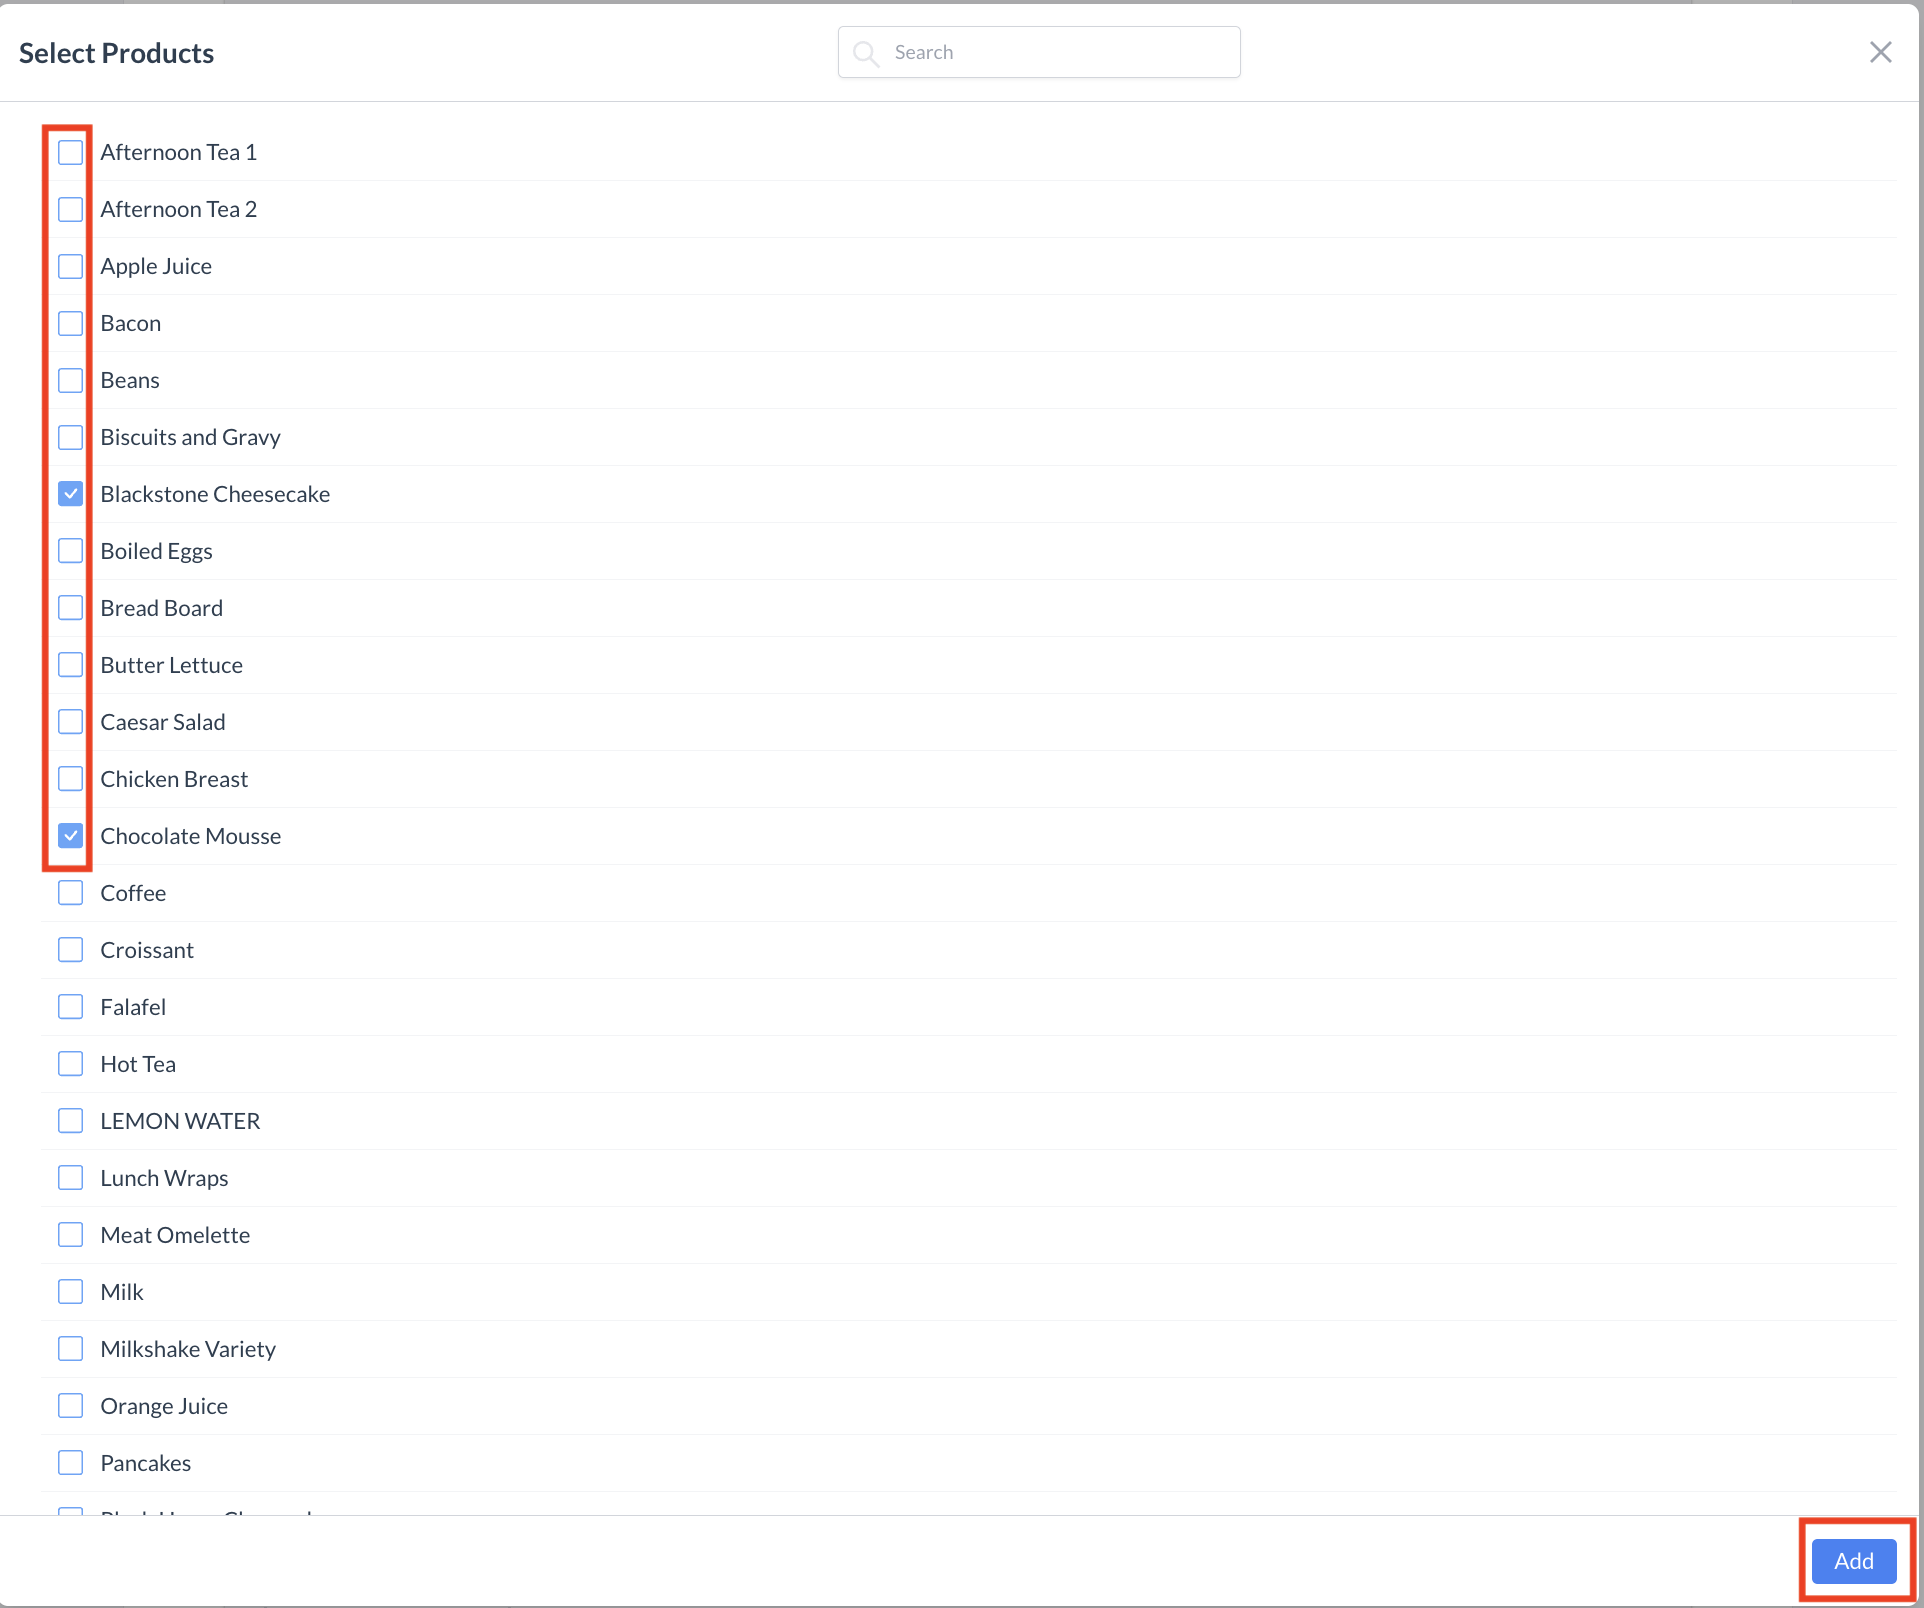
In this step, you will build out the specific menu or product options that are included in your package. This is ideal for creating customizable experiences, such as a plated dinner with multiple course selections.

➕ Add Package Details

  1. Click the Add Package Details button.

  2. A Product Details form will appear. Complete the following fields:

  • Name: Enter a clear name for the product group.
    Example: "Salads"

  • Code: Provide a unique identifier for the product detail.

  • Max. Number of Items: Specify the maximum number of selections a client can make from this group.
    Think of this as setting a limit on how many items a guest can choose from a menu section.

  • Products:

    • Click the “+” icon to open the product selector.

    • Use the checkboxes to select all relevant products for this category.
      For example, select all available salads for the "Salads" section.

    • Click the Add button to attach the products to this detail.

Your selected products are now linked to the first package detail.


➕ Add More Product Details (Optional)

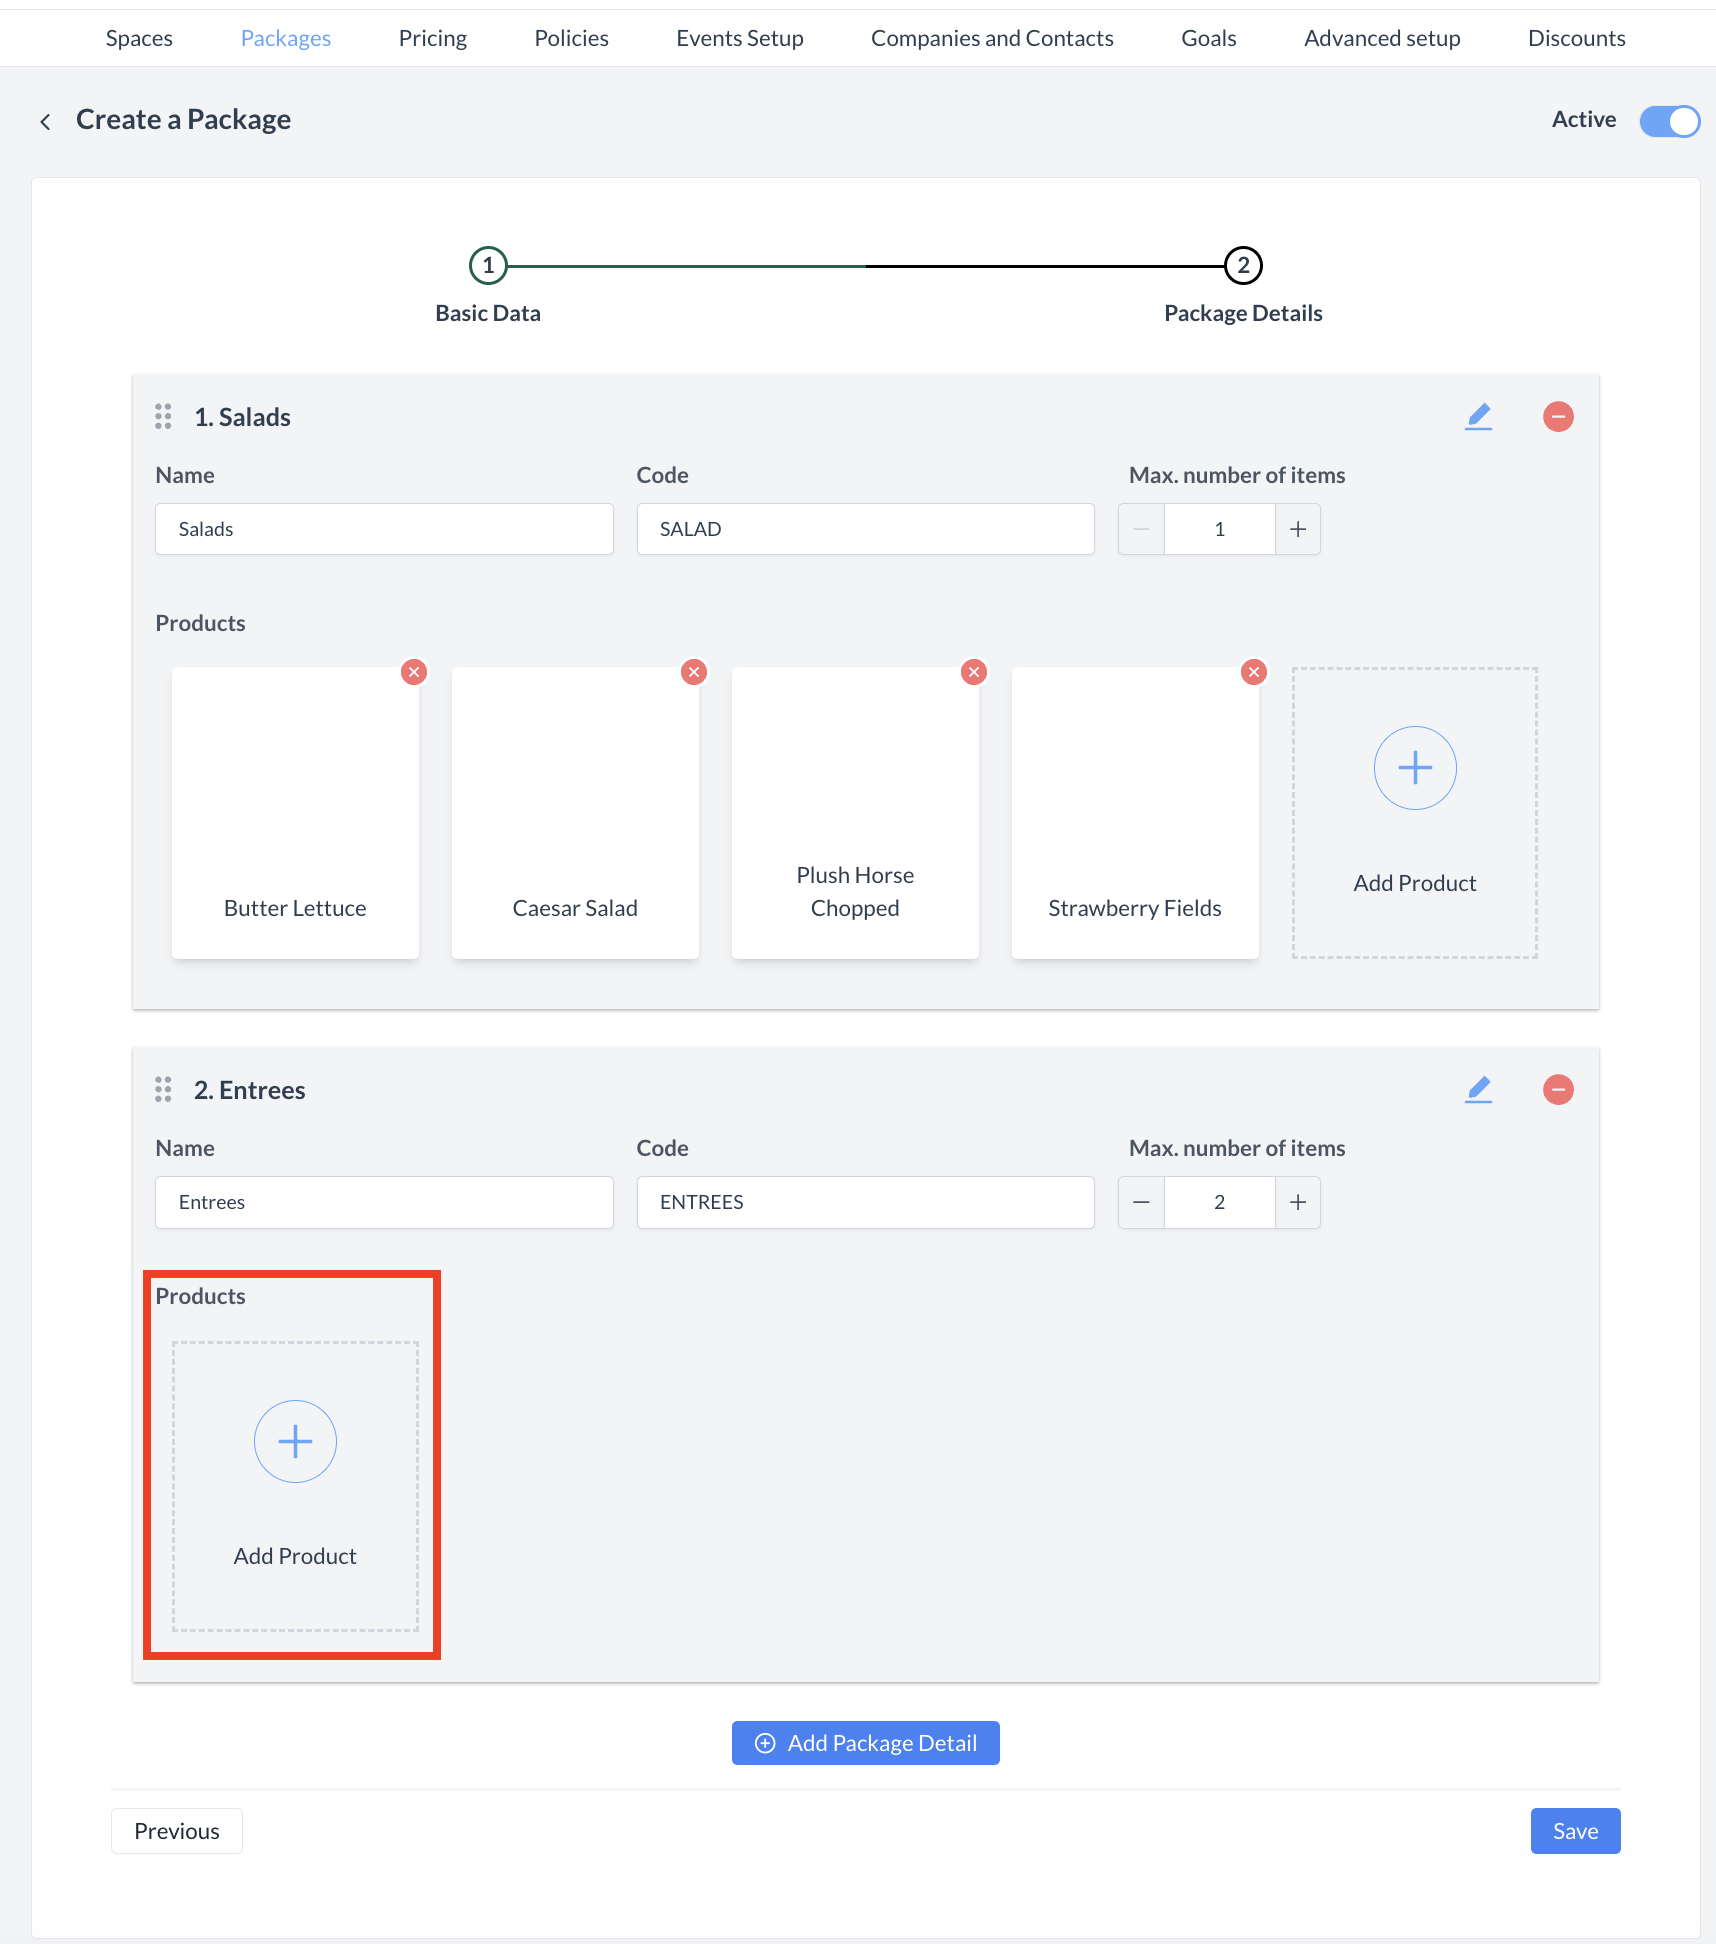
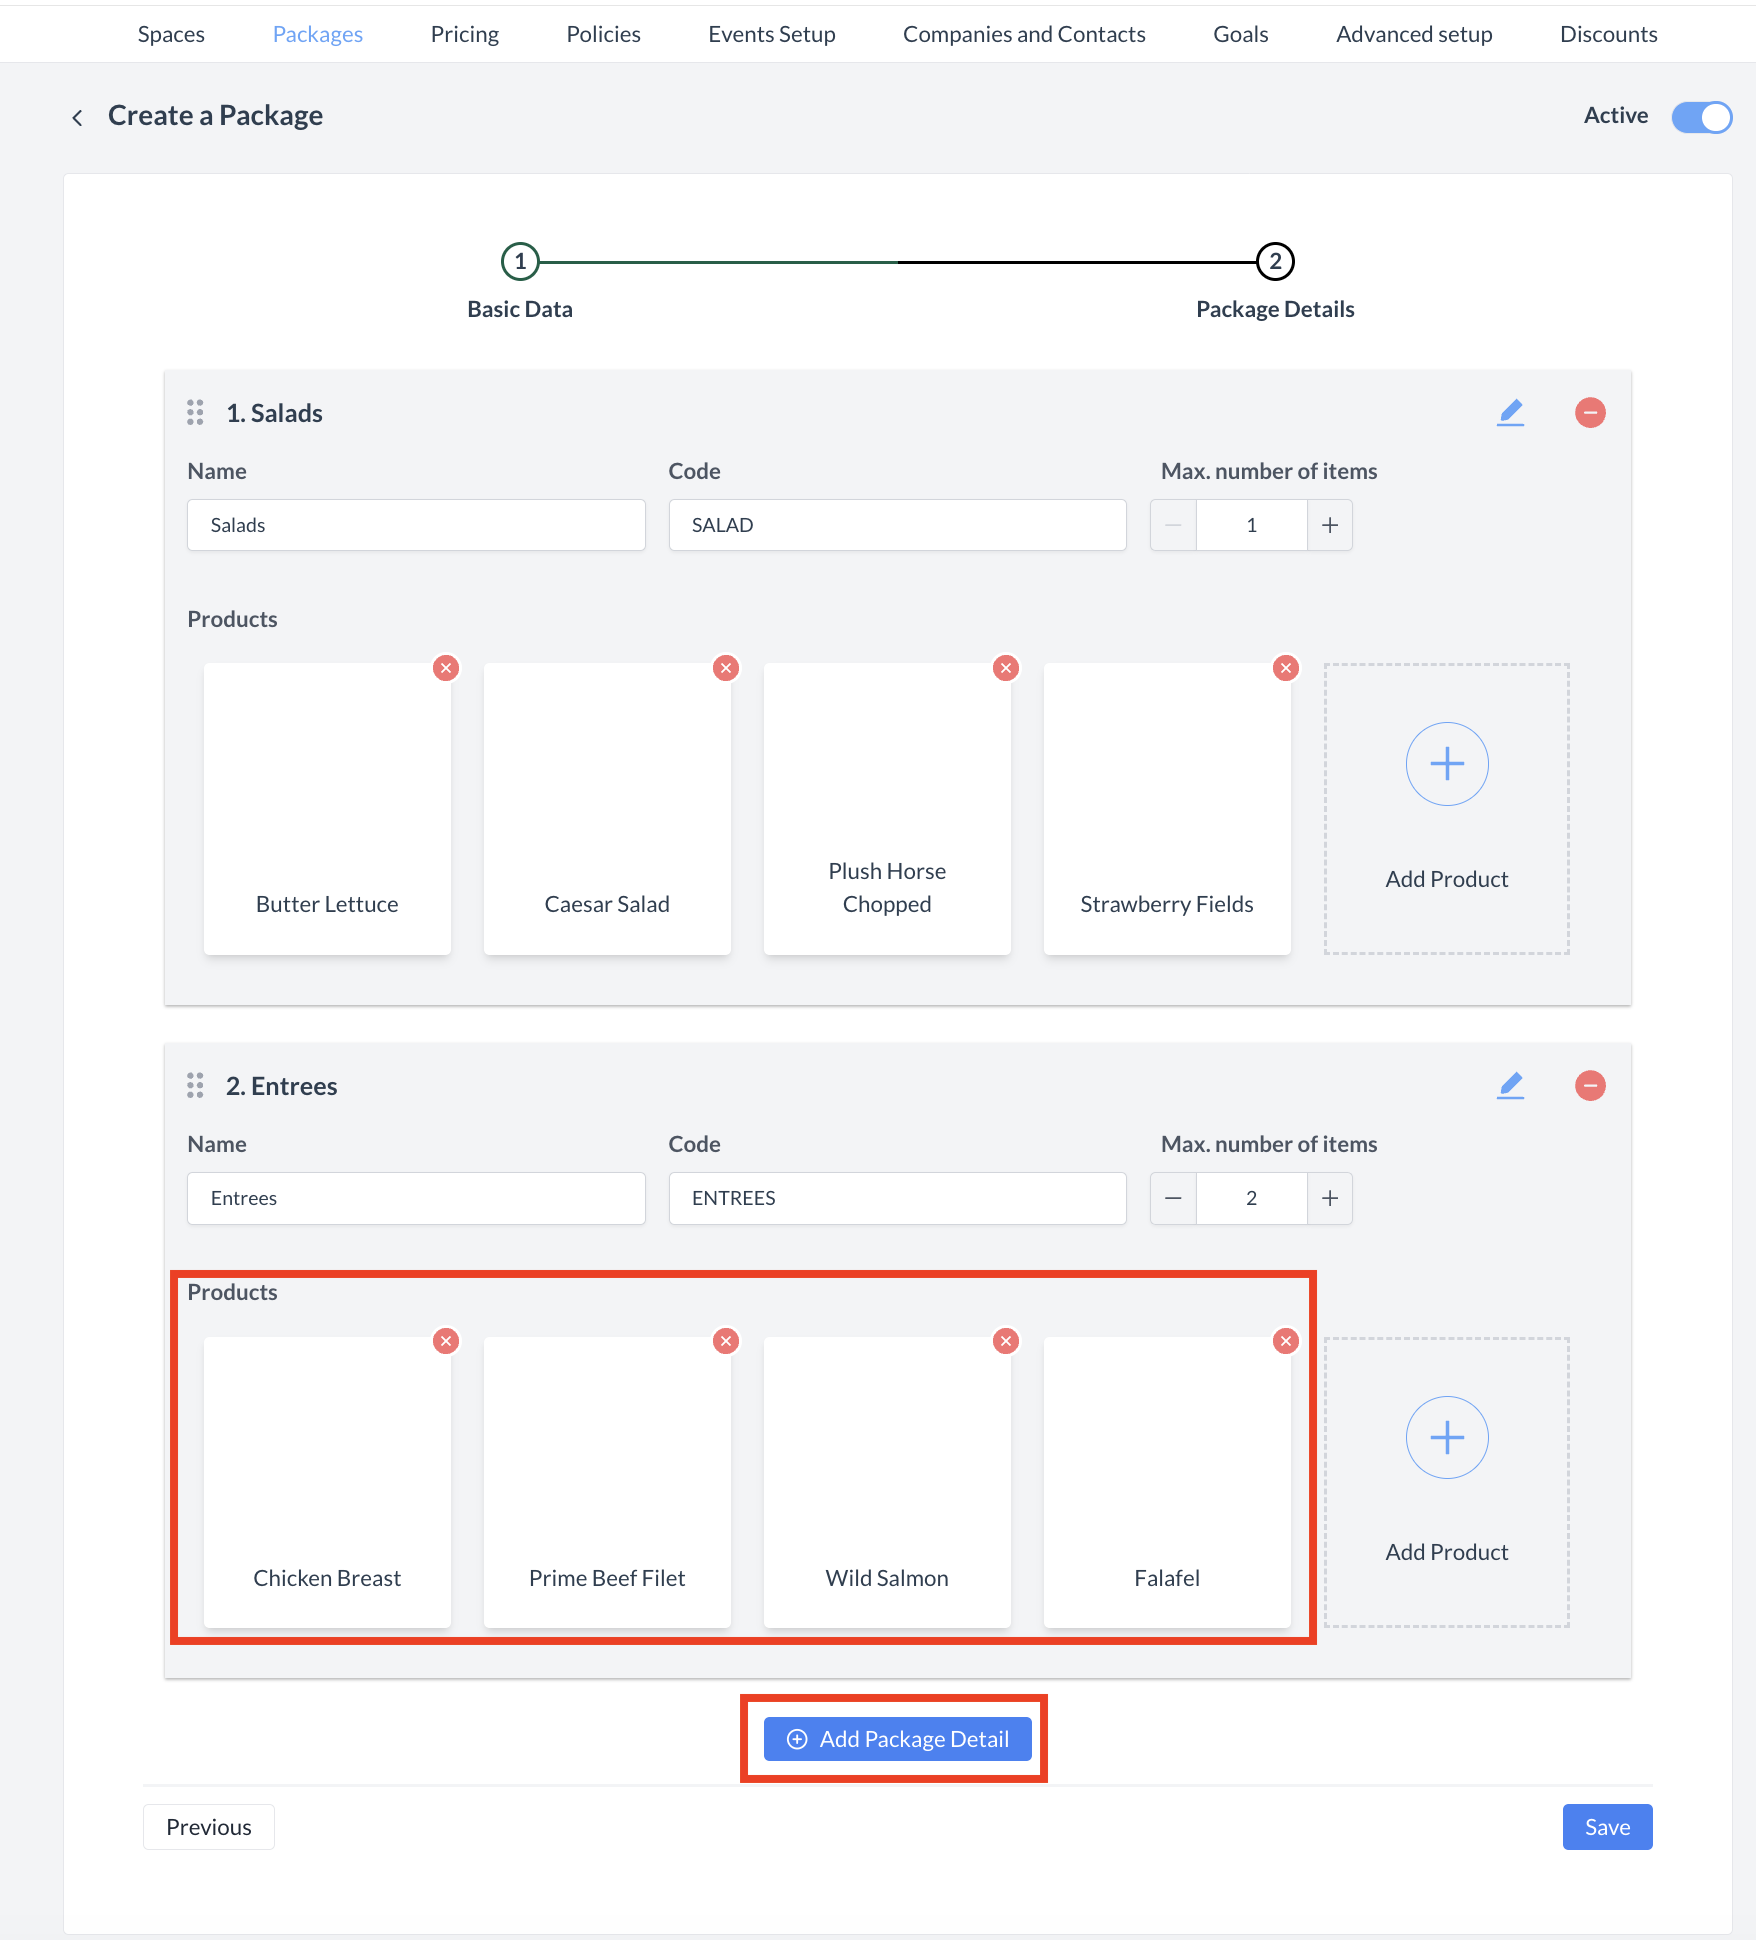
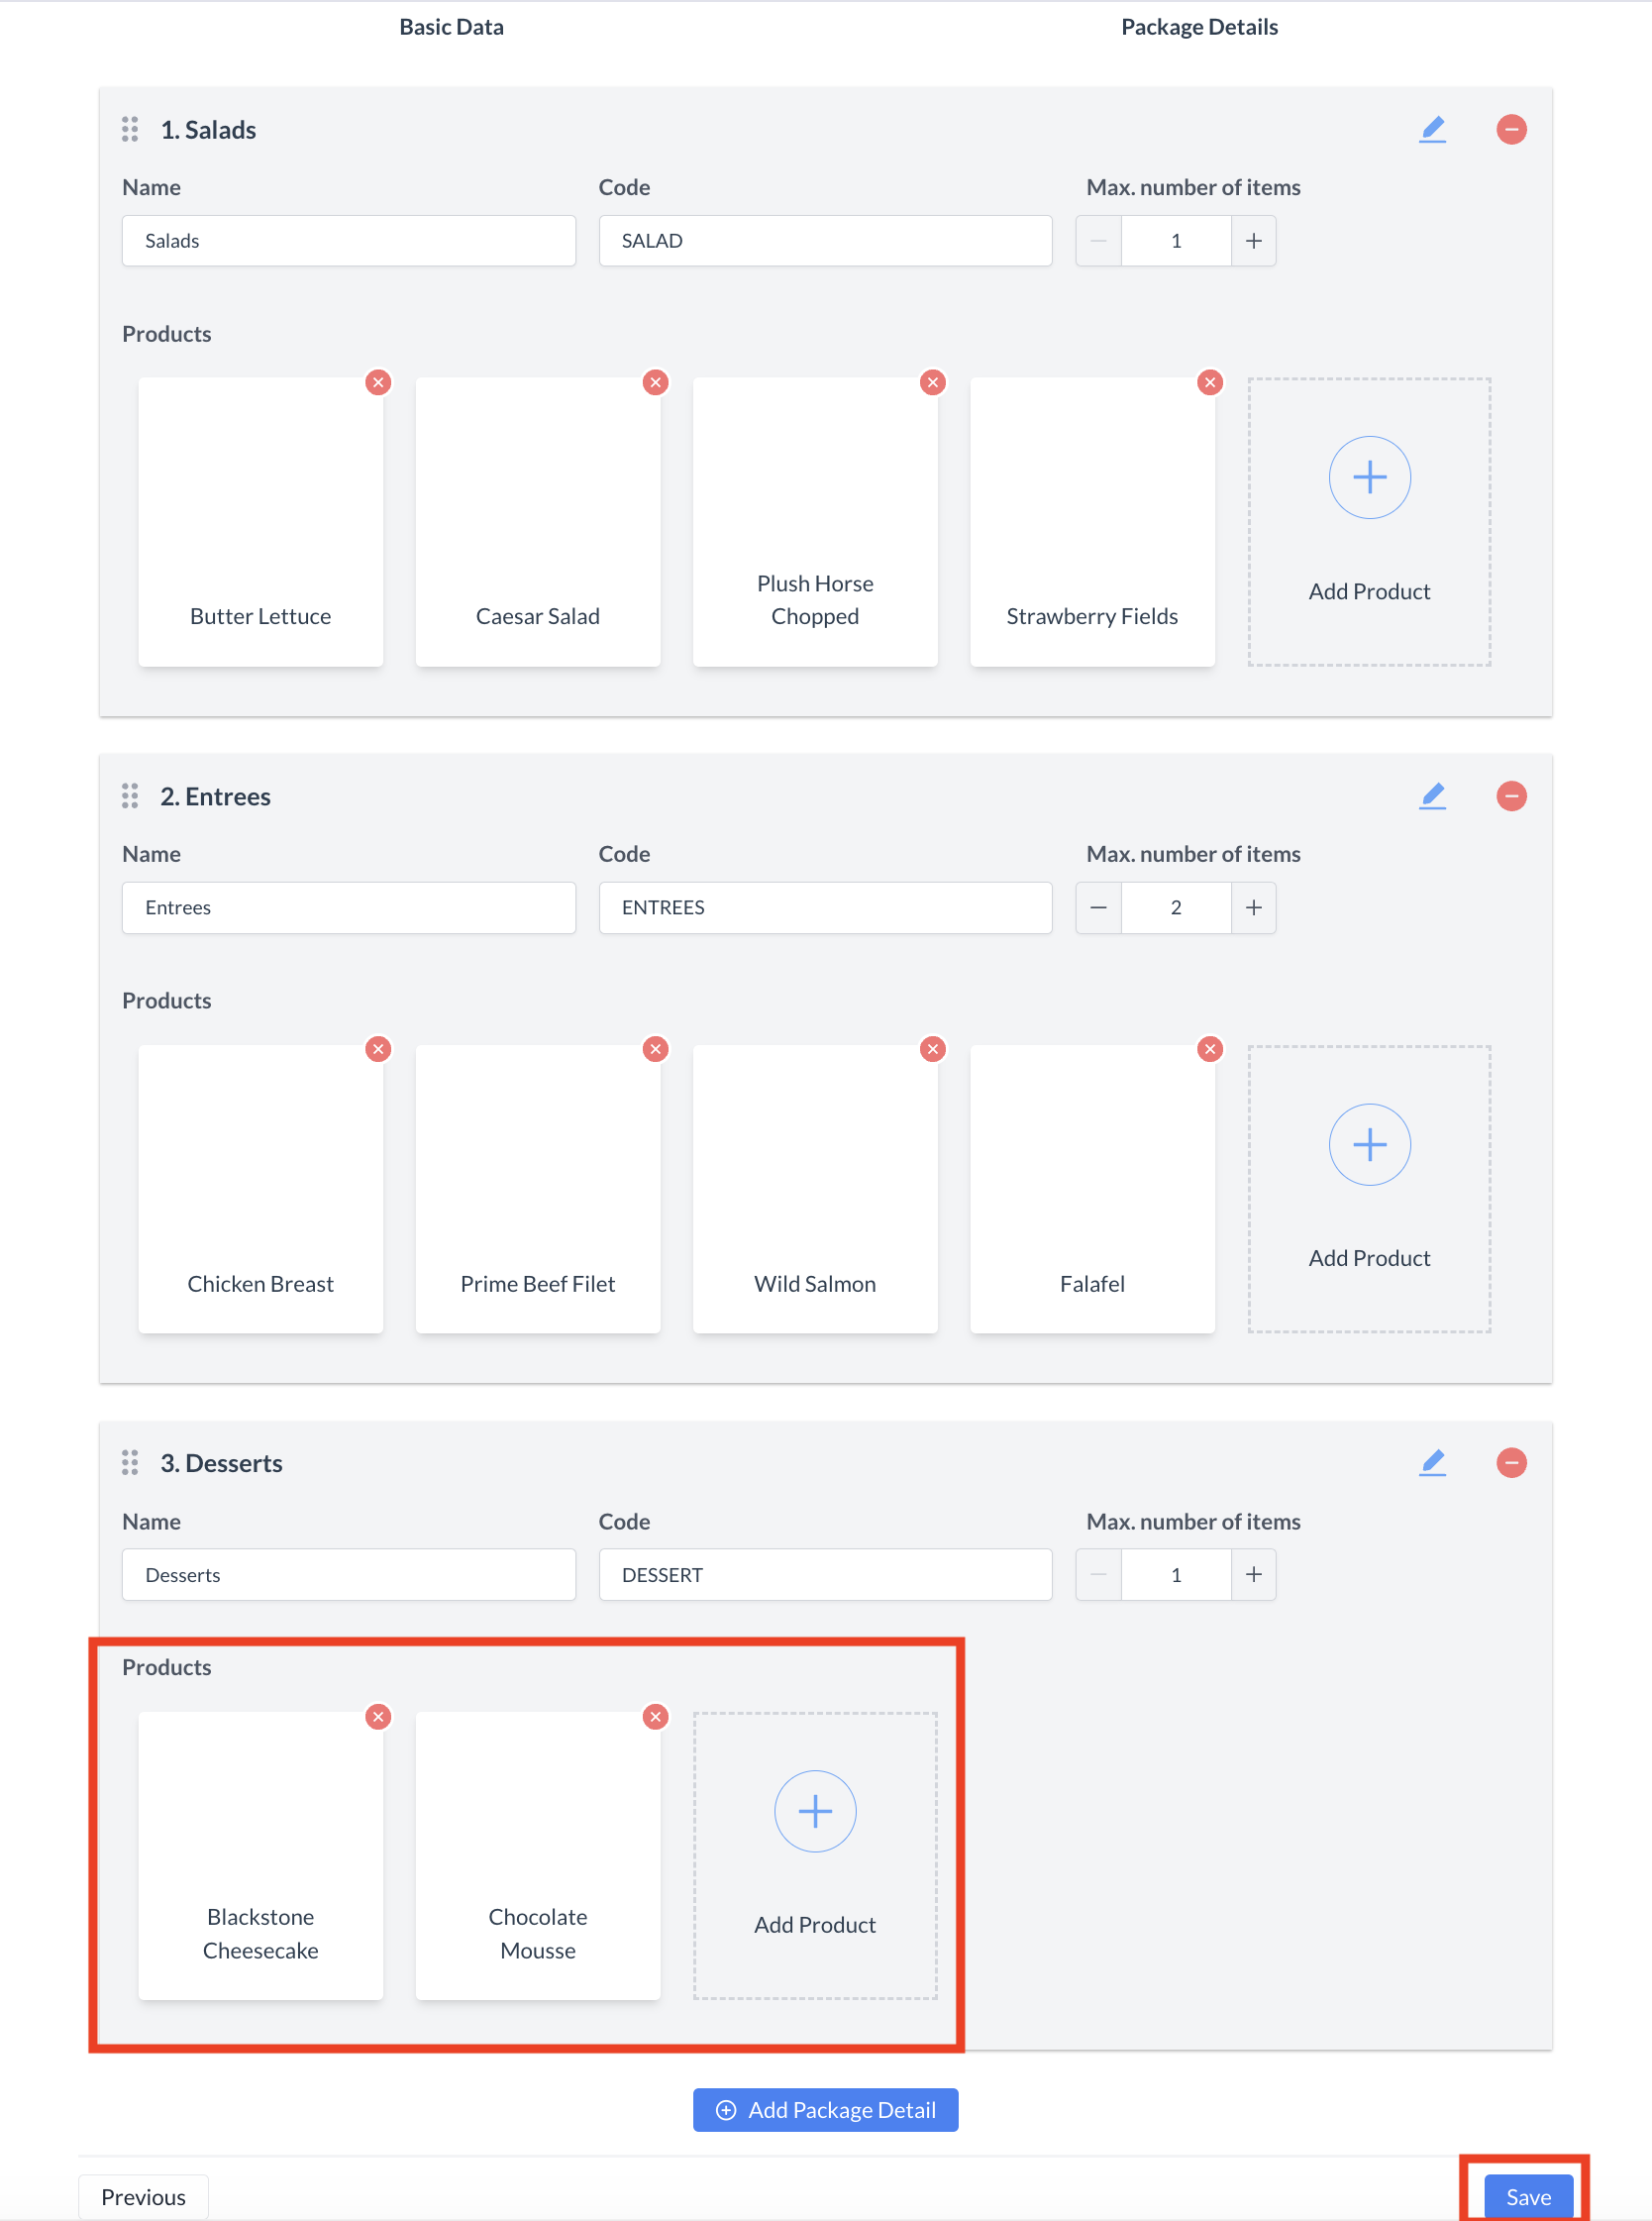
To build a multi-course package, repeat the steps above for each course or category:

  • Click Add Package Details again.

  • For a main course menu:

    • Name: "Entrees"

    • Code: Enter a unique code.

    • Max. Number of Items: Set the limit (e.g., 1 or 2).

    • Select products by clicking the “+”, then choose all relevant entrées.

    • Click Add to attach.

Repeat the same process for desserts or any additional menu sections:

  • Name: "Desserts"

  • Code: Enter a unique code.

  • Select products (e.g., all dessert options).

  • Click Add to confirm.

Each group of products (Salads, Entrees, Desserts) will now be included as a selectable section within the package.


✅ Once all desired package details have been added, click the Save button to complete this step.
Your new package will now appear on the Package Setup listing screen.

Create Package_Add Package Details.png

Packages: Define Package Details

Package Details_Product Screen.png

Packages: Add Products

Select Products_Salads.png

Packages: Select Products

Package Details_Products Attached.png

Packages: Products Attached to Package Detail

Package Details_2nd Package Details.png

Packages: Add Product for 2nd Package Detail

Select Products_Package Details 2.png

Packages: Select Products for 2nd Package Details

2nd Package Details_Products Attached.png

Packages: Products for 2nd Package Detail Attached

Packages: Add Products for 3rd Package Details

Select Products_3rd Package Details.png

Packages: Select Products for 3rd Package Details

Package Details_Save.png

Packages: Save Package Details Setup

Package Created.png

Packages: New Created Package

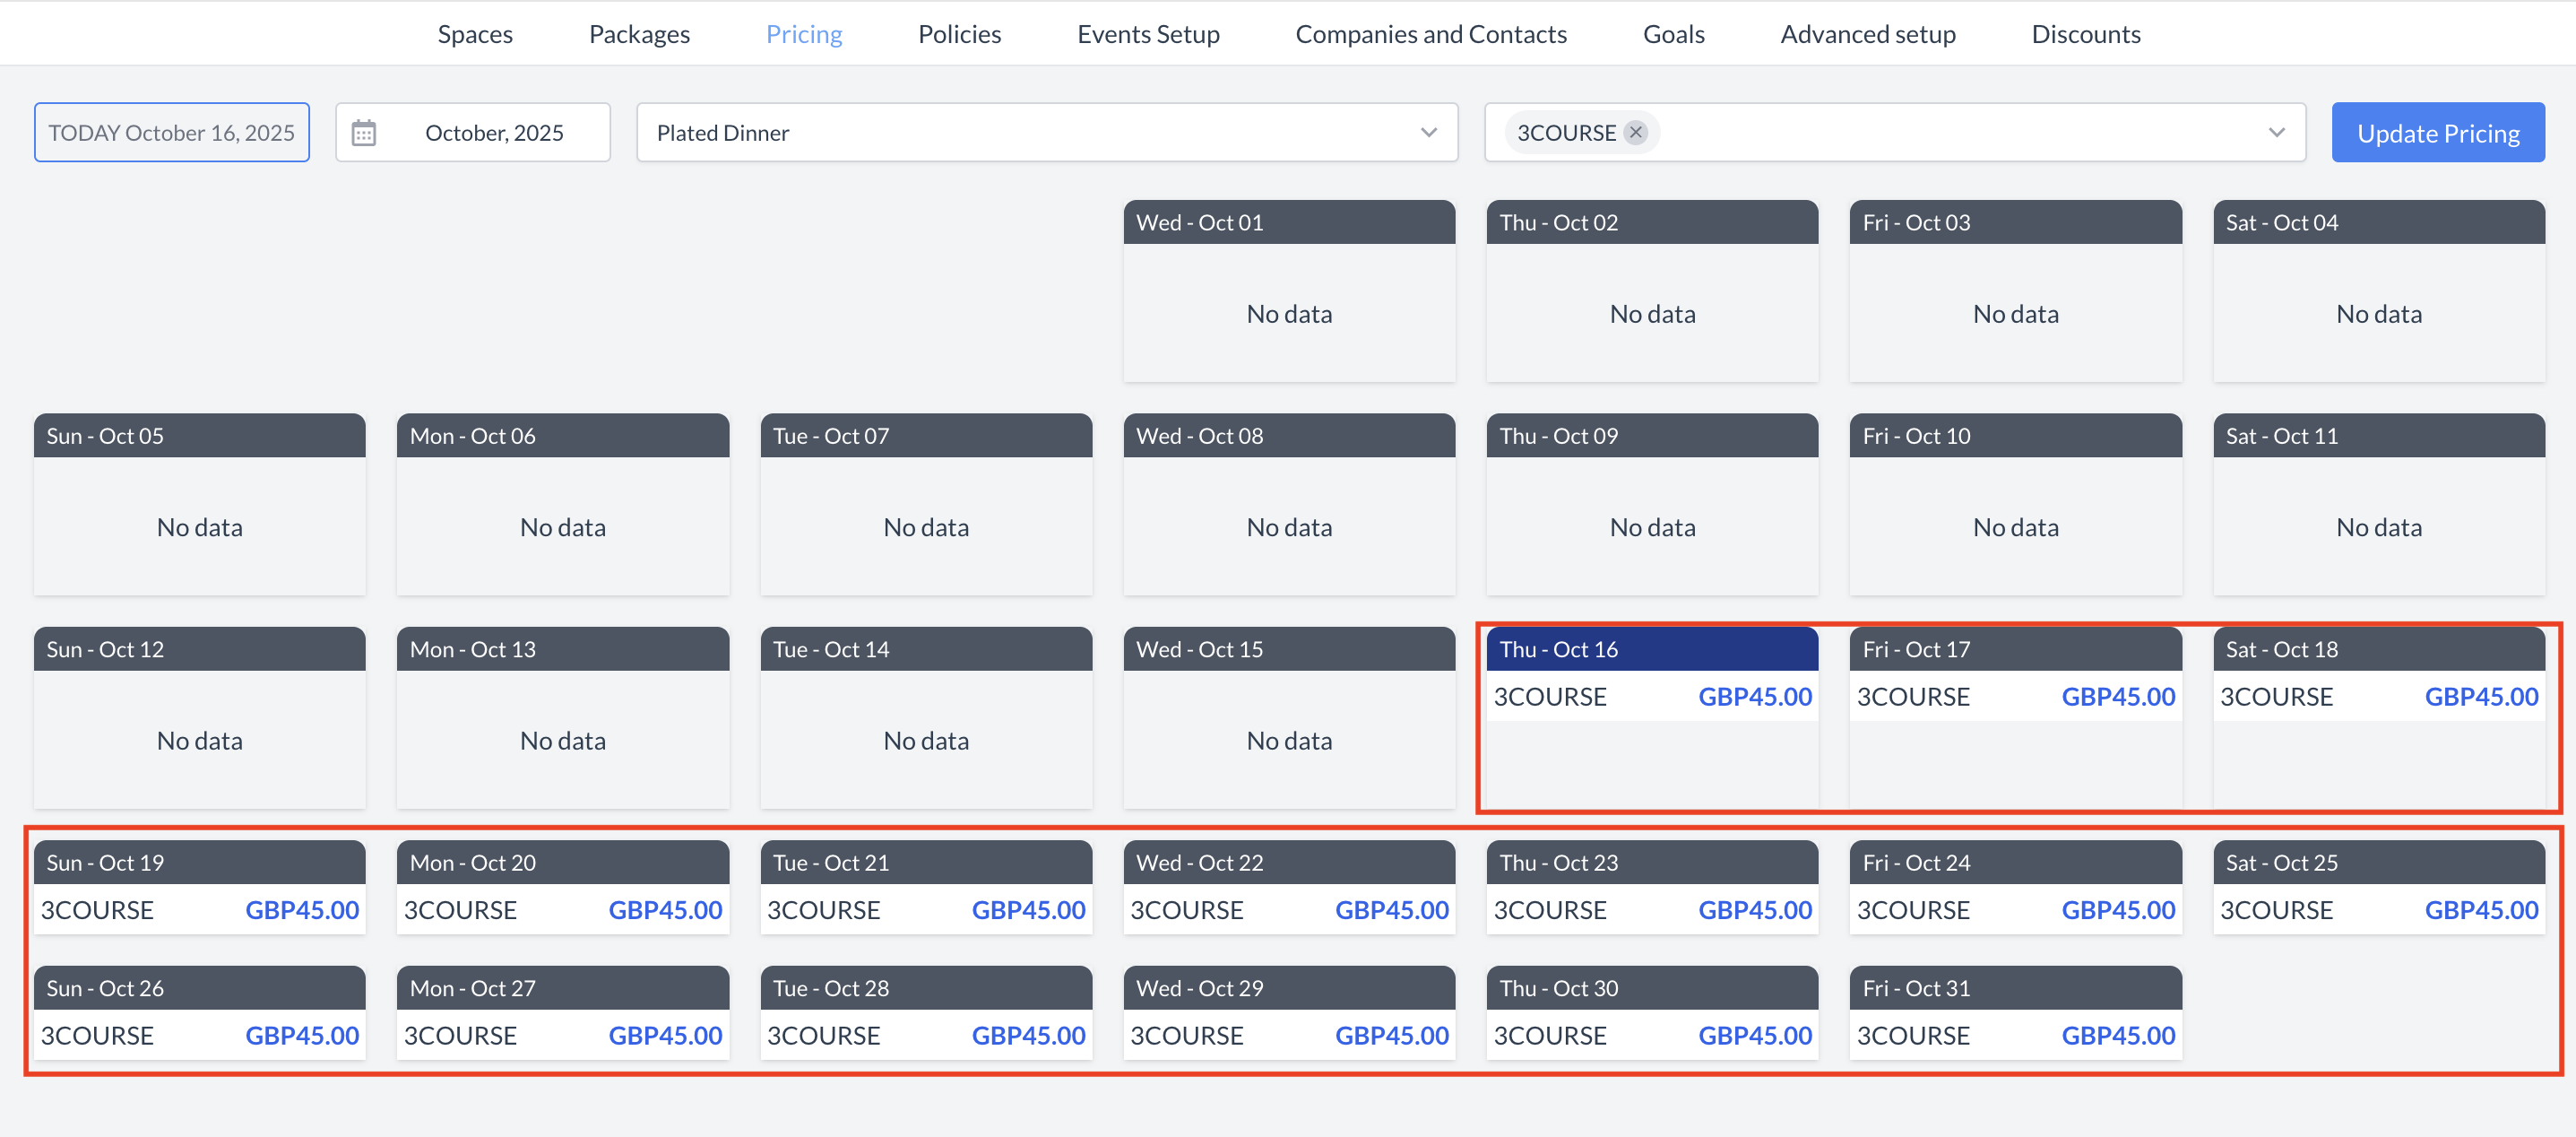
Step 3: Set Package Pricing

Before a package can be added to an event, you must configure its pricing.

🔹 Navigation Path:

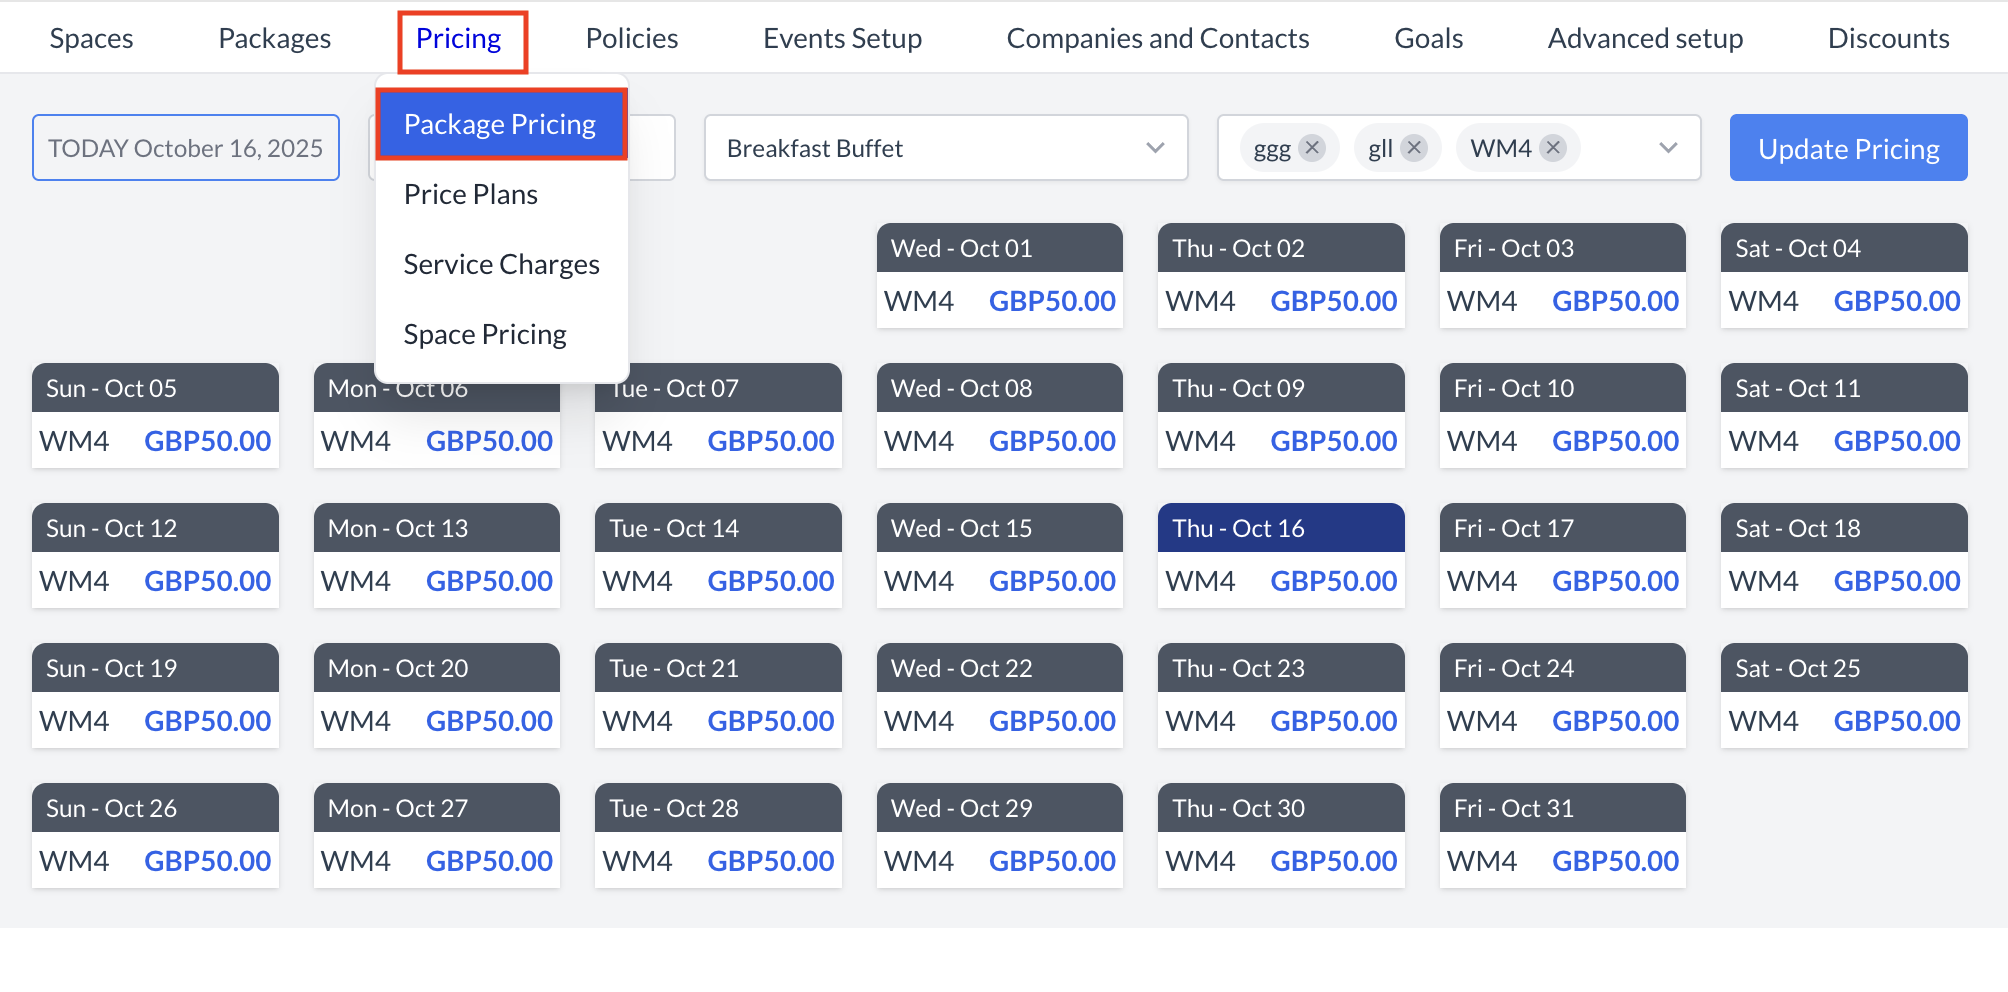
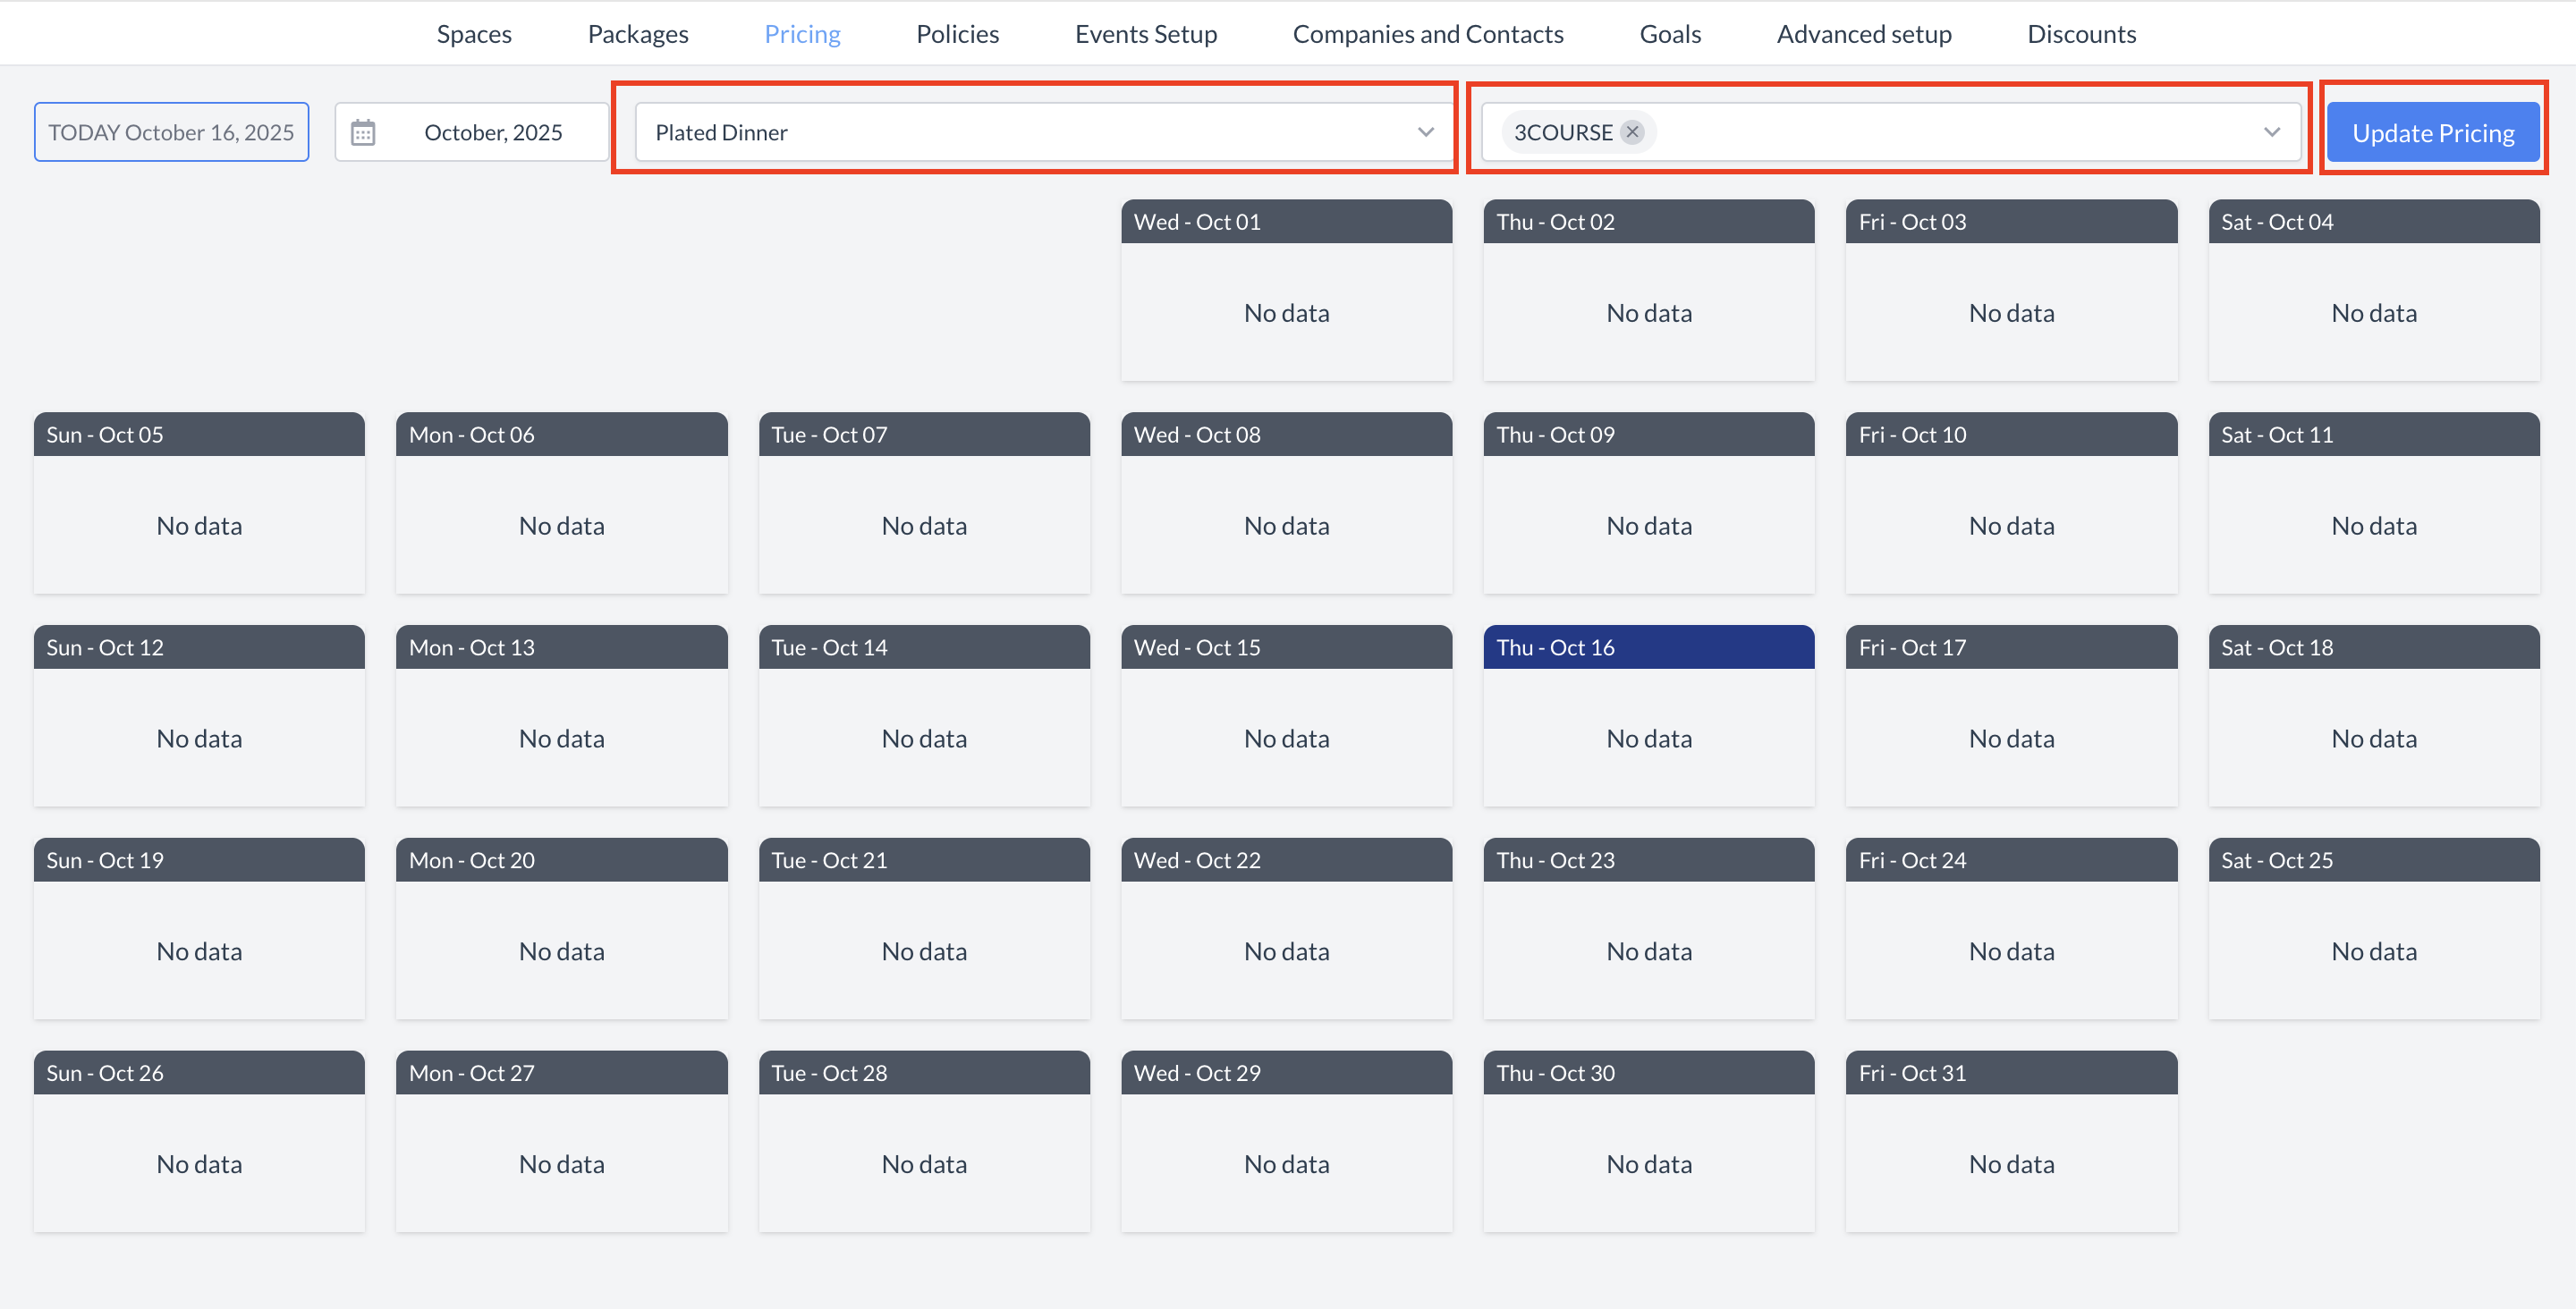
Go to Home > Event Administration > Pricing > Package Pricing

This will take you to the Package Pricing Calendar screen.

Step 3.1: Select Package & Price Plan

  1. From the first dropdown menu, select the package you just created.

  2. From the second dropdown menu, select the Price Plan you want to associate with the package.

🔍 Note: If this is a new package, no pricing should currently be attached. The calendar will show “No Data.”

📘 For more information on Price Plans or how to set them up, refer to the "Price Plans" Knowledge Base Article (KBA) under the Pricing menu.

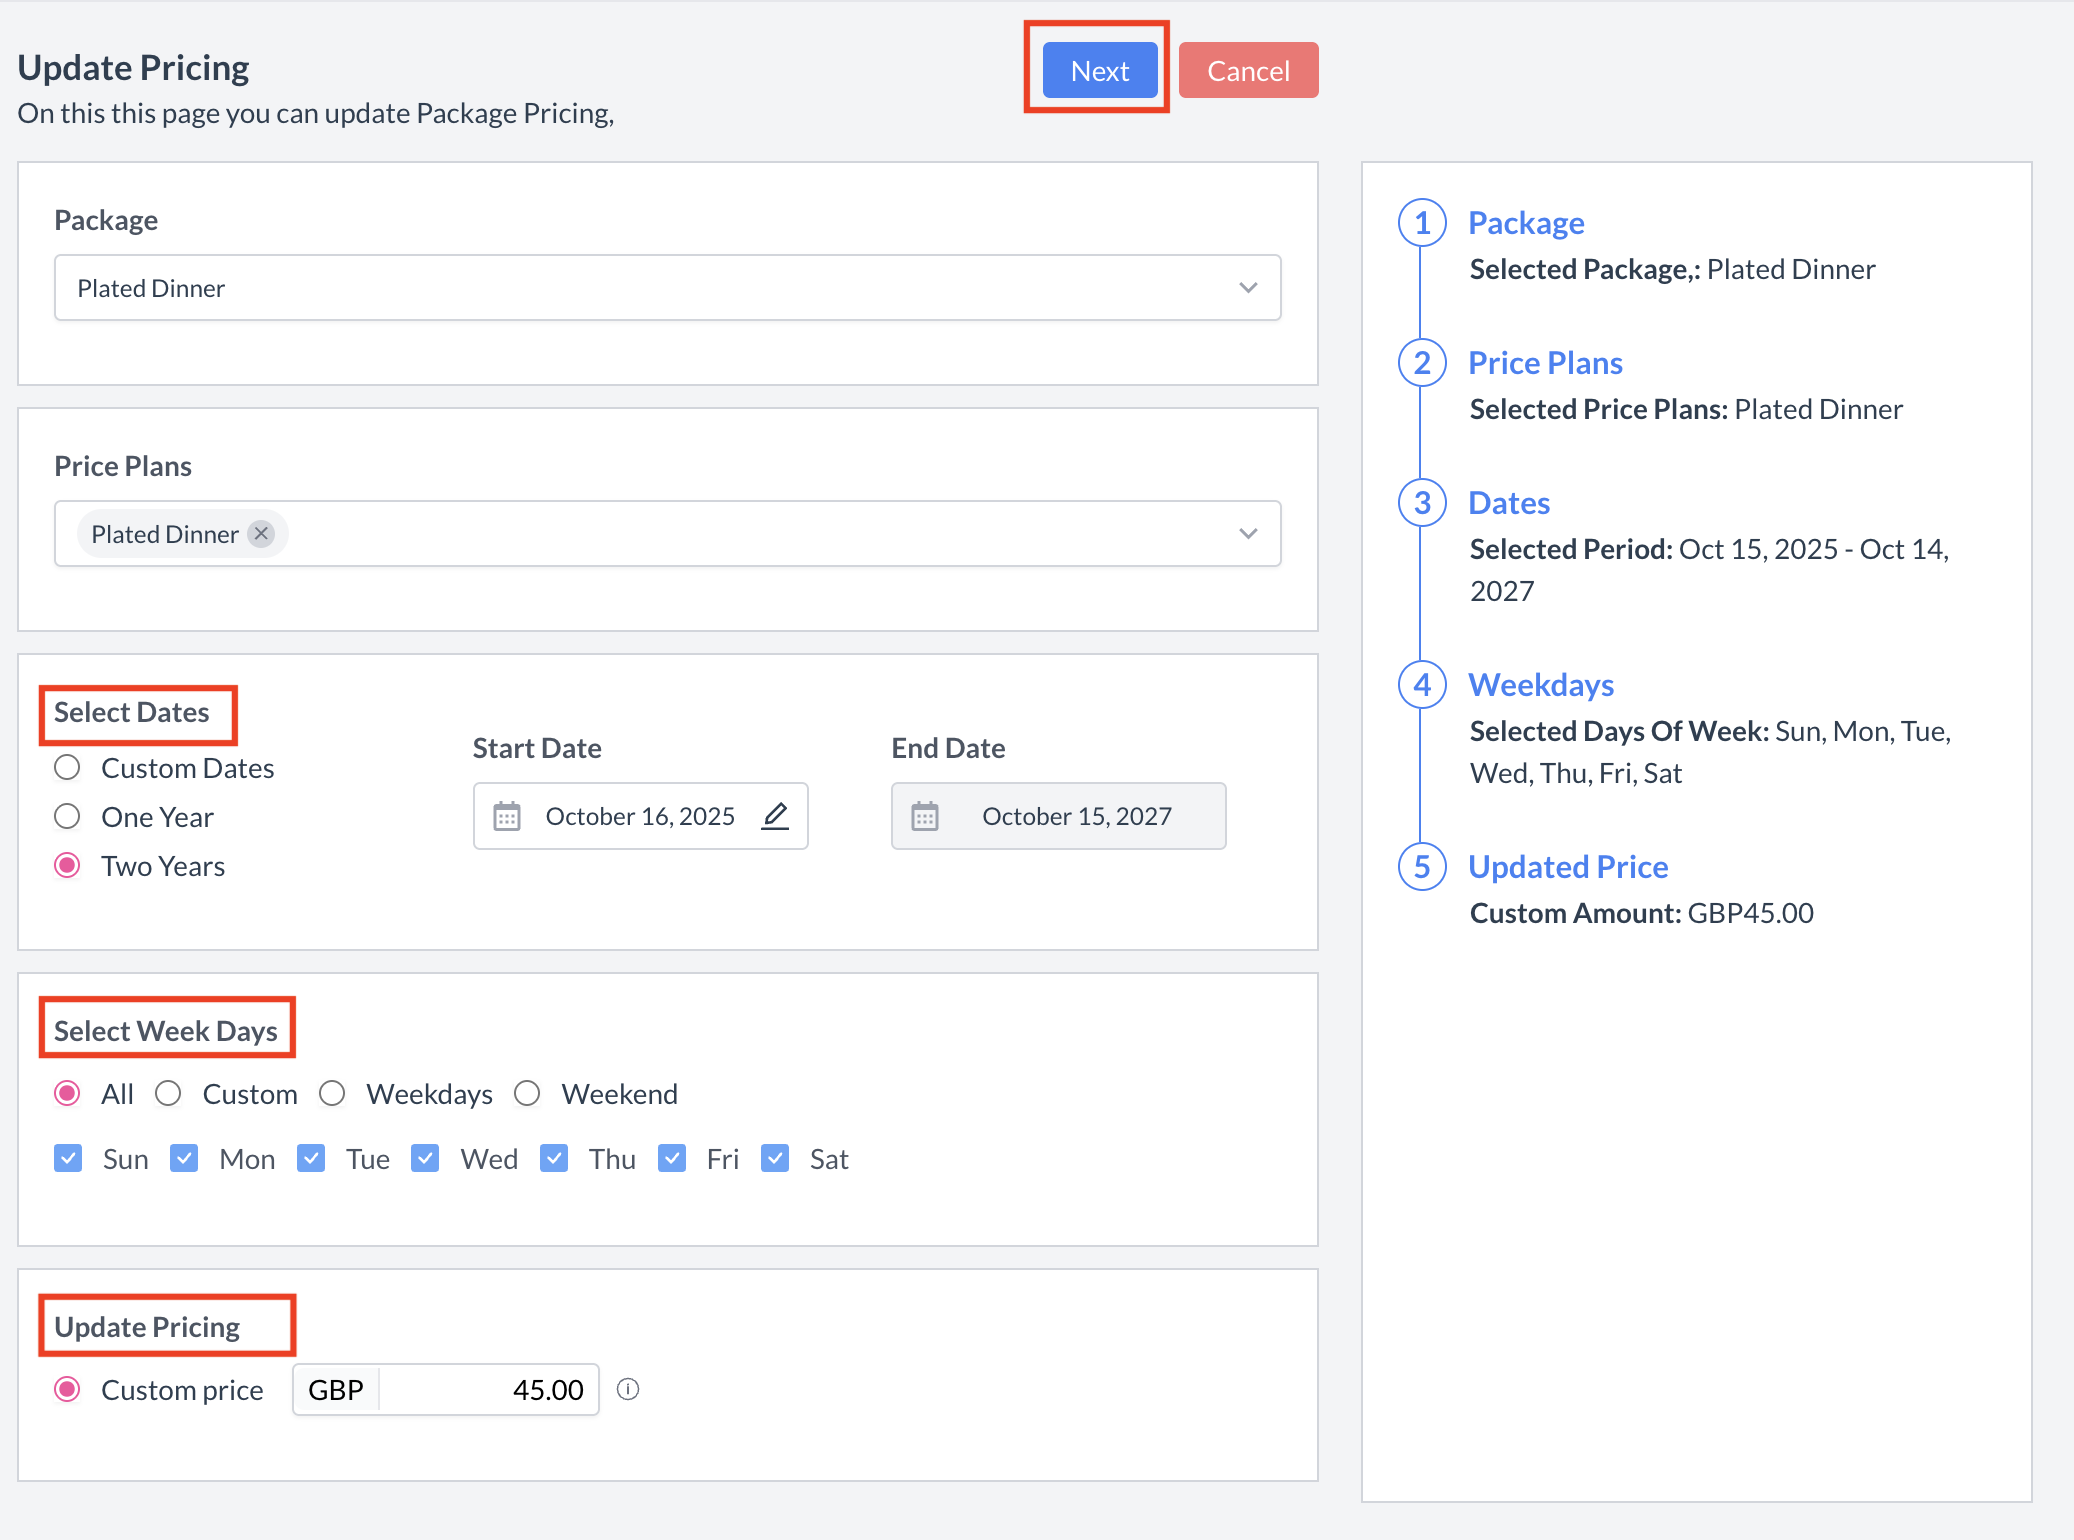
Step 3.2: Update Package Pricing

  1. Click the Update Pricing button.

  2. The Update Pricing screen will appear. Under the Selected Dates section, choose how long the pricing should apply:

    • Custom Dates: Set a custom Start Date and End Date.
      Useful for seasonal or date-specific pricing changes.

    • One Year: Apply the same rate for the next 365 days.

    • Two Years: Apply the same rate for the next 730 days.

Step 3.3: Set Days of Week (DOW) Pattern

Under Select Days of the Week, define which days the pricing should apply:

  • Custom: Select specific days (e.g., just Fridays or Mondays and Wednesdays).

  • Weekdays: Apply pricing to Monday through Friday.

  • Weekends: Apply pricing to Saturday and Sunday.

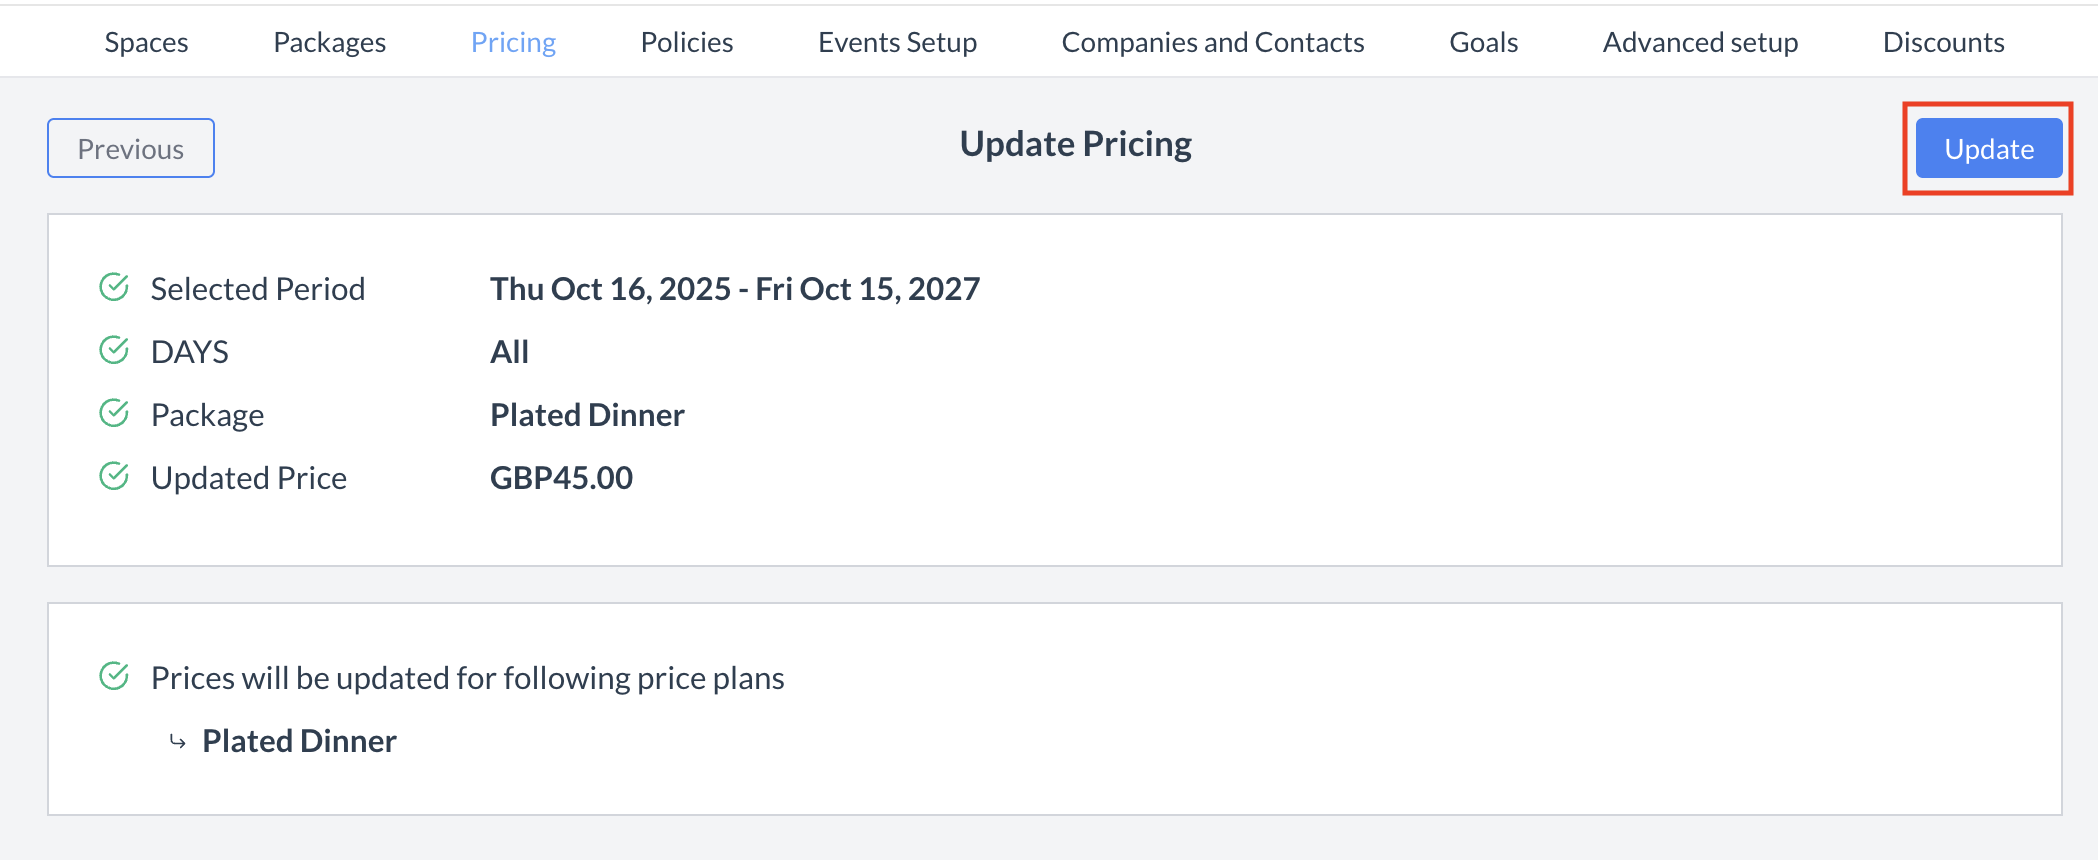
A summary panel on the right side will display your selected settings.

When all information is complete, click the Next button.

Step 3.4: Review & Confirm

You will now see a Review Pricing screen:

  • Review the pricing details you've entered.

  • To make changes, click Previous.

  • If everything looks correct, click the Update button to apply the pricing.

✅ Once saved, the Package Pricing Calendar will update, and you’ll see the rates applied to your package and selected Price Plan.

Your package is now fully priced and ready to be added to events!

Pricing_Package Pricing.png

Pricing > Package Pricing

Pricing_Package Pricing Calendar.png

Package Pricing: Pricing Calendar

Update Pricing Screen.png

Package Pricing: Update Pricing

Update Pricing_Review and Confirm.png

Package Pricing: Confirm & Update Pricing

Pricing Calendar_Confirmed.png

Package Pricing: Updated Pricing Calendar

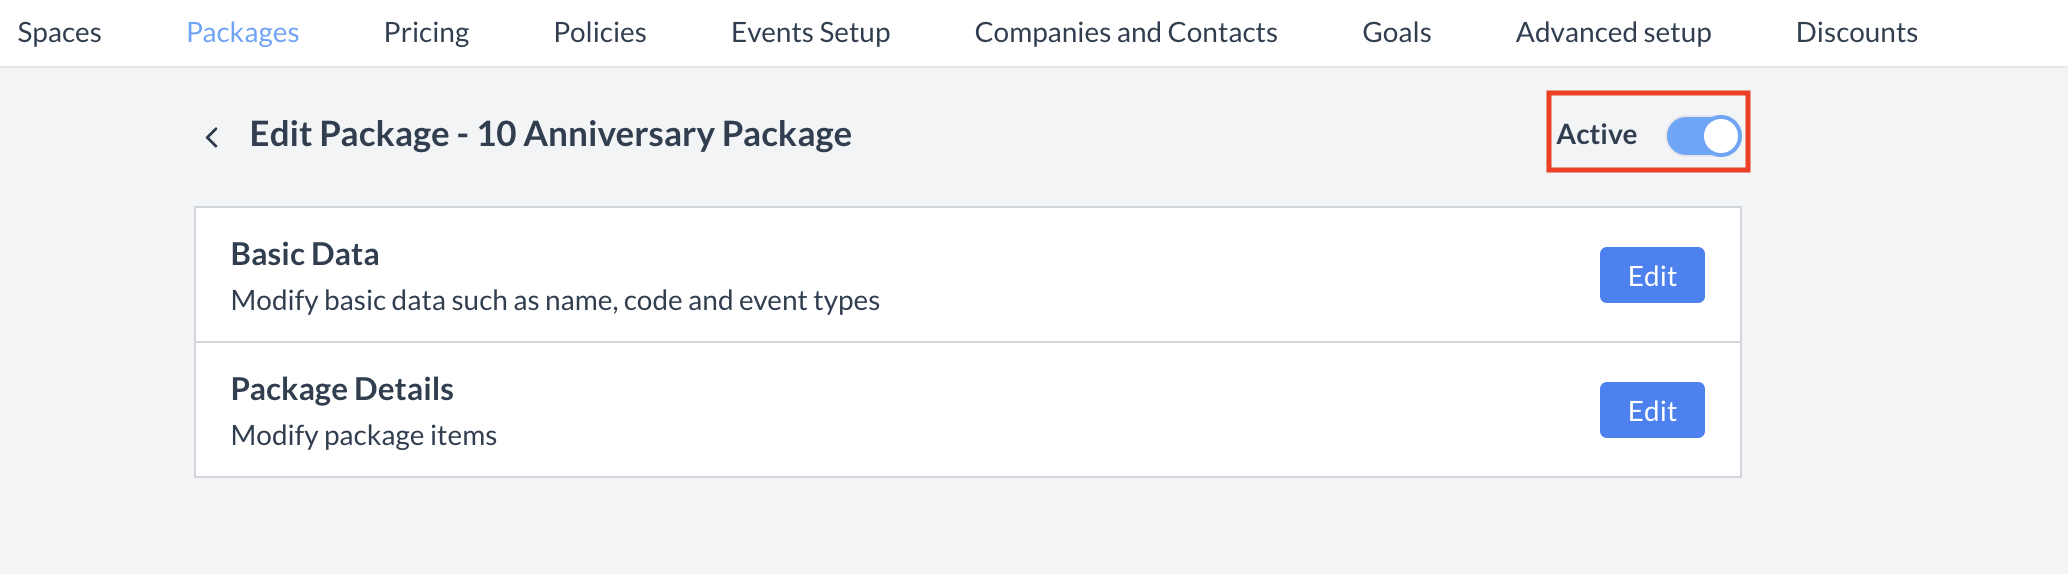
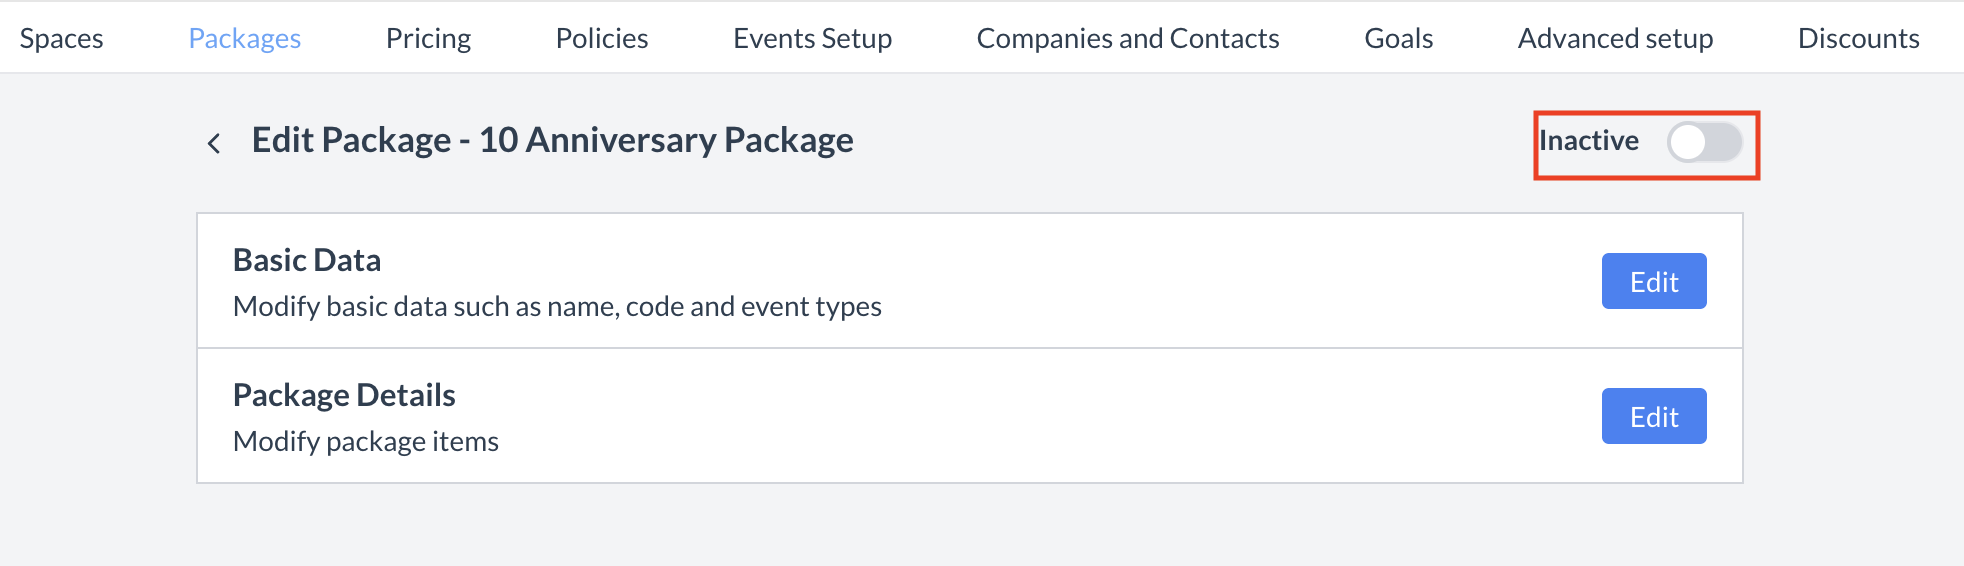
🔄 Inactivating a Package

To deactivate a package:

  1. From the Package Setup listing screen, locate and select the package you wish to inactivate.

  2. In the package header, click the Active toggle to switch it off.

Once inactivated, the package will no longer appear in the Package Setup listing and will not be available for selection on events.

Packagae Setup_Select Package.png

Package Setup: Select Package to Inactivate

Package Setup_Active Toggle.png

Package Setup: Active Toggle

🔁 Reactivating a Package

To reactivate a package:

  1. Navigate to the Packages Setup listing screen.

  2. Use the filter option to display All or Inactive packages.

    • Active packages are marked with a green sidebar.

    • Inactive packages are marked with a grey sidebar.

  3. Locate the inactive package you wish to reactivate and click to open it.

  4. In the package header, toggle the Inactive switch to ON.

The package is now reactivated and will appear in the main Packages Setup listing screen, making it available for use again.

Package Setup_Filter.png

Package Setup: Listing Screen Filter

Packages Setup_Inactive Package.png

Package Setup_Inactive Package

Package Setup_Inactive Toggle.png

Package Setup_Inactive Toggle

🖥️ Where “Packages” Appears in the User Interface (UI)

There are several locations within EventKey Packages will appear both in the UI & Reports. Below are a few more common examples:

Package_Configure Package.png

Packages: Attaching a Package to an Event

Packages_Event Record.png

Packages: Event Record

Packages_BEO.png

Packages: BEO

JavaScript errors detected

Please note, these errors can depend on your browser setup.

If this problem persists, please contact our support.