Target Roles: Front Desk Agents, Reservations Supervisors, Front Office Managers, Night Auditors, System Administrators
Last Updated:
Executive Overview
The Tape Chart (Grid View) serves as the primary visual room matrix in HotelKey PMS for tracking real-time room availability, assigning accommodations, executing drag-and-drop room moves, and monitoring housekeeping and occupancy statuses. HotelKey provides two distinct Tape Chart visual configurations to match operational requirements:
Standard (Expanded) Tape Chart View: Features spacious row heights, extended guest name banners, and multi-line housekeeping status tags.
High Density Tape Chart View: A compact operational interface that compresses grid rows by approximately 60% and introduces streamlined, circular housekeeping badges. This view significantly reduces vertical scrolling and allows front desk teams to oversee larger room inventories on a single screen.
⚙️ Property-Level Configuration Notice:
Switching between the Standard (Expanded) Tape Chart and High Density Tape Chart is a property-wide configuration setting. Properties wishing to enable or adjust the High Density Tape Chart must submit a request through HotelKey Support.
Operational Guide: Navigating the Tape Chart (Grid View)
System Navigation Path
Home > Dashboard > Grid View and Floor Plan
Step
Action
Platform Guidance & Operational Details
Access Tape Chart
On the main dashboard, click the Grid View and Floor Plan action button in the bottom-right quick actions bar.
Renders the visual Tape Chart room inventory grid.
Select Timespan
Click 7 Days, 14 Days, or 21 Days in the top-right header, or click the Date Picker to jump to a specific date.
Adjusts the forward-looking calendar horizon across all room rows.
Sort & Filter Room Types
Click the Room Type dropdown menu on the left side of the matrix header.
Choose Sort By Floor or Sort By Rooms. Filter by All Room Types or select specific codes (e.g., DQ, FT, KR, KS, QQRS) and click Apply.
Apply Reservation Filters
Click the blue Filter button in the upper toolbar.
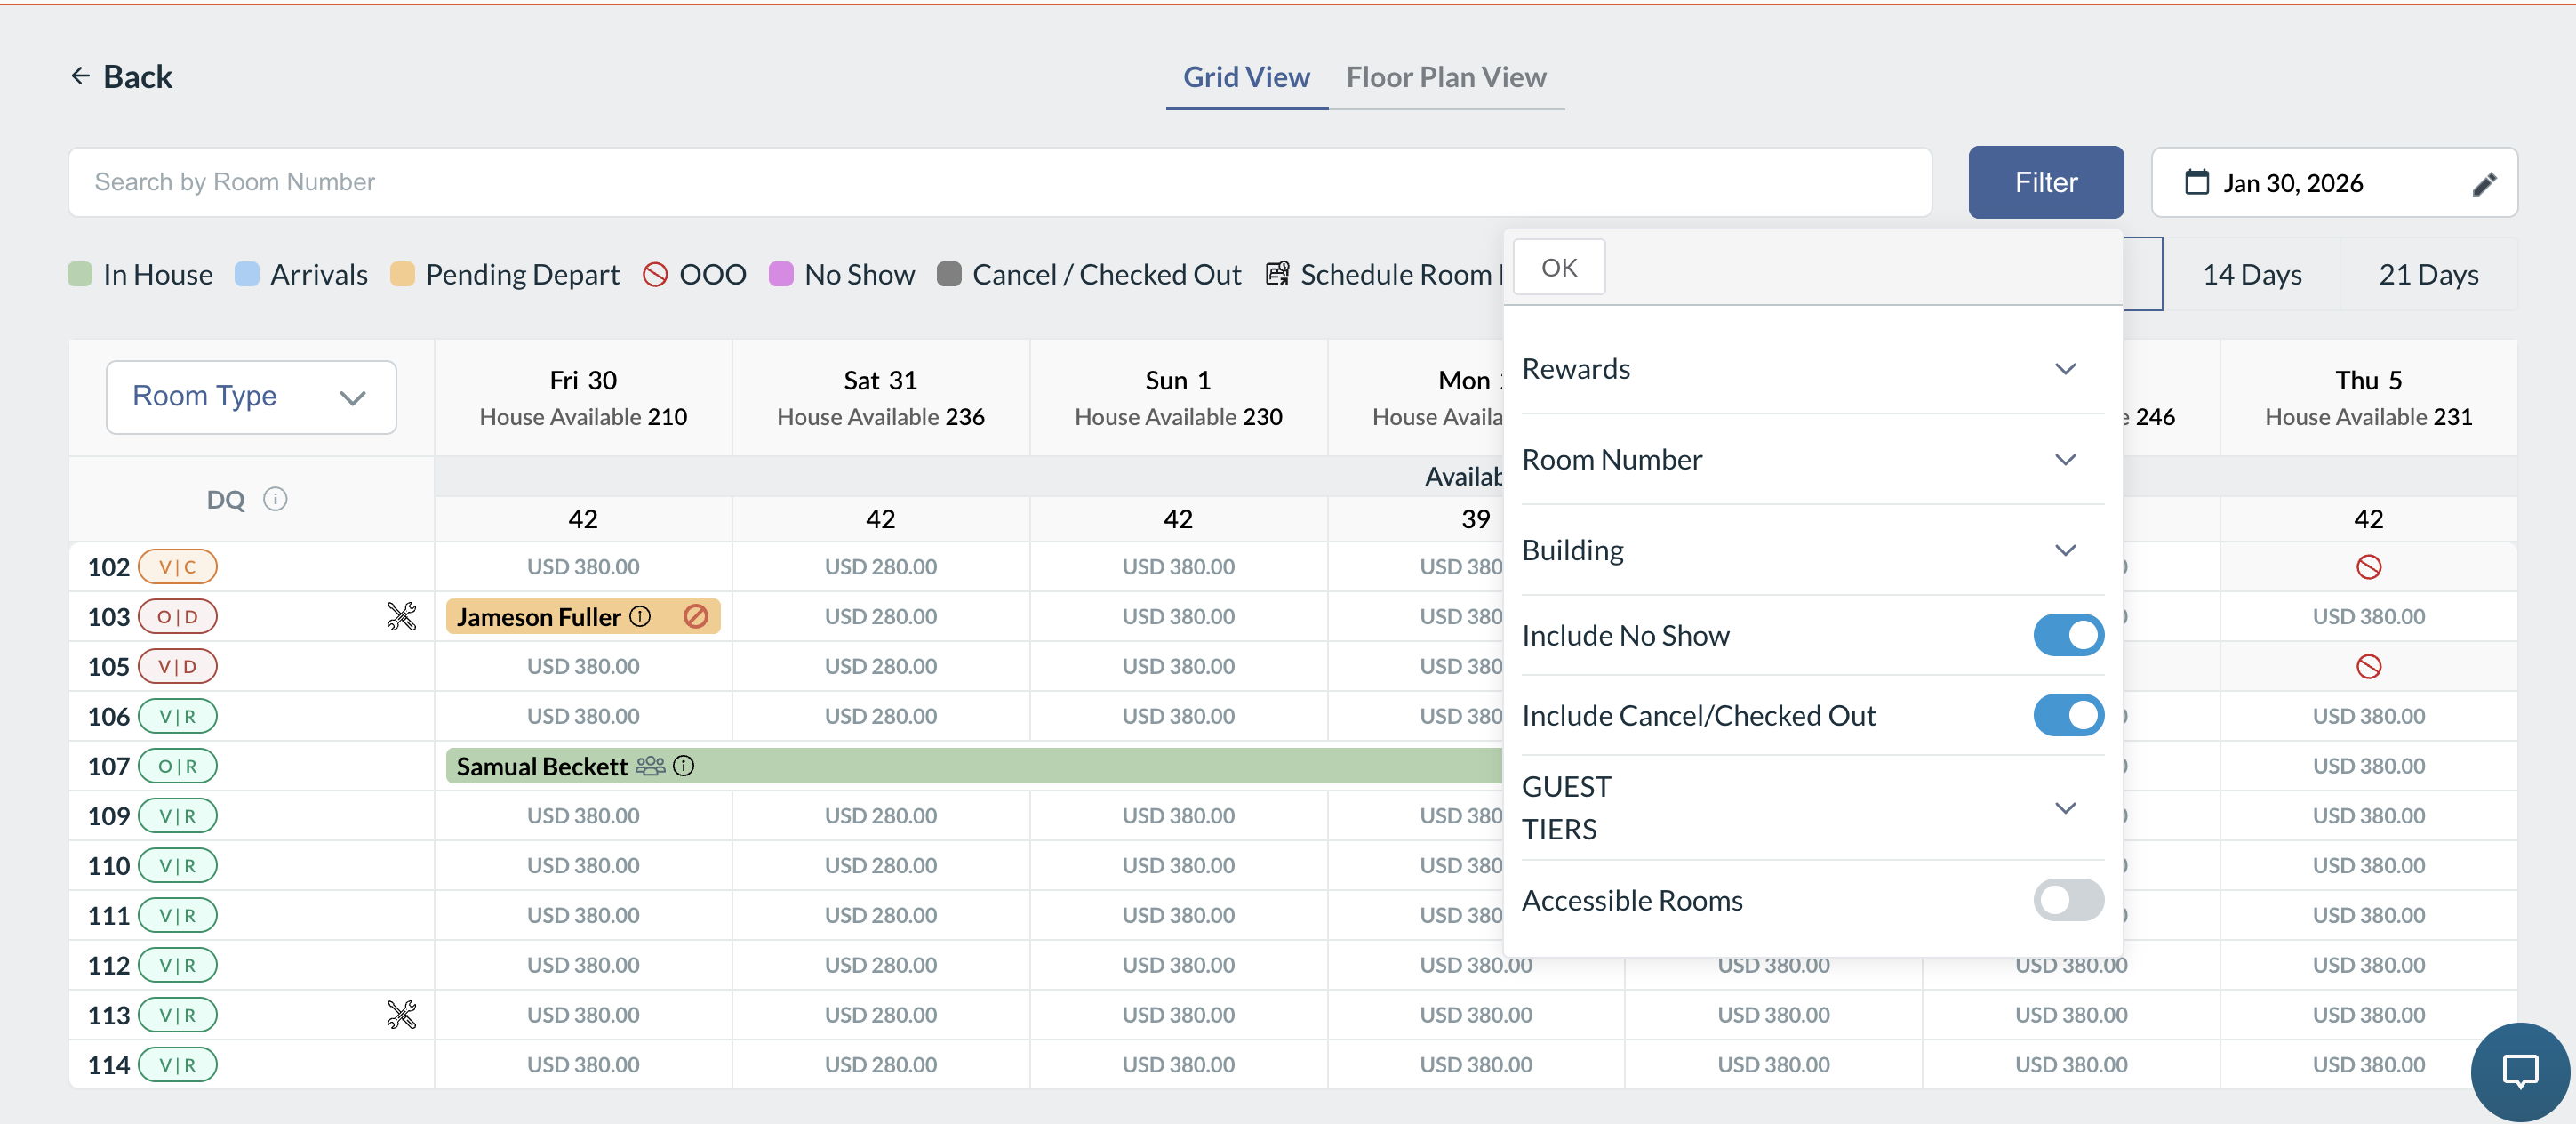
Filter by Rewards Tier (Blue, Gold, Platinum, Diamond, Diamond Select), Building, or toggle Include No Show, Include Cancel/Checked Out, or Accessible Rooms.
Search Rooms Directly
Input room numbers into the Search by Room Number box in the top-left toolbar.
Quickly isolates specific physical room rows in real time.
Drag-and-Drop Room Move
Click and hold an active reservation block, drag it vertically to a clean/available room row, and release.
Prompts confirmation and displays a green notification banner (Reservation Updated Successfully) upon completion.
Assign Unassigned Bookings
Locate the Unassigned tray at the bottom of the room category, select a pending arrival block, and drag it into an open room slot.
Assigns the specific room number to the reservation instantly.
Open Reservation File
Double-click or single-click any colored guest bar directly from the grid.
Launches the complete guest reservation card showing Stay details, Folio, Remarks, and Action buttons.
📷 VISUAL CALLOUT:
Tape Chart Grid Comparison: Standard vs. High Density View
Standard Tape Chart (Grid View)
High Density Tape Chart (Grid View)
Detailed View Comparison & UI Breakdown
Status Color Legend (Header Bar)
The horizontal legend bar directly above the grid defines real-time room and booking states:
In House (Green): Currently checked-in guests residing in the room.
Arrivals (Light Blue): Scheduled arrivals for the business date.
Pending Depart (Yellow): Occupied rooms scheduled for checkout on the active date.
OOO (Red Prohibited Circle): Out of Order / Out of Service rooms unavailable for sale.
No Show (Purple): Reservations that failed to arrive during the designated audit window.
Cancel / Checked Out (Grey): Historical cancelled bookings or departed folios (when filter is toggled ON).
Toolbar view showing the 7, 14, and 21 Days quick-toggle buttons, the calendar date jumper, and the Filter overlay displaying Rewards Tiers, Accessible Rooms, and No Show toggles.
Tape Chart (Grid View) Filtering Options
Operational Workflows
Executing Instant Room Moves
Locate the guest reservation on the grid.
Verify that the target room displays a clean housekeeping status circle/tag.
Click and drag the reservation bar to the destination room row.
Release the mouse. The PMS instantly moves the reservation, updates inventory allotments, and displays a green confirmation alert (Reservation Updated Successfully).
Assigning Unassigned Rooms
Reservations booked without an assigned physical room number collect in the Unassigned row at the base of each room type section:
Expand the room type block to reveal the Unassigned tier.
Identify the unassigned guest badge (displaying guest name and duration).
Drag the badge upward into an available room row that matches the contracted stay dates.
The guest is immediately allocated to that physical room.
Requesting the High Density View
To transition a hotel property from the Standard Expanded View to the High Density Tape Chart:
Submit a formal configuration ticket through the HotelKey Helpdesk.
Specify the request: "Enable High Density Tape Chart Grid View."
HotelKey Support enables the module at the property level, applying the 60% compressed layout and compact housekeeping badges across all front desk terminals.