Target Roles: Accounts Receivable Managers, Credit Managers, Finance Directors, Front Office Managers, System Administrators
Last Updated:
Executive Overview
Corporate and direct-bill account creation in HotelKey centralizes business-to-business (B2B) billing agreements, credit monitoring, booking constraints, and automated invoicing delivery. Through the multi-step Create Local Company wizard, administrators establish organizational profiles, enforce purchase order (PO) requirements, configure credit limits, and define folio delivery preferences.
🔒 Access & Permissions Notice:
The blue + Add New Company button on the Accounts Receivable Dashboard is permission-driven. Only authorized user roles (such as System Administrators, Finance Directors, and Accounts Receivable Managers) have the privileges required to create and deploy new corporate accounts. If the button is not visible on your dashboard, contact your property administrator to request the necessary role permissions.
Configuration Guide: Creating a Corporate Direct Bill Account
System Navigation Path
Companies and Direct Bill > Dashboard > + Add New Company
Step
Action
Platform Guidance & Operational Details
Initiate Setup
On the Accounts Receivable Dashboard, scroll to the Company List and click the blue + Add New Company button.
Launches the 5-step Create Local Company setup wizard. (Note: Visible only to permitted roles).
Step 1: Company Info
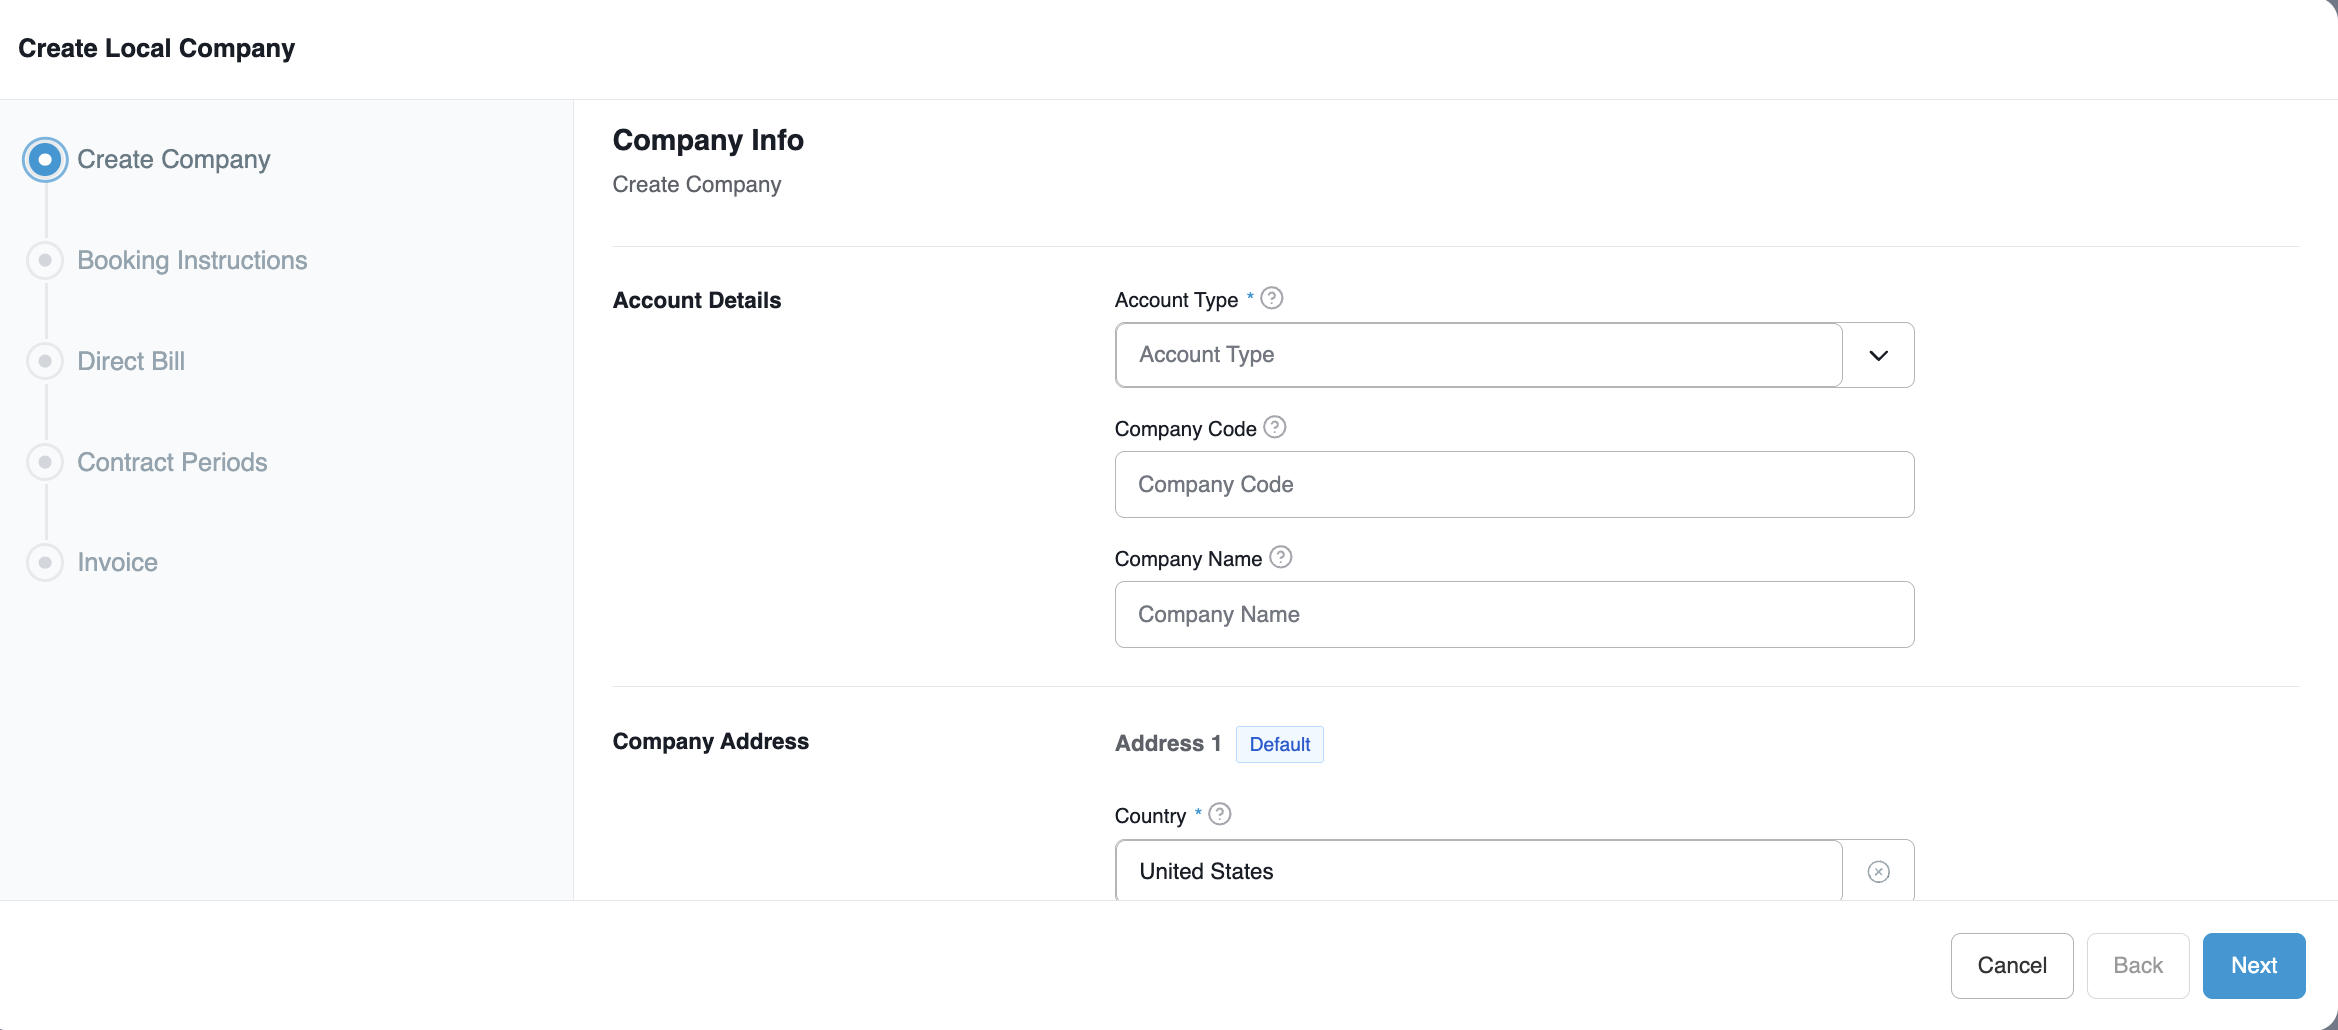
Select Account Type, enter Company Code, Company Name, address, contact numbers, email, Status, Payment Terms, and contact persons.
Blue + Add New Company button to initiate the create new local company wizard and walkthrough of company creation.
Create Local Company Wizard Walkthrough
Detailed Step-by-Step Configuration Field Breakdown
Step 1: Create Company (Company Info)
Account Type: Defines the structural classification of the corporate account (configurable by property):
DB-Direct Bill Account: Authorizes direct billing privileges, credit limits, and Accounts Receivable invoicing.
LOCAL-Local Company: Local property corporate tracking profile without centralized credit privileges.
DEF-Default: Standard company reference record.
Company Code: Unique alphanumeric identifier assigned to the account (e.g., 00125432).
Company Name: Legal corporate or entity title (e.g., Apple Inc).
Company Address: Physical billing address including Country, Address 1, Address 2, City, State, and Postal Code. Use + Add Address to add secondary office locations.
Contact Details: Primary telephone number (with country code) and optional fax number.
Email & Website: Primary corporate billing email address and public website URL.
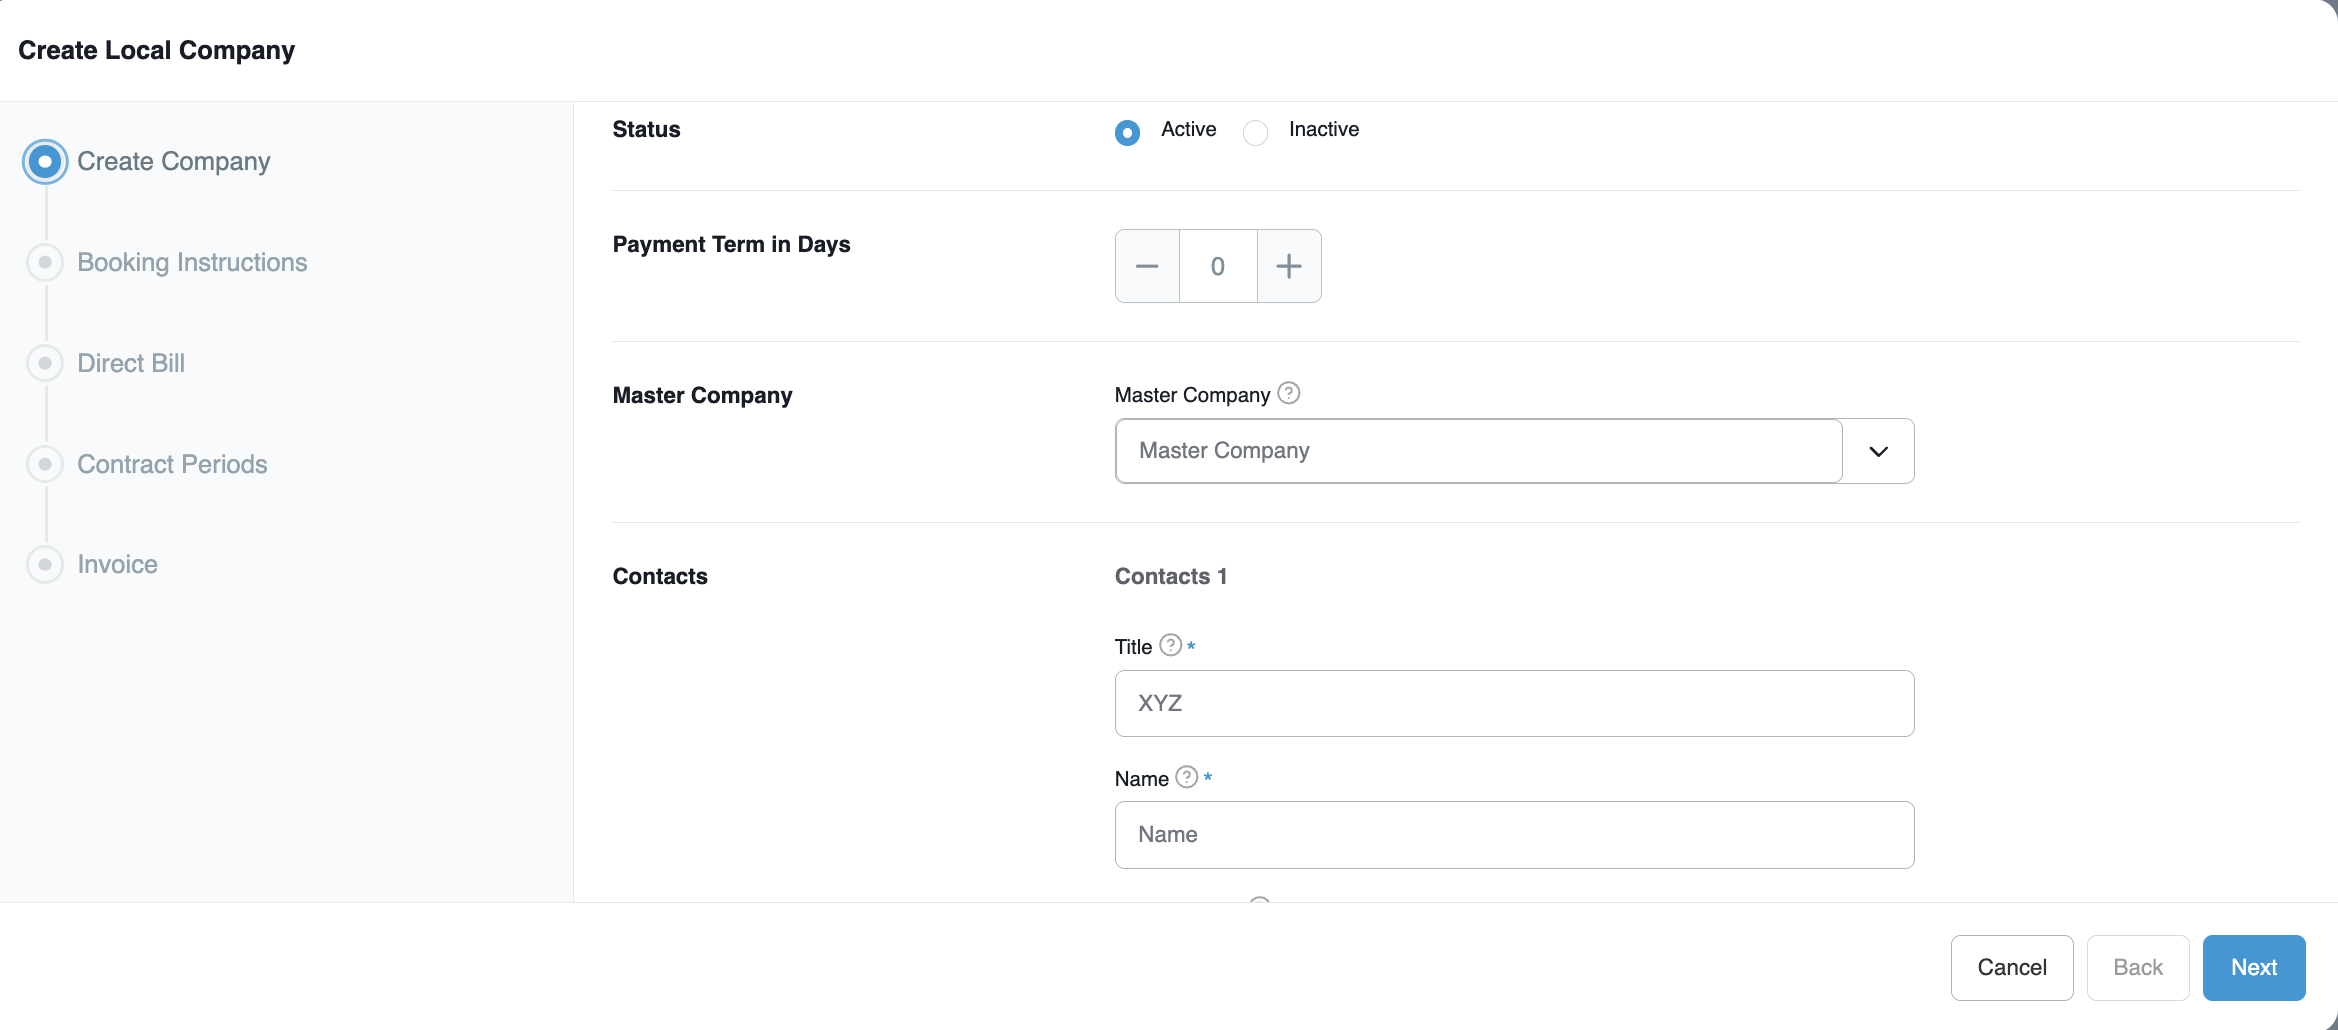
Status: Toggle between Active (available for booking and billing) and Inactive (suspended).
Payment Term in Days: Numerical grace period allowed for invoice settlement following issuance (e.g., 28 days or 30 days).
Master Company: Parent corporate entity dropdown for parent-subsidiary organizational rollups.
Contacts Configuration:
Title & Name: Salutation and full name of the authorized corporate billing contact (e.g., Mr. James Fuller).
Primary Email & Phone Number: Direct contact channels for statement delivery and collection inquiries.
Display on AR Invoice Checkbox: When enabled, prints the contact's name and address directly onto generated billing statements.
Local Details: Property-specific accounting attributes or notes.
📷 VISUAL CALLOUT:
Company Info & Contact Setup Screen
Wizard screenshot displaying Account Type selection (DB-Direct Bill Account), Company Name and Address fields, Payment Term in Days counter (28), and the primary billing contact card.
Company Name and Address Fields
Status, Payment Term in Days & Contacts
Step 2: Booking Instructions
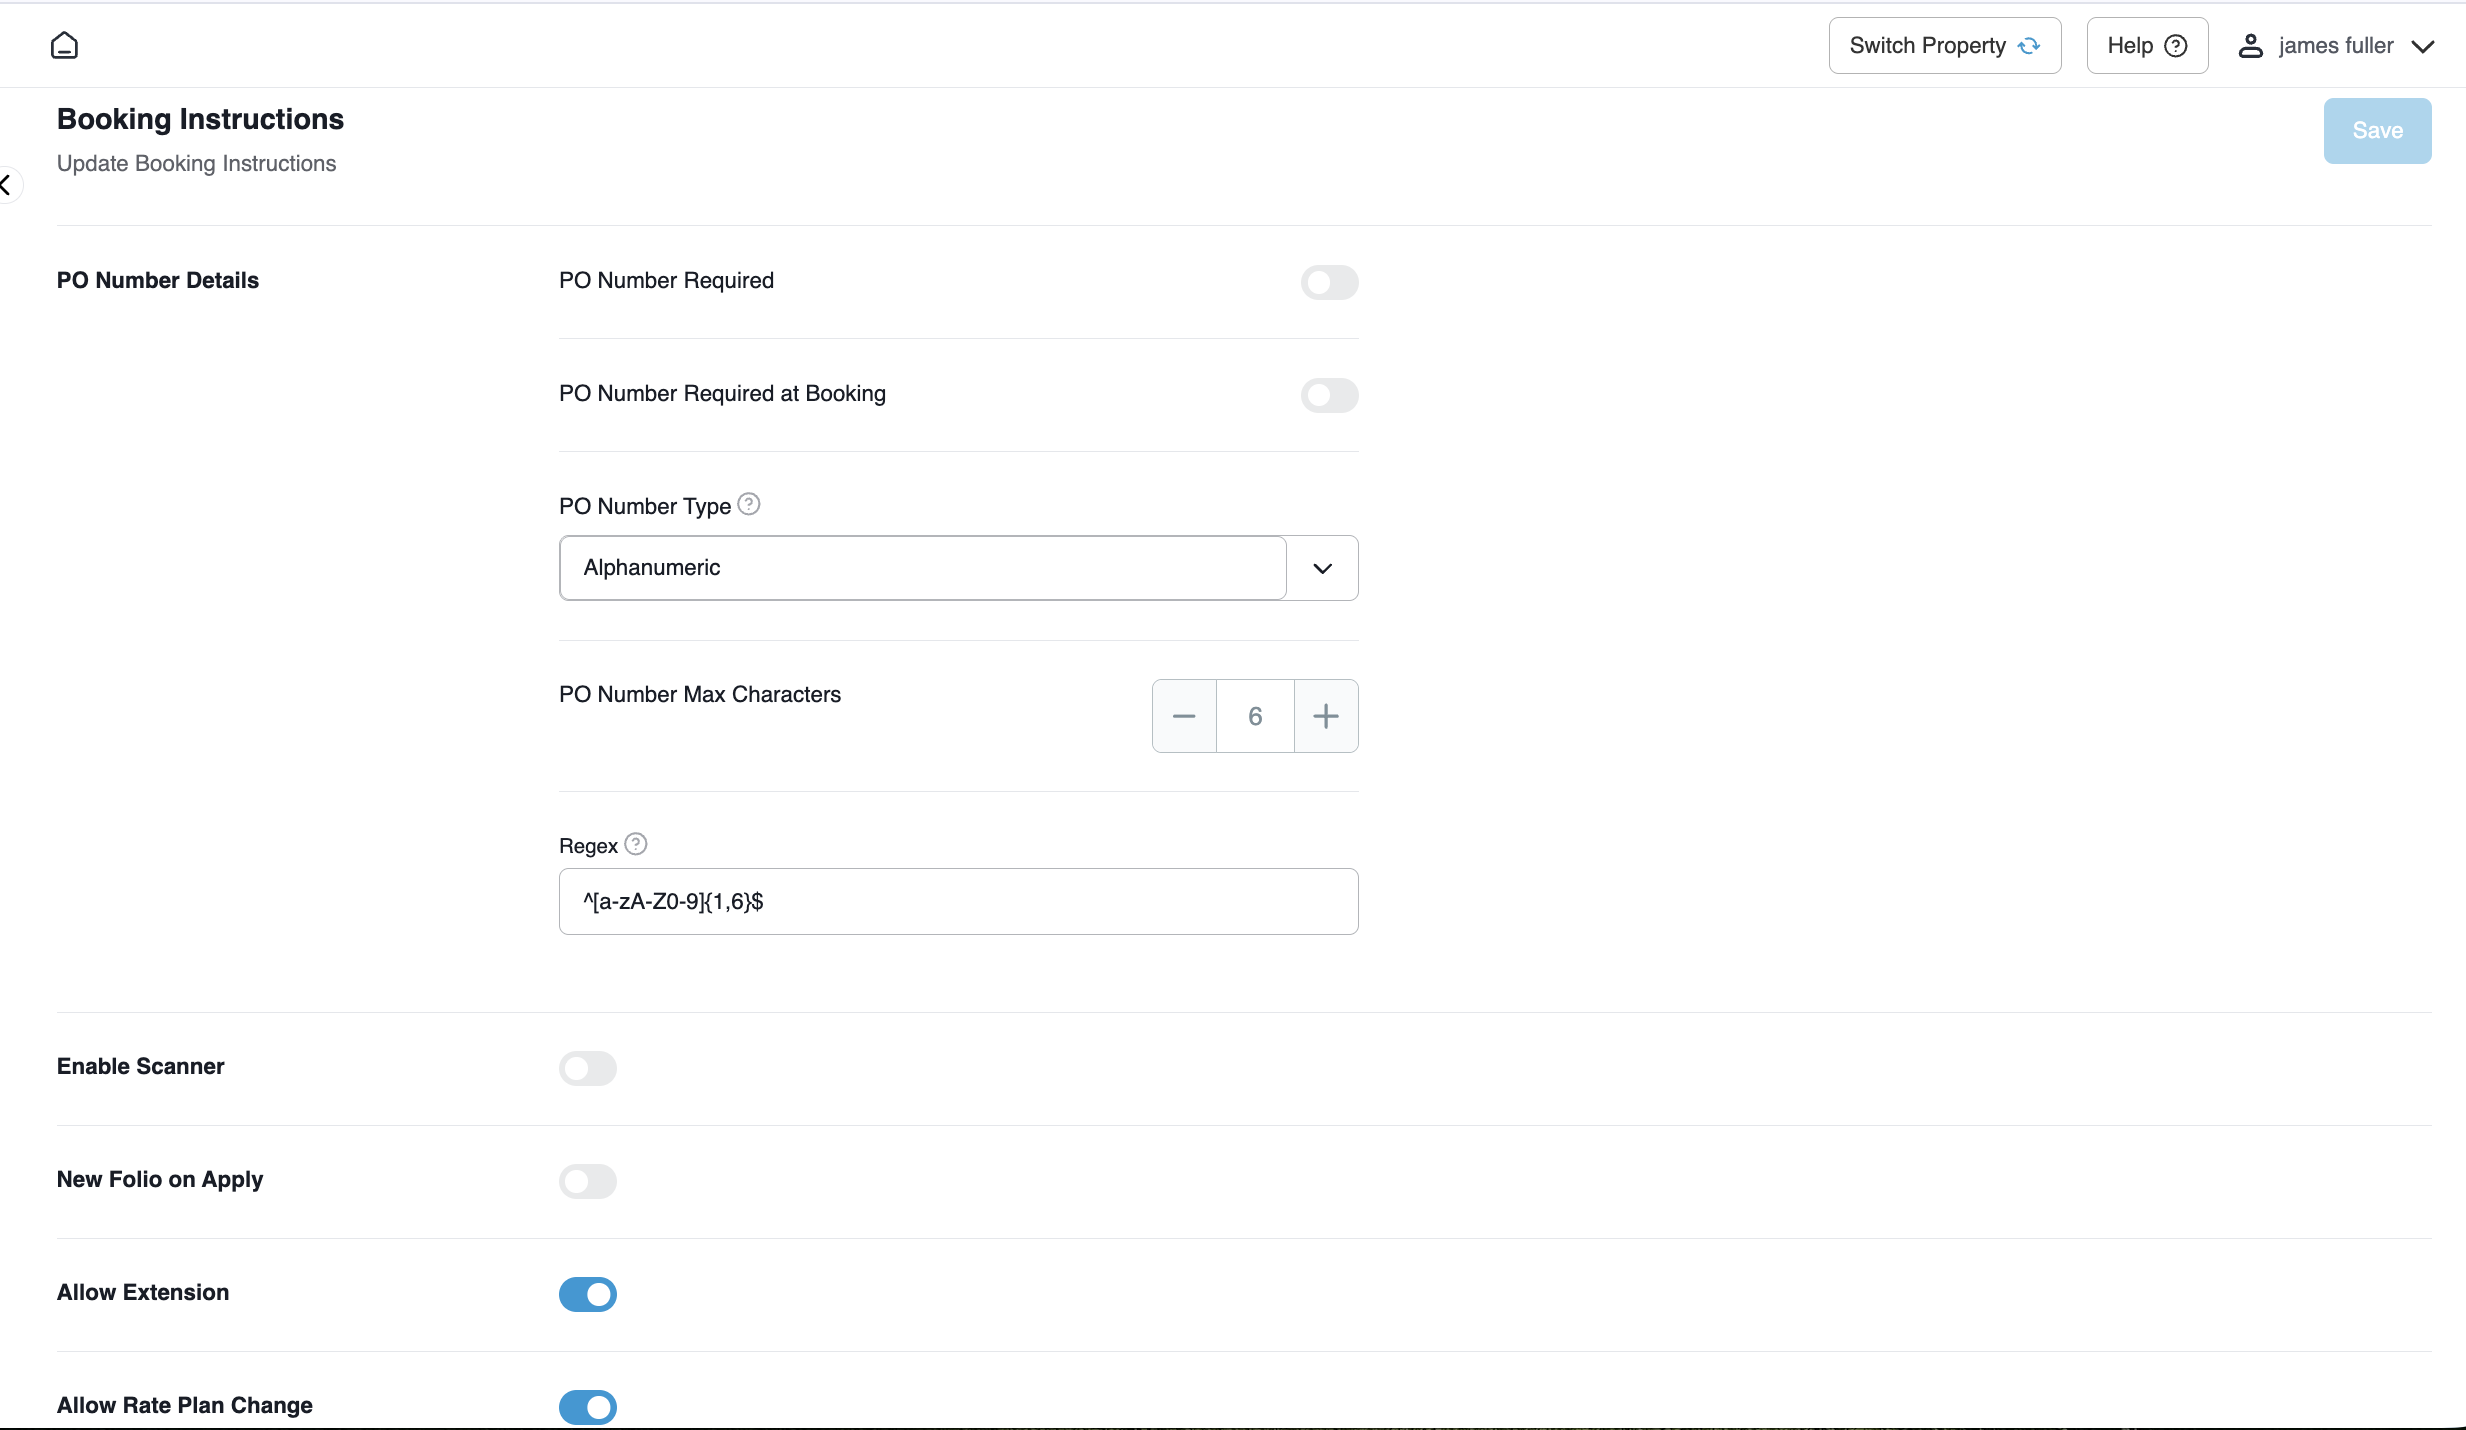
PO Number Details:
PO Number Required: Enforces entry of a purchase order number prior to reservation completion.
PO Number Required at Booking: Restricts booking confirmation if a PO is not supplied at intake.
PO Number Type: Validates syntax using Alphanumeric, Alphabet Only, or Numeric.
PO Number Max Characters & Regex: Defines character length boundaries and regex validation formulas.
Operational Handling Toggles:
Enable Scanner: Activates barcode/document scanning for supporting intake paperwork.
New Folio on Apply: Automatically generates an isolated direct-bill folio when the company profile is attached to a guest stay.
Allow Extension: Authorizes reservation stay-date extensions under the corporate account.
Allow Rate Plan Change: Permits front desk staff to adjust rate plans during check-in or in-house stays.
No Show Nights: Counter setting the number of nights billed to the corporate account upon guest no-show (e.g., 1).
Restrictions & Booking Profiles:
Restrict to Company Rates Toggle: Locks the company to contracted corporate rates, preventing unauthorized discount overrides.
Restricted Booking Profiles: Restricts booking channels eligible to use this profile (CRS_BOOKING, ETL, DIGITAL_APPS, FRONTDESK_WEB).
Commission Setup:
Commission Type: Select PERCENT, AMOUNT, or NONE.
Commission Value: Numerical commission percentage or flat amount.
📷 VISUAL CALLOUT:
Booking Instructions & Operational Controls
Form screenshot illustrating PO Number validation parameters, the New Folio on Apply toggle enabled, No Show Nights counter, and Booking Profile channel restrictions.
Booking Instruction Validation Parameters
Step 3: Direct Bill
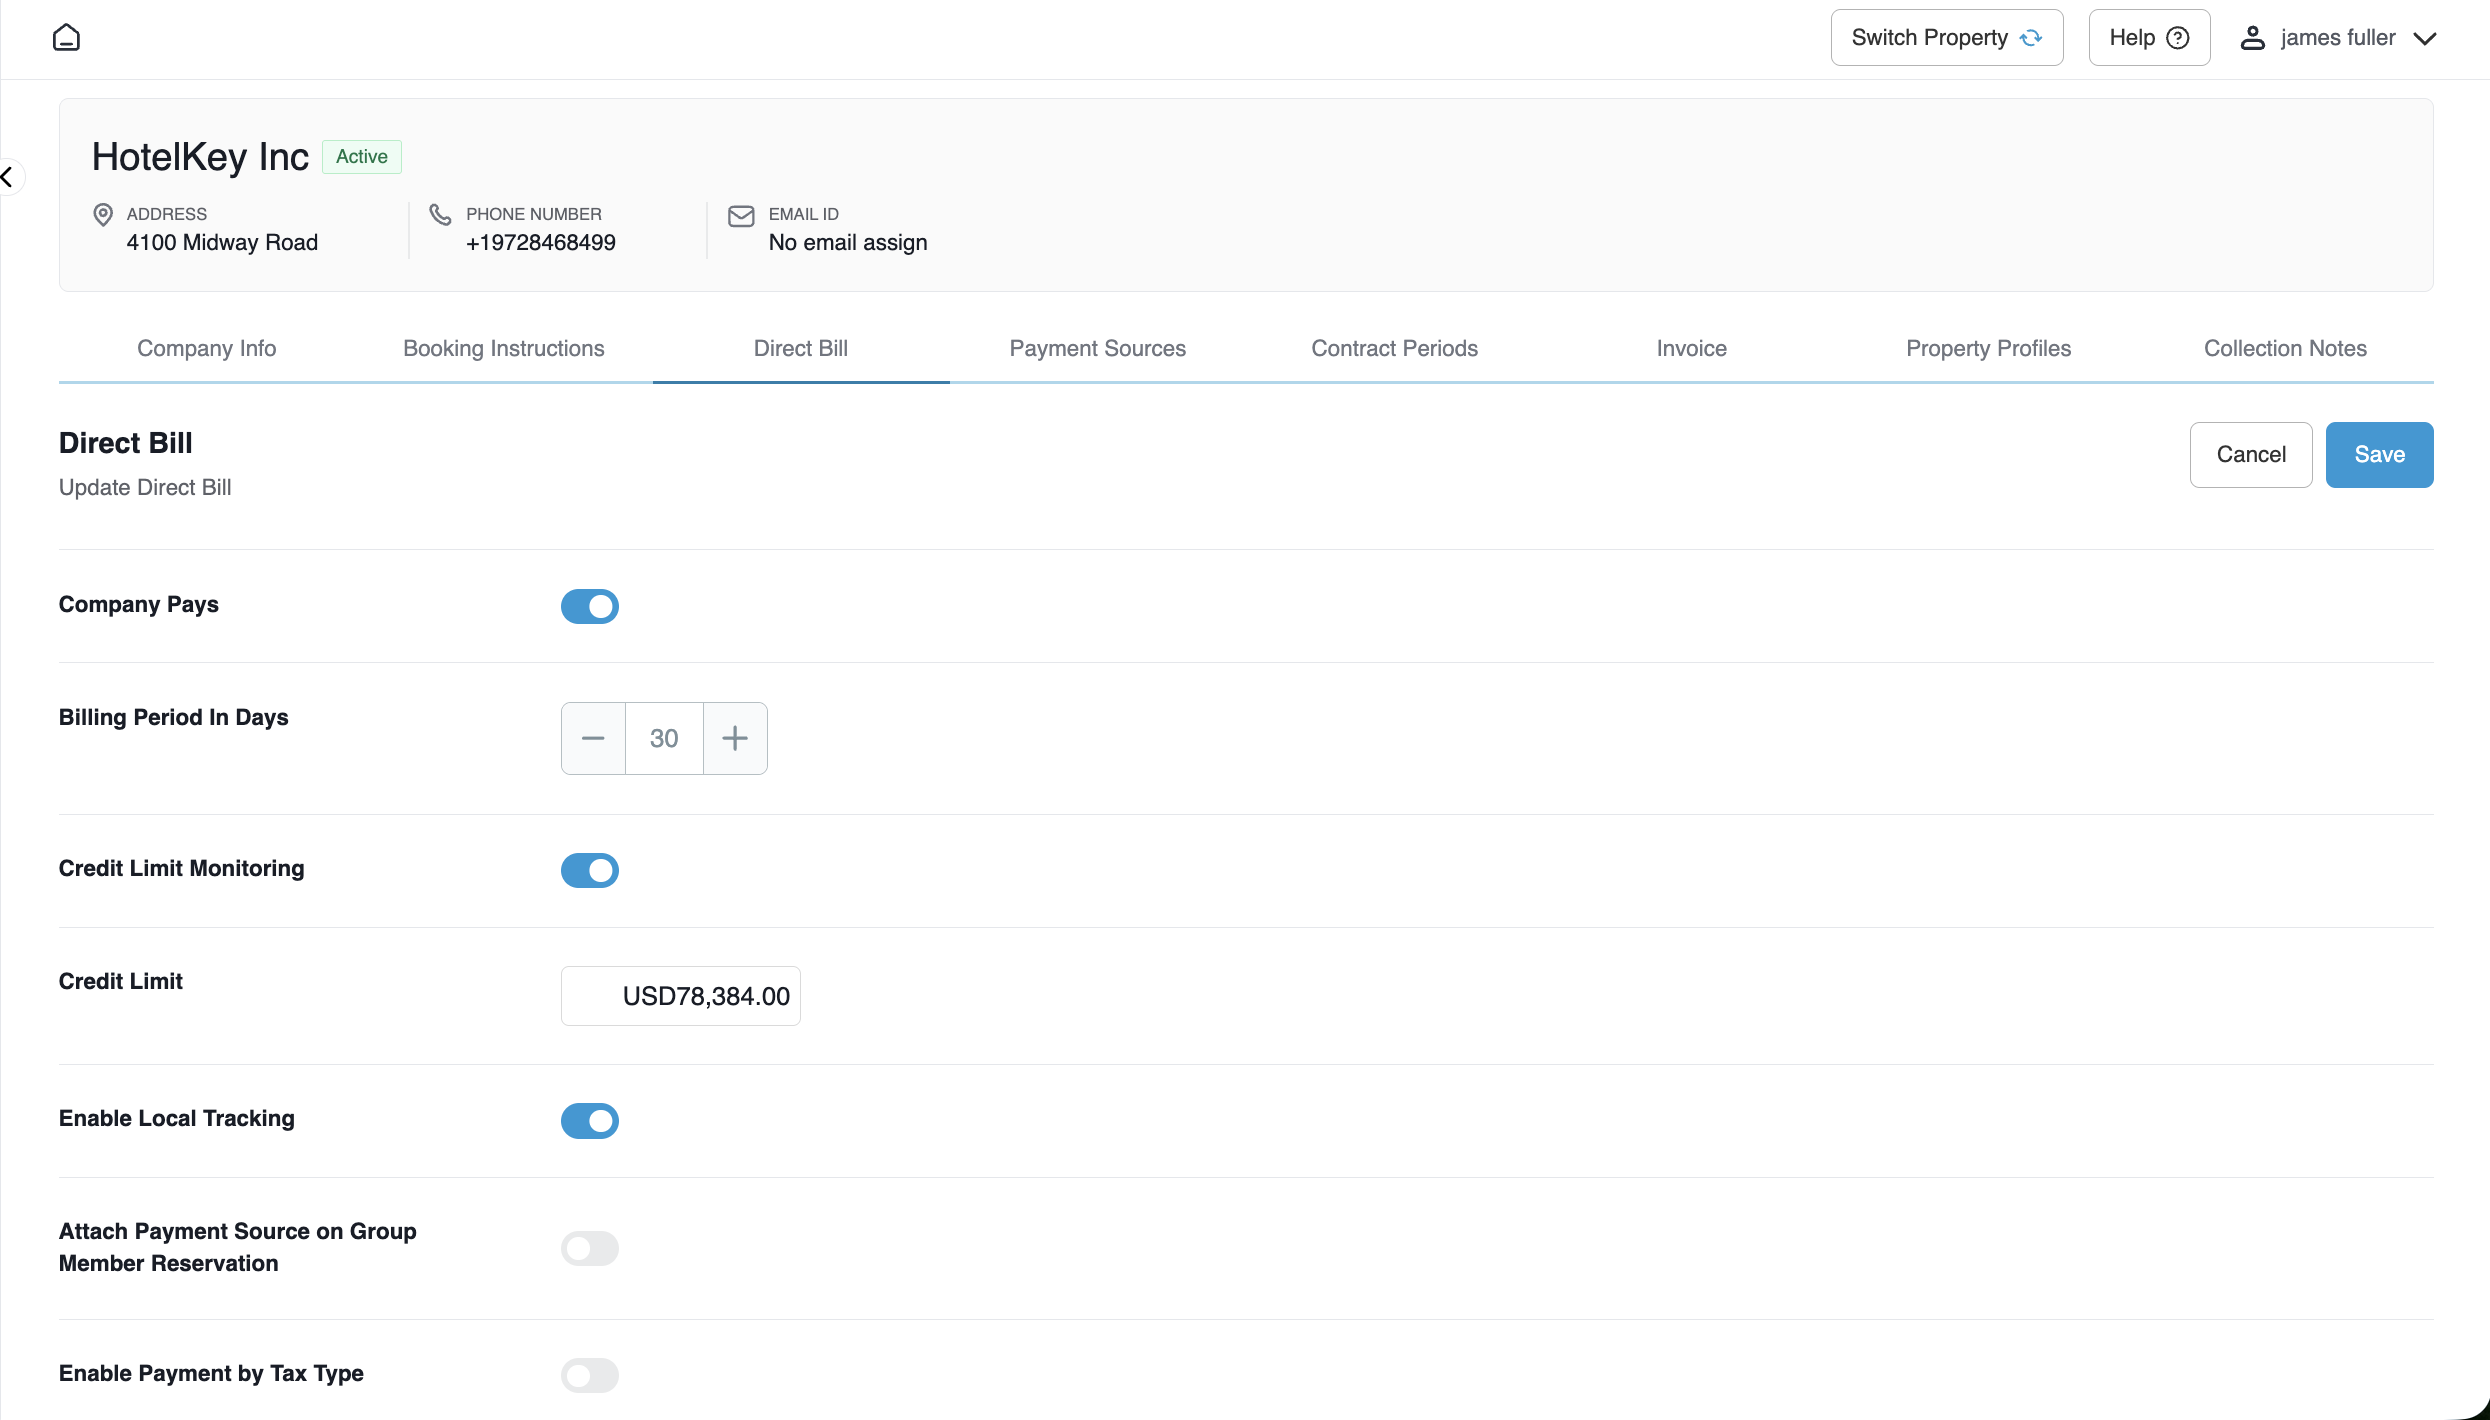
Company Pays Toggle: Activates master billing; routes approved room, tax, and incidental charges directly to the corporate AR balance.
Billing Period in Days: Frequency interval for compiling recurring billing statements (e.g., 30 days).
Credit Limit Monitoring Toggle: Activates system enforcement of maximum outstanding debt.
Credit Limit: Maximum allowable outstanding credit balance (e.g., USD 20,000.00). When exceeded, the system warns or blocks additional direct-bill postings.
Enable Local Tracking Toggle: Keeps property-level audit records synchronized with central accounts receivable.
Attach Payment Source on Group Member Reservation: Automatically maps the corporate billing source to individual pickup rooms inside group blocks.
Enable Payment by Tax Type: Enables selective charge routing based on tax breakdown structures.
📷 VISUAL CALLOUT:
Direct Bill Terms & Credit Limit Setup
Configuration interface capturing the Company Pays toggle enabled, Billing Period in Days (30), Credit Limit Monitoring activated, and the Credit Limit field set to USD 78,384.00.
Direct Bill Configuration & Validation
Step 4: Contract Periods
+ New Contracts Periods: Optional module to input contracted start and expiration dates, tracking valid billing windows and rate agreement lifecycles.
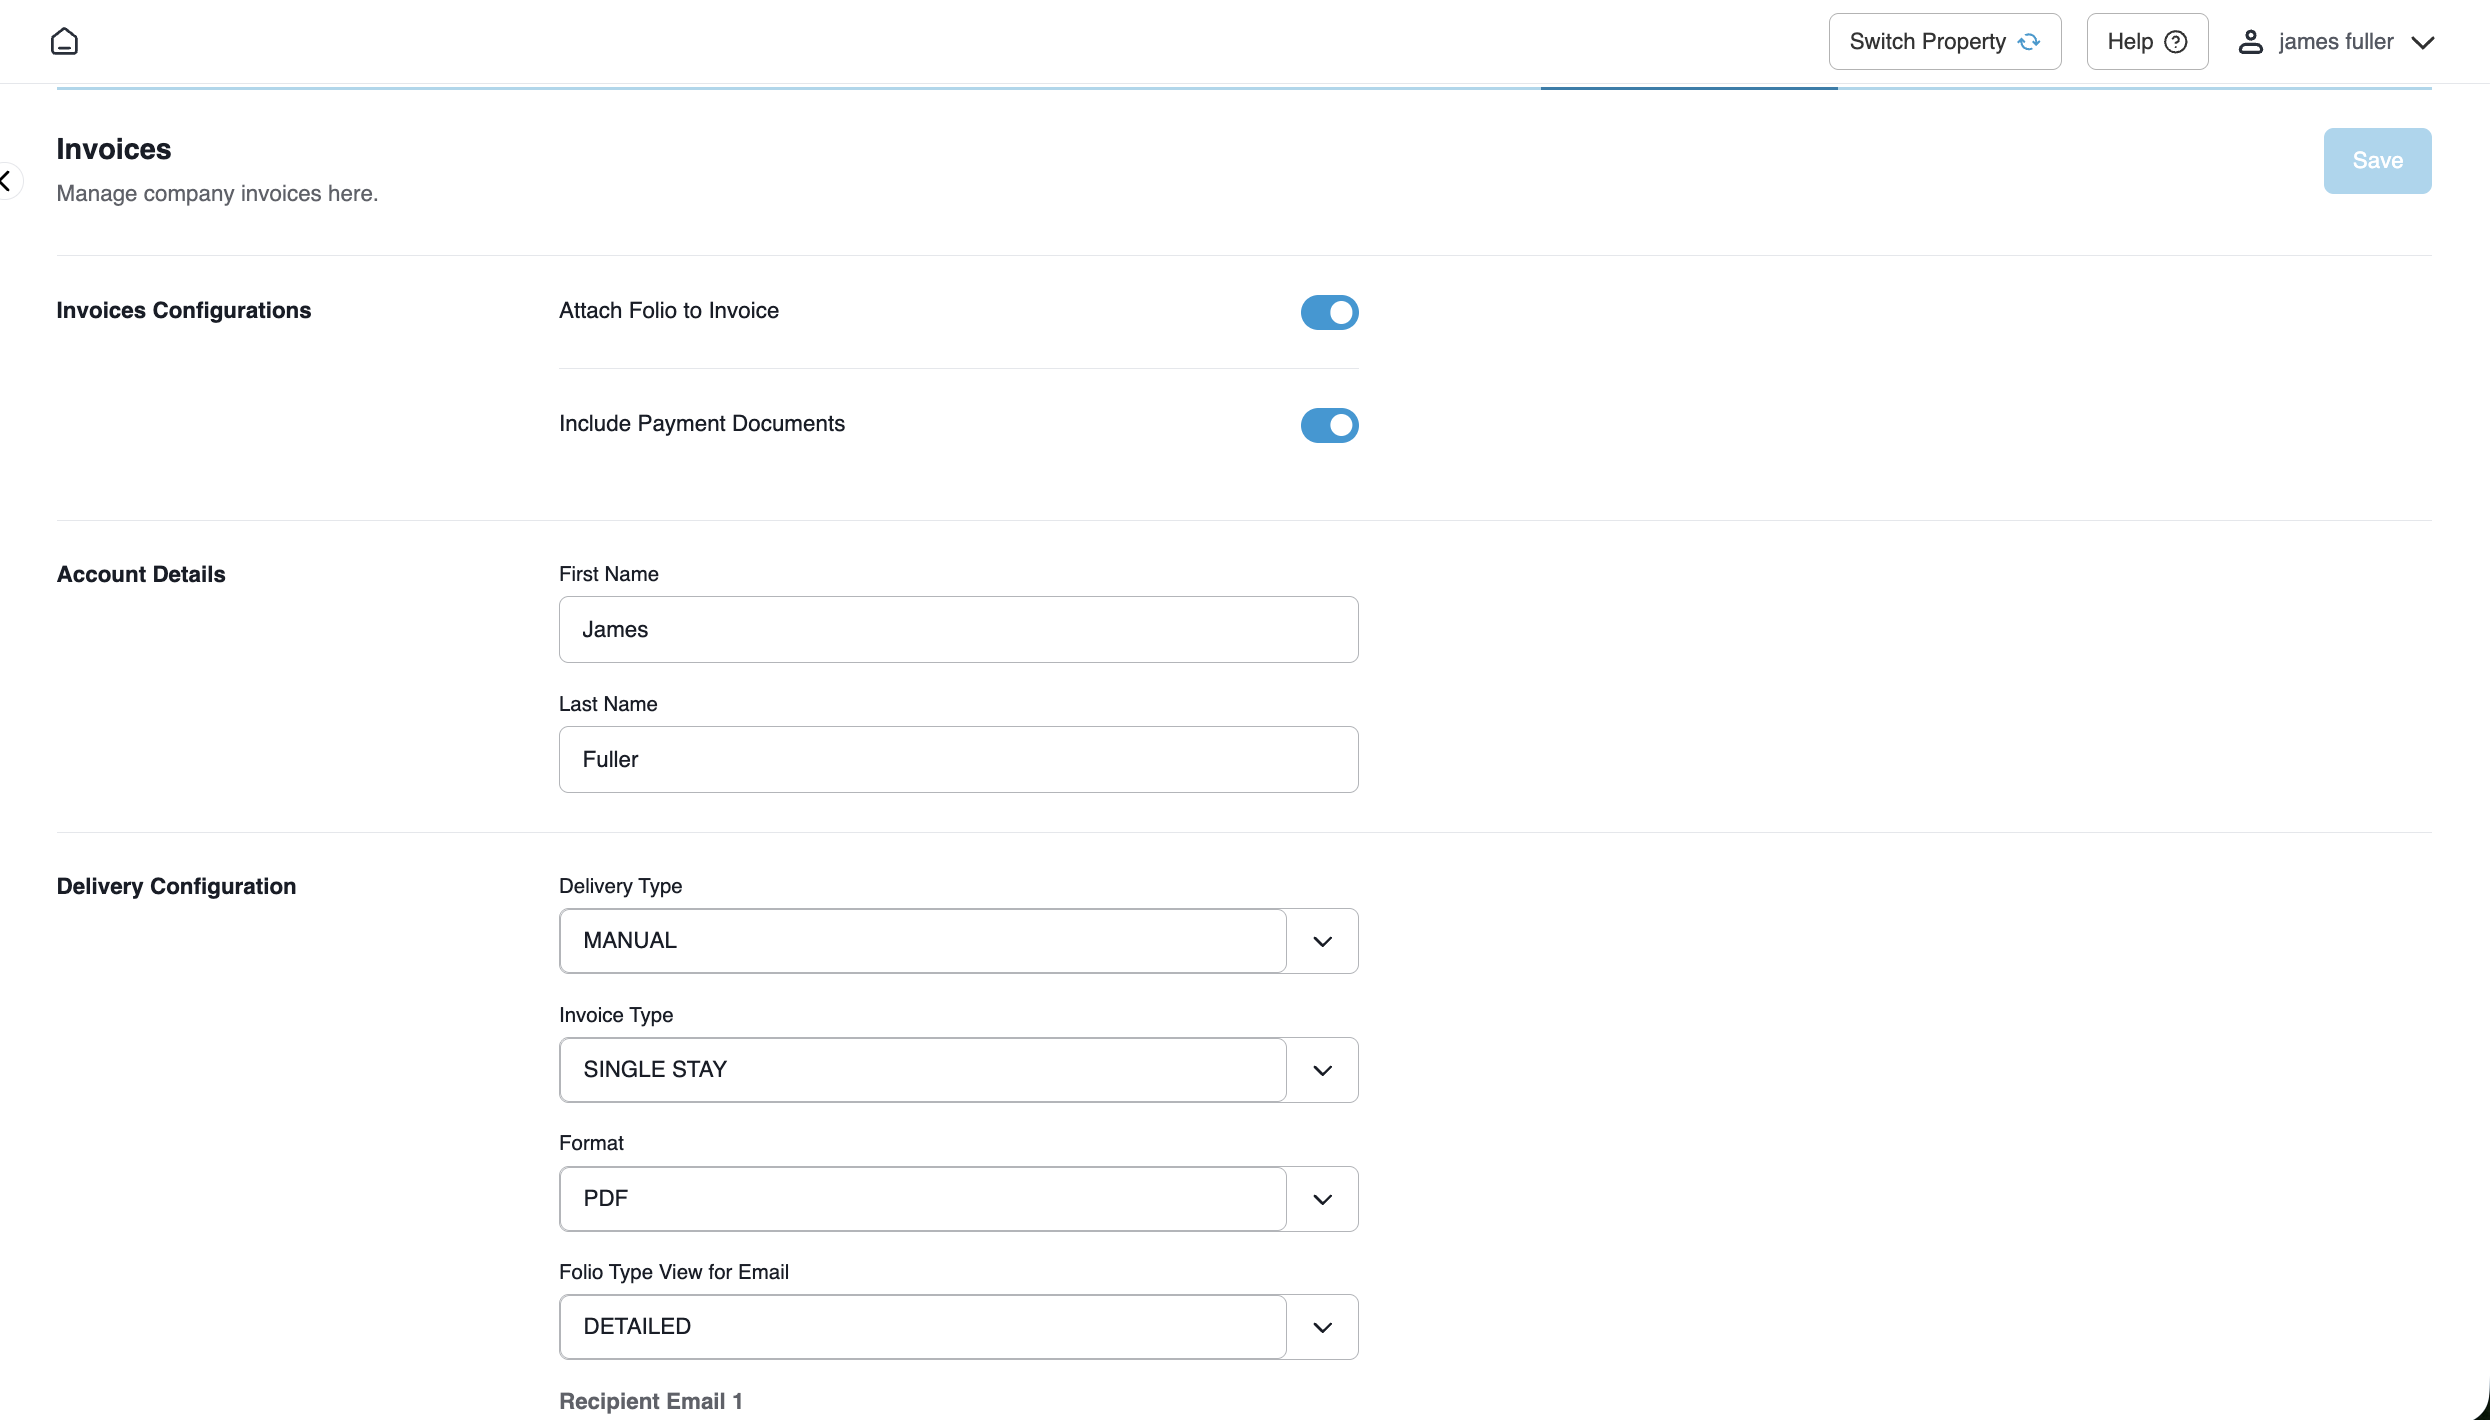
Step 5: Invoice Delivery Configurations
Invoices Configurations:
Attach Folio to Invoice Toggle: Merges itemized guest folios into statement documents.
Include Payment Documents Toggle: Appends processed payment receipts and transaction records.
Account Details: First and Last name of the primary accounting recipient.
Delivery Configuration:
Delivery Type: Choose MANUAL (printed/dispatched manually) or EMAIL (automated digital dispatch).
Invoice Type: Select statement cadence:
SINGLE STAY: Individual invoice generated per guest checkout.
MULTI STAY: Consolidated statement compiling multiple guest stays across the billing period.
SINGLE STAY ON CHECKOUT: Generates and queues the invoice at the moment of guest departure.
Format: Output presentation style for document exports.
Folio Type View for Email: Choose between DETAILED (line-item charge breakdown) or SUMMARY (bucketed category totals).
Recipient Email: Primary and secondary accounts payable email addresses.
Invoice Notes: Standardized footer text printed on all corporate invoices (e.g., "Monthly Corporate Billing").
📷 VISUAL CALLOUT:
Invoice Delivery & Output Preferences
Wizard screenshot displaying Delivery Type (MANUAL), Invoice Type (SINGLE STAY), Folio Type View set to DETAILED, recipient email fields, and Invoice Notes entry.
Invoice Delivery Configuration
System Integration & Post-Creation Deployment
Clicking the blue Finish button completes the workflow:
Immediate System Activation: The system validates all required entries, displays a green notification banner (Success: Saved Successfully), and returns to the Accounts Receivable Dashboard.
Live Company List Addition: The new account profile appears instantly in the Company List with its designated Account Code, Account Type (Direct Bill Account), Direct Bill Privileges (TRUE), and Status (ACTIVE).
Front Office Availability: Front Desk and Reservations staff can attach the new company profile to reservations immediately, enabling direct billing, rate plan mapping, and automated folio routing.